Technical requirements
A stove-heater is the main element of a Russian bath.
A heater for a bath performs several functions. It warms up the steam room, maintains the room temperature and ensures that the correct steam is produced. In order for a furnace to perform these tasks, its design and installation method must satisfy a number of stringent requirements.
- Maximum efficiency – the heater does not work for long. Therefore, it is more important to warm up the room as quickly as possible than to maintain the temperature for a long time.
- In the furnace, the ash collection section should be located at a distance from the floor of at least 18 cm.
- The furnace body can also be metal. But in this case, there is a protective screen made of fire-resistant materials around it. It is more profitable to immediately build a brick oven.
- A brick casing does not replace stones for generating steam. It is important not just to evaporate the water, but to first spray it into very small particles. This requires flat stones, and with a special surface.
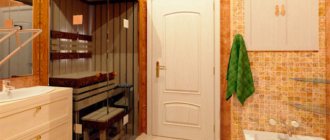
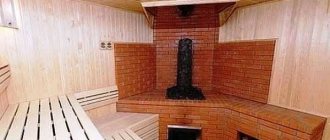
- Install the sauna stove at a distance of 55 cm from the wall. If the body is protected by a stone box, the distance is reduced. In addition, it is allowed to install a wood-burning stove built between the steam room and the dressing room. In this design, the doors of the firebox and ash pan are located on the side of the dressing room, which allows it to be heated from the outside.
- The steam room is finished only with wood, and this material is flammable. To prevent fire, the floor around the heater is protected with asbestos or mineralite sheets. The wall is also protected in the same way.
The stove can be combined with a water heating tank.
Types of construction
Nowadays you can see a variety of portable heating elements in hardware stores, but people mostly prefer a traditional brick stove.
Instagram @barbekiukaminypechi
If you decide to install it, then before starting its construction, measure the room, because the traditional type of heating element may simply not fit there. Most often, their width exceeds 100 cm, and their height varies from 160 to 220 cm.
For all its massiveness, such a unit has a number of significant advantages:
- fireproof;
- retains heat well;
- warms large rooms.
However, if you do not have enough money for materials or the space does not allow you to build a full-fledged stove, then you should give your preference to the compact metal version.
Types of sauna stoves
Types of stoves for saunas
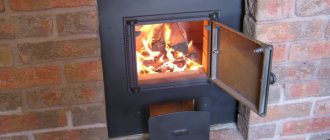
Heaters in a wooden sauna are classified according to a variety of criteria. For example, there are models of constant and periodic combustion. The first ones produce rather hard steam, since here the stones, even on a flat surface, do not heat up above +350 C. The intermittent combustion model only heats the steam room. Here the stones are heated not only by heating, but also by the passage of hot gas through the grate. At the base of the stone slide, the temperature can reach 1100 C, so the steam here is soft - finely dispersed and does not make breathing difficult.
By material
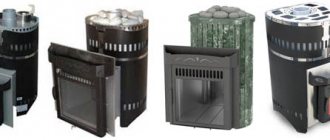
The body of the device is made of two main materials: metal alloy and brick.
Metal heater
Metal alloy – special heat-resistant steels and cast iron. Such designs are attractive due to their low weight, compactness with very high efficiency, and rapid heating - a medium-sized steam room is heated in 1 hour. In addition, iron stoves can be beautifully and unusually designed.
However, such a project has a lot of disadvantages. The metal quickly gives off heat, but does not retain it: the stove cools instantly, and the temperature in the room jumps sharply. The case gets very hot, which poses a danger to the wood-trimmed room. Most often, the heater has to be surrounded by a protective screen and its design becomes unimportant.
A self-made iron stove according to a ready-made drawing is the most budget option. But its effectiveness is low.
Heater made of heat-resistant bricks
Heater made of heat-resistant bricks warms up the room more slowly - up to 6 hours, but maintains the temperature in the steam room for at least 2 hours after the end of the fire. The stone heats up less, so the risk of fire is much lower. A brick oven can heat a room with an area of more than 30 m². Its durability is much higher than its iron counterpart.
The disadvantages include the large weight: you will have to build your own foundation for the stove. Its installation is complex, requires experience, and it is more difficult to care for. And the size of the heater is quite considerable.
If a metal stove is sealed with a brick barrier, the overall dimensions are comparable to a brick heater.
By fuel type
Gas stove-heater
The stove in the steam room is classified according to the type of fuel:
- wood - the most popular, since the cost of firewood is the lowest;
- coal - less common, since coal gives a higher temperature and it turns out to be much more difficult to control the heating of the room;
- gas - this can be installed only with special permission;
- electric – more often found in home saunas and is attractive due to its high fire safety, but is expensive to maintain.
The safest type of steam room is a wood-burning stove.
Selection principles
The stove is mounted between the steam room and the dressing room.
The criteria are as follows:
- power - determined by the size of the steam room and the number of users;
- material – today chromium steel is considered the best option, as it reduces the burning of oxygen;
- type of firebox - elongated, that is, the stove is mounted between the steam room and the dressing room, and ordinary closed;
- type of heater - plane, mesh next to the body, screen around the body and part of the chimney;
- the duration of operation with one filling is determined by the design features of the furnace;
- warming up speed - a “hot” stove warms up rooms in a couple of hours, but quickly cools down, a “cold” stove maintains the temperature.
Other criteria are also important, such as the presence of a water heater, protective devices that prevent carbon monoxide from entering the room, operating modes, design and ease of kindling.
Decorative finishing
A stove in a bathhouse is not only a source of heat, steam, and increased danger, it can also be a decoration for the room.
If you only care about the safety of the stove, then it is enough to paint it with modern paint to protect the metal from corrosion. The use of heat-resistant enamel based on silicone paints is no different from conventional enamels, but protects metal at temperatures up to +800 degrees. The metal is degreased and then paint is applied. After the first layer has dried, the next layer is applied. It is recommended to paint those metal elements that will be covered with brick and insulation.
The decoration of the stove in the bathhouse can perform a purely decorative function in the form of forged decorations and additional decorative elements of the stove itself. You can use heat-resistant paints of various colors with an antique effect. Decoration can also be used to eliminate the increased danger of a sauna stove.
The stove can be lined with red brick masonry (we have already considered this method), but the masonry on the sides can be decorative, in the form of a grid. On the firebox side, the stove can be covered with a screen made of forged elements or simply with a beautiful mesh fixed in the frame.
It can be covered with a beautiful casing, also covered with heat-resistant paint, in the color you like.
A stove lined with heat-resistant stone will look impressive; this will not only give a noble look to your product, but will also improve the quality of the stove itself.
The decorative decoration of your bathhouse stove depends only on your desire, taste and wallet size.
Popular models and prices
Cast iron stoves are rarely installed due to their heavy weight.
The choice of stoves on the market is huge. However, for a bathhouse it is preferable to purchase models from domestic manufacturers, since their products are adapted to existing conditions.
- Harvia produces both regular floor-standing models, as well as wall-mounted and corner models. The main material is high-strength steel. The body is coated with special fire-resistant paint. Models cost from 14 thousand rubles.
- Helo - most models are made of stainless steel, which guarantees a long service life; a characteristic feature is a heat-resistant glass insert that allows you to observe the flame. The cost of electric heaters starts from 40 thousand rubles.
- "Termofor" - produces heaters for the Russian steam room mode. Offers a huge selection of models of different power and design. Heat-resistant chrome-plated steel is used for the firebox. Models cost from 23 to 45 thousand rubles.
- "Hephaestus" - offers cast iron models for baths with the highest efficiency - up to 90%. The stoves are very economical and provide light steam. Minimum cost from 50 thousand rubles.
Cast iron stoves are installed much less frequently. Despite the fact that this design retains heat for a long time, it is very heavy.
How to make a stove for a bathhouse with a water tank
It is convenient if the design of the sauna stove includes a built-in tank for heating water. It can be mounted or attached. Let's look at the features of both options.
Hanging tank for a bath
A separately located tank has its advantages - it does not evaporate moisture in the steam room and at the same time warms the adjacent room. It is better to take tanks from stainless steel; they can withstand even hot boiling water.
The connection between the stove and the tank occurs through pipes and hoses
Use pipes that can withstand high temperatures. Water is poured into such a system before the fire starts. If you pour water into a hot stove, it may burst due to the temperature difference. Water can circulate in the heating device by gravity - for this, the distance from the stove to the tank should be no more than 1.5 m, and the lower edge of the tank should be placed half a meter above the register. You can simplify your task by installing a small pump.
Sauna stove with built-in water tank
The second option for placing the tank is directly above the stove. It is a simple design, easy to implement and does not require any pumps or complex inclination systems. Water is drained from the tank through a built-in tap.
Such tanks are made from high-quality stainless steel with a wall thickness of 1.5 mm
Important! Built-in tanks must be kept filled at all times.
Built-in tanks help create a humid atmosphere in the steam room. Not everyone will like this, so think about it: maybe it would be better to take the tank outside the steam room.
Related article:
This article will discuss types of stoves for a wood-burning sauna with a water tank , popular models from manufacturers and the stages of DIY construction.
Foundation for a brick stove-heater
Foundation for a brick stove-heater
For a brick or cast iron stove weighing more than 700 kg, you need to make your own foundation. The foundation is selected based on the weight of the structure and the nature of the soil.
Rubble concrete foundation
This option is built for a small heater. You can use not only rubble stone, but also brick. The step-by-step instructions are simple.
- They dig a pit, the dimensions of which around the perimeter are 15–20 cm larger than the dimensions of the stove.
- A sand cushion is placed on the bottom and waterproofed. Formwork boards are placed on the walls.
- Lays out layers of rubble stone and fills the voids with crushed stone. The thickness of the layer does not exceed 15–20 cm. Fill the rubble with a thin layer of cement.
- After the solution has hardened, a second layer of stone is laid out. The cement mortar is applied again. The operation is repeated until the pit is filled.
The fragment is not brought to the edge of the formwork by 7–8 mm. Cover it on top with roofing felt and fill it with bitumen.
Foundation slab on piles
Foundation slab on piles
The pile foundation is installed on bulk and marshy soils. Steel or concrete rods are used for piles.
Step by step guide:
- Holes for piles are drilled in the corners of the site. A layer of sand and crushed stone 15–20 cm thick is compacted onto the bottom.
- Roll up a roll of roofing felt and insert it into the recess.
- Piles are driven into the ground.
- Formwork is constructed, reinforced and poured with concrete. The thickness of the slab is at least 20 cm.
Using the same technology, foundations are built on columnar foundations.
Monolithic foundation
Such a solid foundation is installed for the bodies of heavy furnaces. Making a foundation is not difficult, but more materials will be required.
- Dig a pit according to the dimensions of the furnace plus 15 cm around the perimeter. Fill in 15 cm of sand and compact the bottom.
- The pit is covered with expanded clay and covered with film or roofing felt.
- They make formwork. Reinforcement made of rods 10 mm thick, connected with steel wire, is placed inside.
- Fill the pit with concrete and compact it with a vibrator.
The concrete takes about 3 weeks to dry. At this time, the surface of the foundation must be moistened with water and covered with film.
Features of operation
After erecting a stove with a heater for an open or closed bath, it is necessary to dry it. Operating rules:
- It is forbidden to heat the stove with wood for seven days after laying.
- You can heat the stove only after a week. To quickly dry the masonry, it is recommended to perform 3-4 heatings every day for the next 7 days.
- Massive logs should not be used for the first fires. It is important to choose fuel that will burn quickly enough - wood chips, birch bark, straw, small dry branches.
Before starting the first kindling, it is necessary to check the draft. To do this, you need to bring a lit match or lighter to the blower. If the flame reaches towards the hole, there is a draft, you can start a fire.
You also need to pay attention to the stones used. It is better to use basalt, granite, andesite.
Requirements for stone backfill:
- stones should not emit harmful substances when heated;
- cobblestones must maintain their integrity under constant temperature changes;
- The stones must heat up quickly and transfer heat effectively.
The suitable size of stones is at least 10 cm in diameter.
No matter how correctly the stones for filling the heater are selected, with active use, after about a year they will begin to crack. Every 10–12 months you need to go through the entire backfill, throw out small fragments and replace damaged cobblestones with new ones.
The heater can be “built on top” of many standard brick and metal stoves. When assembling it yourself, it is important to make the structure such that it can accommodate the required amount of stone backfill, withstand its weight and exposure to high temperatures.
Materials and tools
Fireclay refractory brick
To build a brick heater you will need:
- refractory brick - preferably fireclay, for laying out the firebox;
- facing for the body;
- steel chimney of the required diameter;
- doors for the firebox and ash pan, cast iron grate;
- clay mortar for masonry;
- trowel, hammer;
- level, slope, tape measure.
You will also need waterproofing material, mesh or steel sheet under the stones.
Rules for successful masonry
The efficient operation of the furnace largely depends on how well the masonry technology was followed. This is influenced by the quality of the bricks, the method of doing the work, the binding solution and the degree of moisture of the material. The result of proper masonry will be a solid structure. An unsatisfactory result is considered to be a structure made without bandaging the joints, separated by vertical lines of seams.
During the work, one important requirement must be met: it is necessary to prevent the gases formed during combustion from escaping to the outside. In addition, air entering the furnace structure is also not welcome.
Careful selection and adjustment of the material will help make the masonry beautiful and durable. It is important that the bricks are split and hewn. Before starting work, the cobblestones need to be soaked in water, lowered into a container for 10 seconds, then laid in a row on a layer of clay.
Craftsmen advise applying the mortar by hand, and using a trowel only when doing external masonry.
The brick laying process is as follows:
- take the block in one hand, grab the clay with the other and apply a thin layer to the brick;
- level the surface;
- place the product in a specific place;
- while pressing on the cobblestone, perform forward and backward movements;
- remove excess mortar on both sides of the masonry with your hands;
- with the next brick, repeat the above steps, in this case it is necessary to apply the solution also to the end of the block, with which it will be pressed against the first one.
DIY making
Arrangement of the heater stove
Laying a heater stove in a bathhouse differs little from the construction of a regular one. It is important to carefully follow the order and act according to the developed scheme.
- The foundation is waterproofed: 2 sheets of roofing material are laid, overlapping by 10 cm. Bitumen is not needed.
- The first row is always solid. The bricks are fixed with masonry mortar.
- On the 2nd and 3rd rows, an ash tray and a channel for air exchange are laid.
- From 4 to 6, the internal walls of the firebox are laid out from fireclay bricks, grates are installed and doors are mounted. For sashes, hinges are placed in the masonry.
- At 8 and 9, supports for the mesh heater are installed. For this purpose, sections of profiles or T-beams are used.
- From 13 to 15, inspection holes and steam outlet holes are formed.
- During laying, each odd row is checked for level to ensure horizontal alignment. Every 2-3 rows, wire is placed in the seams to strengthen the structure.
It is recommended to lay the brick out dry and only then lay it on the mortar.
All fittings are installed simultaneously with the masonry. It is recommended to use asbestos cord for winding the doors.
Water container
Water tank for the chimney
There are 2 water heater options in the bathhouse.
- Tank on the chimney - since the steel pipe will heat up to +500 C. The water in the tank also heats up very quickly. In this case, heat is not lost from the escaping heated gases, and the chimney itself functions longer, as it transfers excess heat to the water.
- Wall-mounted – installed on the wall inside the steam room. The tank is heated by the heater body, and the water is transferred through pipes to the washing area. Less economical model.
It is not advisable to install a hanging tank in a sauna, since this will allow water vapor to enter the room.
Modernization methods
You can make the oven more powerful and convenient yourself. There are several proven options for this:
- Place a tank of water over the stones. It can be used for rinsing after staying in the steam room and taking a shower the next day.
- Inside the brick stove equipment, you can install pipes to make a heating circuit that is filled with water. By installing a special pump, you can make a homemade heating system suitable for heating large bathhouses.
- If the heater is an open type, problems may arise with poor heating of the upper stones. To fix this, you need to make a special opening metal lid on the heater.
Modernization should not reduce the fire safety of the structure.
Possible mistakes
It is recommended to choose basalt stone for the heater.
The heater in the bathhouse will function for a long time and correctly if you follow certain recommendations when arranging it.
- For laying the body, it is better to use red clay bricks. Only fireclay is suitable for the firebox; replacement is not allowed.
- It is important to choose the correct consistency of clay mortar for masonry. If it is too dry and liquid, the masonry will crumble; if it is too greasy, the joints will be loose.
- Not every stone is suitable for a heater. Choose basalt, soapstone, and andesite.
- The stones are selected to be relatively flat in shape and placed in a vertical position. When placed horizontally, heat is distributed unevenly.
Test ignition is carried out after the masonry has completely dried, it lasts no more than 5 minutes. For 3 days, the procedure is repeated several times a day. Only after this do they begin to fully heat the steam room.
Stage one. Preparing the container
First, we determine the dimensions of the container that will be used to heat the water. To do this, you need to find out what the maximum number of people will take a steam bath at the same time. And the calculation should be as follows: per person there should be about 8-10 liters of heated water.
Note! It is preferable to use an open type container for this.
This involves slight evaporation of the liquid, but we get several advantages:
- freedom of access;
- the ability to remove residual water in winter and maintain the internal surface;
- In addition, we will be able to clean the inside of the container from scale and dry it.
Such a boiler can be purchased at a specialized store, or you can make it yourself. Well, let's start building!
Installation rules
The following points apply to installing a sauna stove with a closed heater:
- When planning the design, it is necessary that the door for the combustion chamber is directed towards the exit, and the heater flap - in the other direction.
- Installing a metal stove requires the construction of a concrete base up to 30 cm high. Two rows of bricks are laid on this foundation, which are held together with clay mortar.
- Installation of a metal furnace structure should be carried out on a previously prepared platform measuring 70x70 cm, 20 cm high.
- In the place of the brickwork of the furnace where the pipe will come out, we make a thickening measuring 12 cm.
- All nearby wooden elements and surfaces should be fenced off with thermal insulation material . Asbestos, felt or cardboard are suitable for this purpose. Then you need to apply a layer of clay on top. The pipe located between the ceiling and the roof is treated with plaster and lime mortar.
- The masonry for the pipe must be at least 50 cm high.
- Creating a brick casing - masonry around a metal stove structure - increases fire safety several times. This is especially true for baths built of wood.
Chimney
The heater stove differs from its analogues in that natural stones are used to accumulate heat. The first segment of the pipe passes through just such a compartment with stones. The chimney can also pass inside a container of water to heat it. In all other respects, there are no special differences in the construction of the chimney. It can be assembled from sandwich pipes or ceramic blocks. The manufactured chimney must be insulated.
As for the lower part of the chimney, it is made of steel, right up to the ceiling. It is necessary to install a damper when passing through the ceiling pipe.
The gate is designed to improve combustion intensity, as well as to regulate draft.
If a sandwich pipe is used, then it has two walls, between which there is a heat-insulating material. They can be installed in the area from the ceiling to the fungus on the roof. Basalt mats are used to insulate a brick chimney. They wrap the pipe. Wire is used to secure the mats. An umbrella or fungus must be installed on the chimney. This will protect the chimney pipe from sediment entering it.
When arranging a chimney, you should decide what type it will be: external or internal.
You can learn about other subtleties of arranging a chimney pipe from the video: