Although... it’s hard to imagine a person deciding how to hang the ceiling in a bathhouse when the walls have already been erected. All this planned at the design stage. And when the entire box with the roof is already there, then it either has or does not have ceiling beams.
Below we will not focus too much on exactly how these ceiling beams are placed and fastened; just watch the videos below. And we will assume that their presence is an initial given when installing a ceiling in a certain type of bathhouse.
Which one to make: designs and diagrams
We offer you not only to get acquainted with the structure of each option, but also to look at how good it is in certain circumstances.
Flooring - advantages and disadvantages
This option is considered the simplest and most accessible even for those who do not know how to make a ceiling in a bathhouse.
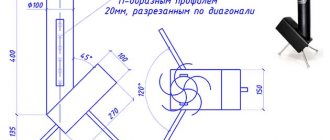
See picture explanation here.
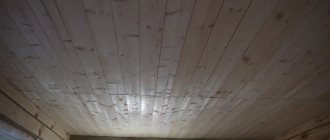
In fact, it is a single-layer plank flooring . The most characteristic feature of this type of flooring is that its boards rest solely on the walls. And long boards, as you know, are doomed to sag under their own weight. Therefore, harmony is achieved by choosing the thickness of the board and limiting the covered space to 2.5 meters (that is, the span from one wall to another should not exceed the specified value).
ADVICE! The recommended thickness of the ceiling board is 50 mm.
The boards are laid evenly, without gaps. It is advisable to fasten them with bars or boards placed transversely on top. The latter are especially good when placed on the end and form sides for future insulation.
The floor ceiling cake consists of these main boards, which can become both a rough and a white ceiling from below, that is, you can sheathe the floor ceiling in the bathhouse from below with clapboard, or you can not sheathe it. First, a layer of vapor barrier is laid on top, insulation suitable for high temperatures is placed on it (especially for steam rooms), everything may or may not be covered with a layer of waterproofing. This is the upper limit of the pie.
The advantages of this type of overlap are as follows:
- low cost;
- optimal suitability for roofs with cold attics;
- ease of doing the job;
- speed of work completion.
But, as you might expect, there are some drawbacks:
- restrictions on span width;
- undesirable loads;
- unsuitable for projects with a residential second floor or a warm attic.
Hemmed - pros and cons
See picture explanation here.
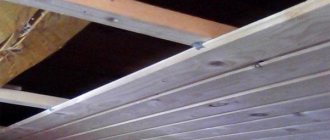
Let's start with the design again. During the construction of walls, ceiling beams are installed using one method or another. They can be placed in special holes or secured using metal corners. They may or may not go outside. One way or another, even before we begin to sheathe the ceiling in the bathhouse, we will have strong ceiling elements stretched from one wall to another, on which you can walk without fear that they will break under the weight of a person .
These beams are the foundation. The ceiling is called a hemmed ceiling because everything else is simply hemmed from above and below to these beams.
Since they are in the middle, the only way to describe the pie is: first we go down, then up.
To properly make a ceiling in a bathhouse, you must either attach a cranial beam to the beams along the cranial beam , and then lay transverse boards on the ledges formed by it, or hem long boards from below across the beam. This is a rough ceiling . From above it is covered entirely with a layer of vapor barrier, on which insulation is placed, then everything is covered with a layer of waterproofing and subfloor boards.
From below you can nail foil and - through the sheathing - clapboard. On top - a white floor is made on top of the subfloor. (You can limit yourself to one layer - just a white floor.)
The advantages of this design are obvious:
- it is simply intended to create a durable floor for the second floor or a warm attic;
- there are no restrictions on the weight of the insulation;
- there are no restrictions on the span length.
The disadvantages include the following:
- high cost of materials (and work if you hire builders);
- great complexity of the work itself;
- longer period for their implementation.
(No, we are not saying that the work of creating a flooring and a hemmed ceiling differ enormously in complexity and time, but there is still a difference, especially if it was not a professional who decided to hem the ceiling in the bathhouse.)
Modification - panel, assembled on the ground
Working with your arms raised and your head up is harder than when the object is in front of you. Therefore, the panel type of ceiling can attract attention and become an alternative to more common methods of installing a ceiling in a bathhouse.
The design is quite simple: the panels are made from boards and beams. The beams (section 50x100 mm) are laid out parallel to the width of the insulation (a couple of cm less than the width of mineral wool, if insulated with it). Boards are nailed across, with their ends slightly protruding beyond the beams.
The length of the beams corresponds to the span with an approach to the walls of at least 5 cm . The resulting “container” with sides is turned over and covered with a vapor barrier, securing it with a stapler. Then insulation is placed inside (if it is not bulk).
After this, the structure can be raised, but to prevent it from falling apart, just in case it is strengthened with jibs between the sides. Then they should be removed.
IMPORTANT! The gaps between the two panels also need vapor barrier, after which they are filled with insulation.
We believe that this option is a type of flooring.
advantages are obvious:
- ease of installation on the ground;
- Easy to assemble even for beginners.
Disadvantages... It seems to us that without special calculations it is possible to make a ceiling in a bathhouse with your own hands only if there is a cold attic above. Otherwise, the beams must be calculated based on the load, because they will be ceiling beams.
Ceiling steam protection
Its thickness should be at least 15 cm. It is also necessary to remember about the chimney pipe. A screed is made on the insulation, created using cement and sand. But when using the attic space as a living space, it is preferable to use special durable flooring boards to create the flooring.
Clay vapor barrier
Vapor barrier film
At the last stage, when creating the final covering of the ceiling surface, you can use natural wood materials. These include coniferous, larch or aspen tree species. The boards must be carefully processed, their surface must not contain cracks, chips or other deformations, and there must be no knots.
We invite you to familiarize yourself with the cinder block foundation: for a house, greenhouse, shed, fences
The speed of work and the amount of money spent creating the ceiling with your own hands will depend on how you approach studying the pros and cons of the type of ceiling you have chosen. A ceiling made without meeting the necessary requirements can negatively affect the microclimate in the bathhouse, and remodeling it can take a lot of effort and time.
Materials and tools
Let's immediately divide the materials into rough and white. The rough board can be unedged, poorly processed, with defects and of low grade. Let's say moderately bad. All whiteboard for the ceiling or floor should preferably be of high grade and well finished.
ADVICE! The finishing material in the steam room should be made of hardwood, in other rooms - optional.
The timber of the false ceiling can also be made of
coniferous trees.
Rough boards for any type and location of the ceiling, in principle, too. The flooring is made from edged boards - they must adjoin without gaps. If no additional finishing is expected, they should be of good quality, pre-sanded. Tongue-and-groove or not tongue-and-groove – it’s the owner’s choice.
The finishing can also be done in the form of lining, but read about it below.
about materials that are suitable for vapor barriers in this article.
Here we will only say that plastic film is suitable , but it is not desirable in a steam room, because high temperatures are not for it. The main principle of vapor barrier is that it should not “breathe”, that is, it is a material with minimal capacity for air and water vapor. Foil, craft paper, and other materials are also suitable.
We also managed to talk about insulation materials suitable for baths Recommended reading.
In short: for a flat ceiling you need light insulation, such as ecowool, expanded clay, vermiculite. for hemming .
Mineral wool must be isolated from moisture and be prepared for the fact that over time all phenols and other binders will evaporate from it, leaving stone dust. But there are no ideal insulation materials yet. It would be good if ceramic fiber became cheaper - it has excellent performance.
We do not give dimensions of lumber here, because it is correct to proceed from calculations for a specific bathhouse, and not from the “average temperature in the hospital.”
Anti-corrosion coating on nails, screws and self-tapping screws in a bathhouse is a given. Small things you will need are staples for a stapler and special adhesive tape for vapor barriers - if you buy a branded one, they also sell adhesive tape there. If you make foil, take metallized one.
In terms of tools, you will need everything you have to cut the boards and attach them. Options: from a hand saw or chainsaw to a machine, whatever is available to anyone. Fastening - a hammer, a screwdriver, an air gun, again - whatever is accessible and convenient.
If you're going to manually make a notch in a ceiling crown for deck boards, you'll need an ax and good ax skills.
Marking tools - square, level, tape measure, pencil. This is all clear. The insulation can be cut well with a knife (mineral wool, for example). For films or craft paper, use regular scissors; you can also use them to cut foil.
Installation of floors in different rooms
From the above, you could already come to the conclusion that different rooms dictate their own rules in the design of ceilings, despite the fact that the type of construction itself is chosen at the design stage. Therefore, the whole difference comes down not to the device, but only to the external design.
In the steam room
There is no point in spreading too much here. Firstly, several features of this particular room were listed above. Secondly, the site has ready-made, extensive and high-quality material dedicated specifically to the ceiling in the steam room.
In the car wash
There is a lot of water in the washing room. That is, this must be understood in two ways: there is high humidity, and water is sprayed in different directions. These are different things, but interconnected. The materials that are best used in this room should be either moisture and water resistant, or have artificial protection.
It was said above that plastic lining has the necessary properties regarding water. But wood is not prohibited from washing, because you have enough options at your disposal to protect it from water.
Firstly, these are impregnations. Of course, they require updating over time, and the time frame is not very long - about two years. But impregnations have an undoubted advantage over coatings that form a thicker film - impregnations do not peel off. And this guarantees a decent appearance at all times.
Secondly, varnishes. There are special types of varnishes that are designed to cover wood in water. A typical example is yacht varnish. If you buy a product from a reputable manufacturer, you can expect it to perform as advertised.
Thirdly, paints. We have not yet reached the European latitude in our views, which allows us to easily paint over wood texture that is valuable from our point of view. And the same Finns easily say goodbye to it, covering it with any color they like. If the washing room has a separate shower stall, the walls can also be painted. We wrote about different bath compositions in some detail here.
ADVICE! For those considering paints, it's best to look at those marketed as bathroom paints. This guarantees their suitability for the washing room. In addition to wood, the ceiling in the washing room can also be lined with mosaics, but this is a rare solution, more often found in hammams
In addition to wood, the ceiling in the washing room can also be covered with mosaics, but this is a rare solution, more often found in hammams.
In the dressing room and rest room
But these two rooms, despite all the difference in “showiness,” depend more on the style chosen by the owner or designer than on the temperature and humidity characteristics of the environment.
That is, here you need to focus exclusively on the harmonious combination of the ceiling in the dressing room or rest room with all other design elements.
If this is an ethnic style, then it is better to choose wood. If something is technologically advanced, choose a material taking into account the fact that the bathhouse as a whole has high humidity. Therefore, there is no need to use any drywall here.
Antique finishing of baths and steam rooms
Most baths are built with a wooden ceiling base, and this directs the thought towards, say, tongue and groove boards - make sure the seams are invisible and paint them in any color according to the design. It will look good even where the high-tech style is chosen. But high-tech, fortunately, has been and will remain an exception to the rules in the bathhouse.
How to properly make a log bath in a log house: features
We found a video that clearly demonstrates the process of inserting ceiling beams into the walls of a log house.
As you yourself saw in the video,
a ledge for a beam is cut out with a chainsaw If the principle is clear, then it is not difficult to explain that in the case of a decked ceiling, a ledge is cut out in the same way along the entire length of the ceiling crown , on which the decking boards will be laid.
This can be done with an ax or chainsaw. Returning to the hemmed option - if the beams are not intended to be used decoratively, it would be better (for working with insulation and its insulation) if it were not a rounded log, but a beam. With the correct geometry of the beams, making a ceiling in a bathhouse from a log house will be easier and will do without voids.
Actually, the only difference in the instructions for building a bathhouse ceiling with your own hands, when it is built from a log, will be the way the boards or beams lie on the ceiling crown. Carpenter's joints can be used in different ways; another video shows the connection of beams with dovetail beams.
Well, to follow up with another video that relieves the fears of those who intend to do this kind of work alone:
Conclusion
In a bathhouse, the ceiling is the most vulnerable place, since the maximum amount of heat escapes through it. To prevent this, you need to choose the right material for the ceiling cladding; for the steam room it is wooden, and for the washing room and rest room it is plastic lining.
All installation work is carried out carefully and carefully, then you can independently carry out high-quality thermal insulation of the ceiling and make it beautiful, safe and durable.
How to hang a ceiling in a bathhouse from other wall materials?
If in a log house one of the levels of logs is called the “ceiling crown”, then in the case of other wall materials it will be “timber beam” or “mauerlat”. This is precisely a wooden beam that is placed on top of the wall (and for block materials - on top of the reinforcing belt).
The Mauerlat simultaneously serves as a support for both the ceiling and the roof truss system. But this is the case if the bathhouse is one-story or the ceiling is above the second floor. Otherwise, you should watch the following video, which shows a labor-intensive but high-quality method of laying floor beams for the first floor in a foam block structure.
After completing all the work described above, the rest will seem easy to you. So, you can fasten the beams with corners to the mauerlat, and the flooring boards directly with long nails or self-tapping screws.
RULE! When wood is placed on wood, there is no need to put insulating roofing felt between them; when wood is placed on any other material other than wood, insulation is needed so that condensation does not form on the contact area. The ends of the lumber are not insulated.
And again: the only difference is in how the ceiling fits onto the walls. Everything else is done in exactly the same way as described in the step-by-step description below for the installation of decking and subflooring.
Prices for the construction of baths, houses
Construction of houses, baths
| Log houses | from 9 thousand/m2 - two-story, from 13 thousand/m2 - one-story |
| Houses made of laminated veneer lumber | from 14 thousand/m2 - two-story, from 17 thousand/m2 - one-story |
| Log baths | from 9500 rub/m2 |
| Baths made of profiled timber | from 12600 rub/m2 |
| Bathhouses made of laminated dry timber | from 16,000 rub/m2 |
| Brick baths | from 19,000 rub/m2 |
| Baths made of gas-foam blocks | from 12600 rub/m2 |
| Baths using frame technology | from 9000 rub/m2 |
| Baths made of SIP panels | from 9650 rub/m2 |
Construction of the foundation
| Strip foundation | from 3400 rub/m.p. |
| Monolithic foundation (slab) | from 4200rub/m2 |
| Pile-screw foundation | from 3200rub/piece |
| Columnar foundation | from 3800rub/piece |
Roof installation
| Installation of vapor barrier | 60rub/m2 |
| Installation of insulation in 1 layer | 60rub/m2 |
| Metal tiles | from 280rub/m2 |
| Flexible tiles (bitumen) | from 300rub/m2 |
| Corrugated sheets (euro slate) | from 200rub/m2 |
| Natural tiles | from 400rub/m2 |
| Seam roofing | from 350rub/m2 |
| Corrugated sheet | from 250rub/m2 |
| Drainage system | from 350 RUR/m.p. |
Floor installation
| "Heated floor" device | from 450rub/m2 |
| Treating the screed with a primer (moisture protection, dust removal) | from 30rub/m2 |
| Floor joist installation | from 180rub/m2 |
| Leveling and strengthening the floor beams to the level (if they were installed previously) | from 80rub/m2 |
| Installation of subfloors from edged boards | from 100rub/m2 |
| Installation of vapor barrier | from 50rub/m2 |
| Insulation (per 1 layer 50 mm) | from 50rub/m2 |
| Laying floor boards | from 300rub/m2 |
Additionally
| Installation of internal electrical panel | from 3800rub/piece |
| Plywood sheathing, OSB | from 260rub/m2 |
| Installing an electrical kit inside the bathhouse | from 7000rub |
Installation
Now we get to the step-by-step instructions. However, it is worth noting that no instruction will be complete enough to reveal all the nuances of the work ahead, so it remains advisable that the builder have at least basic experience with tools and construction in general.
Construction instructions, installation step by step
Grazing
Take all necessary measurements. If you are working in a log house, draw a line along the level where the deck boards will lie. If you have walls made of a different material, check the horizontality of the mauerlat or strapping beam. If it deviates from the horizontal, prepare the necessary tabs.
Boards can be very different - edged, unedged, tongue and groove.
But whatever they are, they need to be cut taking into account the approach to the wall of at least 5 cm (more is possible). In the ceiling crown , as we said above, you need to cut out a “shelf” on which the boards will lie. To do this, you can use an ax or chainsaw. “Shelves” are cut out on two opposite walls only.
on the mauerlat in the same way, only there is no need to make a ledge.
Fastening can be done with self-tapping screws or nails.
Then bars or boards placed on the end are laid out on top - all this across the length of the flooring board. From below they are attached through and through with self-tapping screws. This is a necessary measure to ensure that the boards do not “play” in the future.
Next, we cut and lay the vapor barrier, securing it to the base with a stapler.
We lay the selected insulation on the vapor barrier.
We cover everything with waterproofing ( some do not cover it ).
Below we adhere to the chosen design solution - either we leave the existing one as a finished ceiling, or we fill unedged boards with a shift, or we make a sheathing and cover everything with clapboard.
In the steam room, of course, some owners will stuff the bottom with foil, put the sheathing on top of it and cover it with clapboard. This is done to reflect infrared radiation back into the steam room.
Hemmed
As agreed, we believe that we already have the ceiling beams. We take measurements and set the horizontal lines exactly to the level on the wall. We stretch the construction threads.
the cranial beams in accordance with the horizontal lines (this is one of the options, there are others). The skull beam provides a ledge on which the boards will rest between the beams.
We cut the boards and lay them in the transverse direction of the beams on the skull beam. Secure with self-tapping screws or nails.
On top, without covering the beams, we lay a vapor barrier. This means that the upper section of the beam remains open, the vapor barrier fills only the formed “containers”. This is necessary so that the wood of the beam can release moisture.
We lay insulation on the vapor barrier secured with a stapler .
We cover it with waterproofing (the vapor barrier does not breathe, but the hydro barrier breathes and releases steam from the insulation).
On top of the beams, either a subfloor or a laid.
The bottom trim remains. Here too it depends only on the design decision. See a similar point on the floor ceiling above.
In the steam room: a step-by-step guide
You will find a step-by-step guide on how to make a steam room ceiling in a bathhouse with your own hands on this page.
Site preparation
Any flat area is suitable for building a bathhouse. It is desirable that the soil is dense.
Get rid of all kinds of debris and start excavation work.
Get rid of all kinds of debris and start excavation work
As a rule, foam concrete baths are built on strip foundations. Dig a hole around the perimeter of the future foundation with a depth of 50-100 cm (depending on the characteristics of the soil on the site) and a width of about 30 cm.
Bathhouse placement options
Drive metal rods into the corners and along the perimeter of the trench (in increments of about 100 cm) and stretch a rope between them. This marking will make it easier for you to navigate when performing further work. Be sure to check the horizontalness of the prepared structure.
Finishing
Since we briefly mentioned above the different options for finishing the ceiling in a bathhouse, we will correct this by talking about long-popular or recently fashionable solutions for this finishing.
How to hem, what to sheathe with
Let's start with the fact that there is an option when no finishing is carried out at all. You immediately lay or hem the sanded boards and nothing else underneath. The option is normal if everything else is done efficiently.
In general, it’s worth talking about three more options - tongue-and-groove boards, lining and unedged boards.
Tongue and tongue boards are expensive, usually used for floors, provide good grip through a tongue and groove joint that does not allow water to pass through, and look just great. But it all comes down to price; after all, this is not the most budget option.
Lining is the most common method of covering floors, long chosen by bathhouse owners. It is advisable to attach the lining to the ceiling in a bathhouse using lathing - slats packed onto the previous layer of boards in order to create a ventilation gap between them and the lining. In this case, the necessary ventilation is provided, which dries out those water vapors that inevitably penetrate through the thin profiled boards, which are the lining.
The ceiling in the bathhouse is lined with clapboard
Unedged boards are a fashionable solution today for bathhouses built in ethnic style. The principle is simple - take an unedged board, clean it, polish it, but the edge remains uneven, and even often its unevenness is artificially enhanced with the help of a tool. The result is something that looks authentic to the ethnic style.
Since the edges of the boards are uneven, it will not be possible to ensure a fit. Hence the decision to hem such boards in two layers with a shift that covers the joints of the previous layer. Accordingly, below you see beautiful uneven edges, between which you can see a narrow strip of the layer above.
How to fasten the lining
For those who would like to learn more about lining installation technology , we recommend that you read our article on steam room cladding.
Installation of beacons
After all of the above, you should measure the parameters of the walls and begin manufacturing a wooden frame or beacons according to the measurements taken. The guide beacons must be fixed at a distance of about 0.6 - 0.9 meters from each other, vertically. This is usually done with self-tapping screws.
Beacons must be level. To do this, cut plywood and timber are installed underneath them.
Check whether the guides in the sashes are installed correctly using twine or rope. First, a rope is pulled above the floor level, then the same is done in the middle of the wall and under the ceiling. The lace should not be deflected by the beacons in the other direction and no gaps should form between the sheathing and the lace.
If frame
The frame structure is a sandwich made of (for example) boards, OSB or just boards on both sides and insulation inside. Of course, stiffening ribs are added to this - a frame, as well as steam and moisture protection, but the main thing is that insulation is already present. And if the thickness is good, then you can simply cover the OSB with a vapor barrier, fill the sheathing slats and cover the walls in the bathhouse with clapboard.
If it turns out that there is not enough insulation, then additional insulation can be done, and then everything will be the same. Before covering the steam room in the bathhouse with clapboard, you can cover the walls and ceiling with foil as a vapor barrier.