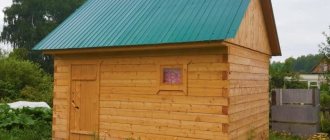
A 3x3 log bathhouse fits well even in the smallest area. You can build a 3x3 sauna with your own hands from any building material: wood, brick, blocks, or stone. The main thing is to choose a suitable project and follow all stages of construction exactly. We will tell our readers in this article about how to build a small 3x3 bathhouse, what features the design has and what rules to follow when assembling it with your own hands.
Features of a 3x3 bath
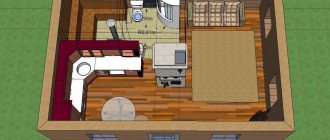
A 3x3 m bathhouse is a small structure suitable for a summer house or garden house. You can accommodate 2-3 people at a time in this one. They usually build a one-story building, but you can choose a project with an open veranda and an attic. This area is enough for a small lounge on the second floor, and on the veranda you can arrange a place for tea drinking.
Basically, the choice falls on a small bathhouse in two situations:
- There is not enough money to build a big one.
- The building plot is too small in area.
One-story bathhouse
A 3x3 bathhouse on one floor can be a good place for a small family to relax.
A one-story 3x3 structure has a maximum area of 8-8.5 m². They are divided into a dressing room of 2-3 m², a steam room of 4-5 m², and a shower room of 2 m². The dressing room is combined with a place to relax. Despite its small size, there is space for a small table and a couple of benches for relaxation. You can make a table with your own hands, fold it, then space will be saved. And during kindling or cleaning, you can free up as much space as possible in the dressing room.
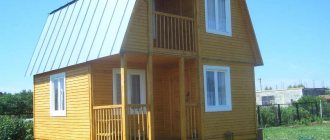
Bathhouse with attic
A 3x3 bathhouse with an attic has a maximum area of 14–15 m². Moreover, the second floor of 6–7 m² is suitable for a recreation room. It is not uncommon for such bathhouses with an attic to be built on summer cottages, when the second floor is used as a guest room or a place for a children's room. You can build an uninsulated attic, then it can be used as a place to store brooms and household items. tools, etc.
To build a 3x3 bathhouse for year-round use, you need to build an insulated structure; for a summer house, you can use a frame version with 1 layer of insulation.
The square shape of the bathhouse makes the construction convenient when placing and choosing a location on the site. Due to its small shape, it can be installed attached to the house or freestanding.
Selection of material for construction
A ready-made log house for a bathhouse can be purchased as a set, where each log is sawn and it will not be difficult to assemble it with your own hands.
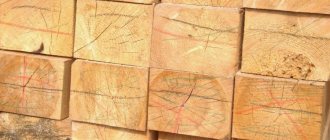
Any material is suitable for construction. The cheapest option is to build a 3x3 frame bathhouse with your own hands. It is built from 100x100 timber on a lightweight strip foundation. To do this, a trench is dug along the foundation markings and a concrete strip is poured over the formwork. You can read how to assemble a frame bathhouse with your own hands step by step in one of the previous articles.
Traditional wood looks good and keeps warm. You can prepare logs yourself and dry them under a canopy. The insulation is also collected from forest moss. Construction with your own hands will cost a minimum, but there will be a lot of labor costs.
A good alternative to logs is rounded logs or profiled or glued beams. You need to use chamber drying, then the construction will give minimal shrinkage, and you can use the bathhouse immediately after construction and finishing are completed. The advantage of glued and profiled materials is that you do not have to additionally insulate the bathhouse from the inside and outside.
Craftsmen assemble 3x3 baths from bricks or blocks, since the box is square, it will not be difficult to assemble it with your own hands. For a brick building, the foundation is made of a strip foundation with reinforcement below the freezing point of the soil. Since the walls are heavy, a foundation reinforced with reinforcement is needed.
Technology for constructing a small bathhouse
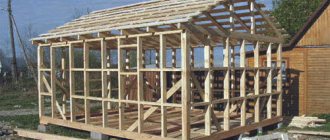
A 3x3 log house can be erected quickly. The work will be much easier if you use not a log in construction, but a profiled beam, in which a system of grooves for fastening is pre-provided. Stages of construction work:
- Construction of a columnar foundation on which the timber will rest. The most common materials used are concrete blocks, brick pillars, or asbestos-cement pipes filled with concrete. The posts are installed with a recess of up to 70 cm; they are placed in the corners of the building, as well as in places where high loads are expected. Asbestos pipes will serve as permanent formwork for the columnar foundation.
- Construction of walls, starting with the frame crown, to which the floor joists are attached. The log house is erected using the “paw-to-foot” technology, which will ensure maximum use of the entire surface of the timber or log. When laying, roll insulation is laid between the crowns, and they are fastened together with dowels.
- Installation of rafter system and roofing. Ceiling beams are cut into the upper crown, on which the ceiling is then laid.
- When the building is completed, you can move on to insulation, arrangement of rough and finished floors and interior decoration. Natural materials are most often chosen for the interior of a bathhouse so that the finish looks harmonious and is pleasant to the touch.
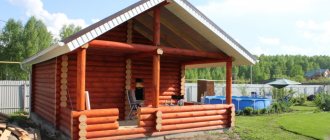
A 3x3 log house with an extension looks interesting. In this case, the useful space is expanded due to a large veranda, which can become a place of relaxation and communication. The roof covering protects the veranda from precipitation, and the building will be very convenient to use.
Andrey Levchenko
Author of publications on 1Drevo.ru with the topics: Windows for the attic | Rounded fence | Five-wall log house | Repair of a cylinder house | Production of cylinders | House layout | Rounded dacha | Induction electric boiler | Solar panels | Canadian log house | Log bathhouse | Wall insulation | Cottage - laminated timber, etc.
Collections of publications on topics:
Asbestos pipes Log bathhouse Log bathhouse 3 by 3
Was this publication useful to you?
Bookmark it on social networks!
Total score: 10Votes: 1
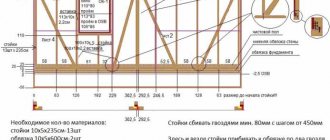
The most common dimensions for making a log frame
Features of installing the last crown of the log house under the rafters
We recommend! — Encyclopedia Wooden Houses — NEW
You can find out detailed and expanded information on the topic of the article from the book “Wooden Houses,” which reflects all stages of building a house, from laying the foundation to installing the roof. Book price = 77 rubles.
You may also be interested in other BOOKS on building houses from wood with your own hands.
We recommend other posts on this topic:
Features of cutting log houses for shrinkage
Interior of a bathhouse made of rounded logs: design errors
Round baths: from design to construction
Wooden extension to a brick house for household purposes
Options for making country wooden toilets
Installing a toilet in a village house - how to build it
Main stages of bathhouse construction
They build a 3x3 bathhouse with their own hands according to the chosen project. In any case, the main assembly steps include:
- Foundation installation.
- Construction of the box.
- Roof.
- Finishing.
Each stage is individual for different materials.
Foundation installation
The foundation for a 3x3 bathhouse is made from a lightweight strip foundation.
The foundation for a 3x3 bathhouse made of timber or a frame is built as a strip foundation, not buried, as we said above. Let's take a closer look at the foundation for a structure made of timber or rounded logs.
A square of 3 by 3 m is marked and a trench is dug to a depth below freezing of the soil, 10-15 cm wide. A sand cushion 10–15 cm thick is placed on the bottom. The cushion must be spilled and compacted. Crushed stone is laid on the cushion and formwork is built. You assemble the formwork with your own hands from a simple unedged board and 40x40 cm bars. There is no need to add more rigidity to the foundation, since the 3x3 structure is not too heavy.
Concrete is poured into the formwork, which you can make yourself (cement + sand + gravel). But when building a bathhouse, it is necessary to use moisture-resistant cement, since the construction involves the use of water. After pouring the foundation, it is necessary to plan the space for the stove and pour a separate concrete pad. In the place of the dressing room, a drain is installed in the form of a pit filled with gravel. Water will get inside and disperse evenly over the ground.
The foundation is insulated using suitable rolled or coating material. The inside can be treated with deep penetrating waterproofing, such as liquid glass. 2-3 layers of roofing material are laid on top.
Box assembly
It is cheaper to assemble a frame bath from 3x3 timber than from other materials.
The box is assembled depending on the selected material. If the brick walls of the 2 lower rows are laid with red waterproof brick, silicate brick can be used above. The lower crown of timber is made of larch or aspen of a larger section. So if the main walls are assembled from timber 150x150, then the lower crown is 200x200 mm. The harness is attached to the foundation using special plates that are screwed to the base of the bathhouse.
The box is assembled according to the plan diagram. It is easier to assemble profiled simple or laminated timber. The tongue-and-groove system allows you to fold the walls like a children's Lego construction set. You can cope with the construction alone, since the 3 m long beam is light in weight.
To lay the timber it is necessary to use wooden dowels and jute insulation. Some people suggest using metal dowels, but when they dry, the cracks may open up some of the connecting parts and the iron will be obvious. You can make dowels with your own hands from leftover wood.
Roof for a bath
The roof on a 3x3 bathhouse must fit into the main ensemble of all buildings on the site.
The roof for a 3x3 box is chosen to be the simplest gable or single-pitch. The angle of inclination depends on the choice of roofing material. The most inexpensive option is roofing felt or slate. For a log house, roofing material is taken for shrinkage and a rough roof is made. You can read more about how to assemble a roof for a bathhouse in one of the articles on our website.
The rough roof is assembled for 1 year so that the box lasts all seasons, after which it is replaced with a finished one. For a bathhouse made of brick or chamber-drying timber, a finished roof is immediately laid.
After this, the floor and ceiling are laid. They are mounted on logs that are placed in the middle of the structure from top to bottom directly on the foundation. The ceiling can be made flat, since the structure is small. This one is attached directly to the walls without joists.
One of the finished 3x3 baths can be seen in the video:
Bath decoration
The interior decoration of a bathhouse made of timber may not be necessary, since the walls are already environmentally friendly and do not look bad.
Finishing a 3x3 bathhouse with your own hands begins with wiring communications. If there is electricity on the site, it is necessary to install light in the bathhouse. The hood must be made from the steam room and dressing room. To do this, you can use a simple ventilation system, which operates under the influence of a small fan and is started mechanically.
The next step is to insulate the steam room. For this purpose, natural insulation materials, such as mineral wool, are used. The walls are covered with foil insulation on top, so that the steam is reflected from the surface of the steam room and maintains the temperature of the thermos trailer. The top of the walls and ceiling are covered with linden or aspen clapboard. In rare cases, oak is used; as it is expensive, it is not profitable to use it in a budget structure.
A small canopy is attached to the wall opposite the stove and benches are placed; it is also more profitable to make them yourself. The dressing room does not need to be decorated with expensive materials; it is enough to paint the walls with waterproof compounds or soak them in oils. They will highlight the texture of the wood and give it water-repellent properties. Brick walls are plastered with moisture-resistant compounds and painted. It’s easy to build a 3x3 sauna with your own hands, since the structure is small. And there are many typical projects of this size on the Internet. The main thing is to approach the process with soul and “light steam” will not keep you waiting.
How to lay a log house
Now we move on to one of the most important stages of construction - laying the frame of the bathhouse with our own hands. When planning to build a log house 5x3 bathhouse, it is very important to correctly mark the logs in order to cut grooves for joining. There are two options for joining beams and logs: “into the bowl” and “into the paw”.
Their differences are as follows:
- The “bowl” log house is traditional, in which the tails of the logs protrude outward.
- With the paw-cutting method, the tails are cut off and the walls have straight angles.
Two cutting methods.
Let's figure out how to lay a log house for a 3x5 bath:
- We apply molten bitumen to the surface of the foundation.
- We lay a strip of roofing felt. For reliability, you can lay it in two layers.
- For additional insulation of the wood, we treat with an antiseptic the side of the beams that should be adjacent to the foundation of the bathhouse.
- Now we lay the first beam on the prepared surface.
- Check the level for evenness of installation.
- We roll out the inter-crown insulation for the bathhouse on the timber.
- We lay the second beam.
- We lay all the other beams in the same way.
Laying timber.