Those who live in a private house know how much building material remains after various works. Dacha owners can also confirm this. Why burn logs and throw away “unnecessary” things if everything is useful on the farm. Those who don’t have enough hands to get bored can try to create interesting interior details, furniture and garden utensils from the surplus. So, the best ideas and options are in our article!
What can be made from timber scraps: interesting ideas in the photo
A variety of decorative and even very useful items can be made from scraps of timber - furniture, decor and various devices for the garden. There are many options, and the result depends on the quantity and quality of the material and inspiration.
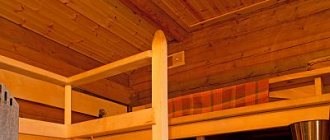
Using bars with a round cross-section, you can beautifully decorate the wall.
This material is an excellent basis for paths in the country. Stumps of the same height are placed close to each other to create a path.
If you put the stumps from the timber in a row, you will get a very interesting border for a flower bed.
Small pieces of wood can be secured to a board, and hooks can be nailed to them, on which you can then hang clothes.
Part of the local area is usually allocated for a children's area. It’s easy to make a sandbox from leftover timber; wooden elements can also be used to make outdoor swings. Additionally, you will need a strong rope.
If large bars are cut into stumps of the same height, glued together and filled with epoxy resin, you will get an original tabletop. You need to attach wooden legs to it to make a decorative table in country style.
Very thick disks are made from the remains of the bars, 3 legs are attached to them and original chairs are obtained. They are suitable, for example, for a country house.
Wooden scraps are also used to make flower stands. It will take a little effort and the consumption of materials is insignificant. The homemade structure is installed both in the house and in the yard.
The most common use of timber scraps is the manufacture of garden furniture. There are many options - from a simple bench to a set of tables and wooden sofas. It all depends on the desire of the master and the amount of available materials.
A large number of scraps of square timber can be used to make a base for a bed in the bedroom.
Various patterns of rings on a cut tree in combination with scraps of logs of various shapes are used to create paintings.
From square bars it is easy to make original steps for stairs both inside the house and in the yard.
If you cut out the central part inside the timber, you will get an excellent bird feeder. It can be hung on a tree.
A little imagination and free time can turn ordinary timber trim into something useful and beautiful.
Source: dm-st.ru
Using old polyethylene
It is unlikely that the film will be used to equip a new country greenhouse or even a small greenhouse, but individual plants can be placed in spring protective structures - film cubes.
In addition, you can cover anything with old film... the same piles of sand for construction, stacks of bricks or decorative tiles for arranging a summer house, bulk materials, feed. You just have to fold it several times, and even old and worn plastic film will become a good protection against moisture.
Article on the topic: How to make an extension to a wooden house from timber
It will also find excellent use in major construction projects. The film can be used to cover foundations and only poured areas so that the concrete does not dry out and crack in the sun.
In the issue of film, we moved a little away from the main topic of crafts and leftover building materials, but now we are returning to it.
Useful things from leftover timber, unusual ideas and uses
Those who live in a private house know how much building material remains after various works. Dacha owners can also confirm this. Why burn logs and throw away “unnecessary” things if everything is useful on the farm. Those who don’t have enough hands to get bored can try to create interesting interior details, furniture and garden utensils from the surplus. So, the best ideas and options are in our article!
Pouring the foundation
First, I cleared the area under the house from debris, bushes and other things that were in the way. After this, I began laying out the foundation.
I had to think for a long time about what type of foundation would be suitable specifically for my area. I studied the geological conditions, learned the composition of the soil and the level of groundwater. Specialized reference literature helped me with this. Additionally, I asked my neighbors what foundations their houses were on.
I live in the Ryazan region. Local conditions make it possible to save on the construction of foundations, so most neighbors have houses on light supports made of limestone and concrete. Most often, they even refuse reinforcement - such is the wonderful soil we have. The soil is sandy, therefore, it is not “heaving”. The water runs deep, and wooden houses weigh little. Therefore, there is no need to install buried monolithic supports in my region.
The foundation began by digging a trench. To begin with, I removed the fertile ball. Sand appeared. To make it seal better, I filled it with water. Then he lined the trenches with stone and laid two reinforcing bars. I tied them up in the corners. I think that the tape is best reinforced both at the bottom and at the top. So I did.
The foundation began by digging a trench
To save yourself from unnecessary work, you could order ready-made construction concrete for delivery. However, in my region this turned out to be unrealistic - there are simply no such proposals. And my plot is such that the truck would have to go through the garden, but I don’t need that.
Plus, ready-mixed concrete is expensive, but sand on my site is free. I ordered the stone with delivery - it turned out relatively inexpensively. I made inquiries: in Moscow, even calling an empty truck would be more expensive. It would have been possible to save additional money by collecting the stones myself on the river, but I had no such need.
Stone
I tried mixing concrete by hand. I quickly became convinced of the pointlessness of this event - it turns out to be too long and labor-intensive. I purchased a concrete mixer brand SM-160. It is relatively inexpensive, and will definitely come in handy on the farm.
I started mixing concrete. The process went quickly and fun. The concrete mixer is very easy to use - it can be moved along the dug hole without any difficulty. I used a sheet for pouring concrete, as can be seen in the picture. I placed several supports under the sheet to prevent the material from bending.
How I made the foundation
The seller of the concrete mixer immediately warned me that when using the unit, there is no need to cover the plastic casing where the motor is installed, otherwise it may overheat. After completing the work, I each time cover the concrete mixer with plastic wrap in case of rain.
The concrete mixer helped to quickly prepare the required amount of solution. I laid stones in the concrete. So I filled the foundation strip to the ground level. The above-ground part of the tape was laid out on a thicker mortar using the same stone.
A little short of reaching the top of the foundation, I installed a reinforcing frame. The masonry was done with smaller stones.
The foundation is almost ready. I left it to gain strength. The base does not look very neat and even, but in the future nothing will prevent it from being finished and put in order. For example, the finishing of the above-ground part of the base can be done using plaster - a traditional option for village and country houses. A more modern solution is special decorative panels.
How I made the foundation
I saved a lot while working. For example, I did not make formwork, but used cheap local materials - stones and sand - to construct the foundation. Even taking into account the cost of my concrete mixer, the foundation turned out cheaper than if I had ordered ready-made concrete and assembled the formwork.
Foundation
Alas, you won’t be able to save this much in every region. For example, if I lived somewhere in the Moscow region, I would have to make formwork, install a spatial reinforcing frame, and only then pour in the building mixture.
While the concrete gains strength (and it needs 3-4 weeks for this), I will start preparing consumables.
We design garden paths
A garden path paved with wood will look atmospheric. Nowadays, most people try to pave paths or line them with fiberglass, but wood always remains the material that looks good on any site.
To implement the design idea, you will need the remains of timber and branches left over after cleaning the garden. Wood of any diameter is suitable, the main thing is to ensure that it is intact and not damaged by pests, mold and rot.
Stages of work:
- You need to cut the tree to the same length. The diameter does not matter, because this is a decorative decoration that includes the author's idea.
- Treat finished parts with a special agent that prevents rotting.
- Dig a trench where there are already markings for the future path.
- Pour a layer of sand into the bottom of the hole and compact it thoroughly. Install saw cuts.
- Fill the gaps with wooden blanks.
After the pieces of timber are laid out along the path, you need to fill the remaining space with sand. This creation looks very original, you won’t have to spend extra money, and you can use the path for several years.
Driftwood and branches in the garden
Any wood is a material for creativity. A board with a greeting is laid out from thin branches.
The decor on the welcome board is attached with glue
Thick ones are used to make unique garden furniture.
A stylish chair will last longer if you remove the bark from the branches
Interestingly shaped driftwood will give your garden a picturesque look if you simply place it among the plants.
Don't pass by beautiful driftwood - it's very rare
And with the help of glue and screws, various animal figures are made from pieces of wood. But first, the bark is removed from the branches and they are lightened.
- Soak the material in a solution of soda ash: 2 cups per 7 liters of hot water. Place a weight on top.
- After 3 days, remove the bark using a wire brush.
- Then immerse the branches in a bleach solution for 2 days: 1 glass per 7 liters of water.
- Dry in the sun for 3 days.
- Sand with fine-grit sandpaper.
Selecting material for drawing up figures is a long but exciting task.
A wreath of bleached branches will decorate a door or gate. Install a strange mushroom from driftwood and branches under the tree. To create a Christmas tree, branches drilled in the middle are placed on an iron pin. It is better to make large figures from driftwood. From curved branches and snags, fancy stands for pots are created. Before installing the seat on the bench carefully polished You can make any decoration for the door from small twigs A funny pig made from driftwood looks great on a green lawn A lamp made from branches is an elegant decoration for a gazebo or veranda
flower bed
If there is timber left over after the construction of a gazebo or bathhouse, why not place the remains in the garden plot. A good idea is a flower bed. Usually, the remains of trees and building materials are burned or simply thrown away, but we suggest doing otherwise.
Making a flower bed:
- Prepare materials and tools (beam, chisel and hammer, chainsaw, plane).
- Cut the wood into small pieces. There is no need to adhere to a specific scheme, your imagination is enough. Once you decide on the shape and length of the parts, design them.
- Make the surface of the bars smooth. To do this you will need a sander or plane.
- A chisel and hammer will help shape the future flower bed.
- Don’t forget to make a hole where soil will be laid and new flowers will be planted.
Be original, think over the shape and design of the flower bed, choose the right varieties of flowers. As a result, you will have a well-groomed flower garden that will perfectly match the wood products on the site.
How to apply lining trim
After any repair, some of the finishing materials remain in any case. Should I throw them away? What if these are clapboard scraps? What can be done with this material, how to apply it, let's look further.
Scenery
Namely, a decorative decoration of the finish. You can make interesting solutions on the walls using leftover wood. For example, these can be decorative additions in the form of planks, baseboards, but the main thing is to join them correctly. You can also make simply interesting accents. For example, if there are a lot of scraps left, adjust them to one size (square if possible), paint them black and white, and decorate one of the areas of the room in the form of a chessboard in which such an element is most acceptable. You can also make other compositions from clapboard scraps by painting the wood in a variety of colors.
You can also decorate certain interior elements. A simple example is a flower pot. You can cut out planks, and they do not have to be the same size. Use glue to plant these planks on an ordinary, nondescript plastic pot. Thus, it will be a wonderful addition to the interior, especially if the flower pot is located in the same room as the clapboard wall decoration.
By and large, it’s enough to turn on your imagination and you can apply the remains in a variety of interpretations. For example, you can make tiny shelves from the leftovers, arranged in the form of a ladder or some set of individual steps. On these shelves you can place small figurines, flower pots and other pleasant interior little things that decorate life.
Another interesting move: you can make a large wall clock from the leftovers. To do this, you will need hands with a mechanism; they can be taken from any old quartz watch. Cut uniform sticks from the clapboard scraps. Conventionally, draw a circle of the required diameter on the wall. The mechanism with the hands is placed in the center, and then the dial is made. To do this, uniform strips are cut out and placed on glue or liquid nails, directly on the wall in the form of Roman numerals. In general, such clocks can suit any interior, since the panels can be painted, making the useful decor unique and interesting.
Now about the baseboards. Using scraps, if they are, of course, more than 10 cm, you can make a plinth. This could be an element of the floor, ceiling or middle of the wall, for example. At the same time, thanks to the composition of such an element, you can also make an unusual solution by painting the parts in different colors. Moreover, if we are talking about a good class lining, which matches each other as much as possible in width. And if there are scraps of eurolining, then even small planks can be laid perfectly thanks to a special lock.
But what if there are very few slats left, and you don’t really want to throw them away, but there is no use for them in the house? It’s okay, you can use them on the balcony, for example, using them as planks for organizing drying clothes. Especially if the entire balcony is lined with clapboard.
And in conclusion: in general, it is better not to throw away decorative elements that remain after finishing work. All you need to do is show a little imagination and it will be a good way to add some zest to your interior. Make it more fresh, organic, interesting.
Sandbox
If you have boards left after finishing the facade and terrace, then do something nice for your children. You can build a safe and beautiful sandbox from them. You will prepare the material yourself, which means you will thoroughly sand the surface without leaving any nicks or irregularities. The child will not get hurt or get a splinter while sitting inside the sandbox. The design is easy to manufacture and does not require special skills. The main thing is to take a sufficient number of boards, a hammer and nails.
Source: build-experts.ru
Shelves in the garage or outbuildings
Decking boards are often used to make shelves. I made the shelves like this: I prepared the base (crossbar) and secured the board on it. The length of the crossbar should be the same as the planned width of the shelf. I chose reliable mounts, because sometimes I put heavy things on shelves. Even if you don’t plan to place objects that weigh a lot on a shelf in the garage, it’s better to play it safe and place the crossbars from each other at a distance of no more than 30 cm.
Source theydesign.net
Ideas from leftover building materials
What can be made from leftovers from renovations?
Since childhood, we have known the school board, every house has an ironing board, in the kitchen we use a cutting board, we race through the streets on a board with wheels - a skateboard, we play chess and checkers. Where else can you use the board?
After repairs, various slats, bars, planks, old window frames, baseboards, pieces of plywood, hardboard are often left behind - what can be made from all this?
The tags include interior items, remodeling, furniture, ideas, order in the house, etc. you can look through and find a lot of different examples that I posted earlier.
Today I prepared a lot more interesting things
– The very first thing that comes to mind is to use a piece of board for a garden bench, or even a small table, etc.
– You can cut interesting cutting boards of unusual shapes. Cut plywood for hot trays. Sand with sandpaper, saturate and decorate the boards as a gift
– If you attach furniture handles and small legs (for example, from large beads or the same furniture handles) and properly process and paint, you will get a serving board (like a tray)
– You can even create an unusual art object by placing your favorite collection on the board, for example, beautiful buttons or bottle caps, etc. And it will turn out to be an interesting panel
– You can also turn an unnecessary piece into a beautiful picture - paint it or even paste it with beautiful postcards, or some bright illustrations. Or even cover it with beautiful fabric. Or you can even sew a beautiful patchwork fabric and cover it.
– I have already laid out the so-called French boards. This is a board covered with fabric with foam rubber, for example. Or padding polyester, batting, etc. On such a board you can place photographs, postcards, pinning them with needles. Or tighten it with braid and place the photos without pinning them, but by placing them behind the banner.
– On such a board you can store your collection of jewelry, also pinning it with pins, or clinging, for example, earrings to a constriction. Or you can immediately screw in hooks, or beautiful little furniture handles, or just drive in small nails and store jewelry and various things
– From slats, plinths, old window frames you can make frames for photographs, paintings or the same French boards. Clean, sand and paint.
– Also, all sorts of bars, slats, boards can be used for mini-shelves and stands. Look what cool ideas! There are still a lot of ideas at the end.
– You can also make a beautiful key holder, or a hanger, or an organizing board for all sorts of notes and little things. Cover it with beautiful fabric or paint it, attach hooks or furniture handles...
– You can draw a board for different games yourself – chess, backgammon, or even make a darts for throwing darts
In general, there is room to let your imagination run wild and use the opportunity for creative ideas.
Look further at more photos and get inspired. Perhaps these ideas will be useful to someone, I will be glad. Good luck and inspiration to everyone!
Did you like the article? Subscribe to the channel to stay up to date with the most interesting materials
Source: sam.mirtesen.ru
Stone
Stone is a noble, “thoroughbred” material, suitable for a wide range of crafts. For example, if we are talking about neat round pebbles, they can be used almost anywhere. For example, for such “rugs” that resemble the texture of a sea beach.
If the stone is rough, then options appear. The cobblestones can be left as is, or crushed into smaller fractions, up to the consistency of crushed stone - it all depends on your taste. Whatever you choose, this material can serve as a filler for gabions - a fashionable solution that is based on filling grids of certain shapes with stone. The simplest option for gabions is a wall:
The benches look a little more interesting:
Particularly heat-loving people can equip a “gabion” fireplace or grill:
Or choose something completely non-standard - it would be a fantasy:
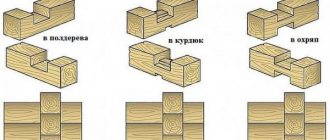
After construction and finishing work, wood waste of varying lengths and thicknesses often remains. Using your imagination, it’s easy to come up with what can be made from scraps of timber.
This elegant stool is assembled from pieces of wood using glue or screws.
The base of the stool can have the most unexpected shape.
If you cut the timber into cubes, you can use them to assemble a chair with a backrest.
The remnants of floor joists or rafters make a designer coffee table.
Saw cuts of timber of various sizes, dug into the ground, can become a garden fence.
The trimmings are used to make a set of garden furniture.
With a little effort and skill, you can successfully use the scraps and acquire new items.
Do-it-yourself furniture made from boards for the dacha: 23 ideas that will make you decide to do great things.
In the summer, when you want to be more in the fresh air with your whole family, at the dacha, you often need simple and natural furniture so that you yourself have a place to sit/lie down and accommodate guests.
Usually furniture corners that have already been used in a city apartment are taken to the dacha, but if you put in a little effort, you can make amazing eco-friendly furniture from boards. It will not be a pity to keep it outdoors, especially if it is treated with special means to protect the wood. Sometimes you need the simplest items - chairs, benches, sofas. And the easiest way to make them yourself is from wood.
Logs
A type of firewood is logs, often a cylindrical section of a tree trunk or branch. You can’t make beautiful furniture from these, but logs can have many uses in interior design. Starting with art objects...
...and ending with self-leveling floors made from thinly sliced wooden “slices”.
Some “interior designers” decide to experiment more boldly: they create a stylish mini-bar, a mirror frame or a hanger from logs.
DIY garden furniture made from boards
Successful country crafts often become the main decoration of a summer cottage. Before deciding which garden furniture will be best and how to make it, you need to determine what it can be made from. The best material for country furniture is wood. It fits perfectly into the landscape of any suburban area.
Of course, other materials are also needed. Be sure to look around to see if you still have any seemingly unnecessary things in your dacha or country house. Quite often, masterpieces are made from the simplest objects. Here are 23 great ideas on how to make your own furniture from boards for your garden.
Unexpected decision! The stones act both as a support and as a decorative element.
A bench and a flower garden - two in one. How great!
I'll probably take this idea into consideration.
After working, you can relax. Moreover, it is a pleasure to sit on such a garden bench!
I love radius solutions. Rounded furniture is my weakness!
New garden furniture, tables and chairs are similar to new interior items in the apartment. With it, both the room and the garden look different.
Atmospheric, isn't it?
Another interesting solution for a street bench.
The baby and the dog have already taken a liking to this wonderful garden furniture set. It’s not at all difficult to make one, the main thing is to stock up on the necessary materials and inspiration to create.
It seems like nothing special, but I want to look at this wonderful solution for a long time, and then get up and start implementing something similar for my garden. Very harmonious!
Stylish and tasteful!
And this idea is perfect for public recreation areas.
Garden furniture has many varieties, but in any case, be it sets consisting of a table and chairs, or benches, hammocks, sofas and garden poufs, they can be easily moved to another place. That is why garden furniture is also called mobile seating areas.
I really want the same set of garden furniture!
And this idea can be realized from old pallets.
When choosing outdoor furniture, it is important to be guided by the spring view of the entire garden plot and the design of the building facade.
This is exactly what I need! Now I know what my husband will do this weekend.
What do you think of this idea? I can already imagine how the whole family and friends gather around such a table and we have fun, eating delicious dinners, and then play board games.
Wooden furniture can be found in both mobile and stationary versions. The mobile look is certainly preferable; such tables and chairs can be brought into the garage for the winter or hidden in the summer during frequent, prolonged rains. However, having treated the wood well and impregnated it with special impregnations, you can not be afraid to leave such furniture outside all year round!
When choosing outdoor furniture made of wood, it is important to take into account the quality of the species, protective coating and manufacturing of fittings. Any garden furniture made of wood is treated with special antiseptics to avoid rotting. The surface of furniture items is coated with varnishes or paints.
If you have an old spreading tree on your site, then you can safely arrange a circular bench around it, and even a small table!
And this idea is my favorite.
How great it is to drink herbal tea and read your favorite book, sitting on such a bench in your garden.
By making such furniture from boards with your own hands, you can easily transform your dacha garden into the vacation spot of your dreams! Many pieces of furniture can be made with your own hands, and all ready-made furniture without exception can be decorated by hand, giving it uniqueness and updating it if it is old.
Source: www.dom-v-sadu.ru
Ideas for using waste lumber
Let's consider what products can be made from scrap boards in your free time.
The list of crafts that we will discuss below includes the following categories:
- a country stool is a necessary thing in everyday life that you can not buy, but make from improvised means;
- a chair that will not only serve as a comfortable element of the surroundings, but will also become an interior decoration;
- lampshade for a lamp, which will look natural in the interior of a house decorated with wooden paneling;
- New Year tree, which will come in handy on the eve of the winter holidays.
Of course, the list of crafts is incomplete, so you can add your own ideas to the ideas already proposed by leaving a comment on this article.
Assembling the stool
The photo shows a stool that you can make yourself
To assemble the stool we will need:
- cutting boards 60 cm long and at least 2 cm thick;
- self-tapping screws for assembling all the parts together;
- paints and varnishes for finishing the finished product.
Tools you will need:
- wood hacksaw;
- screwdriver with drill function;
- sandpaper to level the cut line;
- brush;
- container for mixing paints and varnishes.
Bottom view of the stool
The manufacturing instructions are as follows:
- we cut blanks for the seat from two boards;
- we prepare 4 blanks for the legs;
- in the lower part of the blanks for the legs we make an oblique cut, as shown in the photo;
- We connect the blanks for the legs together with self-tapping screws, so that the cut corners are on the inside of the structure;
- We attach the seat on top of the legs;
- We sand the finished product with sandpaper to remove splinters and irregularities from the ends.
Important: When tightening the screws, we recess their heads so that they are flush with the surface of the lumber used.
As a result, we know how to make a simple and yet reliable stool within half an hour, which will be an excellent addition to a set of homemade country furniture.
Article on the topic: How to build a bathhouse from 100x150 timber
In order for the finished stool to last as long as possible, after assembly it should be covered with a layer of varnish or paint. As a result, if you accidentally forget your own outdoor furniture, it won’t cause much harm.
Assembling the chair
Do you dream of designer furniture, but the high price is stopping you from buying it? It turns out that a designer chair that can decorate any interior can be made with your own hands and the material costs will be very small.
A designer chair that is not difficult to make
So, in the photo there is a chair, the price of which can be several hundred dollars. Meanwhile, it is enough to use your imagination and it will become clear that anyone can make such an element of the surroundings.
What is required to assemble a similar chair?
- A large number of small planks that can be split from waste construction lumber;
- The frame of an old chair that you wouldn’t mind sacrificing in the name of creativity;
- Glue for working with wood.
We make small boards for finishing the chair as follows:
- We place a piece of board on its edge at the site of the cross section;
- With precise blows of the ax we break off chips about 1 cm thick.
The frame of an old chair is the basis for creativity
It is clear that the chips will not be of the same thickness, but this is not important, since the finished chair will have to be covered with many such parts and the difference in their thickness will not be noticeable.
As glue, you can use compounds designed for working with wood. But the disadvantage of such compositions is that they take a long time to dry. And in addition, you will have to provide strong pressure on the slats for the entire time necessary for drying.
Given the number of parts, fulfilling this condition will not be easy at all. Therefore, we recommend using two-component compositions based on epoxy resins and a hardener as glue. Such compositions dry quickly, as a result of which it will be easy to assemble the chair.
Article on the topic: Is it possible to build a house from timber in the rain?
The assembly instructions are simple. The frame used is checked for strength and, if necessary, strengthened.
Next, the wood is primed and then covered with planks. The order of pasting is arbitrary, but you need to try to ensure that the surface of the glued chips is located approximately at the same level.
It is advisable to coat the finished chair with wood varnish. As a result, the craft will look great and will last a long time.
Assembling the lampshade
Chandelier made from planks
If there are a lot of unnecessary wooden planks, you can make a lampshade approximately the same as in the photo.
Manufacturing instructions are as follows:
- from the bars we assemble the base of the lampshade in the form of a ring or hexagon;
- along the outside of the base, we attach strips with self-tapping screws that will block the light from the lamp, creating more comfortable darkened lighting;
- if the room has a wooden ceiling, we attach a homemade structure directly on it around the lamp;
- For aesthetic appeal, sand the finished product with sandpaper and cover it with a layer of wood varnish.
Important: Given the proximity of a hot lamp, the inner surface of the lampshade is not varnished.
Assembling the Christmas tree
Extraordinary, but easy to make “Christmas tree”
Maybe such a tree will be unsightly in appearance, but there is no doubt that it will be original.
The manufacturing instructions are simple. We attach planks of constantly increasing length to a long board at equal intervals. These strips will symbolize the branches of the Christmas tree, and therefore they will need to be properly painted and decorated.
The most beautiful decor from scraps of boards: a cheap miracle with your own hands
It would seem that on the shelves of construction stores, for wall decor, you can find everything you can think of. As it turns out, this is not true. After all, the imagination of our people is limitless. And confirmation of this is the story presented by the author of the YouTube channel MY GALAXY Gennady. In it, the author offers to get acquainted with the miracle that can be created with desire, imagination and hands. And even scraps of boards that were supposed to be thrown away can serve as material for work.
Portable shower
A thing that not only our parents will envy. An easy-to-carry portable shower will always have a use. Wash after work or just cool down on a hot summer day. It fits into a small bag and can easily be used not only in the country, but also on a hike.
It is easy to use: just fill the container with water and use a special pedal to build up pressure in the system. You don't have to press the pedal all the time. Using the safety lever on the shower head, you can gradually use the pressure built up by the pedal.
The shower is made of dense high-quality material, which allows you to keep it in good condition for many years. The price of this indispensable device in the summer is only 2,700 rubles. Relatively little for comfortable washing and maintaining your personal hygiene anywhere.
Where to get material for work, what scraps are suitable for this
Very often, upon completion of the construction of a private house, a huge amount of such scraps remains. And in most cases, they are sent to a landfill or to fuel fireplaces and stoves. In fact, such actions can be called criminal. After all, decorating walls with natural wood looks many times more aesthetically pleasing and richer than plaster or wallpaper.
Cutting boards of any thickness are suitable as a material for decorating walls. At the same time, a minimum of time and effort will be spent on processing.
Assembling tragus elements: the better to fix them
First you need to collect 2 main elements (for one goat). To do this, squares are made from sawn scraps, and the parts in the corners are superimposed on one another.
The folded scraps are first coated with PVA glue, after which they are slightly pressed with clamps. Next, they are leveled with a square to a perfect 90°, and only then the clamp is pulled out completely. This way the connection will no longer move.
Now self-tapping screws are used. You will need 4 of them. per connection. After all four screws are fully tightened, the clamp can be removed.
Securing each connection in turn, you need to assemble a square with right angles
The second element of the goat is assembled in a similar way. However, it is unlikely that you will be able to stand on one goat, which means you will need to collect 2 more squares.
Wood preparation: what work will need to be done
If a person was building a house, then he would definitely have a hand saw at hand, and ideally a circular saw. With its help, you can quickly cut the remaining boards to a single size. In our case, the size 120×120 mm² was chosen, but this is not important.
Folded smooth planks already look good, but you need to give the appearance more color, highlighting the texture more clearly. You don't need any serious tools for this. An ordinary ax and hammer are enough.
Highlighting the structure: a torn surface looks more interesting
Now you can sit comfortably on a chair in front of the block of wood and create the perfect material for decoration. To do this, you need to cut each plank in half along the plane. Having inserted the ax, you need to lightly hit the butt with a hammer. The wood splits quite easily. It is the inner sides of the halves that will be the front sides when finishing.
It is necessary to split each plank in half along the plane PHOTO: youtube.com
Firing and varnishing the structural side of the material
When splitting wood, it is advisable to divide it into several parts. For example, you can separate oak elements from pine. Another group needs to highlight those that have the most beautiful structure.
Pine wood makes sense to enhance the look of the structure with a gas torch.
Oak planks should be put aside altogether; there is no need to emphasize their structure. But with the third group of elements it is worth working more intensively. They should be burned with the same burner until they turn black.
Charred wood will add contrast to the wall PHOTO: youtube.com
All elements must be varnished. This will further emphasize the direction of the grain and protect the wood. It is best to choose acrylic varnish - it is safer.
Original flower stand
As described in the article on the website “Hooks of Hands,” one long board is used to make a piece of furniture that will be useful in any room where there are flowers. This design will complement any interior.
Stand board
The size of the legs is determined by the height of the stand. For good stability, legs in the form of triangles are not made in large sizes.
The selected planed board is sawn into 4 triangles for the legs and 2 rectangles for the base and table top.
Legs for stand
The blanks for the legs are sanded and then glued in pairs with Moment glue. For strength, the connection is reinforced with self-tapping screws.
Glued stand legs
Two structures of legs are connected into a single whole with glue and reinforced with self-tapping screws. The base and tabletop are also glued and then strengthened.
Reinforced stand base
The places under the screws are puttied, and then the assembled stand is sanded and covered with stain.
Flower stand
This design is used not only as a flower stand, but also as a small convenient coffee table.
Choosing the direction of the fibers when placing boards on the wall
First you need to lay out the decorative elements on the floor, figuring out how they will look best. Below are all three possible options.
Probably the best option would be the third one with alternating fiber direction. It looks much more interesting. And for greater contrast, you need to add black spots to this chaotic arrangement. For example, if you combine oak elements with structural burnt ones, you can get a pretty impressive result.
This kind of beauty can appear on the wall PHOTO: youtube.com
Painting
You should decide in advance on the color of the panel: whether it will fit into the interior for which it is being made, match it in color and shades, or represent a contrasting bright spot in the room - it depends only on your desire to decorate the room. Transparent shades on wood look interesting. To obtain this coloring of the prepared bars, the acrylic paint should be diluted strongly with water. Then the structure of the wood will shine through the colored layer. By adding white to colored paint, you can play interestingly on light and dark shades of the same color. However, you can use different colors, as in the version of the panel invented by my daughter.
If you want to leave the panels the natural color of wood, then the structure of the wood can be emphasized by staining or brushing, and then, for protection, paint the cubes with varnish or apply wood oil or wax. Don't forget to paint the glazing beads. After painting, allow all parts to dry thoroughly.
Start of finishing, choice of adhesive composition
When working with wood, regardless of the material of the surface on which it will be glued, preference should be given to quick-setting but environmentally friendly compounds. The ideal option would be to opt for a tool such as a glue gun with silicone rods. With its help, the work will progress very quickly, and the costs will be small. For light wooden tiles, four drops in the corners are enough. At the same time, it will never fall off on its own. It will even be difficult to tear it off.
Using a glue gun with silicone rods will be the best solution PHOTO: youtube.com
Laying wooden tiles on the wall: the main nuance
The first row, which will be laid on the wall, is the most important. It must be leveled, otherwise the entire wall will subsequently look skewed. At the same time, it is desirable that the tiles closest to the walls are the same in size, and therefore it is best to start laying from the middle of the surface. Of course, it will be ideal if the tiles are level. But this only happens if their size was calculated before cutting, and then only with great luck. After all, even if there was a ruler and a stop on the miter saw, no one could cancel the error.
Rosettes located on the wall can also be played out using those tiles that have natural holes. You can try gluing them instead of a decorative overlay. And it doesn’t matter if the seams in these places move.
After laying the first row, the work will go much faster PHOTO: youtube.com
After a short period of time, the wall should be completely transformed. If the master initially assumed what would happen in the end, he himself was a witness and participant in everything that was happening, then the surprise and admiration of the guests who come to the housewarming party will clearly be guaranteed.
The wall is finished, you can clean up the room PHOTO: youtube.com
Birdhouse with collapsible design
Creating conditions for birds to live in a summer cottage is useful and pleasant.
Firstly, the birds destroy pests, and secondly, there is an opportunity to enjoy their singing.
Birds will definitely settle in the house if they follow certain rules when making it:
- the birdhouse is made from hardwood that does not emit resin;
- do not use plywood and chipboard, as the glue repels birds;
- the workpieces are fastened with nails or screws, rather than glued together;
- the wall thickness is made at least 20 mm to retain heat inside the birdhouse;
- The inner surface of the walls is left unplaned so that the chicks rise to the entrance.
A collapsible birdhouse with a flat roof, as shown on the YouTube channel TheAnt, begins to be made by choosing a board.
Board for birdhouse
The board, planed on one side, is sawn into 6 pieces with the following dimensions:
- front wall of the birdhouse - height 373 mm;
- roof of the future birdhouse - height 390 mm;
- back wall of the birdhouse - height 340 mm;
- the bottom of the birdhouse is a square with sides of 150 mm;
- side wall - height 370 mm;
- side wall - height 340 mm.
On the front wall, 100 mm are retreated from above and a compass is used to mark a circle with a diameter of 47–50 mm for the birdhouse entrance.
Taphole marking
According to the marks, the hole is drilled, cut out and processed with a rasp.
Assemble the birdhouse using self-tapping screws. To do this, use a 2 mm drill to make holes at the fastening points.
Assembly begins by attaching the side walls to the bottom of the birdhouse. After this, the back wall and the front wall are attached. The installation is completed by fastening the roof.
Fastening the walls of the birdhouse
In front of the tap hole, you can make a wooden perch on the outside. However, large birds will land on it and pester the chicks.
A wooden pole is attached to the back wall for fastening.
Birdhouse assembled
Since self-tapping screws were used during assembly, the birdhouse can be disassembled to throw out the garbage that the birds brought in. When disassembled, the birdhouse fits into a backpack. You can bring it to the dacha and then assemble it.
Video of making a birdhouse from one board:
Final touches that will emphasize the unusual decor
After the renovation of the house is completed, it is worth thinking about unusual lighting, which will add additional charm to the unusual decoration. In this case, lamps with dark lampshades, through the holes of which rays break through, will look very interesting. Below you can see what an impression it makes.
Amazing lamps that you can also make yourself PHOTO: youtube.com
And ordinary soft light will fit perfectly into such a fairy tale PHOTO: youtube.com
Summing up the work done
We have no doubt that our readers liked such an amazing finish. Considering that nothing other than acrylic varnish and silicone rods was used, the significance of this decor further increases. In addition, to bring such an idea to life does not require any skills, abilities or special skill. This means we can only hope that many who read today’s article will follow this example. After all, the resulting result is a real miracle.
It is possible that there are still unclear points in the information presented to your attention. Share them in the comments below. We ask you to share your impressions of what you read there. Have you thought about similar decoration in your home? Please evaluate the article and the work itself, done by people who have little knowledge of design.
Source: homius.ru
Interesting kitchen utensils
How to make a greenhouse with your own hands: step-by-step instructions and design options.
overview of the simplest and most current projects (95 photos and videos) It is not necessary to make plates or even spoons from boards - in the end, this is still too much processing, for many people it is too complicated. But it’s quite possible to limit yourself to an elegant tray or cutting board: in the end it turns out no worse. Among the breeds it is recommended to use:
- linden;
- birch;
- aspen;
- pear.
In some cases, juniper wood is also used. All this is used without fear, because high strength is definitely not required.
The design can be stenciled to make your life easier. An almost win-win option is to decorate it with Khokhloma or Palekh.