Wooden doors look noble, aesthetically pleasing and elegant! No other door made of any other material can compare with them. Today it is possible to purchase a door blank for painting or varnishing. It's cheaper and more practical. You can varnish the product in the tone that best suits the interior. An even more economical option is to renew a varnished door. Of course, you need to remove the old coating and sand the surface, which takes time, but this option will be much more economical in terms of funds.
The varnish has a transparent structure. Thanks to this, the natural beauty of the tree is emphasized. Even budget door options, for example, those made of pine, acquire a solid, expensive and high-quality appearance after varnishing. The tone of doors, especially those that open onto the same corridor, should be the same. This creates a complete picture of the interior. Although the interior door from the room side can be painted in any tone of paint or varnish that suits the interior.
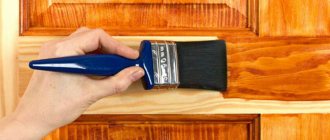
Tools for applying varnish
To varnish the door you will need:
- wood varnish,
- small brush or roller
- rags,
- spatula and wood putty,
- grinder,
- sandpaper with fine and coarse grains,
- construction hairdryer
How to remove paint
When restoring doors and windows, or any other wood products, the first task is to remove the old paint. Scraping or sanding with a knife is an activity for those who are very patient. It takes a lot of time and the process moves very slowly. There are several methods for faster removal.
Warm up with a hairdryer
A new one costs about $25-30, but for one-time work it is unwise to buy it. Can be rented at a hardware store. The surfaces are cleaned of paint as follows: direct a stream of hot air onto the painted product, literally after a few seconds bubbles appear, which are removed with a spatula or scraper.
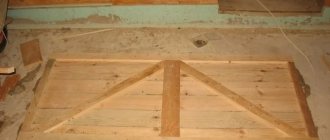
Restoring a wooden door begins with removing old paint or varnish
The temperature in the treated area is quite high, so wear gloves. And a little more about safety precautions: you need a well-ventilated room or outside.
One note: you should not set the temperature above 250oC. At high temperatures, wood loses most of its strength and then quickly collapses. So don't overheat it.
When removing paint with a construction hairdryer, the process goes faster than when processing with sandpaper, but still, it will take a fair amount of time.
Paint removers
There are more than enough different chemical products on the market to remove old paint. They are called "washes". They are sold in jars of various sizes and look like a gel - a slightly colored or completely transparent gelatinous mass.
When choosing, pay attention to what surfaces they are intended for processing. It is necessary to clean the wood - it should be present in the purpose “for wooden surfaces” or something similar.
Apply the paint remover with a brush, spreading it over the entire surface from which the paint needs to be removed. After some time (from 5 to 40 minutes) the paint will begin to rise. You also simply scrape it off with a spatula.
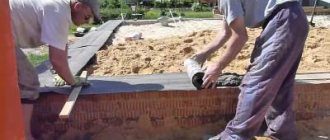
After treatment with a remover, simply remove the paint with a spatula
The smells when working with this product are also not the most pleasant, and you may even get a headache. So the room should also be ventilated. For people prone to allergies, it is better to work with a mask. There is one trick: cover the treated surface with plastic film. This can be either ordinary film (you can use old one - throw it away anyway) or food film, which is sold in rolls. But it’s easier with regular film: spread it out, tuck it in, and that’s it. The gel works better under the film - there are fewer “unremoved” areas left. In addition, the smell is not so strong.
When using paint remover, it must be removed from the surface before painting. First, wipe with a dry cloth, then with a damp cloth, then wash and allow the surface to dry. Only then do they begin further processing.
Folk way
This trick is from the arsenal of an old carpenter. Here you need a film in a roll, a spray bottle and acetone. Pour acetone into a spray bottle and spray the solvent out of it. Immediately roll out the film. It is necessary to roll it so that there is as little air under the film as possible. That is why food film is used - it does not allow air to pass through and has sufficient elasticity. After 15-20 minutes the paint comes off without any problems. It can also be removed using a spatula or scraper.
There are not only ready-made compositions, but also traditional methods for removing paint from wooden surfaces
But some carpenters claim that acetone and all other solvents destroy the structure of the wood. There is another method. It requires more time, but does not damage the wood. You will need a large plastic bag, larger in size than the door, or two, put on both sides. You will also need cotton non-fading rags and clean kerosene. Wrap the doors tightly with rags, pack them in a bag, pour 0.7-1 liters of kerosene into it, tie everything tightly, seal it and leave it for a day. Then you peel off the paint, but do not “expose” the entire surface at once, treat it in parts, otherwise the paint will harden again.
Useful tips from the experts
To eliminate defects and errors when varnishing an interior door, follow the recommendations of the craftsmen:
- Use masking or paper tape. Wrap the product around door handles and other fittings. This will protect the elements from varnish and construction mixtures. Regular tape is prohibited. It will leave traces that are then impossible to get rid of.
- Choose mixtures and varnishes from the same manufacturer. Don’t forget about a trial application of paintwork.
- It is better to get rid of the old protective layer. This has a positive effect on the final appearance of the door and will extend its service life.
- Don't forget about safety precautions. Perform work wearing protective gloves. If your skin becomes irritated, wear protective clothing.
- Ventilate the room.
- After finishing work, allow the door to dry thoroughly: do not touch or load.
On doors made of birch, oak and pine, varnish is applied generously so that the surface is thoroughly saturated. Remove any remaining paint with a brush and acetone. It is better to protect the floor surface and other interior elements with rags, tape or paper to save time on cleaning the room.
It's easy to varnish interior doors. The process does not require a person to have deep knowledge in the painting field. It is enough to arm yourself with tools, choose the right building mixtures and paints, and properly prepare the work surface. Advice from the experts will help you approach each stage more professionally.
Preparation for painting
Regardless of whether you are painting a new door (window) or an old one, its surface is rarely perfect. If you immediately cover everything with paint or varnish, you will not achieve a good appearance. If you want to give the product an attractive appearance, its preparation is necessary.
How to repair dents and cracks
During use, wooden products may develop large chips, cracks and dents. They can be completely sealed and nothing (or almost nothing) will be visible.
For small flaws, wood putty is suitable; for larger ones, furniture wax will be needed. They differ in consistency: wax is denser, sold in the form of bars, putty is paste-like, packaged in jars. Both compositions are tinted: they are given a color that is closest to the main shade of a particular wood. For example, wax and putty for pine have a slightly creamy tint, for alder it is slightly pinkish, for bog oak it is brownish, etc. Choose the one you need.
We cover all cracks and dents with putty.
The prices are something like this: a block of wax is $9-12, a can of putty - depending on the manufacturer and packaging, from $8 to $15.
Before starting work, you need to clean the surface. Wipe first with a dry soft cloth, then moistened with solvent. You can begin restoring the door (window).
It’s not difficult to work with wood putty: take a little of the compound, cover a gap or small depression, and smooth it out. This can be done with a small metal spatula, but there are rubber ones in stores - they are much more convenient for such purposes and cost very little.
When working with furniture wax, you will need a soldering iron with a thick tip. Heat up part of the material with it, take the softened mass with a spatula and apply. You should try to give the area being treated the required shape, but don’t try to make it level: the patch should be slightly higher than the rest of the material. After drying with fine-grained sandpaper, everything is compared.
Furniture wax is softened with a soldering iron
If a large surface has been sealed, it, even if the color is close to the main one, stands out due to the fact that it does not have the texture inherent in wood. If the doors or windows are supposed to be painted with opaque paint, then this does not matter. But if the product is to be varnished, the appearance needs to be adjusted. There are special furniture markers for this. They are available in different colors. You will need to match the main color of the wood species and darker/lighter to apply dashes that imitate wood fibers. A furniture marker costs between $1 and $4.
Patches can be tinted with furniture markers
But you need to tint the “patches” only after the entire door has been sanded - before applying stain or varnish.
Grinding
Even a new door to be painted has a far from ideal surface: there are small scuffs, chips, etc. There are always minor surface defects. Unless you bought very expensive doors. Then the surface is most likely ideal, and it is already coated with varnish. So we start polishing. This can be done manually - with sandpaper or a sanding machine.
To make it more convenient to work with sandpaper, take a wooden block, wrap it in sandpaper and secure it (you can use nails, but so that the caps do not stick out).
If you have grinding machines in your arsenal (you can rent them), you will need two types of them: circular for rough processing and belt for finishing. But when using machines, some places will still have to be processed manually: protrusions, recesses, etc.
An ideal surface can only be achieved by sanding wood.
First, sand the surface with coarse grain, then medium, and finally fine. Pay special attention to the ends. There is usually the most uneven surface - cross cuts have a very rough surface, but they need to be processed carefully, otherwise a lot of paint goes there, and they spoil the look pretty much.
There are no tricks here. Gradually remove the unsightly layer, leveling the surface. When you are satisfied with everything, clean everything with a dry soft cloth. You can start painting.
Wallpaper with a moisture-resistant coating: all about resistance indicators
Although the above-mentioned wallpapers can withstand moisture, this ability varies significantly depending on the type of coating. You can find out about it by the markers on the label that comes with each roll of wallpaper. Moisture resistance is usually indicated by a different number of waves
One means a standard level of moisture resistance, two waves indicate that the wallpaper meets the level of increased moisture resistance and is quite capable of withstanding washing with water. A picture of three waves indicates the possibility of using detergents. If a brush is depicted next to the wave, this guarantees the preservation of the presentable appearance of the wallpaper even with the use of a brush.
WESTWING designers are well aware that the most popular wallpapers
– with vinyl covering. This is facilitated by an excellent selection of various textures and colors, and a reasonable price-quality ratio. What should be the main thing when choosing wallpaper if you like several coating options at the same time?
When purchasing moisture-resistant wallpaper for the kitchen, it doesn’t hurt to pay close attention to the coating. The thickness of the vinyl plays an important role in this case.
The higher it is, the more optimistic the expectations regarding the technical and operational characteristics of the product. An excessively thin layer is prone to frequent damage; In addition, wallpaper with such a coating has a very limited washing life.
Painting a wooden door
We can talk about paints and varnishes for wood for a long time: there are many of them, with different properties. If you are going to paint with opaque paint, choose a suitable composition for wood. Apply the first layer of primer - add 2 parts of solvent to 1 part of paint (which one depends on the type of paint), mix everything thoroughly and apply evenly to the surface with a brush or roller.
To apply paint you will need natural bristle brushes of different thicknesses and a roller
This layer serves to ensure that the paint goes on more evenly, so that there are no unpainted or poorly painted areas. After the primer coat has dried, paint for the first time. Take a little paint at a time and rub it well, making sure there are no puddles or drips. You will have to paint in several layers in different directions, so don’t try to fill everything the first time. If the surface “shimmers” a little, it will disappear under the second and third layers.
For external doors we recommend Teknos paints. They are more persistent compared to other manufacturers and they are not edible by various pests.
Rules for applying paint or varnish
Start at the top and work your way down. This is important if the doors have not been removed: drops will not fall on the already painted surface. If the doors have previously been laid on a table, a workbench, stools, top and bottom are relative concepts. Choose where you will start from randomly, but you cannot change direction during the process: the docking point will be clearly visible.
So, we move the brush from right to left, going down from top to bottom. Apply the first layer and leave it to dry. Drying time depends on the type of paint, its base, temperature and humidity. It may take from 20-30 minutes for water-based paints, up to a day or more for compositions based on alkyd resins.
In order for the doors to be painted evenly, you will have to apply at least three layers of paint.
Despite the fact that the fast drying time of water-based paints is attractive, for baths it is necessary to look at such characteristics as moisture resistance. And it is low in water compositions. Therefore, most likely, you will paint the doors to the bathhouse with alkyd paints. But today there are so many offers that you can probably find aqueous compositions with increased resistance to moisture.
After the first layer has completely dried, inspect the surface. It is quite possible that the fibers that had settled under the action of the sandpaper rose. The surface turned out rough. This is normal. This happens almost always. Therefore, we don’t get upset, but take a fine piece of sandpaper and smooth it out. Try not to wear it down to wood, but that's how it goes.
The next layer is applied crosswise - move the brush from top to bottom. The rules are the same: a little paint, rub it well, let it dry. At this stage there should no longer be any unevenness. But if there are any, sand them again. The last (usually) layer is applied again from top to bottom, but from left to right.
This “multi-directionality” will guarantee that all places and surfaces will be painted evenly.
Choosing the right varnish
Alkyd varnish
Have you decided to use varnish? You made the right choice. All that remains is to correctly select the necessary material to process your doors. Varnish compositions are divided into several types:
- Alkyd compounds are an excellent waterproof, solvent-based option. After application it creates a light yellow tint. To speed up drying, adding a hardener is allowed. This combination will increase the hardness and moisture resistance of the coating. Complete drying time after application is twenty-four hours.
- Nitrovarnish compositions - capable of drying quite quickly, are made on the basis of solvents. Very toxic material, easy to use with a spray gun.
- Polyurethane varnish composition is highly durable and can give the wood a dark color. Before applying it, it is recommended to treat the surface with primer compounds.
- Acrylic varnish is safe from an environmental point of view, since it contains a water base. This type of varnish is odorless, but is not as durable as other compositions.
How to varnish doors
Varnishing a wooden door is the most logical option, especially for a bathhouse where wood is present everywhere. Preparing the wood is no different: you need to carefully fill in all the unevenness and sand it. Perhaps more carefully than when using opaque paints: all errors will be visible through the clear varnish. After which you can start varnishing the doors.
Stains
Stains are used to tint wood.
Stains are often applied under varnishes - these are coloring compounds that give the wood a tint without hiding its texture. There are three main types:
- Alcohol-based - dries quickly, but costs a lot and “smells” just as decent.
- On water it is practically odorless, but it dries for a long time, and the price is not the least.
- Oil-based - they are diluted with solvents (646, acetone, Premierlac, automotive solvents are also suitable).
A little about what to choose: a quick-drying stain or waiting for it to dry for a long time. It's not just a matter of time. The difference is in the effect: slow-drying compounds penetrate the wood deeper, causing it to become darker and the pattern to appear more clearly. So: if you want a light tone, take quick-drying stains; if you want to highlight the texture, buy ones with a long drying time.
There are also stains with varnish - the cans say “glaze plus”. They reduce processing time: you immediately tint the wood and apply a layer of varnish, but working with them is difficult even for professionals. For amateurs, achieving high-quality and even painting is almost impossible.
Lucky
Varnishes are produced on the basis of different substances, respectively, they have different properties. Nitrocellulose compounds should not be used for baths - they have very low strength.
Acrylic varnishes are resistant to ultraviolet radiation and external influences, but since they are different, their other properties are different (when choosing, you need to read the specification). They can be diluted with water or nitrourethane thinners (again, depending on the base).
Wood varnishes are made on different bases and have different characteristics.
Polyurethane has good adhesion to the surface and is resistant to external influences. There are matte, glossy and semi-gloss. Can be used to cover solid wood and veneer. They are also suitable for finishing countertops and parquet floors, as they have high abrasion resistance. It applies well, but on light surfaces it gives a yellowish tint.
Water-based varnishes have a slight odor. But they differ in their long drying time. It's all about what anyone likes. They often have high resistance to external influences, but again they are made on the basis of different substances, so you need to read the scope and properties on the label.
Polyester compounds provide a thick film, are very resistant to various influences, and can be used outdoors. But these are the most “fragrant” and toxic varnishes. Work only in a well-ventilated area or outdoors.
Wood varnish can be glossy (as in the photo), semi-gloss and matte
You can sit outside in the shade or in the sun. But the choice of location depends on the cast you're working with. If it is a quick-drying stain or varnish, then it is necessary to avoid sunlight: on heated surfaces they will evaporate too quickly, resulting in uneven application and an unsightly appearance. But if you are working with viscous masses that take a long time to dry, go out into the sun: they will spread well on warm wood.
But there’s one more thing: dust and midges. If you leave the doors to dry in the open air, all sorts of small things will stick and there will be a lot of dust/debris. So, after working, you will need to carefully bring everything into a closed room.
Oil varnishes - they contain a large amount of fatty resins. So you need to use it on previously painted surfaces with caution: they are not compatible with all varnishes and paints. The thickness of the layer depends on the composition, but the coating is dense and durable. Some compounds cannot be applied evenly with a spray gun; it is better to work with them with a brush. There is almost no smell, when applied with a brush, they go on smoothly. There are compounds with wax - they slightly whiten softer breeds.
Now about which varnishes are best to use for the door: acrylic and polyurethane are most often used. For wet rooms - steam rooms and washing rooms, look for compositions that are resistant to elevated temperatures and moisture. Often these are so-called yacht varnishes.
Varnish selection
Wood varnish
Wood varnishes are divided into several types.
- Alkyd varnishes are solvent-based. They give the wood a yellowish tint and are waterproof. To speed up the drying process, improve moisture resistance and increase hardness, special hardeners can be added to the composition. Drying time is approximately 24 hours.
- Acrylic varnishes are produced based on water. They are odorless and non-toxic. To strengthen the coating, special hardeners can be added, because such varnish itself is fragile.
- Nitrovarnishes have a significant advantage over their counterparts - they dry quickly. Solvents are used as a base. Nitrovarnishes are very toxic, so their use is not always justified. By the way, when using nitro varnishes, it is best to use a spray gun.
- Polyurethane varnishes are strong. They are distinguished by a dark shade and that is why the surface of the door is first primed.
Which varnish to choose
Of course, there are many more wood varnishes, but they are usually not used at home.
Whatever your choice, varnishing the surface of a door is fundamentally no different.
It is more important to understand how to properly prepare a door for varnishing
Door varnishing
Stain is applied to a clean surface. It is advisable to use a spray gun for this. If you don’t have one, you can take a soft, clean cotton cloth (preferably white or light-colored, and certainly one that does not fade). Stir the stain, dip the tip of the fabric into it, squeeze it out, and apply it to the wood with quick movements. Try to distribute evenly, rub thoroughly, do not take a lot of paint at once. After finishing rubbing, take a dry cloth and wipe the surface dry. This way you treat all surfaces.
The stain can be applied with a clean cotton cloth
But this method (with fabric) is suitable for dense wood. It will not be possible to evenly tint soft wood (pine, for example). A spray gun is required. In order not to regret it later, you can practice on a piece of unnecessary board of a similar texture.
You can try working with stain with a wide natural bristle brush. Knead it well so that everything that could spill out spills out. Then work as described above: moisten it a little, apply it, wipe it with a dry cloth.
It is also advisable to apply the varnish using a spray gun. But you can also use a brush. For a spray gun, you will have to either heat the varnish to 60 degrees, or dilute it. Oil varnishes are diluted with white spirit or solvent, the rest are 646, 647 solvents (sold in hardware stores) or 649-650 (these are in car dealerships).
Methods of applying stain
After applying the first coat of varnish, just like when applying paint, lint may rise. We clean it with fine-grain sandpaper. You need to process it carefully so as not to strip it down to bare wood (do not erase the stain). Then, after removing the dust with a soft cloth, apply the second layer. Sometimes it is necessary to completely clean and varnish again.
First dry all layers well until completely dry, then process (if necessary) and apply the next one.
Coating over old varnish
The above process is relevant if you need to coat a new surface with varnish. However, work can also be carried out on old varnish. Although, to be more precise, the main part of the old coating still needs to be cleaned off, and the remaining coating will serve as a primer.
As in the previous case, the door must be removed. This will make it much easier and more convenient to work. Then the surface of the door must be processed either manually with sandpaper or using a grinder. The surface is cleaned of dust and degreased with white spirit. If during the work it turns out that the surface has significant defects, such as cracks or chips, then they must be repaired with special compounds. After completing the above stages of work, the first layer of varnish is applied to the surface. It should be applied evenly over the entire area. When the first layer has hardened, and this will happen after about 12 hours, apply a second layer of varnish, after which has dried you can apply a third and so on until the desired result is achieved
By the way, for the convenience of applying varnish and generally speeding up the process, you can use a roller instead of a brush, but you need to be careful and make sure that no air bubbles appear.
As can be seen from the material presented, you can update a varnished door yourself
It is important to add that work related to the application of paints and varnishes requires not only accuracy, but also compliance with safety regulations. In particular, the room in which work is carried out must be well ventilated
You also need to take into account that when cleaning the surface, fine dust will form. This means that you need to take care of respiratory protection.
What composition should I use?
The choice of varnishes is huge. The compositions are classified into several groups according to the type of base. To choose a paint coating, use the following tips:
A good option is varnish for interior work.
If there is high humidity in the room, then it is better to choose paints and varnishes for outdoor use. Pay attention to resistance to sudden temperature fluctuations. Consider the interior style. For example, matte varnish is suitable for Provence style rooms. Surface quality
When varnishing interior doors, gloss will make defects and unevenness more visible, while matte will disguise it.
Attention It is necessary to check the selected composition for compatibility with the primer. Otherwise, a combination of inharmonious materials will lead to cracking or final damage to the canvas. Next, popular paints and varnishes, their advantages, features and disadvantages will be considered
Which varnish to choose is up to the individual to decide, based on personal wishes and financial capabilities.
Next, popular paints and varnishes, their advantages, features and disadvantages will be considered. Which varnish to choose is decided by the person himself, based on personal wishes and financial capabilities.
Alkyd
The varnishes are made with solvents; interior doors will have an off-white, rather yellowish tint.
Advantages:
- strength;
- moisture resistance;
- quick drying;
- acceptable price.
Minuses:
- unpleasant pungent odor;
- rapid fading in the sun;
- contains harmful substances.
Nitrovarnishes
Acetone and nitrogen compounds act as a base. The substance is transparent and can preserve the natural shade of wood. However, nitro varnish cannot be used in living rooms.
Pros:
- low price;
- strength;
- durability;
- short drying time - up to 1 hour.
Flaws:
- toxicity;
- flammability.
Important: It is prohibited to use this composition in homes where children and pets live.
Polyurethane
The basis is polymers with long molecules. When coated, this varnish changes the shade of interior doors to a darker one.
Advantages:
- nice smell;
- no toxicity.
But polyurethane varnish is applied only to a previously prepared primer layer.
Imitation of natural wood
To repaint interior doors in an apartment, it is not always enough to simply apply several layers of paint. Sometimes you want to see the natural pattern of wood on the surface of the canvas. If your doors are made of MDF or lined with regular plywood, they can be painted to imitate natural wood. There are two methods on how to do this.
Option one
The door leaf is coated with light-colored paint. It is recommended to choose gray, beige or yellowish undertones. When the layer is completely dry, apply liquid soap with a wide brush. A layer of darker paint is applied on top (you can choose dark brown or a “wenge” color). Excess liquid soap will begin to appear through this layer - it should be washed off. The result is a coating with a wood fiber pattern.
Option two
First, the door is covered with paint of one color (also light), after drying, a second layer of darker paint. Take a special brush with a textured surface (it can be purchased at any hardware store) and run it over the still damp surface. This is how lines and curls spontaneously appear, which together give an imitation of a wood pattern. After drying, the decorative layer is sanded to give it a natural look and varnished.
As you can see, there are different ways to paint doors at home. Correctly selected coloring composition and adherence to technology will allow you to obtain a high-quality, durable and aesthetically attractive coating. The choice of color and decor of interior doors is a matter of taste.
Recommendations and common mistakes
It is quite possible to paint wooden doors yourself. The following recommendations will help you do this efficiently:
- Protect the fittings with masking tape. Regular tape cannot be used; sometimes traces of it cannot be removed.
- If possible, choose paint compositions, primers, putties and other products from one manufacturer.
- Always do a test, varnishing a small and inconspicuous area first.
- Remove the old coating so that the new layer looks beautiful and lasts longer.
- Make minimal strokes. The evenness of the coating depends on this.
- Veneered doors can only be processed with sandpaper. The sanding machine will destroy the top layer of the blade.
- It is better to varnish wooden structures made of artificial veneer after priming. This treatment increases adhesion, but the effect of natural wood disappears.
- Dry each layer completely.
- Use odorless and toxic products only in a room with good ventilation; ventilation is required.
Comment! You should wear gloves when painting wooden doors. Protect nearby surfaces with unnecessary cloth, rags, newspapers or film.
To paint wooden doors efficiently, you should avoid common mistakes:
- vertical placement of the canvas - it is inconvenient to work, smudges appear;
- low room temperature, poor ventilation - the layer takes a long time to dry;
- ignoring grinding, degreasing, and dust removal - adhesion, quality and aesthetics deteriorate;
- applying a cold composition or working at high humidity - swelling, peeling of the coating;
- If the varnish layer is too thick, cracks will appear.
Varnish selection
Wood varnish
Wood varnishes are divided into several types.
- Alkyd varnishes are solvent-based. They give the wood a yellowish tint and are waterproof. To speed up the drying process, improve moisture resistance and increase hardness, special hardeners can be added to the composition. Drying time is approximately 24 hours.
- Acrylic varnishes are produced based on water. They are odorless and non-toxic. To strengthen the coating, special hardeners can be added, because such varnish itself is fragile.
- Nitrovarnishes have a significant advantage over their counterparts - they dry quickly. Solvents are used as a base. Nitrovarnishes are very toxic, so their use is not always justified. By the way, when using nitro varnishes, it is best to use a spray gun.
- Polyurethane varnishes are strong. They are distinguished by a dark shade and that is why the surface of the door is first primed.
Which varnish to choose
Of course, there are many more wood varnishes, but they are usually not used at home.
Whatever your choice, varnishing the surface of a door is fundamentally no different.
It is more important to understand how to properly prepare a door for varnishing
The role of accessories in creating a harmonious image
Undoubtedly, the appearance of the fittings used plays a significant role when introducing glossy doors into the interior of a room. Thus, ordinary products of a dark matte color will look like a dirty burnt spot on the canvas, and the entire door in the room will look awkward.
Properly selected fittings should contrast with the main color of the door and at the same time look like one with it. The most harmonious combinations with glossy canvases of any color are handles and hinges made in steel and chrome. For use in a glamorous interior, the best solution would be to decorate the fittings with inserts of large-sized stones or Swarovski crystals.