When installing a shower cabin, many people use the services of craftsmen. However, often the installation procedure does not take place according to technology, since the master tries to finish as quickly as possible and take money for all completed and uncompleted actions. Knowledge of installation technology will allow you to easily install a shower stall yourself or competently control the installation process by a specialist.
Basic nuances when installing a shower stall
The main thing when installing a shower stall is to choose the right place for installation. It should be next to the hood and, if the model has many additional functions, connected to the electrical network with mandatory grounding. When assembling the pallet, you need to use a building level, since the pallet must be installed strictly horizontally. When installing a pipeline, be sure to use sealants, otherwise water leakage will force you to redo the entire job. When connecting the cabin to the water supply, you must install at least one filter. All pipes are run along the baseboards or hidden in a box or wall.
Let's look at a detailed example of installing a shower stall using Massimo as an example. This is a corner booth made in China with a high tray. Size - 100x100 cm. Bought for 30 thousand rubles. For other models and manufacturers, assembly may vary.
Recommendations on how to choose a device.
To select the dimensions of the booth, prepare a cardboard stencil with the necessary parameters. It will be used to determine the location of the booth and the desired model.
Pallets are made of plastic material, or the products are reinforced with fiberglass. If you choose pallets made of cheap material, they will sag under the weight of a person. The fasteners for installing the pallet must be reliable.
The cabins can withstand fluid pressure of no more than five atmospheres. At higher pressure levels in the network, reducers are installed. If the pressure in the water supply is low, you also need to select the appropriate model.
Tools
For installation we will need:
- wrench 19 and adjustable wrench 45;
- long Phillips screwdriver with PH2 bit;
- transparent sanitary silicone;
- construction gun for sealant;
- silicone spatula;
- spray;
- fairies;
- drill with 3 mm drill bit;
- roulette;
- bubble level 1 m;
- jigsaw;
- erasable marker;
- knife;
- thread locker or cold welding;
- water supply hose 1/2″ nut-nut - 2 pcs. (length is selected according to location);
- sewer crossing 40x50;
- toilet paper.
Structural division into types
A closed box for bathing and hygiene procedures is a shower stall.
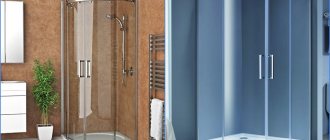
Despite all the variety of models, shower cabins are installed in 2 types:
- When the bathing area is separated by two side walls of the box and two adjacent walls of the room - an open view of the cabin. Masters call this design a shower corner. They install without much difficulty. But for it, the floor and walls are covered with a waterproofing layer and the base is leveled.
Installation of a shower corner is preferred by owners of small bathrooms. A shower with 4 walls requires a lot more space. Corners are most often mounted with transparent glass walls, which makes the structure airy.
- If, in addition to walls, the structure is equipped with a ceiling and a bottom, then it is a closed model. The swimming area is completely closed. Models on sale come in different sizes, but 0.7x0.7 m and 2.0x2.1 m are common.
Closed cabins come in simple and multifunctional types. The latter are equipped with additional options that create a spa at home: hydromassage, aromatherapy, tropical shower system, sauna, radio station.
Pallet assembly
After attaching locknuts to the studs, screw them into the pan. Short - to the center. Screw it in by hand until it stops and secure it with a nut. When tightening, do not apply much force, otherwise the thread may break. Only cold welding will help save the situation.
Screw the second locknut onto each stud with the notches facing up.
We lay the frame on the studs, tighten it and fix it on both sides with nuts.
We screw plastic brackets for the shower screen onto the 4 front studs. The perforated part should hang down.
We fasten the legs with locknuts and install the pallet in place.
We adjust the height of the screen to the lower edge of the side of the pallet. It is adjusted to the level by twisting the legs.
The lower edge of the brackets must be set with a gap of 20 mm from the floor, without being tightened to the end.
What's included as standard
Before installing a shower stall, you need to make sure that the package includes all the necessary elements.
There are only five basic parts:
- pallet;
- walls;
- doors;
- dome;
- central panel.
In addition to the main elements, auxiliary elements will be required: special wheels for moving doors, called rollers; seals, watering can, shower rods, shelves, mirrors, seat, handrail.
Their quality needs to be given special attention, as they quickly become unusable due to frequent use.
Connection to sewerage
To install the drain and siphon, remove the protective film around the drain hole. It is better to replace the upper rubber gasket with silicone sealant. We screw on the siphon. We also treat the threads and lower connections with sealant for reliability.
You need to connect the siphon to the sewer through an adapter. This connection is also coated with silicone.
If everything works, you need to disconnect from the sewer and continue installation.
Installation of side walls
We remove the protective film from the top of the pallet, but leave the bottom protected for now.
We move the pallet away from one wall and install an opaque wall there.
We connect the holes in the pallet with the corner and screw it with 35 mm self-tapping screws (without much effort).
We draw a marker along the corner and mark the holes.
Remove the partition and apply a layer of silicone 5 mm thick.
We install the partition back and remove excess silicone. Further I will not write about removing excess, remove it immediately after pressing the parts.
We move the pallet with the partition to the wall and try on the central panel to see if additional lining is needed.
We apply silicone to the junction of the side wall and the central panel.
We tie them together with 10 mm self-tapping screws.
We fasten the second side wall in the same way as the first.
Let's try on a fixed transparent partition. The bevel cut of the metal profile should be at the bottom.
If everything fits, we silicone the profile and install the partition.
We set the top edge flush with the wall.
From the upper outer side of the profile, drill a hole with a diameter of 3 mm and tighten the partition with the wall using self-tapping screws.
This is what it looks like in practice.
Install the upper and lower profile. The rounded parts are directed towards each other, the upper profile is wider than the lower one. We apply silicone under the bottom one.
Progress
The pallet is equipped with a frame made of pipes with a square cross-section, a screen, a siphon and various fittings. The installation of the box begins with the installation of the pallet.
Installation of pallet (with and without frame) and communications
Pallets differ in size and shape, material, design, and the presence or absence of a frame, which increases the strength of the structure and is used as support. Supports can be made not only from metal, but plastic, PCB and wood.
Instructions for assembling a reinforced acrylic tray:
- The frame is attached to the bottom of the pallet with special fasteners - studs.
The studs are screwed at one end into the prepared holes along the upper edge of the pallet, and the support bases are screwed onto the other end. - Under the bottom there are metal frame elements, adjustable in height.
- The reinforced structure is placed in the prepared place.
- The placement accuracy is controlled by the level.
- Decorative panels are hung.
When installing a pan without a frame, install a tubular pump in the same way. To do this, all the ring elements are disconnected, the connection point is treated with sealant, after which the clamp with the hose is returned to its place. It is important to attach a rubber seal treated with silicone to the end of the hose to ensure a good connection between the outlet hose and the sewer outlet.
Pallet with frame or without frame:
- installed at the location;
- leveled;
- loaded with heavy objects;
- fixed with polyurethane foam;
- ready in a day.
Installation of walls and doors
The studs are screwed at one end into the prepared holes along the upper edge of the pallet, and the support bases are screwed onto the other end.
Procedure:
- Start installation from the back wall, where the electrics are installed and the water is connected.
- Place the wall near the center panel and connect them with screws.
- Connect the structure to the pallet using self-tapping screws, making sure that the slots on the pallet and panels match.
- Treat the joints between the walls and the pallet with sealant.
- Install all side walls in a similar manner.
- The installation of the upper dome is carried out in the same way as the pallet, only in the opposite order - mirrored. Only the device for sound reproduction - the speaker - is treated with a sealed compound.
- Attach the strips.
- Insert the glass into the slats.
- Place a rubber seal in the narrow gap between the glass and the panels, pre-treating it with sealant.
- Insert the rollers into the special holes in the glass so that they are in the slot of the bar.
- Adjust the height of the door using the screw located in the lower rollers.
- Screw the handles onto the doors from the outside and inside.
- Check that the fastening is secure.
Roof installation
Before the roof is attached, all elements must be installed in the shower stall, including lighting, hood and shower. The dome is assembled according to the instructions and attached to the walls using screws inserted into special grooves.
Connection to sewerage and water supply
Once the cabin is completely assembled, it must be connected to the water supply system:
- The water supply to the bathroom is shut off.
- Pipes are installed and taps are connected to supply cold and hot water to the cabin.
- Water is supplied in test mode to check for leakage.
Design verification
Open sufficient water pressure for 10 minutes and close the cabin doors. The water should go into the drain, there should be no leaks outside.
After installation and installation, you need to tighten the nuts again using a wrench and apply sealant at the joints. It is better to stand on the pallet and test it under your own weight, making sure that it is stable and reliable.
Ceiling assembly
Assembling the ceiling of the shower stall. To remove the film, unscrew the ventilation grilles and the speaker.
To make the fan work as an extractor, secure it with the markings facing outwards.
It is advisable to treat the ceiling watering can with sealant to prevent it from twisting.
We install the ceiling in place, without silicone for now. It is screwed from below using 4 16 mm stainless steel screws.
We connect the hoses to the watering cans using clamping clips.
Wires are connected through lugs according to color and marking. The transformer is on the ceiling.
We connect and check water and electricity. Do not wet the top edge of the tray.
We put the booth in place and check its stability and level.
From the inside, we treat the lower perimeter and the central pillar with silicone.
Door installation
From the inside we screw rubber stops for the doors onto 12 mm self-tapping screws.
We screw the handles to the doors. On the outside, the cap on the handles should be on the bottom. If the screw turns, insert a plastic insert into the hole. A cut cross for tiles will do.
From the handle side we put magnetic moldings on the doors. On the other sides there are L-shaped moldings with the shelf facing outwards.
We put the rollers on the doors with the wheels facing out. Rollers with a button are attached to the bottom of the doors (the button should face up). The adjustment screws on the top rollers should face down.
We hang the doors on the upper rollers. To start the lower ones, press the buttons.
We check the smooth movement of the doors and the tightness of the connection. Doors must not open independently from any position. The connection is adjusted using screws on the upper rollers.