Knitting is one of the most common types of needlework. There are many different patterns and loops with which you can create real exclusive masterpieces. Of the many techniques, knitting elongated loops is popular. You can use crochet to make original products: sweaters, hats, stoles, dresses, scarves and other accessories, decorating them with such an interesting pattern. Even beginner knitters can master the basics of knitting if they wish.
What are elongated loops?
The formation of elongated loops serves mainly to decorate knitted items. Based on the differences in execution techniques, we can distinguish three main types of elongated loops:
- Loose loops forming a fringe.
- Picked up loops forming openwork patterns.
- V-shaped loops running along the surface of a continuous fabric.
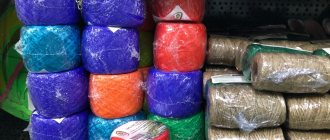
Before crocheting elongated loops, you should think about the yarn. To make products with loops in the form of fringe, you should not use multi-layer threads. Once fluffed up, they can become tangled and lose their neat appearance. However, using yarn that is too thin will not give a fringe effect; the loops will be sparse. The solution is to use yarn with a tight twist in several folds.
For knitting loops of the second type, melange or bright yarn is often chosen, as such patterns look elegant.
Stitches formed by elongated loops of the latter type will be better visible on the background fabric if you use yarn of different colors.
Most often, knitters choose contrasting threads for this type of work. There are no special tricks here, just to form some single crochets, the hook is inserted into the previous rows of the fabric.
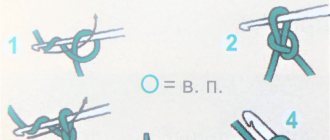
How to knit elongated loops with fastening in the bottom rows
And now we will learn how to pull out the loops and attach them to the bottom rows. This pattern is formed due to the fact that the hook is not inserted into the loops of the previous (or initial) row, but one, two or even three rows below. This very elongated loop will lie on top of the knitted fabric and cover the loops of the lower rows; it turns out to be a kind of satin stitch embroidery. As a rule, this pattern is made with yarn of two or more colors.
We suggest knitting a small sample together according to the diagram shown below. Study it carefully to understand how many rows you need to skip and where to insert the hook!
How to crochet elongated loops: basic principles for making fringe
This technique can be used to decorate the edge of the product or as the main pattern for the canvas.
The second option is used if it is necessary to obtain imitation fur. With the right choice of thread color and texture, elongated stitches help recreate the appearance of sheepskin, which is useful for knitting collars, cuffs, jackets and coats, as well as when working on knitted boots. A visual pattern for crocheting elongated loops looks like the following photo.
The first row should always be continuous (single crochets are best). Next, a lifting loop is made, the working thread is wound around the finger of the left hand. Depending on how long the loops are needed, one or more turns are made. The next step is to knit a regular single crochet. It is advisable to tighten the knitting so that all the loops are the same length. When the column is ready, the thread is lowered from the finger and the next columns begin to be made in a similar way. The purl row is knitted with single crochets or connecting stitches. The latter have a smaller height, which means the fringe will be thicker.
Before crocheting elongated loops, you must practice on a control sample. This is not a recommendation, but a rule. This way you can significantly optimize the process of knitting a product, avoiding unnecessary alterations and unraveling.
Curly hedgehog
As noted above, the “fur” technique is extremely popular among lovers of knitting toys. Below is a master class on how to create an adorable hedgehog with curly “needles” that will appeal not only to any child, but also to adults, reminiscent of childhood.
Related article: Types of DIY handicrafts: how to find yours in a large list
To knit such an animal, all you need is a small skein of wool yarn (the author uses Derevenka yarn) in warm natural shades.
When starting work, you must have:
- wool yarn in two shades of the same color (for example, natural gray and dark);
- just a little black for the nose;
- brown for knitting “needles”, the yarn number is similar to the main threads;
- hook No. 2;
- 2 plastic eyes for toys on the leg;
- needle and thread for sewing the product;
- scissors;
- padding material;
- threads for a scarf as desired (one, two or as many colors as you like).
Head
We start knitting with a black thread, that is, from the tip of the toy’s nose:
1st row: connect 6 single crochets (hereinafter Ϯ) into an amigurami ring (sliding ring); 2nd row: *1Ϯ, increase*, ** X 3 times (a total of 9 loops should be obtained).
Change the yarn to dark gray.
3rd row: 9Ϯ; 4th row: *2Ϯ, increase*, ** X 3 times (12 loops in total); 5 row: 12Ϯ; Row 6: *3Ϯ, increase*, ** X 3 times (15 loops in total); 7 row: 15Ϯ; 8th row: *4Ϯ, increase*, ** X 3 times (18 loops in total); Row 9: *2Ϯ, increase*, ** X 6 times (total 24 loops); 10 row: 24Ϯ; Row 11: *3Ϯ, increase*, ** X 6 times (30 loops in total).
We change the threads again: then we knit with natural gray.
12 row: 30Ϯ; Row 13: *4Ϯ, increase*, ** X 6 times (36 loops in total); Row 14: *5Ϯ, increase*, ** X 6 times (42 loops in total); Row 15: *6Ϯ, increase*, ** X 6 times (48 loops in total); Rows 16 and 17: 48Ϯ.
Row 18: *6Ϯ, decrease*, ** X 6 times (42 loops in total); Row 19: *5Ϯ, decrease*, ** X 6 times (36 loops in total); Row 20: *4Ϯ, decrease*, ** X 6 times (30 loops in total); 21 row: 30Ϯ; Row 22: *3Ϯ, decrease*, ** X 6 times (24 loops in total).
Related article: DIY fabric paintings on the wall: diagrams and master class with photos
Between rows 11 and 12 we fasten the eyes. We fill the head with filler.
23 row: *2Ϯ, decrease*, ** X 6 times (18 loops in total); Row 24: *1Ϯ, decrease*, ** X 6 times (12 loops in total).
Add stuffing material and, decreasing the loops, completely close the hole.
Torso
We will knit the body with dark gray yarn.
1st row: close 6 air loops into an amigurami ring; 2nd row: increase X 6 times (total 12 loops); 3rd row: *1Ϯ, increase*, ** X 6 times (18 loops in total); 4 row: *2Ϯ, increase*, ** X 6 times (total 24 loops); 5 row: *3Ϯ, increase*, ** X 6 times (30 loops in total); Row 6: *4Ϯ, increase*, ** X 6 times (36 loops in total); 7th row: *5Ϯ, increase*, ** X 6 times (42 loops in total); 8-13 rows – 42Ϯ; Row 14: *5Ϯ, decrease*, ** X 6 times (36 loops in total); 15th row: 36Ϯ; Row 16: *4Ϯ, decrease*, ** X 6 times (30 loops in total); 17th row: 30Ϯ; Row 18: *3Ϯ, decrease*, ** X 6 times (24 loops in total); 19 row: 24Ϯ; Row 20: *2Ϯ, decrease*, ** X 6 times (18 loops in total).
Next we knit 1Ϯ + 1 connecting stitch and finish knitting the part.
We stuff the torso.
Hands and feet
1st row: we connect 6 air loops into a ring, as in the previous descriptions; 2nd row: increase X 6 times (total 12 loops); 3rd row: *3Ϯ, increase*, ** X 3 times (total 15 loops); 4-5 rows: 15Ϯ; Row 6: *3Ϯ, decrease*, ** X 3 times (12 loops in total); 7-9 rows: 12Ϯ; Row 10: *2Ϯ, decrease*, ** X 3 times (9 loops in total); 11-12 row: 9Ϯ.
Reduce until the holes are completely closed. We knit the paws according to the same pattern. For the top ones, we knit all 12 rows, stuff and close the hole. For the bottom - 10 rows, sew up without stuffing, flatten with your fingers, and use a tie to form fingers.
Related article: Openwork crochet collar: patterns for a DIY product with video
Needles on the head (cap)
For the “hairstyle” of our toy, melange yarn is most suitable. It has volume and will look fluffier.
1st row: close 6 air loops into a sliding ring; 2nd row: we knit 2 long loops (hereinafter referred to as Ɣ) from each loop of the warp row (12 loops in total) in this way: insert the hook into the loop of the first row, wrap it behind the working thread on the right. We pull the thread that comes down from the finger through the loop of the row. Grab the working thread and pull it through both loops on the hook. Remove the resulting elongated loop from your finger.
3rd row: *1Ɣ, 2Ɣ (increase)*, ** X 6 (total 18 loops); 4th row: *2Ɣ, increase*, ** X 6 (total 24 loops); Row 5: *3Ɣ, increase*, ** X 6 (30 stitches in total).
Row 6: *4Ɣ, increase*, ** X 6 (total 36 loops); Row 7: *5Ɣ, increase*, ** X 6 (total 42 loops); 8-10 rows: 42Ɣ; Row 11: *5Ɣ, decrease*, ** X 6 (total 36 loops).
We received the finished hat. Depending on the thickness of the yarn and the density of the knitting, you may have to reduce or increase the number of rows. The hat should fit snugly to the toy's head.
Back
The knitting method is similar to a hat. We knit the initial 6 rows according to the pattern presented below, then we knit another 5-6 rows in the round without increments. In the last row you can make several decreases.
Product assembly
Sew a hat to your head. To the body - head. “Spikes” - towards the back. Paws - to the body.
The scarf can be knitted using stockinette stitch on knitting needles or using single crochet stitches, changing the colors of the thread.
The wonderful hedgehog is ready!
With a little practice, you can learn how to knit long loops quickly and evenly, and then, perhaps, you will be able to create with your own hands a real fluffy rug for the bathroom or jacket, which will always be warm and cozy.
Crocheted loops in the round
This method is used when the loops must be located very densely. With this knitting, elongated loops will be located in each row, since there are no return (purl) loops.
The specificity of circular fabric is that sometimes knitting occurs in a spiral, without lifting loops for each new row. In other cases, traditional row formation is performed, with lifting loops and connecting posts at the end.
The latter method is justified if you plan to change the color of the rows during the knitting process. Elongated loops, crocheted in a circle, are best suited for making the tops of knitted boots and the cuffs of jackets.
Multiple raises
If we need to add several loops at once on each side of the knitted fabric, we should knit additional air loops in these places.
We propose to figure it out together, focusing on this diagram:
Progress
So, we use a 17th century hook. p., then we stick the working tool into the 4th p. of the chain and knit 1 s each. s n. into each of the loops.
Now we knit the second row: we perform increments of 5 s. s n. at the very beginning and at the very end of the row, for this at the end of the previous one. R. we knit several air stitches. p. + air loops for lifting - in our case, this is 4 in. p. + 3 v. p.p. (we count lifting air loops as one double crochet).
Next, we need to turn the fabric and insert the hook into the 4th stitch from the edge. and knit with. s n.
And again, 1 s. s n. in the next 3 stitches.
and that's it, we just knitted an increase at the beginning of the row, consisting of 5 s. s n. After this we knit with. s n. until the end of the current row.
Next, according to the diagram, we need to perform an increase of 5 s. s n. at the end of the row. There are two ways to do this.
Method one
We perform the addition by knitting a chain from c. n. We fix it to the base of the outermost s. s n. new thread (leftover yarn will do just fine).
We knit a chain of 5 v. p. + 1 v. p.p., tighten the knot, we will hide the thread later.
We knit 5 s. s n. working thread.
Now you need to dial 3 v. p.p., let's start a new row.
Having turned the knitting, we knit the third row with. s n. no additions.
In the new row we again make increments of 5 s. s n. at the beginning and end of the row.
So, we knit 7 in. P.:
Next, insert the head of the hook into the 4th century. p. chain and knit further 4 s. s n.
This is the increase at the beginning of the row that is connected. Next we knit one s. s n. in each subsequent loop of the row.
Method two
We need to knit 1 s into the outer stitch of the row. with 2 n., like this:
Now we put the working thread on the hook like this:
We insert the working tool into the lower crossbar of the previous one. column.
Knit 1 s. from 2 n.
Next we knit another 4 s. from 2 n.
Important! When using this method, you must not forget that the outermost stitch should always be knitted one crochet higher. For example, if we knit fabric from s. from 2 n., last s. and we knit all subsequent increases with 3 stitches.
If everything is done correctly, we will get a sample like this:
Picked up elongated loops
The procedure for performing this technique is shown in the photographs below.
To form long loops you will need a template. This could be a ruler, a strip of cardboard, a thick knitting needle, or any other long object of appropriate size.
When knitting each row, the template should be applied to the fabric and the thread should be wound around it first, and then the loop for the single crochet should be pulled out. By the way, this method can be used instead of winding the thread around your finger, described in the previous paragraph. How to crochet elongated loops and the sequence of further actions can be clearly seen in the photo.
When a row with long loops is completed, you need to make as many lifting loops as necessary to move to the level of the new row. A pattern with elongated loops is formed when, when performing single crochets of the second row, the long loops of the first are picked up. You can immediately remove them from the template or do it gradually so as not to get confused.
The third and subsequent rows can repeat the first and second or form a completely different pattern. In any case, such a canvas looks very expressive and attractive.
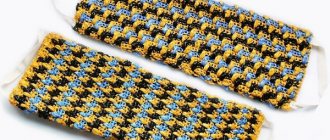
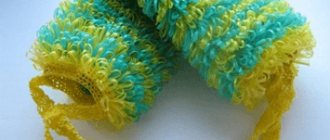
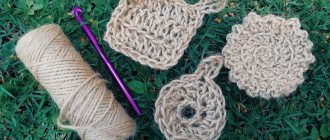
Crocheted washcloth with elongated loops, the work of our readers
Our master classes and video lessons will tell you how to crochet a washcloth.
Crocheting washcloths, master class!
The author of the description is Noskova Nadezhda. Nadezhda writes that knitting is her hobby! Today she will tell you how to crochet a washcloth.
Crochet washcloth, step by step description
First we knit 40-45 chain stitches and connect them into a circle.
We tie 5 rows with single crochets, then begin to pull out the loops (see photo).
3
After pulling, the loops must be secured with an air loop (see photo), otherwise they will crawl out to the wrong side and the washcloth will turn out flabby!!!
We knit the length of the washcloth individually (expecting that it will stretch during use). We finish by tying with single crochet chain loops and tying the handles. A skein of thread costs 25 rubles, enough for 2 washcloths. And cheap and beautiful!
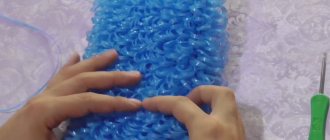
Crocheted washcloth with elongated loops. Oksana's work
You will need yarn for knitting washcloths and a size 4 hook.
A washcloth is a crocheted mug. Work Mys.Kat
To knit a washcloth you will need special polypropylene yarn in two colors and a hook. Description of the washcloth - circles Cast on 6 tbsp into the amigurumi ring, then knit in the round: 12 tbsp. b/n. 18th century b/n. 24 Art. b/n. 36
Read more…