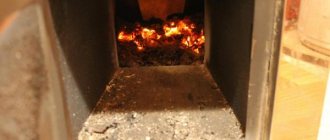
The effect of heater heating on the sauna room
Light-colored floor materials become contaminated with ash, stone and metal particles falling from the heater stove.
Use dark flooring materials and dark cement for joints. It is normal for wooden sauna surfaces to darken over time. Darkening may be accelerated
• sunlight
• heat of the heater stove
• protective agents on walls (have low thermal stability)
• small particles from the stones of the heater, lifted by the air flow
• smoke entering the sauna, for example, when adding firewood.
If you follow the manufacturer's installation recommendations, the heater (for example, the instructions for the Harvia stove ) will not heat flammable materials in the sauna room to a dangerous level.
Smart sauna Nevoton
Nevoton is a Russian developer of automated systems for home equipment, air conditioning, ventilation, security systems, heating systems, irrigation systems, heating baths, and other engineering systems. The company is located in St. Petersburg and offers customers a catalog of control panels for various tasks.
Equipment for smart sauna control
The Nevoton block is designed to work with electric saunas; it allows you to set program settings from a distance: in a smart home system, using an application on a smartphone or directly on a remote control.
The system can be connected to a single-phase or three-phase power supply network. The total power of the equipment connected to the unit should not exceed 25 kW. The unit is represented by a panel with touch buttons, which connects via Wi-Fi. You can control it from a desktop PC.
Features of the sauna control system from Nevoton:
- control and maintenance of the set temperature;
- fan control;
- adjusting the light;
- steam generator control;
- installation and control of humidity;
- delay heating of the bath;
- setting the operating time of the bath.
The Nevoton unit comes complete with a remote control, a power supply, humidity and temperature sensors, a silicone heat-resistant cable, a contactor for more powerful ovens, as well as a mobile application for iOS or Android. You can connect a steam generator, lighting fixtures, dimmable lighting, a fan and an electric heater to the remote control.
The remote control is compatible with stoves of any manufacturer, as well as with combined electric heaters.
Controlling the unit from a smartphone
The central element is the switching unit - the control panel, heating elements and other devices are connected to it. The front panel contains a display, digital display buttons and control buttons. The unit screen displays information about the current temperature, humidity, and current time. Next are 10 touch buttons responsible for different programs. On the side there are connection status buttons, as well as a reset button.
Ventilation of the sauna room Natural ventilation (Fig. 5)
A. The inlet for fresh air should be located close to the floor near the heater stove ( Harvia stove ), and
B. The exhaust vent should be located as far as possible from the heater stove under the ceiling. Since the heater itself ensures efficient air circulation, the exhaust vent is primarily intended to remove moisture from the sauna after steaming.
Mechanical exhaust ventilation (Fig. 6)
A. The fresh air inlet should be located at a height of approx. 500 mm above the heater, and
B. The exhaust vent should be as close to the floor as possible, such as under a shelf.
3.3. Sauna hygiene
To prevent sweat from getting on the shelves, use special towels.
The shelves, walls and floor of the sauna should be thoroughly washed at least once every six months. Use a stiff brush and sauna cleaner.
Sauna control panel TyloCC 300
Push-button remote control equipped with a display. Suitable for use with steam generators and electric stone furnaces. This unit is compatible with the climate control system in the sauna. The main tasks include:
- the ability to set separate modes for each specific day: for example, on Monday the bathhouse will warm up to 50 degrees, and on Wednesday the humidity will be 80%;
- memory for previously created operating modes;
- setting a password;
- using a sauna disinfection system.
The remote control allows you to delay the start from 1 to 24 hours. The display shows information on the current temperature, date, and remaining operating time. The design has the ability to control lighting and ventilation. There is an energy-saving stand-by function.
Monitoring and setting indicators is easy - there are only 3 mechanical buttons on the panel. One of them decreases the parameters, the other increases. The center key allows you to confirm the program selection.
The block is installed exclusively outside the steam room
The system is equipped with the ability to control from external devices: the remote control can be controlled from a smartphone or computer. This switching unit is highly compatible with the steam generator of the Tylarium system. The unit can turn the lights on and off in the steam room, as well as program settings for a week in advance - this is convenient for public and commercial establishments.
Before installation
A.Before installing the Harvia heater, make sure that all safety distances are observed. There should be no electrical appliances, wires or flammable materials within the established safe distances around the heater. When installing the Harvia stove, it is necessary to take into account the safe distances of the chimney!
• If the safety distance requirements are not met, additional protective equipment should be installed (M.1.3., 4.1.4.).
• Additional information regarding fire safety requirements can be obtained from your local fire department.
Floor protection
See Figure 7.
A. Concrete floor without tiles. A heater stove (for example, we consider Harvia stoves) can be installed on a concrete floor without any special precautions, if the concrete thickness is at least 60 mm. Make sure there are no electrical wires or water pipes in the concrete under the heater.
B. Floor made of flammable materials. Protect the floor with a concrete slab at least 60mm thick. The stove should protrude 300 mm behind and on the sides of the heater (if the heater is not installed flush against the wall), and no less than 400 mm in front of it. The slab should be supported a short distance above the floor surface to ensure that the floor material is dry.
C. Tiled floor. Floor adhesives and plaster and waterproofing materials laid under tiles are unstable
to the heat emitted by the heater. To protect the floor, you can use the protective base WL100 (I.1.4.) or other similar protection against thermal radiation.
Features of sauna control
Arranging a sauna in a private home is no longer a novelty: during construction, a separate room for a bath is often allocated. A stove is installed here; if it is equipped with an electronic heating element, then the unit can be controlled remotely. For example, a universal digital control panel for saunas is suitable for electric stone stoves. It is equipped with all the necessary functionality:
- digital panel;
- shutdown timer;
- heating switch-on delay;
- remote temperature change sensor.
An example of a unit from Harvia
All smart sauna control panels operate on the same principle. Before entering the steam room, the user can set the settings on the switching unit and subsequently receive all the required parameters. You can set humidity, temperature, and delay the start of work.
The main convenience is the ability to control from a phone or PC. Smart saunas allow you to save time on preparing a steam room.
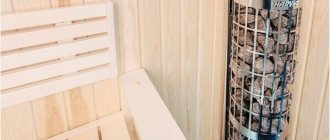
Smart baths work with special control units - they can be built-in or wall-mounted. They are installed outside the steam room, in a dry place. Setting the indicators in advance will save time and prepare the steam room for work at the appointed hour. It is better to select a remote control manufactured by the company that manufactured the oven and steam generator.
Safe distances
A. Improper placement of stones can cause surrounding objects to reach dangerous temperatures, even if they are at a safe distance. The specified safety distances only apply if the stones have been laid in the manner described in section 2.4.
See Figure 8.
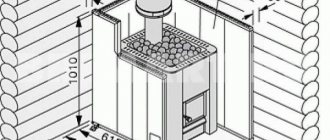
A. Ceiling. The minimum distance from the top of the heater to the ceiling is 1000 mm.
B. Brick walls. Leave 50mm between the walls and the heater so that air can circulate behind the heater and to the sides. If the heater is installed in a wall niche, leave a distance of 210 mm between it and the side walls and 250 mm behind it.
C. Walls and shelves are made of flammable materials. Minimum safe distance to flammable materials: 210 mm on both sides of the Harvia heater stove,
250 mm behind and 500 mm in front of it. For heat entering through the door, the safety distance is 400 mm, calculated at an angle of 45°. Space required for use and maintenance. At least one square meter of space in front of the heater is required for its use and maintenance.
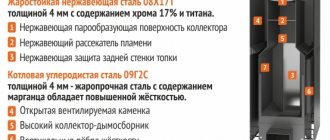
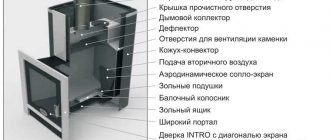
Electric heaters Harvia
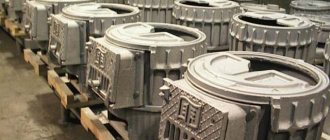
Sauna equipment produced by the Finnish company Harvia is famous for its high quality and functionality. Harvia electric sauna stoves are in greatest demand among consumers . Their design includes:
- frame;
- electric heater (heating elements);
- masonry;
- layer of thermal insulation.
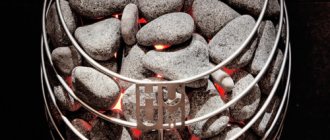
The outer casing is made of stainless steel plates. There are special channels for air circulation in the housing. A separate compartment is provided for laying stones on the heating elements. The efficiency and degree of heating of the furnace directly depends on the mass of laid stones. Steam is generated by sprinkling water on the masonry.
Steel screens are used as a heat-insulating layer, installed one after the other.
The electric heater requires a standard power supply to operate.
Protective coatings
Figure 9. The specified safety distances to combustible materials can be reduced by half using a single protective cover and four times using a double protective cover.
Single protective coating may be made from non-combustible slabs of
fiber cement (mineral board) with a minimum thickness of 7 mm or sheet metal with a thickness of at least 1 mm.
A double protective coating (2x) can be made from the two slabs indicated above. The fastening points must be located close enough to each other to ensure the reliability of the structure.
Leave a gap of at least 30 mm between the surface to be protected and the slab(s). The protective covering must protrude at least 600 mm above the top surface of the heater. The equivalent of a single protective coating is a stone wall with a thickness of at least 55 mm. The equivalent of a double protective coating is a stone wall with a thickness of at least 110 mm. The stone wall must be open on the sides and located at a distance of at least 30 mm from the protected surface.
Harvia Legend heater protection elements Protective base WL100. Safety guard for heater WL200
A protective fence must be installed on the heater. Equivalent to a separate protective cover. Rice. 9.
Chimney guard WL300. for the Harvia Legend stove. Installed around the chimney and filled with stones. Suitable for both straight and inclined chimneys. Rice. 9.
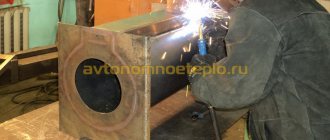
Attaching a heater to a stone chimney
Make a hole in the fireproof wall to connect to the chimney. The diameter of the hole should be slightly larger than the diameter of the connecting chimney. A suitable gap around the pipe is approximately 10mm. Please note that the hole must be at the appropriate height if you intend to use a protective base, for example. It is recommended to round the inner edges of the chimney opening to ensure unobstructed passage of stove gases into the chimney. To facilitate the installation of the heater, additional accessories are provided (>4.3.).
Connecting the heater to the stone chimney through the rear connection hole (Fig. 10)
1. Disconnect the removable frame bars (for Harvia Legend 150 oven: 3 pcs., for Legend 240/300: 2 pcs.)
2. Attach the connecting chimney pipe (included with the Harvia stove) to the rear connecting hole so that the side with the recess is facing up. Make sure the connecting pipe is securely in place. If necessary, carefully hammer it in with a hammer.
3. If the pipe does not connect tightly, bend the holder using a screwdriver.
4. Place the heater in place. Do not block the chimney by pushing the connecting chimney pipe too far. If necessary, shorten
pipe.
5. Seal the entry point of the connecting pipe into the wall, for example with fire-resistant mineral wool. Check the quality of the chimney seal. Add mineral wool if necessary.
Connecting the heater to the stone chimney through the upper connection hole (Fig. 11)
For the top connection (>4.3.) you will need an angled chimney pipe (45° or 90°).
1. Move the plug from the top connection hole to the rear.
2. Bend the plug retaining springs outward through the top connection hole until the plug is firmly seated in the hole.
3. Attach the smoke pipe to the upper connection hole. Make sure the connecting pipe is securely in place.
4. Push the heater into place. Do not block the chimney by pushing the connecting chimney pipe too far. If necessary, shorten
pipe.
5. Seal the entry point of the connecting pipe into the wall, for example with fire-resistant mineral wool. Check the quality of the chimney seal. Add mineral wool if necessary.
Smart sauna from Helo
The smart sauna from the Finnish company Helo is an example of quality and clear controls. These are economical, compact in size, highly reliable ovens, equipped with modern remote controls. Using the device, it is easy to prepare the sauna for use, even several hours before it starts working.
The remote control is placed inside or outside the steam room - this parameter is determined by the instructions. All devices have a stylish and bright design, a convenient digital display and the ability to select a language. Each model allows you to control humidity, temperature, lighting, and ventilation.
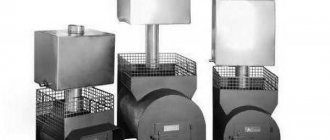
Helo electric furnace
The most popular options for smart bath control systems from Helo:
- EC50 HELO – suitable for ovens with a DET block, and is also a control panel for the HNS-T1 steam generator. The device allows you to change temperature indicators, steam generator modes, operating modes of lighting devices in the steam room. You can set parameters with a delay of 24 hours. To protect the system from unauthorized persons or children, you can set a password here.
- Digi II HELO is a panel with mechanical buttons. Works in 5 languages, the remote model is convenient for commercial saunas, as well as for private baths. The device is equipped with a miniature LCD screen, which displays all the specified parameters. The monitor is backlit and shows the current time and bath heating parameters: temperature and humidity. 4 buttons allow you to program the device according to individual settings. Temperature is displayed in both Celsius and Fahrenheit.
- T1 HELO – touch sauna control unit. Suitable for HNS T1 steam generators. You can monitor the temperature and operating time of the equipment, and adjust the lighting system. Delaying the start of heating for 12 or 24 hours - you can prepare the bathhouse for your return home.
Mechanical remote control Helo
A smart bath from the Helo company can be automatically turned on and off according to specified parameters. Using the remote control, you can set the operating time of the electric stone stove, and also adjust the humidity level. The connection cable is included with the steam generator. If desired, you can change the brightness of the lighting, as well as the intensity of the ventilation system.
Connecting a heater stove to a Harvia steel chimney
The CE marked Harvia steel chimney can be used for the removal of combustion gases. The chimney flue pipes are made of stainless steel; the chimney has fireproof insulation. The chimney has a round cross section. The diameter of the chimney is 115 mm, and the diameter of the outer casing is 220 mm.
1. Move the plug from the top connection hole to the rear.
2. Bend the plug retaining springs outward through the top connection hole until the plug is firmly seated in the hole.
3. Attaching the steel chimney pipe to the upper connection hole in the heater. Make sure the chimney is securely in place. Check out the detailed instructions for installing a steel chimney!
If protective flashing is used around the heater, the chimney insulation should begin at or below the top edge of the flashing.
SL/Duo: The fireproof wall in which the heater is installed must be raised to the ceiling. The safe distance between flammable structures and the outer steel jacket of the chimney must be at least 100 mm.
Harvia Legend 240 Duo, 300 Duo
The heater is installed in the opening of a concrete or brick wall. The minimum opening width should be 405 mm, and the minimum height from the floor should be 485 mm. The maximum wall thickness should be 120 mm. Figure 13.
• Remove the decorative panel.
• Push the furnace tunnel through the opening far enough to allow the trim panel to be reinstalled.
• Push the heater back so that the decorative panel on the door side is pressed against the wall and door.