Ceramic tiles are not as durable and reliable as natural stone. Stone finishing in a steam room does not crack or fade; the stone can withstand many heating and cooling cycles and accumulates heat well.
A stone-lined wall behind the stove will reduce the heating time of the stove and make it possible to obtain uniform heat. Stone is beautiful and aesthetically pleasing; it goes well with wood and Himalayan salt. Natural stone with a relief surface is suitable for finishing Russian steam rooms and saunas; for hammams it is better to choose products with a smooth surface, which is more consistent with the concept of a Turkish bath.
The principle of wall cladding
Before you start facing the walls with stone, you need to create a small plan that will include:
Plan for laying stone
The surface that will “hold” the stone must be carefully prepared. When using natural stone, you should always remember that the rougher and rougher side of the stone will adhere better to the wall. The surface of the wall should have a relatively flat appearance, this will significantly save the cost of the masonry mixture. If there are serious depressions on the wall, they should be plastered in advance.
Once the surface preparation is completed, you can begin covering the wall with reinforced mesh. The size of the mesh cells depends on the size of the stones; the average size for a stone 150*100 is 1 - 2 cm. This mesh can be purchased at all hardware stores. This mesh can be secured to the wall either with a dowel or concrete screws with a countersunk head. If the wall has a softer material than concrete, then the mesh can be nailed with staples from the battle staples.
After distributing the connecting mesh, you can dilute the adhesive mixture. Instructions for diluting such mixtures can be read on their packaging. If confidence in the mixture is weak, then you can add 30 - 50 grams of PVA glue to the finished solution. It will significantly increase the adhesion of the mixture.
If stones of different sizes are used for cladding a wall, then the sequence of its laying should go from larger stone to smaller stone up the wall. This will prevent the stone from falling off the wall during the laying process. The principle of masonry is to lightly tap the stone against the surface of the wall, thereby creating the strongest adhesion of the stone to the wall, and removing air from the masonry area.
Do not forget that during the process of laying stone, the mixture will go beyond the stone, thereby clogging the appearance of the wall. These stains should be cleaned immediately during the laying process. These brands of mixtures are very difficult to remove after complete drying. To more effectively clean the wall from glue, the finished area should be washed with running water and detergent.
When everything is done correctly, the wall will be a new addition to the interior of the bathhouse.
Where else do you think natural stone can be used?
If you found this article useful, please like and subscribe to our channel. Don't forget to share information with your friends on social networks.
Source
Rating
Don’t be shy, vote, your opinion will add objectivity to such an important issue for every vaper.
If you want to find out who is currently claiming the title of “the best stone for a bath,” select your option - the results will then open automatically.
*** We wish you to find the most useful stone or mix that gives the perfect steam for you and your guests. For more materials on stones, see the section page.
And when the best breed or mixture has been chosen, it’s time to read about placing it in a stove or electric heater.
Finishing the steam room: choosing wood and stone. Part 2. Stones in sauna decoration
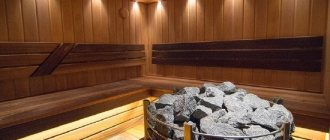
The stone perfectly accumulates and releases the resulting heat. Therefore, in the bathhouse, stones are used for lining the walls around the stove, for directly lining the stove itself in the sauna (steam room), and also as decorative finishing materials.
To decorate a sauna with stone, it is better to use natural minerals such as jadeite, serpentinite, soapstone. The same materials can be used to finish a sauna stove.
To decorate the walls of the bathhouse, you can use stones of different sizes. As well as specially processed stone in the form of tiles, corners and other finishing elements.
Tiles
A stove with tiles is a rather labor-intensive process. Technology has simplified things a bit. But until now, the construction of such a furnace takes 4-5 months, if you use the classic version. The laying and lining of the furnace occurs simultaneously. Although, in a simplified version, you can line a finished stove.
Expert opinion
Nikolay Davydov
Stove maker with 15 years of experience
The drawing can be anything. Usually Russian folk motifs are used. The sizes of tiles are regulated by GOST 3742-47. Permissible deviations should not exceed 1 mm in all directions. Thanks to standardization, the cladding process has been significantly simplified. The most important thing is to choose the right material.
Instructions
You should be guided by the following rules:
- Material of manufacture. Impurities in colored clay will not allow the production of high-quality tiles, so it is not used. In contrast, white clay is an ideal raw material.
- The quality of a product is determined by its ability to absorb water. The more pores in a tile and the larger they are, the less quality the product will be.
- Choose tiles made by pressing.
- The surface of the product should not have a dull appearance and there should be no cracks on it. This happens when a product undergoes only one firing.
For cladding, tiles must be sorted by shade. They will need to be laid in such a way that the transition is not noticeable. The size is adjusted using a rasp and an angle grinder on all sides. Defective tiles should not be thrown away immediately. They can be used later.
The next step is to mark. The thickness of the horizontal seam should not exceed 3 mm, vertical - 1 mm. Now let's move on to installation.
Lay out the first row.
The process is very labor-intensive, but the result is worth it. The first thing to do is to properly prepare the tiles for installation. This will ensure the best result.
The installation order is as follows:
- immerse the tiles in water, waiting until the clay absorbs water;
- the clay in the tiller will increase the heat capacity, so you need to fill it halfway;
- steel brackets allow you to correctly connect the tiles to each other;
- We connect a row of tiles to a row of the stove using wire.
Scheme for fastening the tiles: 1 – lump, 2 – pin, 3 – wire, 4 – staples.
Subsequent rows.
- drill holes in the masonry;
- We use screws and wire as a connecting element;
- We fasten the steel pins using wire;
- we place the tile on the pin and bend the last one;
- the dry solution will fill all the voids between the tiles.
Sauna stove in tiles
Stones in sauna decoration
Serpentinite or serpentine
This is an inexpensive natural mineral, good thermal protection and a wonderful decoration for your steam room. Serpentinite is most often used for cladding walls in the sauna (especially behind the stove) and the stoves themselves, finishing the floor and ceiling. The coil is available in the form of tiles for baths and corners. It is very strong, durable and safe.
The serpentinite bath stone (coil) has various shades of green interspersed with marble highlights - decorating the steam room with this stone in your sauna will look very beautiful.
In addition, the composition of serpentinite is rich in various microelements and has useful healing properties. A sauna with a coil coating (walls, stove) is indicated for frequent headaches and diseases of the upper respiratory tract, helps get rid of colds and digestive diseases. Serpentinite stabilizes blood pressure, relieves nervous tension, and eliminates inflammation in the kidneys.
Soapstone chlorite
Bath stone or soap stone (other names for soapstone) perfectly accumulate heat and release it for a long time and evenly. Allows significant savings on electricity and fuel consumption.
Finishing a bathhouse with tellchlorite stone involves lining the bathhouse stove (facade) with decorative stone, as well as finishing the walls in the bathhouse around the stove and the floor in the steam room. Soapstone tiles look attractive, have a rich texture, and do not slip. It is pleasant to walk barefoot on the soapstone tiles in the bathhouse.
Soapstone for saunas combines perfectly with wood and increases sound insulation. The soft thermal radiation of soapstone coincides with the thermal radiation of a person (8-9 microns), and therefore has a particularly relaxing effect.
The properties of soapstone are very beneficial for health. When heated, it activates the production of vitamin D in the human body, helps increase immunity, improve memory and mood, and activates thinking. Helps in treating colds and lowering blood pressure.
Soapstone is reliable and durable: it does not melt or fade, and does not produce microcracks.
"ComfortStroy"
We will select stones for finishing and equipment of the sauna. We will finish and decorate your sauna on a turnkey basis. We will help you with the project and realize any of your wishes.
Find out how much YOUR SAUNA costs!
Use our unique calculator. Get an estimate in just 5 minutes.
Jade
This emerald semi-precious stone is used in elite design and decoration of baths (steam rooms), and lining of stoves with stone. In saunas, jadeite is usually represented by a panel behind the stove and an original panel on the wall.
The use of jadeite as a material for finishing a bath is due to several of its main properties: jadeite retains heat for a long time (20 times longer than ordinary stones!), is durable and has many healing properties. Therefore, finishing a steam room in a bathhouse (and other rooms) with jadeite is not only very beautiful, expensive and prestigious. It is also very good for your health.
Jadeite absorbs harmful substances, including radionuclides. Clears the surrounding space of radiation, saturates the air with rare metasilicon acid, preventing the occurrence of varicose veins and the development of cellulite. Kills microbes contained in water. It is a source of soft infrared radiation, helps in the treatment of rheumatism and osteochondrosis. A steam room with jadeite is easier to tolerate.
Himalayan salt
Pink, red and black Himalayan salt is used in the sauna and Russian bath. The finishing of the bathhouse is carried out with building blocks (bricks) and tiles made of Himalayan salt. Not only the walls, but also the ceiling in the bathhouse can be lined with panels made of Himalayan salt.
Beautiful panels made of Himalayan salt with LED lighting and lamps are also very popular. Himalayan salt in the bath can also be found in the form of pebbles and crumbs used in the design of a sauna (steam room).
In conditions of high humidity and high temperature, Himalayan salt saturates the air with microelements that are beneficial for people. Helps improve blood circulation and metabolism, calms the nervous system, destroys salt deposits, removes toxins and heavy metals from the body. Improves the performance of the entire body.
Himalayan salt is a unique mineral
It has the same set and the same amount of mineral elements as in the human body. And when heated, it releases negatively charged ions into the air, creating a unique microclimate in the room, close to the sea.
Laying features
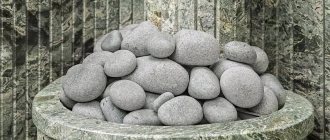
The stones are selected in size depending on the type of stove:
- For open-fire wood stoves and Finnish saunas, stones from 8 to 18 cm are used. The larger the size of the mineral, the longer it retains heat.
- In closed heaters, the main requirement is a size of up to 23 cm.
- To fire electric furnaces, you need to take minerals measuring 4–7 cm. The recommended diameter of cast iron balls is 80 mm.
- To properly fill a cast iron pot, it is important to select a filler that is smaller in size than the door.
To ensure good, thick steam in the bathhouse, stones are selected and placed as follows:
- Inspect each element for cracks, sharp corners or chips.
- Suitable stones are washed with water and dried. This is an important point, otherwise, instead of clean steam, the owners will receive steam with dust impurities.
- The bottom is laid out with large cobblestones, which heat up quickly and retain heat for a long time. Soapstone, basalt, cast iron balls, gabbro-diabase are suitable. A budget option is river pebbles.
- Next come medium and small valuable species with medicinal properties. Often they combine crimson with white quartzite and jadeite.
- Oblong specimens should be placed vertically so that they heat up faster.
- All elements are placed tightly to each other, but the gaps for air circulation should remain less than 15% of the volume of the stones.
- When placing filler in an electric heater, you do not need to place the stones close to the pipes or other parts, but always 5–8 cm above the heating elements. Otherwise, the heated minerals will begin to expand and may cause the breakdown of one of the elements.
- 1-2 times a year it is recommended to inspect the filling, remove damaged, broken minerals, fill the oven with new ones, wash and dry the stones.
- Some rocks emit a characteristic cracking sound when first heated. If after several heatings the sound does not disappear, then you should get rid of such cobblestones, since there is a high probability of harmful impurities in the composition.
Only hot water can be poured onto hot stones in small portions. Do not pour oils, honey or other solutions to improve the aroma. The flame will increase, and the stones will begin to smoke and create unpleasant smoke.
It is much safer to dissolve essential oils in water and place the container over the stove.
Order the construction and finishing of turnkey saunas from ComfortStroy. And be healthy!
"ComfortStroy"
We will select stones for finishing and equipment of the sauna. We will finish and decorate your sauna on a turnkey basis. We will help you with the project and realize any of your wishes.
Find out how much YOUR SAUNA costs!
Use our unique calculator. Get an estimate in just 5 minutes.
Thank you, your application has been accepted!
Our specialist will contact you within 10 minutes.
You specified the wrong phone number. Please check.
Source
Room interior
There is no more suitable place where you can simultaneously relax after a busy work week, imbue yourself with harmony, and cleanse your body than a sauna or bathhouse, which is closer in spirit to the Russian spirit.
For many, visiting it is a tradition that is supported by every generation, and is often instilled in families from early childhood, so it is not surprising that our compatriots want to have their own bathhouse in the backyard.
Great place to relax
The environment inside should give harmony and tranquility. This atmosphere is achieved by the combination of all parts of the interior. You should not think that the type of Russian baths is a standard steam room with a stove and the same type of shelves. A designer interior is always distinguished by original details and decor; only by implementing an individual project can you get a stylish room for couples and relaxation.
Stylish room in oriental style with your own hands
Quality, thoughtful finishing and accompanying accessories are three pillars of internal content that will never cause you any inconvenience. For information on how to equip the interior, I will tell you today. These ideas can be used both at home, for your own needs, and for business.
Thoughtful finishing is the key to success
How to protect the walls of a bathhouse from the heat of a stove - technologies and materials
When planning the construction of a bathhouse, it is important to remember to create safety indoors. First of all, this concerns fire safety. By melting the bathhouse, the stove can be heated to 300-400°C, which significantly exceeds the combustion temperature of the wood from which the bathhouse is most often built.
All the heat from the stove is released into the room, but the main heat is absorbed by nearby walls, which leads to their charring and fire. It is extremely important to avoid such consequences, so in this article we will tell you in detail how to insulate a stove in a bathhouse from the wall.
Russian style
A mandatory rule of any harmonious structure is that outside and inside it is necessary to adhere to a single style. Baths in the Russian style are mainly built from wooden logs, and therefore even a modern building looks the same in appearance as our great-grandfathers - a structure made of untreated wood, measuring 4x6 meters, with a height of approximately 3.5 meters .
We maintain a single style
To be considered an original Russian style, pay attention to elements such as:
- multi-tiered shelves;
- a large wooden table with benches around;
- working fireplace;
- a huge tub of water, wooden ladles and buckets;
- red brick stove-heater;
- wooden floor boards, brooms from different types of wood, towels and sheets.
Spirit of Russian style
There may be many such small and not so small details, but they have one common feature - all the design elements of a Russian bathhouse are of natural origin, consisting of natural materials.
Do you need protection in your bathhouse?
Protecting the walls of the bathhouse from the heat of the stove is not always required. For example, you can provide a distance between the wall and the stove, which will allow you to achieve fire safety without additional protection. The fact is that at some distance the IR rays emitted by the furnace begin to dissipate, which significantly reduces their impact on nearby surfaces.
The distance from the stove to the wall in the bathhouse varies depending on the type of stove:
At first glance, it seems that creating such a distance is much easier than installing additional protection, but this is fundamentally wrong. Maintaining a safe distance is only advisable in large steam rooms, but in small private baths, the stove, including the indentations, will occupy most of the room, so it will be much easier to use insulation.
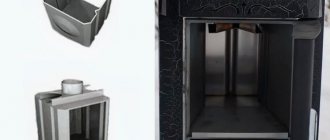
Metal protective screens
On the construction market, the most common metal protective screens are made of steel or cast iron. Many manufacturers of iron furnaces provide thermal insulation for their products, providing them with special casings.
Choosing protective screens is quite simple, because depending on the side of the furnace to be insulated, you can purchase a front or side panel. Installing such screens will also not cause difficulties, because the manufacturer provides special legs that can be easily attached to the floor.
Next we should talk about the installation rules. The panels themselves are installed at a distance of 1-5 cm from the stove, but a distance to the adjacent wall is also required. Protective screens reduce the radiated temperature to 80-100°C, which allows them to be installed 50 cm from a parallel wall.
Shower room
The shower room is an innovation inherent in the modern bathhouse; it demonstrates how you can isolate yourself from prying eyes. It is preferable to tile a room, adding colorful elements to the design, such as mosaics and stained glass. There is a special requirement for the floor covering; it must have a rough texture. The range of equipment for washing is quite large. Installation of a shower, jacuzzi, swimming pool is allowed.
Installation of a shower stall
If you build according to the model of your ancestors, then huge tubs filled with water installed on top will look more harmonious. Naturally, the height of such a homegrown soul should exceed the height of an adult. To get a “shower”, you need to pull the string, after which you are guaranteed an invigorating waterfall.
Huge tubs filled with water
It’s good if the shower room is equipped with shelves and cabinets for storing clean towels, felt hats, sheets, brooms and other paraphernalia, without which a steam room is not a steam room.
The walls inside the shower can be painted or made of wood, but in this case the tile will be functional. Ceramics on the wall will prevent the appearance of fungus and mold, and in addition, it is easy to keep clean and disinfect.
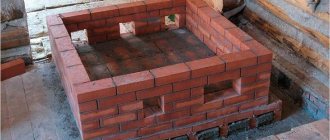
Brick screens
The furnace fence in the steam room can also be made of brick. A brick screen can be installed on all sides of a metal furnace, forming a protective lining. Also, such a screen can only be installed between the flammable surface and the stove, representing a protective wall.
Having decided to lay such protection, use solid fireclay bricks, for the binding of which you can use clay or cement mortar. Typically, half-brick masonry (120 mm) is used, but due to lack of material, quarter-brick masonry (60 mm) is suitable. When using the latter installation method, remember that the thermal insulation properties of such a screen are reduced, so the distance to the wall should be increased.
This finishing of an iron stove in a bathhouse is also carried out in compliance with certain rules:
Benefits of brick
Traditionally, the stove lining is made with brick. This material is also suitable for wooden walls near the stove. It is an additional heat accumulator.
The following types of bricks are used for cladding the stove:
- ordinary ceramic brick (solid);
- refractory fireclay brick.
It is not recommended to use silicate and hollow bricks. It will not hold heat well and will collapse. Fireclay brick is preferable to use, but it is more expensive.
Non-combustible wall coverings
The second option for protecting walls from fire is special sheathing, which is made from non-combustible materials. The working element of this protection, which reflects IR rays that are dangerous for flammable surfaces, is a reflective material, for example, stainless steel.
There are also decorative finishing options that preserve the aesthetic purity of your bath. One of the advantages of this method is that protecting the walls in the bathhouse from the stove will not only prevent fire, but also retain heat inside the room.
Content
The interior, made in the Russian style, is a classic.
Beautiful interior inside the bathhouse
In fact, everyone is provided with such familiar attributes as brooms, hats, buckets, gangs. Only by adhering to the integrity of the overall style and competently choosing the necessary accessories can you make your sauna unique and its interior special.
Design depends on the choice of material
Reflective wall cladding
You can assemble this version of protective casing yourself. To do this, you will need a non-flammable thermal insulation material, which will be discussed in more detail below, as well as a sheet of stainless steel.
Stainless steel can be replaced with a cheaper option - galvanization, however, when heated, it can release harmful substances, so we strongly do not recommend using it. When starting work, secure the insulation to the wall, and then cover it with a metal sheet.
To ensure that such thermal insulation for a sauna stove is as productive as possible, polish the metal surface. This will allow IR rays to be better reflected back into the steam room, and the reflected rays will be better perceived by humans.
You can use the following materials as thermal insulation:
Before covering the wall near the stove in the bathhouse, familiarize yourself with the correct technology for its construction. The most important thing is the installation order and compliance with the gaps.
The ideal design has the following structure:
Remember that the total distance from the wall to the stove must be more than 38 cm. For fastening, use ceramic bushings that will help form ventilation gaps. If the distance between the wall and the stove is minimal, then it is necessary to use two layers of mineralite slabs, between which a gap must also be left.
Steel case
Steel is also a fire-resistant material. It cannot be left untreated, as it will instantly rust in a bathhouse. When finishing the space around the stove with steel, you need to keep in mind that unlike brick, tiles and stone, steel does not insulate heat at all.
A protective portal around the stove made only of steel will be completely pointless, since it will not be able to fulfill its main task - to protect wooden walls from overheating. In order for this function to be fulfilled, it is necessary to provide a good heat-insulating layer of another material, and then cover it with a facing steel sheet.
This heat-insulating separation layer is created from mineralite. Other fire retardant insulation materials can also be used. Simple mineral wool is not suitable, since after getting wet once it shrinks in volume, and this defect cannot be corrected by anything.
The insulation near the stove should not get wet. You need to take care of its waterproofing. Moreover, this waterproofing should only be on the side of the cold wall, but not on the side of the stove.
Steel has a metallic luster. This effect can be used to greatly increase the efficiency of the portal.
If made from uncoated polished stainless steel, it will act as an infrared reflector.
A similar element can very often be seen in electric fireplaces, heating stoves and any other heating devices.
The main difficulty of this solution is the need to use only stainless steel. Compared to ordinary steel, it costs 10 times more, but the total thickness of the sheets for the reflective screen can be small.
Stainless steel perfectly withstands any humidity. It can even be placed in rooms such as a steam room in a bathhouse; the decoration around the stove will be compact and with a modern design. In a steam room, all interior elements are usually made only from wood. Stainless steel would be appropriate next to a metal stove-stove.
Cladding with cladding
This option is practically no different from the previous one, however, if you don’t know how to decorate the wall behind the stove in the steam room in such a way as to preserve the beauty of the room while creating safe conditions, then this option is undoubtedly for you. Protect the walls using heat-resistant decorative materials laid on thermal insulation.
The finishing around the stove in the bathhouse can be done with the following materials:
The tile will not dissipate heat, protecting the walls from fire, so it cannot be mounted directly on the wall. We recommend using the following design:
Such a “pie” will create reliable protection for walls from heat, preserving the beauty of the room.
One of the following options can be used as a fireproof material:
This option will perfectly protect your bathhouse from the possibility of fire, and will also insulate the room, preserving its aesthetic component.
Leave feedback:
Using plaster
Plastering is the most budget-friendly option for finishing a stove yourself. The product takes on a finished look and looks good in the interior. After plastering, you can whitewash it with a special heat-resistant compound.
This type of finishing is quite often used for brick ovens. The technology is as follows:
- It is necessary to properly prepare the surface. All traces of old finishing, incl. plaster and tiles must be removed. Each seam should be selected at 10-15 mm.
- We dilute the deep penetration primer according to the instructions. Carefully prime the surface. Do not forget that the primer must dry (at least 24 hours).
- We stretch and fix the metal mesh using dowels. Such reinforcement will significantly increase the strength of the tile fastening.
- Apply plaster to the stove. We recommend using a ready-made mixture specifically for ovens. The plaster must be allowed to dry for 48 hours.
- Now the stove needs to be whitewashed.
How to insulate the wall from the stove in a bathhouse? DIY protective screen
Protective screens for sauna stoves are made from various non-combustible materials in compliance with certain air gaps. Also often, in order to create an effective thermal barrier, a reflective sheet of polished stainless steel is placed between the wall and the metal stove at a certain distance from the protected surface and the heated body of the stove. Another common option for thermal protection is to install a brick wall between the stove and the flammable exterior wall finish, but this solution is quite labor-intensive and requires certain skills.
Distance from stove to wall
The most durable and reliable barrier that prevents excessive heating of the wall surface from the heat of the stove is the air space between them. If all distances established by standard regulatory documents are observed, you can be 100% sure that there is no reason to fear the walls heating up from the stove body.
According to standards taken from SNiP 2.04.05-91, the distance from the stove to an unprotected wall with a fire resistance limit of REI 60 must be at least 500 mm (in diagram A
), that is, half a meter.
If you install a dense sheet of non-combustible material (minerite or glass-magnesite) on the wall and additionally attach a reflective layer of stainless steel to it, then this standard distance is reduced to 380 mm (in diagram B
).
The dimensions of the parts of the protective screen structure that protrude beyond the dimensions of the furnace are also regulated (in diagram C
).
This distance should be taken into account when calculating the material to a value of at least 150 mm. As for the distance from the firebox door to the wall opposite it, it cannot be less than 1250 mm (in diagram F
).
However, as practice shows, in order to comply with all these standards you need to have a fairly spacious steam room. And usually this room has very limited space and most of it is planned for shelves, which you want to make as spacious and comfortable as possible. Therefore, it is difficult to imagine a stove located with indentations of half a meter from the walls on each side.
Of course, this is not an excuse for violating fire safety standards established by special responsible authorities based on experimental scientific research. At the same time, manufacturers of Finnish stoves indicate other numbers in the technological documents for their products for the safe placement of their metal stoves in the walls of the steam room. For example, when installing a protective screen, the permissible distance to the wall is only 250 mm.
Style and design
The design and choice of finishing materials depends on the overall design of the sauna. Small steam rooms should be styled in one key. Today, a dry steam room is becoming a necessity in the intense rhythm of city life. Modern technologies make it possible to install a sauna in a city apartment. It becomes part of a small space with the help of glass partitions and elements of the overall design of the living room in a minimalist style.
Miniature sauna cabins are often placed in the bathroom , then its design is selected accordingly. The Scandinavian style of the entire room is perfectly suited for a sauna decorated with natural wood. The light tone of the walls and white plumbing harmoniously combine with the yellowish color of the wood. Lightweight glass shower structures do not clutter up the room and make bathing procedures convenient. A plain floor made of large porcelain tiles unifies the space, large windows allow you to admire nature and create a bright, pleasant interior.
The open space of the loft is not divided into separate rooms. Glass partitions conditionally separate the sauna, bathroom and bedroom. The technology of all components and ultra-modern equipment give futuristic features to the entire interior. The sauna, located at the back of the room, becomes an element of the decor. This emphasizes its convenience for regular use.
With all the advantages of an apartment sauna, nothing compares to a bathhouse in a country house. Here you can give free rein to your imagination and decorate the house to your liking. A small bathhouse made of round logs is designed in a traditional rural style. Small windows with wooden frames, a wide solid table top, and a brick stove will add rural charm. To create dry steam, the steam room is isolated with a durable wooden door, the wash room occupies the middle room, the entrance area is formed by a locker room combined with a rest room.
The furnishings in the rest room are stylized as rustic - stable benches, a table with a samovar, and a chest are installed. The walls are decorated with peasant household items. Brooms on the walls, wooden buckets in the washroom, and simple lamps with bulbs in the yellow part of the spectrum would be appropriate. The unique traditions of the national culture are manifested in the deliberate roughness of finishing materials; modern technological equipment is hidden behind traditional rural decor.
Inside
Spacious saunas in a private house have several rooms, each of which can be decorated in a specific style. The steam room inside can be decorated in high-tech style. LED colored lighting will give the interior a futuristic feel. The smooth lines of the benches model the space in an unusual way. The simplicity of the decor is compensated by the concept of lighting and curved walls.
Restroom
In terms of its functions, the relaxation room can serve as a regular locker room or a place for drinking tea after bath procedures. Modern comfortable lounges are decorated like living rooms and are complemented by a cooking area, TV, and billiard table. Finishing materials here are not exposed to intense moisture or heat, but still must be hygienic, easy to care for, and have good decorative qualities. In between visits to the steam room, most of the time is spent in the relaxation room. It should be pleasant to be here, so the walls and windows are decorated in a certain style.
A popular finishing option is chalet style. The rest room should have large windows with a beautiful landscape. The walls are lined with natural wood materials or plastered and painted in a single light color, decorated with hunting trophies or paintings with hunting scenes. The floor is made of tongue and groove boards or ceramic granite tiles. The firebox of the stove is designed in the form of a fireplace and leads into the rest room.
The use of color to highlight structural elements in the Scandinavian style looks beautiful. The lighting beautifully models the space. Wooden wall cladding elements are combined with stone, which gives solidity to the room. The live fire of the stove becomes an attractive center of relaxation. The floor should be finished with granite tiles, which replicate the colors and texture of the wall finishing stone.
Shower room
The shower room is the most vulnerable room in terms of moisture resistance, so the use of tiles, stone, glass, and metal would be optimal here. Pool shower equipment has become popular. It is traditionally finished with tiles. In the shower room, lighting plays an important role in decorating the space. Soft light on the multi-level ceiling imitates the reflection of water, creating the effect of depth.
Ceramic tiles with the texture of a wooden surface will connect the decoration of the steam room and shower with the pool. It is a good idea to combine dark-colored floor tiles with similar wall tiles. It is better to select finishes from one collection so that the whole complex looks harmonious. Natural rich tones will not seem gloomy due to the large area of window openings. Simple rectangular designs take on a stylish charm.
If you want to create some cozy recreation area on the territory of a private house where you can spend time with friends, then most choose the classic, time-tested option - building a bathhouse. This is where a person can relax, feel relaxed, and chat with friends. In addition, the bathhouse is a place for hygiene procedures, an opportunity to relieve oneself of psychological and moral stress. Relaxing in a bathhouse will improve sleep, normalize blood pressure and remove toxins, which a bathtub or jacuzzi cannot do.
Protective screen manufacturing technology
The basis for creating a thermal barrier is sheet non-combustible material. Glass-magnesite (SML) or mineralite slabs are used as such materials. Their installation is carried out through a sleeve, on a wooden frame or directly on the wall surface. The safest way to install this protective layer is to install it on self-tapping screws through a special metal or ceramic sleeve with a length of 3 cm. An example of the location of the thermal barrier with an illustration of the appearance of the sleeve is shown in the image below.
Next, we will consider the design of a very effective two-layer protective screen using various fireproof technologies.
Here you can see essentially two protective screens. The one closest to the wall is made of fire-resistant gypsum board gypsum boards mounted on metal profiles. An additional reflective layer is made of foil attached directly to the wall. The mineralite slabs were installed on top of the plasterboard using self-tapping screws through a 3-cm porcelain tile sleeve. Thermal insulation boards are finished with tiles that are laid with heat-resistant adhesive.
Now we will give examples of simpler, but well-proven ways to create a thermal barrier. First, let's figure out how to make a partition in the steam room, into which the furnace window opens.
This structure is made of glass-magnesium sheet (GMS) 10 mm thick, which is mounted on a metal frame with basalt insulation inside.
Source
Materials
The traditional material for finishing a sauna made of timber is natural wood. It is resistant to high temperatures and does not burn when touched, which is important for arranging benches in a steam room. Has moisture-resistant flexibility. The elastic structure of wood does not deform from exposure to moisture. This material is environmentally friendly, and when heated, it releases healing essential oils.
The beautiful structure of wood fibers has high aesthetic qualities. In first place in terms of performance properties, the beauty of light pinkish wood without knots, with a smooth surface, is African oak - abash. This is a fairly expensive and valuable type of wood. A sauna made of abasha will last for many years with this durable, crack-free, moisture-resistant coating. Due to its high cost, abash can be used to make beds and benches in the steam room, and the rest of the cladding can be made from other types of wood of an affordable price category.
We suggest you familiarize yourself with How to lay stones in a sauna stove: choice, laying order, sequence
Popular finishing materials are hardwood lumber - linden, alder, aspen. In addition to the aesthetic appearance and pleasant color of the wood, these tree species have healing properties. When heated, healing essential oils are released. Hardwood is heat-resistant, does not form cracks, and is moisture resistant. The price range belongs to the middle segment.
The optimal species for finishing a sauna are cedar and larch. Durable, with a beautiful pattern of wood fibers, cedar and larch do not require additional decor. High resistance to moisture and heat resistance make them indispensable for the steam room of a sauna. The healing properties of essential oils are not inferior to linden.
Pine is the most affordable material on the domestic market and has little resistance to moisture. When heated, resins form unsightly streaks on the surface of the wood. This material is best used in the design of a rest room. Wooden finishing materials are produced in the form of lining with various profiles.
Cladding the walls and ceiling with a block house is an excellent imitation of a log house made from solid logs. For benches and canopies, use an edged board with a thickness of at least 4 centimeters with a rectangular profile. The ceiling is covered with clapboard with a rectangular or cylindrical profile. The floor is made of tongue and groove boards.
Facing natural stone or brick will add solidity to the sauna. The combination of stone and wood is considered classic. The stove-heater and some walls of the steam and washing compartments, made of stone or brick, have a noble appearance. Stone is the most durable material; it does not burn and does not deform from water.
Not all types of stone are suitable for a steam room; only jadeite, soapstone, and serpentine are preferred. This type of finishing perfectly accumulates heat and maintains the optimal temperature in the steam room for a long time. The beautiful grainy texture of the stone will decorate the walls of the room. The coil has high aesthetic qualities; its layered structure has healing properties.
Practical finishing of the walls and floor of the sauna with ceramic tiles is a good solution for showers and swimming pools. The tiles resist moisture well and have good fire-resistant properties. This is the most convenient and hygienic material. A variety of tile decor, size, color palette, and special anti-slip textures allow you to choose the desired design option. Imitation of luxury marble, granite or oriental mosaic details will add a stylish touch to the sauna.
A budget finishing option is plastic panels. They are distinguished by ease of installation and variety of designs. Plastic resists moisture well. It is easy to keep clean, just wash it with ordinary detergents. The disadvantage is low heat resistance, susceptibility to mold and short service life in high humidity conditions. Plastic trim is used for the rest room and the ceiling in the shower.