When building a bathhouse on a site, the question arises of what material is best to make the floor from. Many, of course, will say that a concrete base will be cold and uncomfortable. And this is partly true. However, today technology allows you to make a warm concrete floor in a bathhouse with your own hands with step-by-step instructions without high costs.
The main advantages of a concrete coating are its durability, resistance to mechanical stress, water resistance, and resistance to rotting and rapid destruction. And these qualities are extremely necessary for a bath room with high humidity.
The nuances of arranging a concrete base
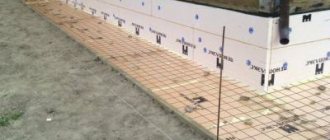
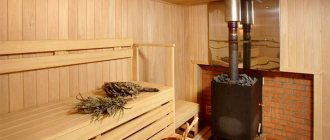
Figure 1. Concrete floor in a bathhouse
Arranging a concrete floor in a bathhouse allows you to achieve a solid foundation whose service life exceeds 10 years. This material is resistant to repeated exposure to moisture. It is environmentally friendly as it is made from natural ingredients. The solution contains sand, natural filler, cement and water. To improve the properties of the material, plasticizers and other polymer components are added to it. Mold and mildew do not grow on concrete, which is typical for wet rooms without a constant temperature regime. This flooring is not susceptible to damage by insects and rodents.
after using the sauna . This material is heavy and therefore requires a strong foundation. In order for the floor screed to dry completely, you need to wait 30-45 days. Over time, the material shrinks, the duration of which is determined by the amount of liquid in the solution.
When pouring a concrete floor in a bathhouse, it is important to choose the right components from which the solution is prepared. You should also strictly follow the technology for pouring the mixture. It involves preparing the base, laying out the composition, finishing and sealing the joints.
Positive and negative sides
Floors on the ground have several advantages:
- ease of installation;
- efficiency;
- sustainability;
- ability to withstand significant weight;
- minimal load on the walls or its complete absence;
- wear resistance;
- maintainability;
- suitability for coating with any type of finishing materials;
- possibility of installing a “warm floor” system.
Design disadvantages include:
- the need to lay a layer of insulating materials;
- impossibility of installation over a layer of bulk materials more than 60 cm thick.
Groundwater lying close to the soil surfaceSource avatars.mds.yandex.net
Preparatory activities
Before pouring concrete onto the floor, it must be carefully prepared. If this procedure is skipped, the characteristics of the finished layer will be poor.
Alignment
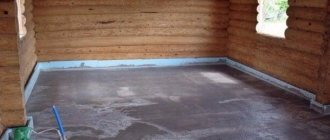
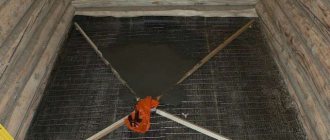
Figure 2. Leveling the floor in the bathhouse
The specified procedure involves the following actions:
- Removal of the top layer of soil with organic residues to a depth of 40-45 cm.
- Leveling the base surface. At the same time, do not forget about arranging a pit in the center of the room. Water will collect in it.
- Installation of a drainage pipe with a diameter of 10-20 cm. It must be laid on a slope so that the liquid drains by gravity.
The quality of floor leveling can be checked with a laser or a regular building level.
Seal
Before pouring concrete floors in a bathhouse, the base must be thoroughly compacted. For this, a manual rammer or vibrating plate is used. At this stage, a cushion of sand (layer 5-10 cm) and gravel (layer 10 cm) must be installed. It needs to be compacted as much as possible. The cushion protects the concrete pie from heaving of the soil and rising moisture from it.
Briefly about the main thing
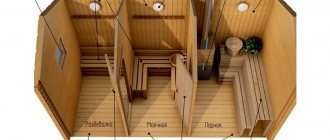
The washing room is distinguished by the presence of a large amount of used water, which constantly freezes in winter and periodically thaws in the pores of the wooden elements in the bathhouse. Because of this, they begin to rot. To eliminate the shortcoming, the floor is insulated. This also helps reduce sudden temperature changes.
The washroom has a tiled floor with a concrete base, a solid wooden or pouring floor. All structures are insulated. Depending on the type of floor, foam plastic, mineral wool, penoplex, perlite or expanded clay can be used. Often in the washing department they create a floating screed on a wooden base or pour a completely concrete floor on the ground.
Ratings 0
Concrete floor in a bathhouse - installation methods
Before making concrete floors in a bathhouse , you need to determine how the material will be poured: on the ground or on joists. The choice of method depends on the personal preferences of the master and the financial capabilities of the owner.
Installation of the solution directly on the ground
Before pouring a concrete floor over the ground in a bathhouse, it is necessary to remove the top layer of soil. Its height is 40-50 cm. A sand and gravel cushion is placed on the base. Its total height can reach 60 cm. Before using concrete, sand and gravel are carefully compacted. After completing the floor preparation, you can pour the solution. Don't forget about the slope of the base. The screed is poured in one or two layers. At the same stage, waterproofing and insulation of concrete is arranged, since it has high thermal conductivity.
Pouring concrete on joists
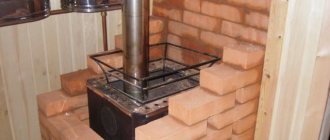
Figure 3. Pouring concrete onto joists
When constructing a concrete floor in a bathhouse using this method, the pouring technology is somewhat different. The advantage of this method is the arrangement of a ventilated underground. In this case, installation of additional ventilation systems in the screed itself is not carried out. Arrangement on wooden logs involves preliminary antiseptic treatment of the elements.
The cross-section of the beam is 10-20 cm. After the product is completely absorbed and the material is dry, it is laid on a base in the form of a mesh. A subfloor made of boards is mounted on wooden The optimal thickness of the elements is 2-4 cm. A layer of thermal and waterproofing is laid on the surface. The concrete floor in the bathhouse is poured with your own hands, taking into account the reinforcement of the layer with metal mesh.
Device
The concrete floor is a multi-layer structure. This structure allows for an optimal balance of strength and durability. This “pie” consists of the following layers:
Backfilling. The lowest layer, which is the soil itself
Please note that during the construction of floors, the turf is removed, and in its place is filled with dense soil without plant impurities. It can be compacted using special vibrating machines.
Litter
The main components of this layer are sand or crushed stone (supplemented by a geotextile layer). The optimal thickness of materials after pressing is about 40 cm.
Footing. This layer is a concrete screed, about 10 cm thick. It is protective and supportive, and also additionally levels the base.
Waterproofing layer and insulation. Special films based on polyethylene, as well as liquid bitumen and others are used as waterproofing. Expanded polystyrene with a thickness of up to 10 cm is considered the optimal insulation
It is important to use only high-density materials (EPS, etc.).
- Damper tape. It is placed around the perimeter of the foundation. It compensates for the expansion of the top concrete layer.
- Top screed. This layer is made of durable concrete, which is additionally reinforced with metal mesh. To prevent rapid cracking, so-called expansion joints are formed over the entire surface of the floor.
Please note that this concrete floor structure is not always used
Concrete floor installation diagram
In order to properly fill the floors in a bathhouse with concrete , you need to observe the nuances of the technology for working with this material and take into account the design features of the structure.
Step 1: construction of a drainage system
The bathhouse is operated in conditions of periodic high humidity, so the water drainage system must be well-established. It must be planned during the creation of the construction project. Drainage should not interfere with bathing procedures. It is better to place it under the shelves.
Do not forget about the pit into which the waste liquid will be collected. From it, water is then discharged into the main reservoir. After organizing the system, the floor is waterproofed and poured.
Step 2: laying a heat-insulating layer
Concrete has a high level of thermal conductivity, so it heats up quite slowly. To eliminate this problem, thermal insulation of the floor screed is carried out. Mineral wool or expanded clay is used to form the layer. There are also newer materials, but the choice here depends on the financial capabilities of the bathhouse owner.
Insulation methods
The floor in a concrete bathhouse must be insulated, otherwise visitors will feel uncomfortable, and it will also be more difficult to achieve the necessary atmosphere inside the room. There are the following isolation methods:
- Pouring two layers of concrete mortar, between which thermal insulation material is laid. This procedure requires more time and material costs, but it provides the necessary technical properties of the floor in the bathhouse.
- Laying the insulator on a dry screed. In this case, additional finishing of the concrete is required.
To finish the floor, a flooring made of wooden boards is used. Over time, wood deteriorates due to constant exposure to moisture and high temperature, so this layer will have to be replaced.
Step 3: pouring the first layer of mortar
To fill, you need to choose a suitable brand of concrete for the foundation of the bathhouse . Since the load will not be very large, a solution of M150-200 is sufficient. The thickness of the first layer of screed is 12-15 cm. You can spread the solution all at once or in portions, dividing the room into parts. The mixture must be leveled with a rule and left until completely dry.
It is important not to forget to make a slope towards drainage. For concrete to completely harden and shrinkage occurs, a certain amount of time is required: at least 5 days. Only after this can the next layer be laid.
Filling must begin from the corner opposite the front door. The process should be carried out without stopping. To prevent the screed from cracking, it must be periodically moistened until it dries completely.
Step 4: laying waterproofing and insulation
So, what brand of concrete is needed is already clear. Now we need to consider the features of laying hydro- and thermal insulation. To protect against the negative effects of moisture, a double layer of insulation is required. At the same time, the concrete should not have any depressions, cracks or chips, oil stains, dirt, or dust.
To reliably protect concrete, you need to coat it with liquid mastic. Moreover, it is applied in several layers. After the product has completely hardened, a roll of material is laid on its surface. It should go onto the walls. There should be no cracks or gaps between the insulation sheets.
Lastly, a thermal insulation layer is laid, the height of which is 2-10 cm. Expanded clay, expanded polystyrene, foam concrete, and mineral wool are used as insulation.
Step 5: pouring the second layer of concrete
What kind of concrete is needed for the foundation of a bathhouse is already clear: M150-200. Since the second layer must be poured correctly, fine gravel or crushed stone should be used in the solution. If the base has a small area, then additional reinforcement with mesh is not required. The surface must first be cleaned of debris and dust.
The optimal thickness of the second layer of concrete floors in a bathhouse is 10 cm. After installing , you need to wait a few days until the solution hardens. If you follow the step-by-step guide , then after a week or two the room can be used for its intended purpose.
Warm floors: a brief overview of types
Today, a warm floor in a bathhouse relaxation room is a common occurrence and has already become an integral part of comfort. Especially when it comes to tiles and not wood.
To ensure surface heating, the following types of floors can be used:
- water;
- electrical cables;
- infrared;
- air.
Example of water heated floors
At the first stage, the choice should be guided by the financial situation and the requirements of the floors themselves:
- Mermen. A perfectly flat surface is required. You will have to purchase additional equipment to control the temperature. Quite an expensive type, although self-sustaining.
- Cable. They consume a lot of power, so you should make sure that the current wiring can handle the voltage. Cheaper than water ones.
- Infrared. They do not have any specific requirements. Accessible.
- Airborne. Very expensive to install.
Example of electric cable floor
More details about all types, except air, which is too expensive, later in the article.
Waste water drainage system in the bathhouse
Pouring the floor in a bathhouse is a responsible process, so it is important to provide a drainage system. There are several installation schemes.
Directly under the bathhouse, when installing screeds on the joists
Since properly designed drainage system ensures comfort in the room and longevity of its operation, with such a bathhouse design, a drainage hole is dug under the building itself. Its depth is 1 m, and its dimensions are 1 * 1 m. A cushion of crushed stone and sand is placed at the bottom of the catchment.
To prevent an unpleasant odor from wastewater from appearing inside the premises or around the building, ventilation pipes are laid in the drainage pit. This option is acceptable if the screed is located above the ground surface.
Choice of insulation
In order to insulate the floor in a bathhouse, the following materials can be used:
- mineral, fiberglass or basalt wool;
- expanded clay;
- expanded polystyrene;
- construction felt;
- aerated concrete.
The insulation is laid between a layer of steam and waterproofing, which are located between the rough and finishing concrete floor. If the floor is made on joists, then the insulation is installed between them.
To ensure normal thermal insulation of the floor, the thickness of the insulation layer must be at least 150 mm, it all depends on the material used and the climatic conditions of your area.
If you use expanded clay, then it must be laid carefully, since those granules that are broken lose their high thermal insulation characteristics. Despite the layer of insulation, such a floor in a bathhouse will still be cold, so now many people decide to make heated floors.
Some tips from the professionals
Creating a floor screed on the ground is a task that even home craftsmen can do. Modern process technology has made the process as easy as possible; the main thing is to follow the stages of work, do everything efficiently and listen to the advice of specialists:
- The screed level is set taking into account existing or planned doorways. Level markings must be carried out along the entire perimeter of the base. Stretched cords will help make orientation easier;
- if a clay layer is involved in the preparatory work, then it should be moistened and then compacted - such an obstacle will become almost insurmountable for groundwater;
- concrete screed on an earthen base - a multi-layer “pie”, each of the layers in which must be carefully aligned horizontally;
- the thermal insulation characteristics of a concrete floor can be improved using an expanded clay, cork or plywood layer;
- the thickness of the rough screed should be about 8 cm, and the thermal insulation layer should be at least 10 cm;
- when creating a reinforcement frame for a concrete floor that will have to withstand severe operational loads, it is best to use rods with a diameter of 8 mm;
- The concrete surface is prone to cracks; to avoid this problem, expansion joints are created on the surface. After cutting, they must be sealed;
- To prevent the appearance of dust on the screed, special impregnations are used, which are applied no later than 7 hours after compaction of the concrete layer.
It is very important to use high-quality materials when arranging a concrete screed, especially for the “filling”, that is, insulation and waterproofing. If they fail, the entire structure will lose its strength and will not last long.
You should not save on screed materials, otherwise you will subsequently have to spend significantly more money on repairs.
The result of competent work with high-quality materials will be the appearance of a reliable and durable concrete floor. It will not only withstand high operating loads, but will also serve as an ideal base for applying any of the topcoats on the market today.
Floors with a properly installed concrete screed will last for many years, or even decades.
By following the technological sequence and paying due attention to all its stages, even an amateur who has very modest knowledge of the repair process and has minimal skills can cope with the creation of the screed
Guidelines for choosing a future design
The owner of a country bathhouse must initially decide on the type of drainage of water constantly pouring onto the floor and the material for constructing the floor. Basically, in buildings recognized as a mandatory component of suburban areas, the floor is poured with concrete or boards are laid on logs.
- A concrete foundation will require more labor effort, money and time, but it will serve without any complaints for more than half a century.
- It is easiest and cheapest to build a floor in a bathhouse with your own hands using lumber, but after 7-8 years its wooden elements will need to be replaced.
Wood structures, based on the type of drainage and the associated complexity of the structure, are divided into leaking and “non-leaking” subcategories.
Pros and cons of leaking floors
A leaky floor is the simplest and extremely cheap. It is a boardwalk, between the elements of which gaps are left for direct discharge of wastewater into the ground. It does not have any additional sewer “delights” except for the drainage hole located in the underground, and there is no insulation either. Therefore, a leaky floor is suitable for bathhouses in the southern regions and for temporary summer cottage use.
Building such a floor for a bathhouse with your own hands is as easy as shelling pears. It will not be difficult to replace damaged elements and complete repairs. The boards are not nailed to the joists at all; they can and should be removed and taken outside for ventilation and drying. If desired, instead of a drainage pit, you can install a pan, the drainage from which will be discharged into a sewerage facility.
Specifics of leak-proof design
A non-leaking system is much more complex. It is constructed from two rows of boards. The top flooring, going on top of the logs, is made of tongue-and-groove pine or larch boards without the slightest gaps. A subfloor is installed underneath. A non-leaking floor is classified as “dry” and can be equipped with insulation.
The floorboards of the finishing flooring are placed with a slope towards the place where wastewater is collected and subsequently discharged into a sewer ditch or septic tank. A hole is made at the lowest point of the plank surface, to which a siphon is connected to drain the waste. The hole can be replaced with a full-length tray. The tray is installed with a slope towards the collection point of contaminated water.
What should the concrete floor pie be like?
Concrete floors in bathhouses are poured in three technological stages. The exaggerated “sandwich” of the design consists of six components, these are:
- compacted and strengthened soil base prepared for pouring;
- first layer of concrete 5 cm;
- insulation, most often expanded clay or felt;
- reinforcing concrete layer with chain-link mesh;
- leveling layer;
- coating.
Tamping the soil and the reinforcing gravel-crushed stone mixture of 15 cm laid on top of it, as well as pouring each of the “sandwich” layers, is carried out with a slope towards the drainage pit. As a result, the design should have a normal bath drain. The slope is standard, like wooden structures, 10º.
We decided on a scheme according to which the installation of floors in the bathhouse would be carried out. Do not forget that if the floor has to support the weight of a permanent rather than portable sauna stove, you need to take care of creating a foundation for it in advance.
Laying mortar and curing concrete
Begin laying the mortar from the corner farthest from the door. Everyone decides for themselves whether they are right or left. A portion of the solution is laid out between the guides, leveling it a little. Then they take the rule and, resting it on the beacons/guides, stretch the mixture, leveling it along the way.
Leveling the solution using the rule
You can simultaneously move the rule a little to the right and left. This makes it a little easier to distribute the composition evenly. Having achieved the filling of all voids, leveling the solution, lay the next portion, gradually filling the entire space. During work, it is advisable not to take long breaks so that the edges do not have time to harden and “stick.”
If you have installed guides, once the concrete is hard enough to hold its shape, you can pull them out. After some time (about a day after installation), the holes remaining after pulling out the guides are sealed with mortar. When using beacons, they are left in the floor and no additional work is required.
Curing
In order for the screed to be strong, the concrete must harden and not dry out . Therefore, for the first three to four days at normal humidity and low temperature, the surface of the screed is moistened with water - 2-3 times a day. At high temperatures, the surface is covered with polyethylene foam. It is also necessary to ensure that there are no areas with different temperatures: sunlight should not fall (close the windows), if work is carried out in winter, the heating should not work.
After the screed has hardened a little, the traces from the guides must be sealed with mortar.
It is advisable to leave the floor without load for 3 weeks, but the minimum period is 1 week. If you want to increase the strength of the screed and speed up its “readiness”, you can add a plasticizer.
It's the whole process. As you can see, you can make a floor screed with your own hands even without much experience in construction. The most difficult and troublesome thing is to set up and secure the beacons. The rest of the work is quite simple.