How to make a ceiling in a bathhouse with your own hands
Many people wonder how to make a ceiling in a bathhouse and not have to worry about the condition of the building for a long time. The ceiling for this building should not only protect from bad weather conditions and retain heat, but also not absorb moisture. In the bathhouse, hot steam rises and condensation forms on the ceiling. Therefore, it is important to choose the right material for the ceiling even before making the right ceiling in the bathhouse, so that the structure will delight you for many years.
Most often, the ceiling in a bathhouse is made of durable boards or beams. The ceiling is erected only after roofing work is completed, since unfavorable weather conditions reduce the effectiveness of thermal insulation and can lead to the appearance of fungus and mold on the walls.
Material selection
In order for the finishing of the ceiling in the bathhouse to be of high quality, it is necessary to choose the right material. Of course, such buildings are most often made of wood. Sometimes plastic is used, but if there is a steam room, it can become deformed due to elevated temperatures, especially near the chimney, so it is better to stick with the traditional material - wood. But even here there are secrets - not all breeds are suitable for baths.
The best solution is considered to be linden lining - this wood has a delicate golden color and a pleasant honey smell. It also resists moisture well, rarely cracks and splits, and does not heat up well at high temperatures.
Sometimes there is an aspen finish - this tree is very durable, does not rot, and quickly releases moisture. But it has one drawback - with regular exposure to high humidity and high temperatures, it darkens.
It is strictly not recommended to use coniferous wood for finishing ceilings. If you like the smell of pine needles, you can make floors and benches from such wood, but not the ceiling - when heated, resin will be released, which can cause serious burns.
Arrangement of a panel ceiling for a washing room in a bathhouse
The ceiling is equipped according to the following plan:
- We install two bars on a flat surface at a distance of 0.5 meters.
- We fasten them together with planed boards 0.6 meters long, leaving a 5 cm exit on the sides. For reliable fixation, we use galvanized nails with a length of 10 cm. The thickness of the boards should be approximately 5 cm.
- Using a construction stapler, we secure the vapor barrier foil film inside the panel along the edges and on the folds.
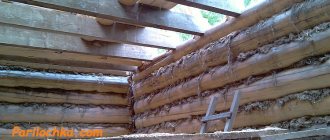
- We stuff two temporary slats (jibs) diagonally between the beams. This will allow the panel to be transported to the top of the washing room without deformation.
- We mount the structure on the upper edges of the load-bearing walls. It should occupy at least 5 cm of wall thickness. We install all panels strictly according to the level until the ceiling is completely closed.
- We seal the resulting joints with jute.
- We lay the insulation on top of the vapor barrier material in the panels themselves and the joints between them.
- We fix the waterproofing layer on top.
- We fasten all the panels together with a board 4 cm thick. Its length should be equal to the sum of the width of all panels.
- We sew up the rest of the space with boards 0.6 meters long.
- We install an overhead board at the transverse joints.
Due to the large weight of individual structures, it will not be possible to carry out the installation yourself, so get an assistant in advance. By installing a panel ceiling above the sink, you can use the attic space.
Ceiling device
The installation of a ceiling in a bathhouse involves laying a base (internal boards). Unedged or edged boards are often used; they are usually sheathed with clapboard (see Correct ceiling cladding with clapboard).
A protective layer is laid on the internal boards between the floor beams to retain heat and protect against moisture. Waterproofing and vapor barrier must be without cracks, joints must be sealed tightly. Boards must be selected of high quality, without knots. To create the best conditions and prevent the presence of water, you need to ensure that the boards fit snugly and even overlap them.
There are such types of ceiling installation: hemmed, panel and floor. The hemmed one is suitable for large rooms, the floor one is suitable for small and medium-sized rooms, and the panel one is universal.
The flat ceiling does not require external cladding, as it is covered with thermal insulation material. Such a ceiling arrangement for a bathhouse is not suitable if there is an attic - any repair of the floor there will certainly affect the ceiling, even just walking on it will be impossible (read: “Cold attic: device”).
A false ceiling in a wooden bathhouse can be done even if there is an attic (read: We insulate the ceiling in a wooden house: methods). The best thermal insulation for it is mineral wool. Its layer is covered with waterproofing and sheathed on the outside with boards. This material is produced in the form of pressed slabs, which are easy to install.
Panel ceiling is the most complex flooring option, but at the same time cheaper. It is a structure consisting of load-bearing beams, into which hydro- and vapor barrier is installed, and often there is also a layer of insulation - mineral wool. It can be assembled outside the building itself, but you need to take into account that it is impossible to install a floor ceiling in a bathhouse with your own hands; this will require the participation of at least two people.
In any case, you can’t do without insulation. The ceiling in the bathhouse is constantly exposed to high temperatures and high humidity. Hot steam settles on the walls and ceiling, resulting in condensation forming when it comes into contact with cool air. Uninsulated floors are destroyed due to wetness and temperature changes. Therefore, it will not be possible to do without vapor barrier and insulation, no matter what type of ceiling is chosen (read: “Insulating the ceiling in a bathhouse - methods”).
To do this, it is better to choose materials such as mineral wool, polystyrene foam, expanded clay - when working with them there is no need to involve specialists, and they are also quite cheap. However, experts still do not recommend using polystyrene foam for the reason that at elevated temperatures it can release toxic substances and is classified as a fire hazardous material.
Construction of a panel ceiling step by step
The three most common ways to make a ceiling in a bathhouse will provide the opportunity to choose the best option for the device. It’s easy to figure out the simple methods using the described diagrams; the complex panel type needs to be studied in detail.
Making shields is the main “catch”
To build a shield, you need a level platform; for this you need to level a piece of land or lay plywood. For convenience and control, you will need an even measuring rod and 3 templates 50 cm long.
Here's how the work is done:
- Two bars are laid parallel on a leveled plane, there should be 0.5 m between them. Templates will help to thoroughly check the distance at each point. The accuracy of the location is checked by perpendicular installation of the auxiliary rail.
- Boards are nailed perpendicular to the bars. The length of the nailed boards is 0.6 m. From each edge, the transversely laid board should “overhang” over the bars by 5 cm. When joining inverted panels, these indentations should form a “pocket”; it is needed for insulation and vapor barrier placed in the joints between the individual elements. The board is secured on each side with two self-tapping screws or two nails. It is recommended to sheathe the ceiling in a Russian bathhouse with galvanized nails with a fairly wide head. Two nails are nailed in one place due to the additional load from the weight of the insulation.
- The knocked together shield needs to be turned over, carefully distributed and the vapor barrier attached to the inner surface of the “box” with a stapler. It is recommended to nail jibs to this “semi-finished product” to make moving it to the ceiling assembly site more convenient.
Panel ceiling assembly
Work order:
- Before installing the panels, a sealant is placed on the walls of the bathhouse at the points of contact with the timber. 5 cm of the panel should rest on the beam, 10 cm of the beam is left for the installation of the rafter system.
- When installing panels between them, due to the presence of overlaps, a “pocket” should form. It contains a vapor barrier layer and insulation. The panels are not connected with ties, and the ends resting on the beams are not nailed down. To connect them, transversely laid boards are used.
- Thermal insulation material is placed in vapor barrier panels installed tightly to each other. Most often it is mineral or glass wool.
- The “boxes” equipped with insulation are secured using transverse boards. The starting board should span the entire width of the ceiling. The transverse boards are nailed to the bars of the panel boards.
- Next, you can nail several short cross boards, then a long board again. Such alternation also promotes savings by reducing the consumption of long lumber.
- The joint lines are covered with overhead boards.
The ceiling assembled from the panels is ready, but most often the work does not end there. If not very presentable remains were used to make the shields, the interior decoration of the bathhouse ceiling will be required. But it will need to be done after modernizing the rafter system.
Changes in truss structure
According to precisely calibrated dimensions in the rafters, it is necessary to select corner recesses so that the leg can rest on the upper crown. The excavations made will slightly reduce the load-bearing capacity of the roofing system. Strengthening will be required by installing two vertical supports with a horizontal crossbar. To install the support beam, you will need to cut a recess and install a support in it. The rafter legs will need to be attached using cap screws to the upper lintel and to the crown in the area of the sawn corner. Screws are used to fix the point of intersection of the crossbar and the support, and the intersection of the crossbar and the rafter leg.
The three methods of installing a bath ceiling are distinguished by technology, load-bearing capacity, and cost of lumber. The owner of a small family bathhouse with a pitched roof will most likely be satisfied with a simple flooring. But the owner of a solid bath structure has a choice: hemmed and panel type. The first type will help save effort and time, the second - financial investments.
Ceiling cutting
Cutting the bathhouse ceiling should be done by professionals. A safe chimney is the key to your own safety and the safety of the entire building. When laying a stove and installing a chimney, it is very important to follow all the rules. Even minor errors can cause the operation of the bathhouse to become dangerous due to the possibility of fire.
Installation and design
Ceiling insulation
As in any construction, the floor is built first, then the walls, and then the ceilings. In the case of the most popular false ceiling, it is necessary to follow the sequence of layers.
What fits in at the beginning and what at the end - let's take a closer look.
- The top layer consists of boards facing the attic space.
- The next layer below is moisture insulation. This may be a waterproofing film specifically designed for such purposes.
- Even lower is a layer of insulation. Preferably mineral wool or glass wool. The insulation sheets are lightweight and easy to install. This is much more practical than filling the top with sawdust or heavy expanded clay.
- A vapor barrier layer is laid under the insulation. This is either a special membrane or foil reinforced with glass mesh.
- The penultimate layer is slats of small cross-section (from 30×50 mm). They are necessary for subsequent fastening of the final lining for the bathhouse.
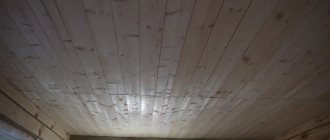
- The last layer that you will see above your head is the final lining from the inside of the room. As a rule, eurolining is used. Buy the lining from non-resinous wood, otherwise the resin, melting from the hot air, will drip in fairly large quantities.
The ceiling in a Russian bathhouse of a hemmed type is also convenient because, thanks to its strength and reliability, it can even be used in an attic. You can safely walk on it and even use it for household needs. (see also the article Features of a bath font)
With proper selection of materials, the height of the ceilings in the bathhouse will not be much lower than planned. However, it is necessary to take into account the total thickness of this entire multi-layer cake before installation.
If you plan to use the attic, provide a hatch in the ceiling in advance for access to the outside.
Insulation of a flat ceiling
A flat ceiling is often used in small baths, as it allows you to create reliable and dense waterproofing. In this case, mineral wool is laid directly on the ceiling boards. Vapor barrier of the ceiling in the bathhouse is achieved thanks to a layer of bulk material (see Insulation of the bathhouse ceiling: choice of material, procedure).
To install insulation, floor boards must have a minimum thickness (no more than 5 centimeters); spans cannot be more than 2.5 meters. First, a vapor barrier is laid on the boards, then insulation. Loose thermal insulator perfectly covers all cracks and depressions. To use it, you need to create additional barriers - the sides around the perimeter of the ceiling will become an obstacle.
A flat ceiling has many disadvantages. First of all, it cannot be installed in large baths - it is only suitable for small buildings. It will also be impossible to use the attic, and if the ceiling is repaired, the insulation will have to be changed (
Advantages and disadvantages of this option
As you have already seen, there is nothing complicated in the design of a false ceiling. Any self-taught craftsman can assemble the frame and then cover it with several layers. Moreover, even without an assistant. This is one of the main advantages of a false ceiling. But not the only thing. In addition, the suspended ceiling has:
- Versatility - it can be equipped in baths of different sizes. Including those where the span between the walls is more than 2.5 m;
- High strength - in the process of assembling the ceiling, thick beams and high-quality boards are used. This makes it possible to walk on the attic floor and arrange the attic floor with furniture;
- Maintainability - the false ceiling “pie” is made from quickly installed materials. They are just as easy to dismantle. If it is necessary to replace one of the components (the need to increase the thickness of the layer, its damage), the previous layers are easily lifted, the “unliquid” material is removed and new material is laid.
A relative disadvantage of a false ceiling is the use of expensive lumber in its construction: beams of large cross-section, boards 5-6 cm thick and long enough to cover the span between the walls.
Rate this article:
- 5
- 4
- 3
- 2
- 1
(1 vote, average: 5 out of 5)
Share with your friends!
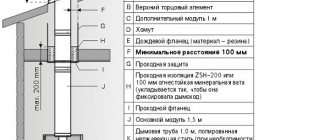
Features of the arrangement of vapor barrier and waterproofing layers
The presence of a vapor barrier layer is not a whim, but a real necessity. Especially when it comes to rooms such as a bathhouse, where hot air is an integral part of using the room for its intended purpose. Rising in the form of steam, moisture can have a destructive effect on the insulation and contribute to the formation of mold and mildew on the wooden elements of the bathhouse frame.
Scheme of insulation and insulation of a bathhouse roof
In order to avoid problems that may arise as a result of moisture accumulation on the ceiling and walls, special films and coating materials are used, for example, anti-condensation membranes. When choosing a suitable material, it is advisable to purchase one that has a foil layer.
Helpful advice! During the installation of a vapor barrier film, it is very important to pay attention to its integrity. It is necessary to prevent the occurrence of gaps, as this will greatly affect the technical characteristics of the coating.
To ensure waterproofing, special films are used, which can be purchased at hardware stores. Sometimes the most ordinary polyethylene of sufficient density or cheap roofing felt is used.
To protect the bath frame from moisture, it is recommended to use a waterproofing membrane, which can be mounted in contact with the insulation without losing its properties
Installation sequence
The choice of ceiling installation determines its functionality. If the surface plays the function of a partition, which is located under the roof, then there are no special conditions for strength. The main point is thermal insulation and decor. If there is a desire to build an attic above the bathhouse, then the ceiling can also be the floor for the second room. Among other options, this one is the most durable and reliable. If you break down the installation technology into stages, then it looks like this:
- The stage of laying the required vapor barrier layer.
- Cladding stage.
- Stage of installation of waterproofing and thermal insulation.
- Internal surface treatment stage.
- External ceiling cladding stage.
Panel filing
This type of installation involves tight fit of specially made blocks to each other. Insulation is installed between them, which does not accumulate moisture. Each of the segments is made according to a special stencil and consists of several panels with wooden blocks laid on top of them.
Then a vapor barrier layer is mandatory. It can be made from expanded clay and covered with plastic film. Then only the wood flooring is attached.
This type of ceiling structure saves the use of wood when compared with other options. You can use not solid boards, but wooden planks up to 1 meter long. This is considered a waste material, so its cost is not high.
Suspended ceiling structure