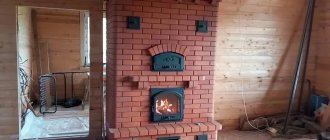
An excellent option for organizing an autonomous heating system in a private house or bathhouse is a stationary stove with a water heating boiler.
Such a device is practical and economical, has high heat transfer and efficiency, which allows you to effectively heat rooms of various sizes in a short period of time.
It is quite easy to organize such a system yourself, without involving expensive specialists.
Rules for installing a boiler in a brick kiln
Making good boilers for installation in a stove with your own hands is not a difficult task, but there are subtleties and nuances here too. For example, it is better to take a thick-walled and seamless pipe for them, but in the most extreme case, when there are no other options, you can take one with a seam - but be sure to weld it again before that.
It is best to weld the supply near the edge of the upper thick pipe, but the return – wherever your heart desires, it will still work. Further, pipes cannot be butt welded - it is necessary to chamfer along their edges so that the welding seam is the same thickness as that at the pipe walls. But when butt welding, some places can easily turn out to be poorly welded, and therefore the boiler will begin to leak.
The optimal distance between the knees is 5-6 cm, this is the most convenient way to cook. By the way, if it suddenly turns out that the new boiler is leaking into the brick oven like a sieve, it’s okay. All holey places will just need to be cleaned with a grinder, a grinding disc and rinsed again.
It is necessary to place the boiler in the furnace strictly according to the level, although very small errors are still acceptable. But - small.
System design
The operating principle of a homemade heat exchanger is that it receives heat from a heating device, which heats the water. The liquid is distributed through the pipes, thereby heating the room evenly. This system significantly saves fuel consumption, since the room is heated much faster.
Conventional stove heating can be improved in the following two ways:
- re-build the furnace to fit the dimensions of the heat exchanger;
- carry out the installation of a technical device that is designed based on the size of the firebox.
It is important to know that the heat exchanger must be connected to the entire heating system so that the pipe through which low-temperature water is supplied is located as low as possible.
Do not forget about the expansion tank, which is installed at the very top of the pipeline.
Thanks to this element, the volume of heated liquid is regulated and accumulated air is released. If the heat exchanger that carries out the natural circulation of the coolant turns out to be ineffective, it is necessary to install a pump that will do this automatically.
Masonry technology
Before you start laying the stove with your own hands, you need to choose a diagram and draw an order plan with your own hands; it is better to use ready-made, proven diagrams. An example of such a stove is the Kuznetsov stove with a heating register built into the smoke duct on one side of the stove.
Kuznetsov stove, video
To lay such a stove with your own hands in a private house, you will need the following materials:
- concrete for the foundation;
- red solid brick;
- refractory fireclay brick;
- masonry mortar or its components: clay, clean dry sand, clean water;
- metal pipes for making a heat exchanger.
You also need to buy ready-made elements: grate, doors, dampers, dampers, roof penetrations. The price for these elements is usually quite high, so you need to calculate in advance what exactly is needed.
Required tool:
- trowels and trowels;
- rubber hammer;
- grinder with a circle for bricks;
- levels, plumb lines, twine;
- roulette.
Do-it-yourself sequence of operations
- Mark the position of the future furnace and pour a rod-reinforced foundation 5 cm below the finished floor level. It should not come into contact with the foundation of a private house.
- After the foundation has completely dried, two rows of masonry made of red solid bricks are laid out according to the order scheme and drawing on ordinary cement masonry mortar; their purpose is to level out possible unevenness in the foundation and lay the foundation of the furnace.
- The next rows are laid on clay masonry mortar according to the chosen pattern, observing the dressing indicated on it. The solution is made from pre-soaked red clay, quarry sand and clean cold water. The optimal ratio of clay and sand is determined experimentally.
Properly prepared masonry mortar should not be too plastic or crumbly. You can check it this way: roll a ball the size of a tennis ball out of the solution and drop it from a height of 1 m onto a flat surface. It should be slightly deformed, covered with small cracks, but not crumble.
- The thickness of the joints between the rows of bricks is no more than 5 mm. The smaller the seams, the more uniform the structure of the stove and the better the heat transfer. The jointing is carried out immediately as the laying proceeds.
- The doors are installed like this: an asbestos sheet in the form of a strip is placed on the previous row of bricks at the location where the door is installed, and the door is placed on it. Annealed wire, each at least 40 cm long, is pre-inserted into the holes in the corners of the frame. This wire is fixed between the rows of masonry. If this is not done, sooner or later the solution will crumble and the door will fall out. They lay several rows, all the time checking the position of the door according to the level. An asbestos strip is also laid over the door and brick is laid on top.
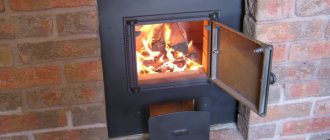
- The firebox is lined with fireclay bricks. Red ceramic is not suitable for these purposes - it will crack over time, and the vault may collapse. In diagrams, fireclay bricks are usually indicated in yellow.
- Under the hob, grooves are made in the brick to the thickness of the slab. This is done to reduce heat loss and prevent smoke. The plate is placed on the solution.
- A homemade heat exchanger is installed in the smoke channel during the masonry process at the stage of laying the row through which the lower fitting exits. It is installed in the combustion chamber when laying the bottom row of the firebox. There must be a gap of at least 5-7 mm between the heat exchanger and the brick.
- It is imperative to provide cleaning doors in the smoke channel with the heat exchanger, since soot will settle on the register, which will worsen its heating. The number of doors must provide access for cleaning to any part of the heat exchanger.
- The upper part of the smoke channel is equipped with a damper or damper. The chimney itself can be either brick, or you can buy and install a sandwich chimney. In this case, you need to follow the rules for passing pipes through the roof, and make fluff on brick pipes.
The distance from heated metal elements to combustible structures must be at least 25 cm! Passages through the ceilings are insulated with basalt fiber or other non-combustible materials!
- After the oven has dried, it is carefully heated, without overheating, several times. Check the draft, stability of firewood combustion, and absence of smoke leaks. After this, you can install an external heating circuit and fill the system with water. The oven is ready for use.
Heat exchanger connection diagrams
Within the framework of this publication, we will not describe methods for making stoves, but will immediately move on to the binding. If you want to make a water heating stove yourself, we recommend that you read the separate manuals:
- homemade heater for the garage using solid fuel and waste;
- instructions for fireplace and stove laying;
- diagram and order of a hob with a water boiler.
If you purchased a factory-made stove with a heat exchanger, carefully study the attached instructions. The documentation always indicates the diameters of the pipes and methods of connecting the water circuit to heating devices. Usually 2 schemes are used:
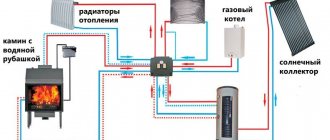
- An open system with gravitational (convective) coolant flow.
- Closed radiator network with forced movement of water from a pump.
It is not necessary to use a circulation pump in this scheme, but the forced movement of water noticeably speeds up heating
Note. In gravity circuits, circulation pumps installed on the bypass are often used. The goal is to reduce the temperature difference between supply and return, increasing the coolant speed and heating efficiency. In the absence of electricity, the system will continue to operate in gravity mode.
Gravity flow is organized by increasing the diameters of highways and the slopes of horizontal sections. The minimum cross-section of the distribution manifold with a gravity scheme is 32 mm (inch and a quarter), the slope is 3...5 mm per 1 linear meter. The open expansion tank is at the top point, where all the air entering the system goes.
The safety group on the feed is not shown, but it must be present
With the closed circuit shown in the figure above, the coolant is under pressure (at least 1 bar “cold”) and moves under the pressure of the pump. The membrane expansion tank is located at the lowest point and is connected to the return line through a shut-off valve. It is mandatory to install a safety group with an air vent, pressure gauge and relief valve.
Advice on choosing a scheme. When buying a stove for a home with water heating, the homeowner obviously expects the system to operate autonomously. Hence the conclusion: for joint work with a hot-water furnace, a gravity-flow scheme is best suited. After turning off the light, circulation in the circuit will not stop and the heat exchanger will not burn out.
An example of a gravity circuit powered by a brick stationary stove
Application of pyrolysis furnaces
Long-burning stoves using wood, pellets or sawdust are often used to heat utility rooms and workshops, garages, and greenhouses. They can also be used to heat a house, but it is necessary to ensure that the stove is sealed, as carbon monoxide may be released.
If you use a pyrolysis stove to heat a garden or residential building, it is better to equip it with a water circuit connected to the heating radiators, and install the heating unit itself in the boiler room.
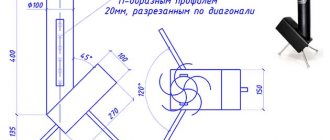
This article talks about how to simply make a smokehouse for cold smoking, which at home will help you prepare real delicacies from the most ordinary products. You can find out how to make a smoke generator for cold smoking by looking here. Here you will find the most understandable drawings for creating an effective potbelly stove with your own hands: https://gidpopechkam.ru/pechki/burzhujki-chertezhi.html
Helpful tips and general expert advice
In some rooms it is necessary to build stoves into a niche or install them on rectangular / square bases. To do this, you will need to mark and pour the foundation. After assembling the body, taking into account the order, secure the doors, combustion chamber, hob and other elements.
During the first heating, you need to heat the stove to maximum. This will allow you to evaluate its performance and effectiveness.
Drawings of the future stove can be created with your own hands or ordered from professionals. If you do not have experience in design, it is better to entrust the work to specialists. They will offer ready-made schemes tailored to your requirements.
Furnace with a water circuit for heating a house: device and choice
The heating system in any home is an important component, without which it is impossible to imagine a home. A stove with a water circuit for heating the house will come to the rescue. It is the most versatile option; it can be purchased or made with your own hands from fire-resistant bricks. Yes, it will be made of brick - it will be a traditional stove. Only with the ability to heat not one or two rooms where its dimensions reach, but the entire house.
Diagram of a furnace with a water circuit
What types of water-circuit stoves are there?
Having already touched upon the issue of the species diversity of stoves, it is worth dwelling on it in more detail. A stove with a water circuit for heating a house can be: wood-burning, cast-iron, brick, or buleryan.
The first type is a steel firebox, the wall thickness of which reaches 6 mm. There are tubes built into it in which water circulates. These tubes, along with water, are heated by the combustion of solid fuel. These can be mounted anywhere, which meets safety regulations.
Steel stove with water circuit
The second type has certain advantages over wood-burning ones. It is more reliable to heat a house with a stove with a water circuit made of cast iron, since it is resistant to elevated temperatures; it certainly does not deform from the high combustion temperature, which is most often formed when burning dry wood. This type has a long service life, longer than all other types of stoves. Such furnaces are equipped with a “water jacket” - these are steel sheets connected to each other, coated with special paint. They have 4 adjustable legs that allow you to set the level of the unit during installation.
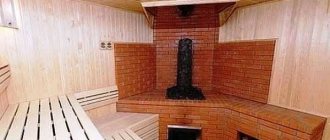
Brick stoves with a water circuit can be used for heating, both autonomously and connected to the system. It is reliable and multifunctional. In general, this is a standard wood-burning stove that grandmothers have in villages, only modernized. It can additionally heat the entire house using the built-in coolant. This type is considered the most effective, since their efficiency level is close to 85%, and you can cook food and even sleep on such a stove.
Laying a brick oven with a water circuit
Buleryan is an original solution to choosing a stove with a water circuit. It only runs on wood due to its design features, so before choosing this type, consider whether it will be possible to replenish wood supplies in large quantities. Such a stove is a cylinder with a chopping block and a combustion chamber. In the latter, the wood burns, or rather, it smolders, because after it is fully loaded, the door is closed and all the fuel smolders. The results of this process are the formation of gases that are burned in the upper level. Buleryan contains curved pipes for air, which can actually serve as a water circuit for the heating system.
Calculation and its influence on choice
In order to choose the right stove for heating a house that has a water circuit, you need to learn about all the important parameters. These include:
Power. On stoves this indicator is indicated through a dash. These are the characteristics of the total thermal and power of the heat exchanger. The first indicator indicates how much thermal energy the stove can provide with its infrared radiation, which penetrates through the glass of the firebox and convection channels. An important component is the second indicator - this is the heat that is transferred directly to the radiators. You can read about which heating batteries are best for a private home on our portal. Now an example: if the total power of the furnace is 12 kW, and the heat exchanger is 5 kW. To heat 10 square meters of a home, 1 kW is needed, that is, such a unit will heat a house with an area of up to 120 square meters. But please note, these figures imply constant combustion of fuel
If you use firewood, this process will be very labor-intensive. When considering the dimensions and weight of the stove, it is important to know that they are quite heavy, and the dimensions of the model should not contradict fire safety rules. That is, the stove must fit in the house without creating potential dangerous situations. Calculation of coolant volume. You need to know this in order to mount the heat exchanger to the system
It includes the volume of all pipes and radiators. The length of the pipes and the number of sections in the batteries have an influence. The latter can be calculated using the calculator proposed below, and regarding pipes, you can use the table presented below.
Calculator for calculating heating radiator sections
Date: September 25, 2021
Choosing the best option
It will be difficult to install a massive brick stove in an already built house. In this case, water heating is best organized on the basis of a metal potbelly stove, which can be placed on a reinforced wooden floor without pouring the foundation.
However, if it is possible to make the foundation as it should be, then preference should be given to a more reliable brick stove structure.
The water circuit around the house for a wood-burning stove is best made from thick steel pipes and with natural circulation of coolant
Installing a circulation pump and/or accumulator in the heating circuit in question is a waste of money and zero additional benefit. They will only complicate the installation of the system. And if the lights go out, these devices will create problems. Whereas the heating option without them will continue to calmly heat the house if there are problems in the electrical network.
Radiator assembly
Assembling radiators is a simple process, because it completely repeats the process of disassembling them. The sections are connected by nipples that have left and right threads on both sides. This way, the sections at the top and bottom will be pulled tightly against each other when the nipple is turned. When the gap becomes 2 cm wide, you should wind the asbestos-impregnated cord and only then tighten the nipples completely.
When the entire structure is assembled, you should wait for the drying oil to dry, and then check the joints for leaks. that is, supply water under high pressure to the radiator. This will ensure the subsequent use of the radiator and there will be no leaks.
The return and coolant supply pipes must be connected diagonally to the radiators. Holes that remain open must be closed with plugs. It is better to take inch pipes. On one side of the radiator there will be a right-hand thread, so there will be no difficulties with connection. On the opposite side, use a coupling with a squeegee and a nipple.
Rules you need to know when building a chimney
Diagram of a brick chimney.
The structure for solid fuel boilers is made together with the walls of a private house. These elements are constructed according to a single principle, and it does not matter whether the channels will be used as ventilation or smoke. You will definitely need to build a foundation for the chimney. The base structure can be made of brick or concrete.
In all cases, a foundation project is prepared. During the design process, it must be taken into account that its height must be at least 30 cm, and its width must be such that the base structure extends beyond the border of the chimney device by 15 cm or more. If the chimney is made as an element of the external wall, then you need to know that the lower part of the chimney base must be placed at the lower level of the wall base.
During the construction of chimney structures, special attention should be paid to the quality of tightness. To make a durable brick chimney, you will need to follow the rules
The material should be laid so that the seams overlap the elements of the next row. In most cases, the same mixture is used as for the construction of load-bearing walls of the structure.
In the process of making a chimney for a solid fuel boiler, it must be taken into account that its internal base must be smooth.
Therefore, when performing construction work, you need to use a template. The walls between the elements must be at least half a brick thick. For ventilation elements, the thickness of the partition should be 2 times less.
At the end you will need to make a header. The extreme parts of the element must protrude beyond the structure by 10 cm or more. The outlets of the ventilation ducts must be created under the head; in most cases, 2 walls are used, which are placed opposite each other. This placement method will prevent air from being blown in.
Selection of materials
The job of the heat exchanger is to ensure that the coolant transfers as much heat as possible. Therefore, it is recommended to pay attention to the thermal conductivity properties of the material. Copper pipes conduct heat seven times better than steel pipes. Based on this, we can conclude that to transfer the same amount of heat, you need to install 3.5 m of copper pipes or 25 m of steel products.
Heat exchangers made of red metal are the most economical in operation. However, copper is a very expensive material. Therefore, to manufacture such a device, it is more advisable to use steel pipes, the diameter of which should be at least 32 mm.
If coal is used as fuel, it is recommended to use cast iron pipes to create the apparatus, since this material has better strength properties. In addition, it is more slowly susceptible to the destructive effects of fire and high temperatures.
What dimensions should the chimney have?
Chimney placement options.
The draft in the chimney channel will occur due to differences in the height of the inlet and outlet, as well as due to temperature differences. To ensure continuous operation of any heating device, you will need to make a strong draft
Before starting masonry, it is important to decide what type of heating device will be used, what dimensions it has and how many channels it is planned to make
The number of channels can be determined taking into account the power of the heating device, fuel and the special requirements of the device manufacturer.
If the diameter of the chimney channel significantly exceeds the calculated value, the draft in such a channel will greatly decrease. As a result, there will be frequent interruptions in the functioning of a gas boiler or other heating device. If the channel diameter is smaller, this may impede the removal of combustion products. It is for this reason that in most cases the operation of boilers stops.
To make brick channels, you will need to use ceramic brick grade M50-75. You can also use concrete blocks that have channels with a square cross-section.
If you plan to use ceramic bricks to make a chimney, then you should know that its minimum cross-section is 14x14 cm. If you plan to purchase material with a round cross-section, then the permissible diameter is 15 cm or more.
In a brick chimney whose height is less than 5 m, the dimensions of the channels must be increased to 14x20 cm or 18 cm in diameter. Such structures should be made in the walls between rooms that are planned to be heated. In this way, it will be possible to create a certain protection of supporting structures from cooling, which in most cases leads to a weakening of traction.
It is necessary to try to group the chimney channels so that in the device that will be installed above the roof, their number is maximum. In this way, it will be possible to reduce the cost of manufacturing work and significantly improve the performance of the chimney device.
Fuel
The following types of raw materials can be used:
- Coal (brown, stone, reach temperatures of 1500 degrees);
- Logs (the most accessible, with a long shelf life and low cost);
- Fuel briquettes (they are convenient to store, burn for a long time and evenly).
By the way. Which resource to choose depends on personal preferences. This parameter does not affect the furnace design.
Important nuances
A heat exchanger for water heating, made of smooth structure pipes, is called a register. The device resembles a kind of lattice. Simpler designs, which are presented in the form of a rectangular or cylindrical tank, are no less popular.
When manufacturing a heat exchanger for a furnace, it is recommended to follow the following rules:
- The space inside the device must be 5 mm or more. Otherwise, the water may boil quickly.
- It is important that the thickness of the pipes is at least 3 mm, otherwise the material will quickly burn out.
- The distance between the heat exchanger and the walls of the combustion chamber must be at least 10 mm so that the metal can freely expand when heated.

