This information may be useful to anyone who has ever encountered or will encounter the installation of socket boxes. Let us describe it as briefly and concisely as possible, what is a socket box, how to install it correctly and how much its installation may cost. You will also learn how to put back a fallen socket and what can be used instead.
- Installation Rules
- Socket sizes
- Installation in concrete
- Grilling
- Installation in drywall
- The socket doesn't stay in place
- Installing socket boxes in tiles
Remember three basic rules for a quality installation:
| Rule #1. A correctly installed socket box should not protrude or be too recessed into the wall, that is, it should be built flush with the finished wall. A finished wall is considered to be a wall that has already been prepared for painting. We will consider cases when it is planned to lay tiles or some other false panels on the wall below. |
| Rule #2. Socket boxes must be installed strictly level, even if there is only one socket box, it must be set level to avoid difficulties in the further installation of sockets or switches. |
| Rule #3. A correctly installed socket box should hold very tightly in the socket. |
You can also add a few nuances that will help you understand what kind of electrical outlets you need; how to prepare holes (sockets) for them; how to properly insert a cable into a socket box; and how to install it correctly.
Nuances of choice
In general, when choosing a socket box, it is necessary that the person selecting them knows where they will be used - if you purchased your own socket box for the required material, then the question of how to secure this device should not arise.
Another thing is their basic check; it is especially good to check those that will be fixed in drywall, since there are moving parts there. Even those that will be planted on the solution must be intact and without cracks. Separately, it is worth checking the bolts that will screw the base of the socket to the body, and also trying it on so that the socket is properly fixed inside. In general, the ideal option is to purchase sockets and socket boxes as a set.
Source
Socket sizes
Everything about the size of the socket boxes is simple, the most common size of the socket box is 70mm in diameter. In the vast majority of cases, they all have the same size. And most modern sockets and switches are designed specifically for these sizes.
Types of socket boxes
It is important not to forget about such a parameter as the depth of the socket box . But even in this case, everything is simple, if you plan to connect several wires in the socket box, in addition to the socket or switch itself (for example, use a socket box instead of a junction box), then you will need a deeper socket box. If possible, use deep socket boxes; they are then easier to work with and install sockets in.
Switching wires in a socket box instead of a junction box
Remember! - Once installed correctly, the socket box never reminds of itself again.
Required tools and materials
When large-scale electrical wiring work is being carried out, all the necessary tools will most likely already be at hand, but if the only thing on the agenda is the installation of socket boxes, then you will need the following:
A detailed overview of the tools required for installation of socket boxes in this video:
The rest does not apply to the work itself, but a broom, cleaning rags and, possibly, a vacuum cleaner will also come in handy.
Installing a socket box in concrete
What needs to be done to install a socket box in concrete? Right! - Hollow out a hole under the socket box! For this, it is best to use a drill with a diamond bit, but this is not the best option in terms of cheapness. A more convenient and practical option is a hammer drill with a concrete impact bit, or simply cut out the concrete with a grinder and a stone disc (but this is a very dirty method, and dust will be absolutely everywhere: in the ears, eyes and in the entrance).
It should be noted that when gating, a lot of fine dust is generated in the room, and first of all, installers should take care of their health and purchase standard protective equipment: masks, respirators, headphones and a construction vacuum cleaner.
Future holes must first be marked. We draw a line along the level and place marks on the wall. If you have 2 or more socket boxes, then the distance between the centers of the circles is 71 mm . This is a distance calculated empirically by professional electricians, tested with sweat and blood! Remember 71mm!
The easiest way to make marks is to attach a group of sockets to the wall.
Types and characteristics of socket boxes
Modern sockets in appearance and installation method differ significantly from those installed in Soviet-era houses.
If previously they were simply embedded in the wall without the possibility of replacement, today installing them and, if necessary, changing the socket is not particularly difficult.
A socket box is a mounting device designed for reliable fastening of electrical installation products for hidden wiring.
Regardless of whether the installation of a single or a group of socket boxes is carried out, before their installation, the walls are chipped
When buried in a brick or concrete wall, these mounting boxes or glasses are secured with alabaster
The socket box is fastened to partitions and false walls made of plasterboard using adjustable spacer legs
Almost all building materials and slab options used in rough wall cladding are suitable for installing socket boxes in them
In the line of products for hidden wiring you can find options for arranging log and timber buildings
Socket boxes are used for installing single switches, power points and socket blocks
During operation, it is easier to tighten the “loose” mechanism in the socket box. With its use, installation is carried out faster and more accurately
Selecting a socket box based on wall material
The main selection criterion is the material of the walls into which the socket boxes will be installed.
On this basis, there is the following classification of boxes:
- structures intended for installation in walls made of solid materials: concrete, reinforced concrete, aerated concrete, brick;
- glasses for walls made of composite materials: plasterboard, plastic boards, chipboard, plywood and others.
In the first case, the socket box is a round glass without any additional elements. It is fixed to the wall using mortar.
There are mounting holes in its walls or bottom for electrical wiring. When installing a socket box, it is enough to remove the jumpers and push out the plug.
Socket boxes with side docking units allow you to quickly and easily install two or more sockets at once
To install several sockets located nearby, you can use glasses, on the side of which there is a fastening mechanism. The socket boxes are connected to each other using special grooves and combined into blocks.
Drywall boxes contain special plastic or metal clamping tabs designed to secure elements into hollow walls. The clamps are attached to screws, which rotate to adjust their position.
When the screw is turned, the foot rises or lowers. Clockwise rotation brings the clamping element closer to the wall and secures the glass in the drywall
What shapes are the products produced in?
Round socket boxes have become most widespread. It is very easy for them to make a hole in the wall using a variety of tools.
Round glasses can be used both for mounting a single socket or switch, and they can be combined into groups, connecting to each other using docking units.
Square boxes, although not used as often, have certain advantages. Their volume is much larger, so you can hide a lot of wires in them.
They are often used to install elements of the “smart home” system. There are single and group square-shaped socket boxes designed to install up to five sockets.
There are also oval boxes on sale, which, like square ones, have a large internal space. They are convenient because you can immediately connect a double socket to them. All the products described above are mounted in walls and used for hidden wiring.
There is another type of mounting boxes that stand somewhat apart - plastic linings or multiboxes, designed for open installation on the baseboard. They are designed for one or more outlets and are usually square in shape.
This type of installation of plastic overlays can only be used on dismountable plastic skirting boards
External socket boxes have two modifications - designs with installation to the middle of the baseboard or to the floor. Since multiboxes are mounted on top of the baseboard, their distinctive feature is their aesthetic appeal and original design.
Installation box size
An important parameter of socket boxes is their dimensions, which are selected based on specific installation conditions. The fork dimensions are 60-70 mm in diameter and 25-80 mm in depth.
Standard designs have external dimensions of 45 x 68 mm, but it must be taken into account that the internal depth in this case will be 40 and the diameter 65 mm.
When installing several round socket boxes in a group, one of them, which has an increased depth, can, in addition to its main purpose, serve as a distribution box
Glasses of increased sizes, the depth of which is about 80 mm, are advisable to use when there is no distribution box in the electrical wiring, and its functions are performed by the electrical outlet itself. As for square products, as a rule, they have a size of 70x70 or 60x60 mm.
Material for making mounting boxes
The most popular are socket boxes made of non-flammable plastic. They can be installed in concrete walls and structures made of composite materials.
There are also metal boxes, which were used everywhere in the past, but today they have almost been replaced by plastic products.
Metal socket boxes are usually installed when installing electrical wiring in wooden houses. They are made of galvanized or non-ferrous metal and cannot be welded, so the connection to a metal pipe is made by soldering.
For safety reasons and fire prevention, when installing electrical wiring in wooden houses, it is necessary to use metal socket boxes
Hole cutting
After marking, in the marked centers of the circle it is necessary to make a hole using a drill with a slightly larger diameter than the crown drill (for example, an 8-10mm drill). We drill a hole with a margin, taking into account the length of the drill bit of the crown itself (but do not forget about neighbors and thin walls). This method is also suitable when working with a diamond core bit in drilling mode.
The process of gating. After drilling holes in the center of the future circle, you need to use a crown to go deeper into the wall a few millimeters (this only applies to the method of working with a hammer drill!). Along the intended circle, you need to drill the maximum possible number of holes to make it easier for the crown to “gnaw” the concrete.
With a diamond crown, you just need to drill - without chiselling, periodically letting the crown cool. It is worth noting that if a diamond bit gets on the reinforcement, its service life is significantly reduced.
When working with an angle grinder, the whole task comes down to making cuts in the wall to the required depth and hollowing out the area where the socket boxes will be located.
We proceed to the direct installation of socket boxes
Before starting work, it is advisable to have a complete set of consumables. Power cable, required number of socket boxes (with a small reserve for scrap), building mixtures, PVA glue. The power tool you plan to use to cut the holes.
Marking
Regardless of whether the power cable is laid in advance, or you will be trenching the walls for it at the same time as drilling niches for sockets, the installation of socket boxes begins with careful marking.
It is impossible to guess where electrical appliances will be placed. Perhaps tomorrow you will want to rearrange your apartment. Therefore, sockets are installed according to the following principle:
The horizontal position must also be taken into account. From corners, ceiling, floor, door frames - a distance of at least 15 cm. From heating radiators, no closer than 50 cm. Of course, you cannot place sockets above heating appliances (with the exception of the “warm floor” system) and above kitchen stoves. Electrical installation rules and SNiP prohibit the installation of sockets and the laying of wires on walls directly facing the street.
Making holes
There are three main ways. There are no advantages or disadvantages between them. It all depends on the tools and attachments you have. There is no fundamental difference between installing socket boxes in a brick or concrete wall, so the technology is similar.
Advice! What to do if reinforcement gets in the way of the crown? (Applies to concrete walls only).
Identifying the metal under the crown is not difficult. You definitely can’t go wrong: the deepening stops and a characteristic knocking and vibration appears.
The best advice is to change the location of the outlet. The reinforcement has a pitch of 15–30 mm; if the placement is not so important, move the hole by 3–5 cm. Before doing this, try to determine which reinforcement you are in: vertical or horizontal. This will help avoid further mistakes.
white tiles with black grout on the floor
If it is impossible to move the socket block, you will have to remove a piece of reinforcement. To do this, knock out a “glass” of concrete to see the metal. Use a bolt to break the area around the reinforcement a couple of centimeters. A wire with a diameter of 5–6 mm can be cut with a chisel.
Thicker reinforcement will have to be drilled out.
Tip: Don't be afraid to damage the integrity of the wall around the holes. Of course, you want everything to look beautiful even at the preparatory stage: the holes are like in the picture, a perfectly even row. You will simply waste extra time; all uneven areas will be plastered over and covered with the finishing surface.
By the way, if you are installing socket boxes in a brick wall, drilling will not be a difficult task. The material is soft, easy to drill even without a hammer drill: with a conventional drill with a Pobedit drill bit.
If you are making a niche in red brick, try to get between the cement layers. There is less damage (concrete breaks out in pieces), and it is easier to select a hole.
The only condition under which this method is indispensable is working with a reinforced concrete wall of special strength. You will simply dull an expensive bit, and the discs on an angle grinder cost pennies.
Together with the grooves for the power cable, we simply cut out rectangular or square holes with a margin around the socket boxes.
It definitely looks rough. On more or less treated walls, the hand does not rise to such blasphemy. And if finishing is still a long way off, this is the fastest and most effective way. Also suitable for brick walls.
The end result is ready-made holes for socket boxes with connected grooves. We clean the niches with a brush or a construction vacuum cleaner, and be sure to prime them.
Installation of boxes
In accordance with the markings, we try on the assembled blocks. Installation of socket boxes is carried out regardless of the quality of the holes. If the box rests on an incorrectly drilled niche, it needs to be expanded. Marking is our everything! Don’t be lazy at this stage, even if you don’t want to pick up a chisel again and make a mess.
Experienced installers attach the socket boxes to some kind of guide, fix the ideal location, and then cover the boxes with alabaster.
If you simply sit the socket boxes in a liquid solution, they may move before they dry completely. You'll have to redo everything again.
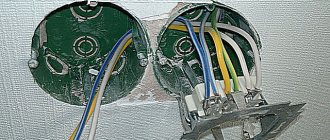
The wires must be left with a margin of 10–15 cm. When installing sockets, you will remove the excess, leaving a small installation loop.
What to do if, while drilling, a drill or bit gets into the reinforcement?
There are several ways to remove rebar. One of the fastest and most painless is knocking out the reinforcement with a chisel - an attachment for a hammer drill. If the crown gets into the reinforcement (an indirect sign of it getting into the reinforcement is sparks or a clear slowdown in the drilling process), it is better to remove this reinforcement, otherwise you will ruin the crown.
The second less convenient way is to use an old crown. It doesn’t matter which way you do it, with a diamond or a drill bit, in both cases we simply drill out the reinforcement. The reinforcement metal is very soft and can be easily broken through with a hammer drill. And the third, dirty way, is to simply drill out the reinforcement using a grinder with a diamond disc on the stone.
Surface preparation and marking
Marking for socket box
First of all, you need to get rid of all foreign objects (wallpaper, dowels, etc.). Make sure the surface is smooth and remove any imperfections if necessary.
Next, you can start marking. First, decide how far from the floor you need the outlet. There are no special restrictions here, so everyone chooses the most convenient place for themselves. Some place them closer to the floor, others choose a standard location. The only caveat is that it is not recommended to place sockets near window and door openings, as well as in the vicinity of gas and heating mains.
Outline of the socket box
So, we have decided on the distance, now we make the markings:
- We mark the central point of the future niche.
- Using a level, draw a crosshair at this point.
- Depending on the selected diameter, mark this distance on the lines.
- We apply the socket box to the intended boundaries and draw a circle (square).
Well, your markings are ready, it's time to start creating the hole.
Embedding a socket box in concrete
The best way to secure socket boxes is to embed them in the hole using alabaster or rotband. A small life hack - so that the solution does not harden too quickly and you do not have to wait a day - you need to mix alabaster with rotband.
First, use a vacuum cleaner to remove all dust from the hole and moisten (prime) the hole with water. And only after this, we apply the solution with a small spatula, spreading it along the inner walls of the hole. The solution should be thick enough not to leak out of the wells. It is important to understand that the area of contact between the solution and the socket box should be maximum! Plus, coat the socket boxes themselves with the mixture. The solution will envelop the socket box from all sides and adhere well to the base of the wall, only then can we say that the socket box is installed efficiently!
Using a large spatula, remove excess mortar while leveling the surface of the wall. Before this procedure, it is necessary to remove or screw in all the screws of the socket box.
Laying the cable in the socket box. It is best to lay the cable in an already installed socket box; the windows for the cable are easily knocked out with a screwdriver, and it is better to make channels for pulling the cable between the socket boxes in advance. When the solution has cooled, you can safely insert the cable into pre-made holes or recesses.
If you don’t have that much time and the cable needs to be installed together with the socket box, try to align the socket boxes as accurately as possible. You can insert the cable into any hole, but it is better not to use the side windows for this, so that there are no difficulties with the subsequent installation of sockets.
Important! The entry of the cable into the socket box should not in any way interfere with the future socket, especially from the side of the spacers. A very common mistake when installing socket boxes is to break the wires with a spacer from the socket - in this case, a dangerous potential may appear on the socket body, or a short circuit may occur when the electricity is turned on.
Ceramic tile
A diamond bit is used to cut holes in ceramic tile walls. Before starting work, make a template with holes from plywood. It is glued to the tile with double-sided tape. During drilling, the crown is watered. Otherwise, the tile may overheat and it will crack. It is also not recommended to use an attachment with a central drill. It can cause the ceramic to crack.
The resulting openings in the ceramic tiles and the base of the wall are filled around the perimeter with alabaster or gypsum mortar. The socket boxes are inserted into the seats, having previously pulled the wires through the holes in the boxes.
Drilling holes in ceramic tiles with a diamond core Source www.1shop.lv
Hollow panels
For a group of block socket boxes, a rectangular opening is cut with a grinder, a block is inserted into it and coated on all sides with alabaster mortar. You can use a trick. If the bottom of the PR reaches the opposite surface of the void, then a hole is drilled in it and a dowel is inserted. The socket box is secured by screwing a self-tapping screw into the dowel through a hole in the bottom. If the depth of the hole is large, then you can place a wooden spacer.
At what stage of repair (finishing) is it better to lay a socket box?
This is one of the most pressing issues that not everyone thinks about at the beginning, but understands how important it is in the end. Ideally, you need to follow RULE No. 1 , but this does not always work out.
Therefore, you need to know in advance how much the layer of plaster or other layer (plasterboard, tiles, etc.) will protrude before installing the socket box. As a last resort, you can break this rule and install the socket box flush with the bare concrete wall. But in this case, when plastering the walls, the socket boxes will be recessed into the wall, to the depth of the plaster layer. It will not be easy to properly install sockets in such a socket box, but our electricians know how to do it correctly.
Preparing the solution
Since it is necessary to quickly fix the socket in a concrete wall, gypsum or alabaster-based mixtures are used for fastening. A pure gypsum solution hardens in 3-5 minutes, which requires constant mixing of small portions of the mixture and regular cleaning of the container from the hardened material.
To increase the shelf life of the solution, use a mixture consisting of 3 parts gypsum and 2 parts Knauf Rotband gypsum plaster or equivalent. It is not recommended to use pure plaster due to the reduced mechanical strength of the hardened material.
The solution is mixed in a 3-4 liter container made of elastic material. To dissolve the powder in water, use a mixer clamped in the chuck of a drill or hammer drill (in non-stress mode). Before mixing the batch mixtures, the container is cleared of any remaining solidified solution.
Installation of socket boxes in gypsum board
When working with drywall, the cable is laid in advance or pulled through using technical holes and broaches. In the places of future switching (connections) of the cable, or in those places where there should be a socket box, leave a supply of cable, and mark outside where this cable is located. Mark the location of the future hole for the socket box in any way convenient for you, for example, screw in a self-tapping screw in this place.
Markings for socket boxes are made in the same way as markings on concrete. The distance between the centers of the circle is the same 71mm . It is important to consider that a drilled hole cannot be fixed (or rather, nothing is impossible for a good electrician), but before you call an electrician, you need to try to do it yourself.
Holes in drywall can be made with a regular wood bit, 68mm , using a screwdriver or drill.
After drilling the hole, you need to find the necessary wires, which should be right behind the wall. It happens that they are hidden in a junction box, or hang on a cable, with the help of which the wires can be pulled to the hole. Each master has his own way of pulling wires into hidden cavities, but that's a different story.
You need to insert the wires into the socket box BEFORE installing the socket box itself, otherwise it simply cannot be done.
Now comes the fun part. The most painful procedure is the correct installation of the socket box in the drywall. This is due to the fact that different manufacturers of socket boxes for plasterboard (or wood) have lugs for securely fixing the socket box to the ceiling wall (plasterboard, plywood, or whatever you have). In some cases, because of these ears, the rosette does not fit into the prepared hole, but this problem does not occur on all rosettes!
It is best to take care of this in advance when buying socket boxes. Make sure that the ears, when open, do not go beyond the circumference of the socket itself, for example, like here
If, nevertheless, you manage to buy the “wrong” socket box, then you can use one little trick: eyelets are made in plywood or drywall at a slight angle (it is enough to make them only on one side), after which the socket box can be installed normally. The socket box should fit into the hole normally at an angle. The main thing is not to overdo it and not to make a hole with a larger diameter than the outer edges of the socket box.
After all the procedures, we fix the socket box by tightening the screws
Common mistakes
Common mistakes made when installing socket boxes:
- Installation of socket boxes before the walls are finished, which makes subsequent leveling of the surfaces difficult. When installing parts that are skewed, you will have to remove the mounted boxes and then seal the parts again. An additional layer of plaster reduces the likelihood of contact between the crown and the reinforcement during drilling.
- Installation of socket mechanisms in walls without transition elements. This installation method is strictly prohibited, since it does not provide insulation of the wall material from the power cables.
- Horizontal skew of the socket block and erroneous determination of the distance between the centers of the mounting boxes. Incorrect positioning leads to the formation of gaps between the wall surface and the decorative frame of the socket module.
- It is prohibited to use foam for fixing socket boxes, since the material does not meet fire safety requirements. There are non-flammable foams of class B1, but the strength of the material is inferior to gypsum or alabaster mixtures.
What to do if the socket box pops out of the wall
In cases where you are faced with a dropped or poorly secured socket, there are several ways you can correct the situation. The simplest and most reliable is to screw a self-tapping screw into the base of the socket box (if it is concrete, a self-tapping screw with a dowel). The second method is to use a glue gun. Before gluing, it is necessary to remove all dust from the hole. More complex situations, when, for example, the base is gypsum and it crumbles. A plaster solution will help here ; the base must first be primed, for example with PVA glue.
The mortar method can also be suitable for plasterboard structures. In general, the solution is, in principle, a panacea for fallen socket boxes. In some severe cases, you can screw the socket or switch itself to the base of the wall.
Socket installation
Before installing the socket box, it is strongly recommended to lay out the wiring, otherwise it will be quite problematic to squeeze through it later. Calculate the length of the wires in such a way that there is a cable reserve of about 20 cm. This is necessary for convenient installation of the socket, as well as in case of its replacement.
Having connected the wires to the corresponding contacts, make a loop from the remaining part of the cable, avoiding any breaks. Now carefully recess the socket into the niche and secure it with screws. All that remains is to fix the cladding and enjoy the result of your work.
Installation of socket boxes in tiles or wall panels
It is better to lay the cable and install the socket boxes in advance, before laying the tiles. But if the tiles are already there and you need to make an outlet or switch, then crowns for ceramic tiles will help. The drill bits will help you carefully drill holes in the tiles.
The hardest thing is if there is concrete under the tiles that needs to be tapped. In this case, it is best to use a diamond crown, otherwise there is a chance of damaging the tile (when chiselling with a regular crown).
There is a cheaper and dirtier way, this is drilling a hole with a grinder, the main thing is to drill everything out as carefully as possible so that the hole is covered by the frame from the socket.
The nuances of installing a multibox on a plinth
What should you do if your house has already undergone high-quality repairs, but you need another point to connect electrical household appliances?
In this case, it is not at all necessary to rip off the new wallpaper and ditch the wall; you can make a socket directly on the baseboard.
Multiboxes fit all types of standard single sockets. They can accommodate not only electrical, but also telephone sockets, as well as Internet cable connectors.
However, it should be noted that this method can only be used on collapsible plastic skirting boards with a cable channel. Before installing the socket box, it is necessary to lay the wire inside the baseboard.
To do this, remove the cover from the part where the socket will be located. This operation is performed from a corner or from a nearby plug; simply pry the cover with a screwdriver and carefully remove it.
Cut the baseboard so that there is a gap the width of which matches the size of the plastic trim. Insert the multibox into it, thread the wire through the hole in its body, and secure the socket box with dowels.
What comes first, plaster or wires?
When to do the electrical wiring - before or after plastering? - This is a dispute between an electrician and a plasterer. It is more convenient for everyone to first complete their part of the work without any interference. But if you do the repairs yourself, or one technician does it, then the procedure will be as follows:
- What's your opinion, what comes first?
ElectricalPlastering
- The walls are cleaned of old finishes. Lines are drawn on them along which the wires will pass, the installation locations of socket boxes and junction boxes.
- Under thick wires and corrugation, grooves (grooves) are laid along the entire length to exit points: switches, sockets. The use of corrugated channels is mandatory when the walls are made of combustible materials. They are also used to make it possible to pull out and replace the wires. Laying cables in plaster is allowed without corrugation.
- Thin wires can be laid directly over the surface without gating, if a layer of plaster mortar will hide them.
- Next, the electrical wiring is laid and fixed to the wall.
- The walls are plastered with or without beacons. The ends of the wires protruding from the channels can be wound up and covered with film.
- After the walls have dried, use a hammer drill with a crown to drill out spaces for sockets, distribution boxes and switches. This is done after plastering, because otherwise it is not clear to what depth they will be installed.
- Then the final finishing is done - wallpaper or decorative plaster. After this, sockets and switches are inserted.
Coordination of teams of electricians and plasterers
Coordinating the work of different teams is a headache for any foreman or customer. Here the “electrician or plaster” dilemma is especially acute.
When choosing a method for installing electrical wiring before plastering work, the procedure will look like this:
Electricians run cables along the ceiling, install junction boxes, and connect electrical wiring to switches and sockets.
Please note that at this stage the wiring is not yet serviceable; Then the finishing craftsmen begin to work, plastering the walls; Then the electricians get to work again, whose task now is to align the socket boxes and install the panel; The master finishers appear again and do the final finishing; After them, the electrician appears again and installs sockets and switches. Now let’s consider the procedure if the method of installing electrical wiring after plastering work is chosen:
Now let’s look at the procedure if you choose the method of installing electrical wiring after plastering work:
- Finishing masters perform rough plastering work;
- A team of electricians simultaneously ditch, lay the wiring and put it into operation;
- The walls are being finished;
- Electricians install sockets and switches. By the way, the installation of sockets and switches, if the client does not mind, can be carried out in the previous stage of work.
Thus, the second method is much more practical and more controllable, unlike the first.
The possibility of accidental damage to electrical wiring during plastering work is also completely eliminated. Such damage can cause undesirable consequences, including redoing all construction work with a new one, which will require both additional time and additional cash injections, which is highly undesirable.
Conclusion
Due to the above circumstances, it becomes clear that it is better to do the electrical installation after plastering work: it saves time, money and nerves, which is important. Laying electrical wiring before the plastering process is used in cases where, due to certain circumstances, it cannot be done using another method.
Laying electrical wiring before the plastering process is used in cases where, due to certain circumstances, it cannot be done using another method.
Now the question “what comes first, plaster or electrical” will not cause any difficulties.
Know how to correctly decide on the method of installing electrical wiring and have a successful repair!
Similar materials on the site:
- How are phase and zero indicated?
- Methods for attaching the cable to the wall
- Electrical wiring in a wooden house - rules
- Detailed description of the NYM cable
Methods for transferring a connection point
There are two simple methods that allow you to transfer sockets without destroying the wall finish:
- By creating a loop - involves creating a jumper from the old “point” to the new connection point.
- By extending the wire - involves extending the electrical line in the cavity of the new groove.
If the new chosen location is much further than the previous one, you can make a complete replacement of the entire line by laying a separate wire from the distribution box located at a slight distance. But, unlike the two methods described above, laying a new line requires large-scale repair work.
An important point: it is necessary to extend the conductor with an electric cable, the cores of which have the same cross-section and are made of the same material
When choosing a daisy chain method for connecting a new outlet, keep in mind that such a connection is very unreliable for installing three or more power points. If one section or socket is damaged, the entire sequential chain of devices will be inoperative. And, according to the rules of the PUE, it is not allowed to be used to power powerful electrical appliances: microwaves, electric stoves, refrigerators, washing machines, etc.
Another negative side is that when two sockets are connected with a single cable, the current load sequentially passes from one device to another. Therefore, when several devices are plugged into sockets connected through jumpers at the same time, there may not be enough voltage for their operation.