All wall finishing work is completed by installing trim on the doors. If they were dismantled on purpose, there are no problems - they are installed in the reverse order. If the repair work was accompanied by the replacement of the door block, then very often the question arises about how to install trim on the door with your own hands.
At first glance, nothing complicated. However, in the process of work, moments arise when knowledge of the nuances cannot be avoided.
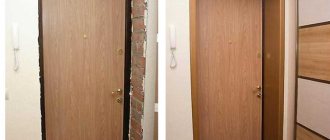
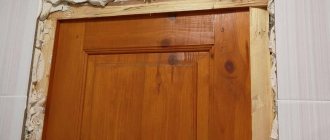
It is unlikely that anyone will agree to live for a long time in an apartment with such doors.
Below we will consider what material and what shape of trims to buy, as well as how to install them correctly - advice from professionals will help you do the work yourself quickly and beautifully.
Why are platbands needed?
After installing the doors, gaps remain between the frame and the wall, in which fasteners and foam are visible. Previously, the remaining open openings were plastered and then painted or covered with wallpaper, but now they are hidden under extensions (you can see how to do this in the material “Installing extensions on interior doors with your own hands”) and platbands.
The platband is a strip installed on the wall along the perimeter of the doorway on both sides of the door frame. Based on the above definition, it can be argued that the platband is one of the door elements that closes the gap between the wall and the door block for aesthetic purposes. Consequently, the appearance of both the wall near the opening and the door itself depends on the quality of its installation.
Properly installed platbands allow:
- visually align the door frame if errors were made during their installation that led to loss of verticality;
- beautifully hide the gap and hangers between the wall and the edge of the frame of the door block;
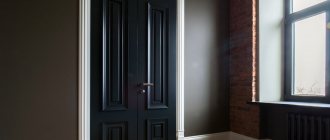
It is not only functional, but also very beautiful.
- serve as one of the interior elements that emphasizes the chosen style of room design (curly trims are installed, for example, Doriot, Greco, etc.);
- hide various wires and cables.
Different colors of the door leaf and trim allow you to turn the original ideas of designers into reality.
Simply put, the interior door, being part of the space in which the family lives, along with other elements of the room (floor, walls, ceiling, etc.) creates coziness and comfort. Therefore, special attention should be paid to the selection and installation of platbands.
Fastening planks with adhesive compounds
This method of fixing the frame of doorways greatly depends on the quality of the adhesive composition. Fastening with “liquid nails” has both advantages and disadvantages.
pros
- The advantage of this method is aesthetics, because after installation the fastening remains invisible.
- Can be used for elements made of any material - wood, MDF, plastic or metal.
Minuses
- If the wall surface where the elements are installed is uneven, fastening with “liquid nails” should not be done, since a loose connection can cause a loss of adhesion and the platband will fall off.
- If it is necessary to dismantle the frame, the planks installed with glue may break.
Rice. 7. Glue installation
To install platbands, you need to apply a layer of adhesive compound to the back side of the plank using a mounting gun, and then simply press it against the wall. The setting time of the glue depends on its composition and manufacturer and is usually indicated on the label.
Required materials and tools
To cover the door frame, you will naturally need platbands and one of the types of fasteners: nails, screws or glue. In addition, you need the following tools:
- screwdriver with drill and bit - necessary when working with self-tapping screws;
- hammer or pneumatic hammer for driving nails;
- jigsaw or hand saw for wood;
- miter box - for cutting corners with a hand saw;
- roulette;
- chisel;
- construction square;
- construction pencil;
- wax pencil when attaching platbands to nails or screws.
Without these tools, it will not be possible to install platbands.
Kinds
Despite the unique versatility of the product, the telescopic casing has 2 types of design: a standard product and an extended type. Standard products include platbands with one corner. Such designs can increase the width of the door frame by no more than 2 cm.
Expanded-type platbands can increase the size of the door frame by up to 15 cm. They are additionally equipped with an extension strip that has a special groove for the corner platband.
Thus, both versions of the product cope perfectly with their functional tasks. The main difference between them is the presence of an additional element and the principle of purpose of the device.
Preparatory work
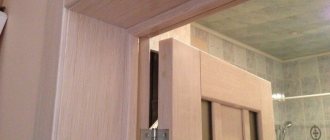
When installing platbands from the extension side, as a rule, no problems arise. But on the side of the door frame, carpenters quite often encounter a situation where the door block is either slightly recessed into the opening or protrudes outward. In this case, it is necessary to carry out work to hide these shortcomings.
The box is recessed
If the structure of the door block is recessed into the opening, and there is no way to correct the mistake by adding more, a thick platband is taken and an undercut is made in the wall under it. The work order is as follows:
- the platband is attached to the box;
- the line of the platband is marked on the wall;
- using a grinder with a cutting wheel for concrete or brick, an incision is made into the wall along the drawn line;
- use a chisel and hammer to knock out a recess for the platband - no need to be afraid to make the cut deeper or go beyond the line;
- a small amount of cement mortar is made (it is better to use ready-made putty);
- the knocked-out recess is lightly covered with mortar and the casing is immediately applied, as tightly as possible. Excess mortar that appears is removed first with a trowel or spatula, and then with a rag or rag;
- The casing is removed, and the solution is given time to set.
To prevent the solution from sticking to the back of the plank, it is first moistened with water.
The platbands will look strange if the box is slightly recessed into the opening.
The box protrudes
If the box protrudes beyond the wall, a plane and wooden trim will help. The technology is simple: the size of the box is marked on the back side, after which a quarter is selected from the back side of the casing using a plane. You need to work slowly, constantly monitoring the process of selecting a recess for the box.
Manufacturing
When the material for the manufacture of door trims has been selected and the necessary tools are at hand, then you can move on to the active phase of work on the manufacture of door trims. First, the workpieces are cut to size , which must be determined in advance. Their dimensions are selected individually for each door product. Note that a high-quality result is possible only if there are cutting knives on the machines used for work.
When the door trim is ready, it is sanded. This work is carried out in two stages:
- the first is performing rough grinding using an electric machine;
- the second is manual processing, during which they resort to the use of fine-grained sandpaper.
It should be noted that at the second stage it is necessary to remove circular scratches that occurred when working with an electric machine. When the platband is ready, it is covered with a layer of protective composition.
Installation instructions for platbands
When the materials have been purchased and the tools are at hand, all that remains is to figure out how to properly install platbands on interior doors.
All construction work begins with adjusting the material to size. This also applies to platbands. There are two ways to connect the vertical strips to the top casing. Let's look in detail at how the strips for each of them are measured and cut.
At an angle of 90
The rectangular connection of platbands can be of several types, and therefore measurements are taken in different ways.
Vertical. The connection of the planks with a vertical seam involves the placement of a horizontal platband between the side posts. In this case, the work is performed in the following sequence:
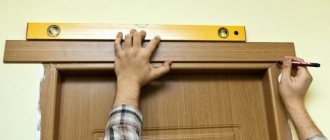
- on the side of the hinges, at a distance of 3-4 mm from them, a platband is applied to the door (the indentation is necessary for the doors to open freely) and at the top, on the inside, the line of the strip is marked;
The platband should not interfere with the operation of the hinges.
- a similar operation is carried out with the platband and on the side of the handle. In this case, one of the trims must be marked - they may have different heights due to the uneven floor;
- The top strip is applied to the door frame and brought to a horizontal position. If there is a visual distortion, adjustments are made in such a way as to hide the existing defect as much as possible;
- taking the drawn vertical lines as a guide, the length of the upper casing is noted;
When the platbands are connected vertically, the side strip is attached last.
- a mark is made along the top of the plank, close to the edge, which necessarily intersects the previously placed vertical lines;
- side trims are applied to the door one by one to determine their length - marks are placed opposite the drawn crosses on the slats;
For reference: in the absence of an urgent need to obtain precisely fitted joints, the width of the casing and the amount of offset from the hinges are added to the vertically installed bar from the lower level of the horizontal beam of the box.
- on the surface of the planks, cut lines are marked with a pencil using a construction square;
Construction square to help.
- Using a jigsaw or a handsaw (preferably using a miter box), the platbands are cut to size.
Horizontal simple. With a horizontal connecting seam, the upper casing is first applied to the door frame. After finding its specific installation location along the bottom edge, horizontal lines are drawn from both ends that will show the length of the side trims.
After this, the length of the vertically located strips is determined by analogy with the previous example. Experienced carpenters determine the size of the top platband after attaching the side ones - a perfect match is guaranteed: a horizontal platband is laid on the fixed strips. Marking its length is not difficult.
A line is drawn defining the height of one of the side trims.
Horizontal with an overlap. In some cases, designers suggest installing the top trim with slightly protruding edges. In this case, the top strip is laid on the already installed side trims, as in the previous case, and then the cutting lines are marked.
At an angle of 45
It is somewhat more difficult to join semicircular and figured platbands - you will have to cut the ends at an angle of 45o. Note that this is the most common way to join the trim at the top of the door, allowing you not only to hide the cracks, but also to get a beautifully designed opening. The technological operation consists of several steps:
Step 1. The length of the left and right trim is determined. To do this, on the side of the hinges, with an indent of 3-4 mm, a platband is applied to the box. The lowest point of the cut is marked. It is located above the door opening by an indent.
Step 2. The length of the second casing is determined in the same way.
Step 3. Platbands are placed on stools or a table. The lower control lines are drawn along the marks. After this, the platband lengthens to its width. The upper control line is drawn along the second mark.
By connecting the opposite corners of the marks, we get a cutting line at an angle of 45o.
Step 4. The trims are cut at an angle of 45o. If sawing is done with a hand saw, then the bar is attached to the miter box so that one of the marks is opposite the slot at 45o. If you have a jigsaw at hand, mark the place of the cut with a pencil - the upper and lower marks are connected diagonally.
Without a miter box it is very difficult to get an angle of 45o.
Step 5. Side trims are installed.
Step 6. The top strip is placed on the platbands so that its bottom coincides with the beginning of the cut of the ends of the side strips.
After installing the side trims, the dimensions of the top strip are determined.
Step 7. The corners at the top bar are cut.
Step 8. The joints are sealed with acrylic or silicone sealant and then painted with a corrector.
The sized planks are attached in several ways.
On nails
The most common method of attaching cash to a door is with finishing nails. They are hardly noticeable on the surface of the planks, do not require work experience, and are easily removed from the box along with the trim. For work, use nails with a flattened head, about 40-60 mm long, and 1.5 mm in diameter. The color of such nails may be different, since they are coated with one of the following metals:
- zinc;
- copper;
- chrome;
- brass;
- bronze.
If desired, the finishing nails can be matched as closely as possible in color to the trim.
You can hammer in with a simple hammer or a pneumatic tool. The step between the fastenings is about 50 cm.
The most reliable tool is a hammer.
If you can’t buy finishing nails, you can use regular ones. In this case, they are not hammered in completely, leaving the opportunity to bite off the caps with a side cutter. After removing the heads, the nails are driven in completely.
Of course, it’s more convenient to work with a pneumatic gun, but a simple hammer will do the job just as well.
In most cases, nail heads are inconspicuous and do not require masking. If you need to hide traces of fastening, then use a wax pencil.
For self-tapping screws
Fastening with screws completely follows the instructions for fastening with nails:
- platbands are cut to size;
- are applied to the box (side), after which the places for screwing in the screws are marked on them;
- holes are drilled (the drill is taken 1 mm thinner);
- side strips are attached;
- Using the same technology, the top cash is attracted to the box;
- the heads of the hardware are masked with a wax pencil, veneer or film.
It is better to hide the traces of fastening.
Attention: with a vertical seam of 90o, it is necessary to attach the platbands in a slightly different order: the side strip, then the top, the process is completed by side trim again.
For liquid nails
Fastening with glue also does not cause problems. The MDF planks adjusted to size are turned upside down. Liquid nails are applied to them with a snake along the entire length, without gaps. To fix the platbands, they are pressed tightly against the box and held in this position for several minutes - the specific time is indicated on the packaging.
Liquid nails are not applied to the entire surface, but in a small strip.
Fastening PVC strips
Plastic panels can be installed with glue, which is not the best solution, but can be assembled using a special profile. The operating procedure is as follows:
- the planks are cut to size;
The corner connection of PVC trims is modest, but tasteful.
- A profile is cut to the size of the box. May be a little shorter;
- then the profile is cut in half at an angle of 45o, after which it is screwed to the box with self-tapping screws. The connection at the top should be 45o. That is why such a cut was made. Naturally, the connection in the middle of the beam should be rectangular;
- The planks, cut at an angle of 45o, are connected in the side fittings and then snapped into the profile.
PVC strips are attached to this profile.
This is what the side fittings for the corner of the plastic trim look like.
Installation of platbands on the front door
Installation of platbands on the front door is carried out in the same way. There aren't even any nuances.
How to apply markings
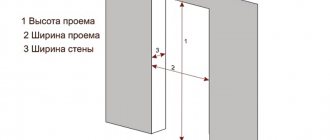
In order to obtain an even cut of the trim strip, it is necessary to carry out a number of preparatory steps in measuring and marking each of the framing elements:
- Using a tape measure, the height of each side of the frame is determined (if the opening is correctly aligned during finishing work, the vertical parts should be identical in length). Measurements are taken taking into account the width of the plank, since diagonal trimming takes into account the abutment of perpendicular parts with a joint at 45 degrees.
- All 3 sizes are recorded on paper with the corresponding markings for each platband.
- Next, the part is laid on a horizontal surface face down.
- The master puts down the readings obtained when measuring the opening on the bar, marking the surface of the part with a pencil.
- Measuring an element can begin from the end if its factory cut is made perpendicular to the vertical plane. Otherwise, you need to set aside 1 - 2 cm from the edge and draw a perpendicular line using a square for its subsequent trimming.
- A similar segment, perpendicular to the long part of the casing, is applied along the marked mark.
Rice. 4. Marking elements
The marking is repeated for all 3 platbands, and a distance equal to the width of the opening plus 2 thicknesses of the elements is set aside on the horizontal bar.
Nuances of the work
Every job has its secrets. Here are some tips from professionals.
How to join the platband to the baseboard
The platband is installed close to the floor. The length of the plinth is adjusted to it. The plastic baseboard has a beautiful cap at the end. Wooden ones are processed: the end adjacent to the baseboard is beveled at an angle of 45o.
I wonder who would like this connection between the casing and the baseboard.
How to trim the platband
When working with a jigsaw, all cutting lines must be very clearly drawn. If you only have a hand saw, then it is advisable to have a miter box on hand. Another important point concerns the width of the cut. It can eat 3 mm from the length of the platbands. Therefore, when applying markings, the easiest way is to raise it by 1.5 mm, and cut exactly along the line.
For a jigsaw, the cutting line must be well drawn.
How to align the plane of the platband with the wall
When installing a door block, it is not always possible to achieve the same plane of the wall and frame. In this case, preparatory work is carried out to eliminate the defect, as discussed above.
A few more tips
Finally, here are some more tips.
- Platbands are installed after finishing the walls.
- Significant wall defects are well hidden under wide, about 12 cm, platbands.
- Errors when joining platbands at an angle of 45o can be eliminated with putty, tinted after drying with a corrector to match the tone of the panels.
To eliminate the gap you will have to work hard: first putty and then paint over it with a corrector.
- Visible gaps between the platband and the frame are sealed with acrylic sealant, and then tinted to match the materials with a corrector.
The main problem when installing platbands is not the technological process, it is simple, but the correct choice of strips in color, width and shape of the front surface.
Fastening the planks to mounting studs
A similar method of fixing platbands was invented relatively recently. Mounting spikes in professional jargon are called “beaks” and their use has the following features:
- A metal fastening element is fixed to the back side of the element using small self-tapping screws that do not cut right through the body of the bar.
- The extension or box, in turn, has grooves for installation.
- The craftsman carefully presses the part with the “beaks” against these indentations until a characteristic click is heard.
Rice. 9. Fixation with “beaks”
With such a connection, dismantling while maintaining the integrity of the elements is practically impossible, since the wedge of the fastener always breaks the groove in which it is fixed.
MDF panels
Facade option for entrance doors made of MDF.
The benefits that come from finishing a door with MDF panels and designing an opening from them can be felt at the installation stage. The opening does not require preliminary preparation or plastering. The registration process is accelerated, and doing it yourself becomes quite possible.
Interestingly, even with an old metal door that you would not want to replace, it is also possible to decorate the doors with MDF panels yourself. You can choose sheets in the form of door facades and similar sheets to decorate the opening.
Installation of facades
More recently, it was difficult to imagine a different finish for a metal entrance door than upholstering it in leatherette. Today, manufacturers provide us with a wide selection of different materials.
The most interesting of them are products made from MDF. The price of such facades is slightly higher than the price of leatherette, but the result exceeds all expectations. And this applies not only to the appearance of the doors as a result of finishing, but also to their acquisition of excellent performance qualities.
It is not at all difficult to decorate the front door with MDF panels yourself.
You just need to perform the actions in a certain sequence:
- first of all, thoroughly clean the door of the old coating;
- remove the lock and other fittings;
- metal sheets must be treated with products designed to combat corrosion;
- carefully mark and cut out holes for the lock on the MDF panel;
- we attach the panels with glue, securing them in several places with self-tapping screws; we choose the screws of such a length that they do not damage the door panel on the reverse side;
- install locks and fittings;
- The finishing of the MDF entrance door from the inside is complete, let's move on to the design of the opening.
Installation of slopes
Opening design diagram.
Before you start sealing the opening with panels, you need to completely seal all the holes and cracks and cut off the excess foam around it.
The sequence of work on finishing the slopes of the front door is described by the following step-by-step instructions:
- We fill wooden guide strips on the edges of the openings according to the level;
- we apply the platband on the outside of the slope and measure the distances to determine the width of the workpiece;
- when measuring the distance, take into account that it will be necessary to install a decorative finishing corner on the edge under the casing;
- Using a jigsaw, cut along the workpiece for the upper slope;
- We fasten the workpiece to the top bar with self-tapping screws;
- proceed in the same way with the side blanks;
- glue a decorative corner along the top and sides of the opening;
- we close the corner with platband;
- in the places where the slopes join the door frame we also glue thin decorative corners;
- small gaps between the slopes themselves can be sealed using a special wood putty.
Advice. To make it easier to complete the opening design work, you can use cardboard templates. Before turning on the jigsaw and sawing off the workpieces, try on cardboard templates on the slopes. And then cut out the parts using them, so you will protect yourself from damage to the material.
In the video presented in this article you will find additional information on this topic.
Size standards
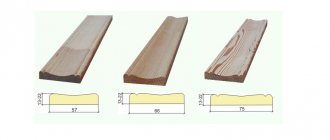
The finishing of doors with platbands is necessarily determined by the requirements of GOST. First of all, this concerns the dimensions, which are taken into account when preparing decorative finishing materials. If we are talking about a standard door leaf, the dimensions of the platbands should be 200x800 mm. Depending on the type of entrance door and the material used to create the trim, the width of the product can vary between the following values:
- For standard platbands - from 60 to 100 mm (the most often used figure is 70 mm).
- For strips made of metal and wood - 40 mm (a narrow strip is chosen so that the trim does not rest against the doorway, which is located too close).
- For models with decorative elements - 50-80 mm (64 mm wide plates are common).
- Semicircular strips - 70 mm.
The width of the curly strips is determined by the texture and pattern used. The main thing is that the platbands do not rest against the door jamb and do not interfere with opening/closing the door, which will interfere with their practical component.
Opening design options
The opening after installing a metal door looks unpresentable and requires finishing work.
The most common types of decoration are:
- plastering the opening with ordinary cement mortar;
- forming edges using drywall sheets;
- finishing doorways with MDF panels;
- plastic linings;
- wooden extensions;
- an opening trimmed with decorative stone.
Plaster work on the design of openings is considered the most common.
These elements have their own characteristics that need to be taken into account when choosing an installation option.
The entrance door slopes must meet the following requirements:
- should serve as a beautiful detail that matches not only the entrance area, but also the entire interior;
- must have good thermal insulation properties, preventing cold air from entering the apartment;
- must be strong enough not to be accidentally broken;
- Such a characteristic as resistance to scratches and mechanical stress is also valued, because they often cling to the slopes and touch them with objects brought in and out through the door.
Plaster
The plaster solution is applied in several stages and rubbed in well.
The most labor-intensive option is considered to be plastering the opening with cement mortar. But it also has its advantages. Such slopes are monolithic and completely cut off the possibility of cold air penetrating through them.
The plastering process is carried out in several stages and can take 3-4 days, since it is necessary to wait for the previous one to dry before applying the next layer. After finishing the plastering, you can paint the surface or stick any material on it.
Important. If you already have metal doors with MDF finishing installed, then take care of their safety during the plastering work
We recommend covering them well with film, securing it with tape so that drops of the solution do not fall on the front surface of the doors.
Drywall
The photo shows the process of applying glue to the back side of drywall blanks.
This option is used quite often when there is no time or desire to do plastering work.
There are two options for working with plasterboard sheets:
- glue installation;
- installation on guides.
For doorways, adhesive installation is more often used. Special glue is diluted thickly and distributed in cakes in the form of beacons on the back side of the plasterboard blanks. The strips are then glued into place, leveling is done by pressing the sheets until the glue dries.
Important. The disadvantage of this method is that there is free space under the plasterboard strips, and the plasterboard can be accidentally broken during operation
Stage 4. Assembling the accessory box
Before installation, we assemble the extensions into a solid, rigid box.
Using a drill, we drill holes for self-tapping screws - for fastening from the inside. This is a mandatory step so that when screwing in the screw does not split the MDF panel.
We make several holes at a distance of 10–15 cm from each other.
Stage 1. Control measurement of the opening after door installation
We make accurate measurements of the actual dimensions after installing the door - even if we know the exact factory dimensions. It is necessary to measure the width, height of the vertical and length of the horizontal extension.
Door trims are decorative strips that cover the walls of a doorway. They are installed if the opening is wider than the door frame. Most often, MDF panels are used for this.
It is necessary to measure at three points vertically on each side and at two points horizontally (from above).
The additional element must necessarily be adjacent to the door frame, so we measure the length along the width of the door.
Dismantling
Removal of platbands is usually required when cash is replaced. There is no need to worry about their safety, but the work is done carefully. Taking an ax with a sharp blade and a hammer in their hands, they begin to dismantle:
- To remove the trim carefully, the interior door is placed in an open position. Positioned in the doorway, the tip of the ax is inserted in the upper corner between the bar and the frame.
- The hammer is used to hit the butt of the ax until the blade plunges under the cash.
- By pressing the handle on the ax, the bar is separated from the box. The further procedure consists of similar actions. They use an ax in a circle until the dismantling of the platbands is completed completely.
The procedure must be carried out carefully so that no dents are left on the door frame. Instead of an axe, homemade sharpened strips of durable metal or other similar devices are suitable.
Installation methods
The installation of the trim should begin from the side into which the door opens. This is explained by the fact that the hinges interfere with the fastening of the strip to the door frame. Therefore, you have to make an indent that is the same on all sides.
It happens that the door is in a corner, then the platbands are installed only on two sides. Or you can saw off half the width of the plank and install it from the side of the adjacent wall (as in the photo).
There are also cases when the platband is installed only on one side. For example, when the slopes on other sides are finished with tiles or something else.