Arranging a home bath and a classic sauna is quite an expensive and difficult task. They require certain construction skills from the master, careful preparation of materials and tools. In addition, saturated water vapor and high temperatures are not suitable for everyone. An alternative option for independent work is an electric sauna (as an example - a sauna model harvia), which does not require freeing up a large area and great skills.
Brief overview of the article
- Advantages of the electric model
- The principle of an electric sauna
- Choosing a sauna stove
- Selection of design by installation type
- Choosing stones for the sauna
- Construction of an electric furnace
- Preparation of the drawing
- Tools for work
- Assembly of the structure
- Photo of an electric sauna
Advantages of the electric model
The advantages of choosing an electric sauna include a number of advantages:
- Simplicity of the device.
- The ability to use compact-sized rooms for arranging the structure.
- A significantly narrowed range of contraindications for use.
- Lack of saturated water vapor, which reduces the risk of fungal colonies developing in the room.
- There is a fairly large selection of electrical installations, as well as the ability to install them yourself.
- A large number of diagrams and high-quality prepared drawings for work.
If difficulties arise, the master has the opportunity to watch educational video lessons on carrying out construction work.
Choosing a place: bath, kitchen or balcony?
When you live in a private house, you don’t have to make such a strict choice - you can use the basement, the attic, the extension, or one of the free rooms with equal success.
In a city apartment, everything is different: the attic and basement are public (although in Finland, for example, these rooms are equipped as a sauna for the entire house), it is prohibited to use them for your own needs (only for storing things, and even then not in all houses).
You can build an extension - but this applies exclusively to residents of the 1st floor, and construction on central streets is prohibited, and for peripheral houses a lot of approvals will be required, and therefore money.
What remains are the premises that are parts of the apartment, the so-called “living” area. Balconies, loggias and glazed verandas have recently also begun to be classified as “residential” meters
Let's look at the legal documents and see what is allowed by law. It turns out that placing saunas in living rooms and kitchens is strictly prohibited (by the way, the ban also applies to basements of high-rise buildings). What remains is a balcony (loggia), a corridor or a bathroom.
If you live in the north, your balcony will require high-quality thermal insulation, since the outer wall of the house usually freezes. The corridor needs redevelopment, and only if it has sufficient area. The pantry is usually used as a dressing room - this frees the living space from bulky cabinets.
Thus, a sauna in the bathroom should be considered a more rational solution, provided that the footage and legal regulations allow, which you will have to get to know more closely.
The principle of an electric sauna
It is important for a novice master to understand the parameters in which an electric sauna differs from a classic or infrared installation. A sauna of this model is equipped as follows:
- The room, as in most cases, is lined with wood slats.
- An electric oven is installed in the center (most often, but there may be other options).
- The oven may have different structural options, but the principle of its operation is the same for all models. A 220-volt electric sauna heater is standard.
- The furnace heats the stones located behind the protective limiter.
- The heated stones heat the air in a sealed room.
The location of the stove in the center is most optimal, as it allows warm currents to spread evenly throughout the room.
The most important element of the design is, of course, the electric sauna stove. Maximum attention is paid to its technical parameters and design features.
Kinds
Electric ovens can be very different, each unit has its own characteristics.
- Powerful electric ovens. You can put a lot of stones into such ovens, on which you can also pour water without fear that it will get on the heating elements. This stove creates an incredible atmosphere of a real Russian bathhouse.
- Oven for a small amount of stones. They warm up the room quite quickly; such units can be installed in saunas and even in apartments.
- Oven with thermos effect. They have a closed structure with stones inside. The lid can be opened; such ovens also heat the steam room quickly and well.
- Oven with steam generator. It allows you to increase the level of humidity in the steam room, but the relevance of such stoves is low, since hot humid air is difficult to inhale.
- Oven with steam generator. They may also emit wet steam.
To keep the steam dry and moderately moist, an electric oven and a separate steam generator are used.
Choosing a sauna stove
The operating principle of the oven is convection. The model is reliably protected from moisture, and, consequently, from fire and electrical short circuit. The distinctive ability of the stove is the ability to heat the air in the room to 85 degrees in 60 minutes. When purchasing a stove, you should evaluate the following characteristics:
- Dimensions.
- Availability of protective fences.
- Power.
- Technical ability to heat air.
- Guaranteed properties and integrity of the device.
A very popular model today is the Harvia electric stove, reviews of which are widespread.
Who is not recommended to use the sauna?
The simplicity of compact baths and saunas is a blessing, but do not forget that this type of water treatment is not recommended for everyone.
In particular, you should refrain from visiting the bathhouse:
- Persons who have had a heart attack, as well as diseases accompanied by renal or heart failure;
- Those who have ulcers on their body;
- Prone to sudden bleeding or diagnosed with anemia;
- Suffering from various forms of tuberculosis, cancer, bronchial asthma, epilepsy, inflammation of skin areas;
- Who is not recommended to stay in open sunlight;
- If the age exceeds 65 years and for young children. But, this point is very often violated, especially by older people who cannot imagine their life without visiting the bathhouse at least once a week;
- When the sole of the feet is damaged, for example, when cracks appear on it. You should avoid bathing procedures until the problem is resolved.
Advice: Pregnant women are not prohibited, but they should be careful about such procedures to prevent bleeding.
Selection of design by installation type
Technological progress does not stand still. Today you can choose not only classic floor-standing stoves, but also wall-mounted models. Floor-standing options have a massive body that can accommodate a large number of stones. For wall structures, high-quality fasteners and the weight of loaded stones are important (this figure should not exceed 30 kg).
Do you need permits?
When reconstruction work is planned in an urban residential building, you need to remember the regulatory documents dictating special conditions. This also applies to a sauna - its construction is permitted, but there are a number of regulatory standards and restrictions.
You can refer to documents such as “Residential multi-apartment buildings” or “Architectural and planning solutions for multi-apartment residential buildings”, where you will find a list of rules and recommendations for the design and construction of saunas
There is a lot of useful information there, without knowledge of which you can receive an administrative penalty in the future.
In wooden apartment buildings (1-2 storeys), the construction of a sauna is strictly prohibited, but in monolithic or brick ones with reinforced concrete floors, regardless of the number of floors and the number of entrances, it is allowed.
Particular attention is paid to the type of stove - a necessary device for sauna equipment. It is recommended to use a factory-made unit, with a passport and technical characteristics, including automatic shutdown after 8 hours of operation and when heated to 130ºС
The stove should not be gas or wood-burning, but must be electric - this is also a necessary condition. Accordingly, it is necessary to install a three-phase power cable into the room.
Any violation (burning with wood, lack of protective shutdown) is punishable by a fine with subsequent correction of the defects.
A number of requirements relate to the premises themselves. For example, if you have a studio apartment with an area of less than 38 m², you can say goodbye to the idea of a home sauna.
The area regulations apply to “two-room apartments” and “three-room apartments”: a two-room apartment is at least 54 m², a three-room apartment is 68 m². The area of the steam room itself is small.
For example, Moscow legislation regulates a “patch” of up to 2 m³, designed for a maximum of 2 people. Such a strict restriction was introduced due to a weak ventilation system, which is sufficient for residential premises, but not enough to maintain a steam room
One of the requirements relates to the materials from which the sauna casing is made. It should be environmentally friendly wood, treated against fungus and mold.
Preference is given to aspen, linden, oak, that is, deciduous species. A wooden frame must be equipped with a fire-fighting device. Usually this is a pipe with many holes, fixed like a cornice (along the perimeter of the ceiling).
It is assumed that, in the event of a fire, spraying water from the holes should extinguish the fire and prevent a fire in the apartment.
In addition, it is necessary to attach a fire sensor to the ceiling, which, in the event of force majeure, transmits a signal to the Ministry of Emergency Situations.
Before visiting the BTI, you need to collect a package of documents, which includes copies of documents for the apartment, a floor plan, an extract from the house register with a copy of the personal account, a drawing of redevelopment or other design changes (usually performed by a licensed construction company).
Be prepared that it will take a lot of patience, time and effort to visit the following authorities (without guarantee of approval):
- fire service;
- HOA or other housing authority responsible for your home;
- housing inspection;
- Rospotrebnadzor department;
- SES;
- architectural and construction supervision inspection.
This list is not final, since the number of approvals depends on the specific region. Remember that permission for conversion will be required even if you want to install a purchased sauna cabin instead of a shower stall.
Choosing stones for the sauna
An important element for ensuring high-quality sauna operation are stones. The following types of stones are perfect for an electric oven:
- Jade.
- Volcanic peridotite.
- Scandinavian diabase.
Such rocks are able to withstand ultra-high temperatures, remaining intact for a long time. The stones are placed tightly in the heating element to ensure maximum heating of the room. It is also important to periodically inspect the rocks for cracks and chips, followed by replacement.
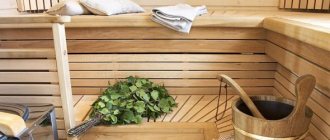
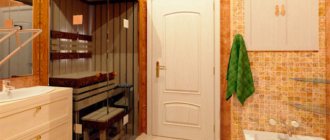
Construction of a built-in sauna
It is important for every person to have a place in the house where he can rest, relax and gain strength. Since ancient times, one of these places was the Russian bathhouse. However, not everyone can afford to build a separate steam room even on a country plot.
And yet you should not give up the pleasure of taking a steam bath at home at any time. After all, to do this, it is enough to build a built-in sauna in a free space - be it a bathroom or the basement of a house. Moreover, it does not require a separate room and engineering work for sewerage and communications.
Construction and materials
A built-in sauna is a cabin made of wood and heated by a stove-stove: in a summer cottage - wood-burning or electric, in the city - only electric. When building a steam room, various types of wood are used; Scandinavian spruce and pine, hemlock and cedar are more popular, ordinary pine and spruce, as well as hardwood (aspen and linden) are less popular.
The walls of the built-in sauna are made in the form of a frame, covered with clapboard on both sides. Pressed cork, mineral wool or fiberglass insulation is used as a heat insulator. To achieve airtightness of the door, its edges are made in three stages, and the glass door is sealed with silicone.
For good ventilation and to prevent condensation, the distance between the cabin and the wall should be at least 50 mm.
Everything a person touches—headrests, shelves, back supports, and footrests—should be made from abasha, an African wood that has low thermal conductivity and prevents burns.
It is better to make the floor in the sauna from tiles. Wooden ladders are placed on top of it or wooden gratings are laid. To illuminate the room, use a lamp in a sealed housing, which is mounted with a recess in the ceiling. The switches are moved into the adjacent room.
Assembly
Step48, a member of the Home and Dacha forum, who has extensive experience in installing saunas, advises first deciding on the location for the sauna and its size. At the next stage, the room is finished, leaving the walls behind the steam room untouched.
Frame
The frame of the sauna, if the size of the room allows, is assembled on the floor, otherwise it is immediately mounted on the wall. To protect the frame from a wet floor, the master recommends placing it on an aluminum profile; you can also lift it and fix it on the wall. The frame is assembled in the form of a square, then sheathed on the outside. If a sauna is built locally, a double frame is often made: first, a 50 mm beam is attached vertically to the outer wall, which sets the ventilation gap.
Afterwards everything is covered with a roofing membrane. This is necessary so that the insulation does not fall out into the ventilation gap, and moisture does not get into it from the outer wall. Then the main frame of the sauna is made. For Step48, its dimensions are 40x50 or 50x50 mm. The step is equal to the width of the insulation minus one centimeter. As insulation, a forum member advises using hard basalt (“rock wool”) or foil-coated “Isover”, with the foil facing out.
Wiring
Wiring for lamps is made of heat-resistant wires. Step48 uses three wires: phase, neutral and ground. He doesn’t connect the wire underground (but it can be useful), he throws plastic cases under the shelves: the temperature at the top is too high. It is better to lower the ceiling, make it no higher than 210-220 cm from the floor.
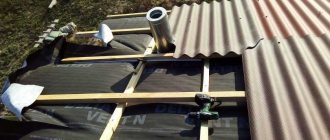
Ventilation
When installing ventilation, the specialist uses the scheme of the Swedish sauna manufacturer TYLO: the supply hole is made strictly under the stove, it is always open, the stove is located on the same side as the door, two exhaust holes are made on the opposite wall: one is under the ceiling (opens only when drying), the other – under the shelf (always open).
Insulation
For walls, 50 mm insulation is used, for ceilings - 100 mm. Next, using a stapler, the walls are sheathed with foil. It is easier to work with foil reinforced with paper-based thread: if accidentally torn, it breaks down to the nylon thread. Step48 prefers to use thick solid foil.
All joints and staples from the stapler are taped with foil tape. To achieve the “thermos” effect, an air gap is created between the foil and the lining, securing a 18-20 mm thick strip on top of the foil with self-tapping screws and only then the lining.
It is better to do clapboard cladding horizontally. In this case, each board will be in its own temperature zone (in a sauna, the temperature difference between the floor and ceiling ranges from 40 to 120°C), which will prevent the board from “warping.” It will also be easier to replace the bottom boards if they become damaged by moisture.
Shelves
The frame for Step48 benches is attached to the wall. His hanging shelf can support a weight of up to 500 kg; sometimes the master places 2-3 supports on several benches. A pull-out shelf simplifies indoor cleaning.
When installing sun loungers, it is necessary to install embedded elements in the places where the frame is attached to the walls of the sauna. The fastening of the final coating of the shelves is carried out in such a way that there are no traces of metal fastening elements on the front surface.
Next, the frame is covered with boards, which are called “shelves”. Its size is 25x90 mm, linden, aspen, cedar or abasha are used.
Bake
An electric stove for a built-in sauna should be selected according to the rule: one kilowatt per cubic meter of room volume. For a steam room 2x2x2 meters you will need an 8 kW oven - it will heat the room for one hour.
Do not turn on household electrical appliances while the sauna is warming up!
A wood-burning stove will take much longer to heat; a chimney will be installed under it and a foundation will usually be installed, since the weight of such a stove is quite large - up to 250 kg.
Only special stones are used in heaters: Scandinavian diabase, volcanic peridotite or Karelian gabbro-diabase. A stone with a grainy structure, such as granite, can crack due to temperature changes.
Finishing
At the final stage, corners, baseboards, and joints are finished. At the same time, hang and connect the electric oven. If the control panel is located outside the sauna, the wires are laid in the wall before covering it with foil. Next, the lamps are attached and covered with lampshades.
For sauna lighting, lamps with reduced voltage (12–24V) and a power of no more than 60 W are used.
If desired, make a fence for the stove and wooden grates for the floor. At the end, all wooden elements (shelves, backrests, railings, grilles, headrests, etc.) are coated with special oil for shelves.
Possible mistakes:
- the insulation is placed close to the wall;
- the foil is attached close to the lining;
- the foil is not taped (the insulation gets wet);
- the space under the shelf is closed (no ventilation)
- Foil based on polyethylene foam is used, which cannot withstand high temperatures.
Price
The cost of building a built-in sauna is from 30,000 rubles. The period is about three weeks. Costs depend on the materials used: dried or raw wood for the frame, type of insulation, etc. Step48 does not recommend saving on wires.
Based on materials from participants of the “House and Dacha” forum
Construction of an electric furnace
A classic floor structure can be made with your own hands using construction skills and a number of materials. The entire process of manufacturing an electric sauna heater can be divided into several stages:
- Preparation of the drawing.
- Preparation of tools, selection of installation location.
- Assembly of the structure.
The advantages of self-production include the ability to choose the shape and size yourself. In addition, home-made electric stoves are quite profitable financially.
Pros and cons of electric heaters
Let's look at the pros and cons of electric heaters.
pros
-Small sizes.
-Easy to install. Independence from chimneys.
-Ability to program readiness for a specific time. Including remote control.
-The possibility of using small stones, almost gravel - smoke does not need to pass through the stones, and therefore the laying can be quite dense.
-Cleanliness and absence of ash, soot, wood debris from firewood.
Minuses
- Mandatory grounding.
-Very strict limitation on volume - otherwise you will need a very voracious electric furnace. After all, a sauna will require a heater power of about 1.5 kW per cubic meter of room volume! Some manufacturers talk about a standard of 1 kW, but this is clearly not enough.
-The presence of electromagnetic fields and the need for mandatory serious steam and moisture-resistant electrical protection. That is why it is recommended to always turn off the power to the heaters while people are in the steam room.
-Difficulties with connection - a fairly serious power line is required. Not everywhere power consumption limits can allow such a luxury. It is highly desirable to have a 380 volt line. And sometimes this is a mandatory condition.
-Terribly wasteful. Even expensive.
Controversial statements
-Many sources say that ventilation is not required. But this is a lie. Ventilation is required. Ventilation is needed for air exchange, for hygiene, for breathing. Even the absence of a chimney can be called rather a minus - after all, under certain conditions, the pipe of a wood-burning stove works in a bathhouse as a ventilation element.
- Possibility of installation in an apartment. It is better not to install saunas in an apartment. Without water it is harmful to humans, but with water it is harmful to the apartment.
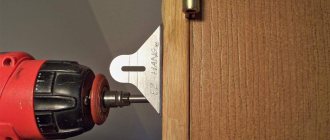
Tools for work
To make an electric oven you will need the following set of materials and tools:
- Steel sheets or body from an old washing machine. Often a variety of available materials are used.
- Fasteners.
- Welding and grinder for metal work.
- Durable gratings for fencing stones.
- Stones (durable fireproof stones can be purchased at a specialty store).
- Power cable with high quality insulation.
- Rheostat for optimal control of the power of the device.
- Cement board as a heat-resistant base.
- Temperature sensors.
- For decorative finishing, you should purchase only special paint.
A construction marker, tape measure, file, and pliers should also be prepared. We must not forget about our own safety by first preparing personal protective equipment (respirator or mask, protective mask for welding, thick rubberized gloves).
The most optimal place for installation is, of course, the center of the room (cabin). All construction work on finishing the cabin is carried out in advance, and installation of the heating unit is done last. In the center of the room there is a place for an electric stove.
This arrangement allows for optimal heating of the air in the sauna cabin. During the renovation process, you should either leave a niche in the floor without wood paneling, or use a stone slab as a fire-resistant base.
Advantages of an electric sauna
- They are functional and have a fairly attractive appearance and interior.
- The electric heater is made of high-quality materials that prevent the spread of fire. When choosing, you should pay special attention to this aspect and not chase after cheap analogues. The electric heater is equipped with special protective systems that immediately turn off the device if a towel or other fire-hazardous object falls on it. Therefore, there will be no fire.
- Electric mini saunas in an apartment can maintain the required air humidity in the steam room. This is controlled by the amount of water, which must be added to the stones if necessary. A built-in or separate steam generator makes it possible to turn a Finnish bathhouse into a Russian one.
Small sauna for a private home
- Electric heaters are easy to use and maintain, which allows them to become leaders in comparison with conventional stoves. No need to worry about wood or coal or other fuels.
Assembly of the structure
Assembly instructions for an electric sauna stove:
- The body is assembled first, connecting the steel sheets by welding.
- The support legs (if provided in the model) are also welded at this stage.
- Next, stones are laid one by one and the heating element is mounted (3-4 of them will be needed, depending on the power of the heating device).
- It is imperative to leave air gaps between the stones and pipes to ensure sufficient convection of heat flows.
- A protective casing is required, which is best constructed from refractory bricks.
- Decorative finishing is carried out only with fire-resistant paint, which, when heated, will not emit toxic compounds, burn or smoke.
One of the last stages is connecting electrical networks to the furnace. For a sauna, it is optimal to use only wires with sufficient insulation. The wires and control panel from the sauna cabin must be taken to a separate room. This approach to construction is the safest and is recommended by GOSTs.
Peculiarities
An electric steam room for a bath is very popular, but at the same time, it has a number of features that are important to consider during its operation.
- In some cases, to connect the unit, it is necessary to install a separate power supply line. The wires must have a large cross-section and also be heat-resistant.
- The steam room can warm up from half an hour to two hours. This depends on the thermal insulation of the stove and its power.
When choosing an electric oven, it is important to consider additional safety requirements. These may include requirements for electrical networks, as well as ventilation gaps.
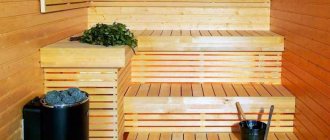
Photo of an electric sauna
Installation of a stone stove
The device is extremely simple to operate: you connect to the power supply, turn it on, and the room begins to warm up. After achieving the required microclimate in the room, the heater automatically maintains the set temperature level.
Installing the stove is simple, but requires compliance with safety regulations. It is worth reading the instructions carefully. It contains simple rules that an inexperienced user will not always think about. For example, that you can’t install a stove in a walkway (you could get burned), or that you need to connect a three-phase network.