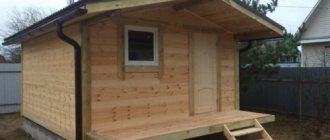
A sauna in the house, made with your own hands, is a real godsend for a zealous owner. There is always the opportunity to take a steam bath, replenish your strength after a tiring day at work, or spend a pleasant evening in the company of family and friends.
Photos of a homemade sauna in various variations can be found on the pages of practical construction magazines.
Brief overview of the article
- Benefits of a homemade sauna
- Principles of sauna design
- Main types of saunas
- Building a sauna with your own hands
- Preparation of the drawing
- Materials and tools for work
- Finishing the floor in the sauna
- Wall decoration
- Installation of central equipment
- DIY sauna photo
Benefits of a homemade sauna
Building a sauna with your own hands in your home or at your summer cottage is a great way to save money on going to a private company. In addition, the advantages of choosing include:
- The ability to independently choose the type of sauna and heating device (electric model or installation with infrared radiation).
- Ease of installation work, especially when using detailed instructions and manuals from experienced craftsmen.
- Useful properties of a sauna. Regardless of the type of radiation used in the sauna, the owner receives a lot of beneficial effects (relaxing, bactericidal, immunostimulating effect).
- The ability to use a variety of available materials for construction.
No special skills or abilities are required from the master. It is enough to have experience working with tools, and the electrical wiring can be entrusted to a specialist of the appropriate profile. If necessary, you can watch video lessons on construction work.
Legislative permission
Every nuance in construction is very important, but it can go down the drain, all your efforts and invested funds will disappear the first time your neighbors contact you. The bottom line is that by law you are required to register every building.
For this you will need:
- Plan
- Estimate for materials
- Type of future foundation and its drawing
- Confirmation of no complaints from neighbors
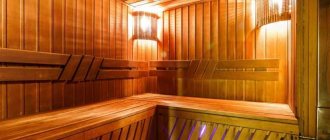
Principles of sauna design
The most optimal location for a sauna is to arrange a steam room and dressing room in a separate building. In private ownership, this can be a separate room in the house (especially for an infrared model). Any sauna has the following structure:
- Entrance corridor. Its size doesn't matter. The corridor is necessary for optimal heat retention in the room, for the location of outerwear and shoes.
- Waiting room. There is a table, sofas or armchairs, shelves and hangers for clothes and a change of linen. In the fullest sense, this is a recreation area. All wires, control panels, and distribution boards are routed to the same area.
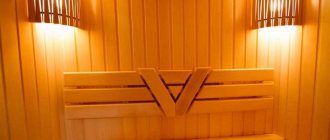
- Cabin with heating device. Infrared installations, an electric oven, shelves and sun loungers are installed here.
Some of the premises may be missing if the sauna is installed in the form of a cabin (for example, in an apartment).
Foundation
This is the support without which your building cannot exist, and if you make a mistake at the initial stages, the entire construction will go downhill.
Main types of saunas
All saunas differ from a traditional bath in the level of humidity and the absence of water vapor (for the model with infrared radiation). The following types of steam rooms are distinguished:
- With electric oven. In the center of the room is a homemade or factory-made stove, inside of which there are specialized stones.
- Sauna with infrared emitter. Only production lamps from trusted supplier companies are used. Installations are located around the perimeter of the room in the recommended order. An infrared sauna can be done very successfully with your own hands.
There are many advantages of each of the presented models. Infrared radiation has a number of pronounced medical and biological effects that are successfully used in medicine and rehabilitation.
Dimensions
In general, in any case, it is recommended to stick to the minimum, because... Each square meter very significantly increases the heating time of the room.
But if you have many friends who are close to you in their love for the sauna, calculate the required size, allocating five square meters of the total area for each person.
Building a sauna with your own hands
To work independently, you need to choose a sauna model, prepare equipment, and select a room for arrangement. The entire construction process consists of several successive stages:
- Preparation of the drawing.
- Preparation of materials and tools.
- Floor finishing.
- Wall decoration and shelf making.
- Installation of central equipment.
There are a number of parameters for which there are certain requirements:
- Safety rules must be strictly observed.
- All materials used are either fire-resistant or coated with antipyretics.
- There should be no slippery floors or walls in the sauna.
- For wiring, wires of sufficient cross-section with the ability to withstand voltage are used.
- Control panels and distribution panels must be placed outside the steam room itself.
- Lighting fixtures are covered with lamps made of fire-resistant material.
- The owner must be able to easily carry out wet cleaning with disinfectants. For this reason, it is necessary to provide coatings that are resistant to chemical agents.
- Heating devices (electric stove or wood boiler) must be covered with protective nets, gratings or wickerwork.
Special requirements must be placed on the premises: the condition of the walls, floors, coverings, communications, and wiring is assessed. If necessary, all repair work is carried out in advance before the interior decoration of the future sauna begins.
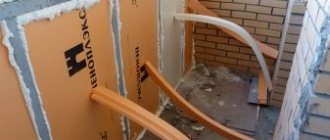
Thermal insulation of walls
Naturally, for a comfortable stay in the sauna it is necessary to provide high-quality insulation. Only in this case the heat loss in the room will be minimal. The following materials are used as insulation: basalt or mineral wool. They are laid in the voids between the frame and the wall. You can also put a foil layer on top of the frame, which will turn the room into a kind of thermos.
The foil is fixed in such a way that the shiny reflective side is directed inside the room. By reflecting thermal energy, this layer prevents the room from cooling down quickly and promotes its rapid heating. The foil is fixed using buttons, brackets or special tape. With proper insulation, any sauna can be made comfortable for visitors.
Preparation of the drawing
A well-designed plan provides absolutely all parameters:
- Room dimensions.
- Location of communications, including electrical wiring, location of sockets, lighting fixtures.
- Design of shelves and their location.
The drawing indicates the finishing features of the floor and walls, the fasteners used and niches for infrared installations. If you do not have the proper artistic skills, you can use the services of a specialist, and find out the required safety parameters from the regulatory literature.
Prerequisites
- First, consider the height of your original room. It should exceed 210 centimeters, but be below 230. Indicators higher than this will make heating the building much more difficult; you will have to spend several hours to achieve a comfortable temperature.
- The shelf on top should have a distance from the floor of about 1.2 meters.
- The distance between shelves should be forty centimeters
- To calculate the room size you need, take 3 square meters for each user.
Materials and tools for work
For successful work, the master needs to prepare the following set of tools:
- Wooden slats.
- Natural stone-plast for finishing the floor.
- Cement, sand, gravel for pouring and mixing the solution.
- Fire-resistant brick for making a protective frame for an electric boiler.
- An old metal container for self-construction of an electric stove or wood-burning boiler.
- Several heating elements (you can make a sauna stove with your own hands).
- Special stone for homemade stoves.
- For decorative finishing you will need paint with fire-resistant properties.
You will also need a grinder, welding, sets of fasteners, a trowel, a tape measure, and a construction pencil. Lighting fixtures, wires, distribution boards can be purchased at any building materials store.
Features of the procedures
Among the advantages of Finnish sauna procedures, the following should be noted:
- The air in the steam room is dry, which allows you to tolerate high temperatures with ease;
- The heating temperature in the steam room can reach 120 °C. The optimal temperature is 85-90 oC;
- The internal walls are sheathed only with natural wood panels from deciduous trees; coniferous trees emit a lot of resin;
- Brooms are not used for going to the sauna. If desired, and to create an aromatic atmosphere, you can use soft birch and juniper brooms.
- Unlike Russian baths, the shelves in saunas are located on several floors. The higher the shelf, the hotter it is. You can sit anywhere depending on how you feel and the desired effect;
- Dry air has a beneficial effect on diseases of the lungs and bronchial tubes. Systematic procedures activate metabolic processes and help get rid of extra pounds. In one visit, depending on your body type, you can lose from 0.5 to 2 kg of fat;
- When visiting the sauna, you must first wash in the shower without soap and shampoo, try not to wet your head so as not to cause overheating. It is advisable to wear a special cap on your head. The number of visits to the steam room can be several, 10 minutes each. It is not recommended to visit the sauna more than once a week;
- During the procedures, it is recommended to drink warm tea and herbal decoctions that will help replenish fluid loss in the body;
- After your visit, take a half-hour rest to recuperate.
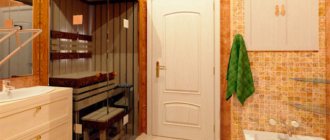
Finishing the floor in the sauna
Wooden floors are gradually becoming a thing of the past, giving way to traditional stone flooring. This type of finish is the safest and has good resistance to high temperatures. Also in practice, tiles can be used. Instructions on how to make a sauna with your own hands:
- The first step is to prepare the foundation (for individual rooms). For a room or decoration of an already finished room, only the alignment of the underlying base is used.
- After the foundation has hardened or been leveled, they begin laying stone or tiles. Today, craftsmen have the opportunity to use original designs with original design ideas in their work.
- Particular attention is paid to finishing corner joints, crevices, and cracks. The sauna room should be as airtight as possible so that the hot air is evenly distributed throughout the room.
It is necessary to ensure that during construction work there are no protrusions or chips left on the floor, which could lead to injury to sauna visitors.
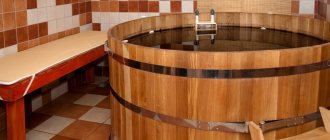
Varieties
There are two completely different types of saunas - wet and dry. The first option combines a very high percentage of humidity (from 95 to 100%) and a relatively low temperature (60-75°C).
This option is very good when it comes to ordinary get-togethers; these parameters create a very comfortable atmosphere that allows you to warm up, but without the extremes of enormous temperatures.
A dry sauna, also known as traditional or Finnish, has completely opposite characteristics - low humidity (5-20 percent) and high temperature (from 90 to 120°C)
Installation of central equipment
The final and most important stage of the work.
Infrared emitters are located around the perimeter (two on the back wall, two on the front corners, one along the bottom contour of the shelves). The electric oven is placed in the center of the steam room, enclosing the installation with a protective casing.
There are special requirements for the installation of a wood-burning boiler. An old metal container (for example, a frame from an old washing machine) is used as a boiler. The opening for storing firewood can be located either in the steam room itself or brought outside (to the next room).
Frame bath
For such a structure, it is important to take reliable resources. The beams of the frame bath must first be dried and leveled if necessary. A lattice frame is produced for the walls. To make it you need:
- The bars differ in their cross-section and are suitable in size.
- Insulation with excellent thermal insulation qualities. It will be used when filling the structure.
- Something to sheath the structure on both sides. Typically, OSB, edged boards, siding or lining are used for this.
DIY sauna photo
Ready-made complexes
The Finnish sauna harvia is very popular among lovers of bath treatments. On the construction market you can find ready-made complexes and individual components for baths, saunas, and living rooms.
These include wood-burning and electric fireplaces, compact custom-made steam rooms that will fit optimally into your room and allow you to regularly enjoy warm treatments.
Vertical frame
After the walls are erected, they are lined with moisture-proofing material. Take bitumen paper or glassine. Glassine has better thermal insulation. We attach it to the wall with ordinary slats. The inside of the wall is additionally lined with thermal insulation (mineral wool will do), then with foil. The mirror side facing inward will serve as a thermos. This is a mandatory step in building a sauna at the dacha
>
We continue to build a sauna at the dacha, covering the inner surface with clapboard. The choice of tree is up to you. Linden is fragrant, alder is durable and proven. We will not consider exotic varieties. There are no special secrets for the roof. We knock together the base into a single whole and install the rafters.