A bathhouse is an atmospheric place with a special microclimate and functional attributes, providing complete relaxation and comprehensive healing of the body. One of the obligatory elements of the interior is a hanger for the bathhouse.
Modern designs differ in purpose and installation method. The simplest products can be made independently from available materials - wood or metal, taking into account their operating conditions.
Choosing material for bath hangers
All attributes for a bathhouse are selected taking into account the characteristics of use.
The hanger is no exception. The action of steam, high humidity, and significant temperature changes will quickly render a product made from unsuitable material unusable. In addition, the device must match the style of the room. The material is selected taking into account the following parameters:
- high resistance to rot and mold;
- low thermal conductivity;
- resistance to moisture and steam.
Cost is also taken into account when choosing. You need a little wood, but it doesn’t make sense to use an abashi product in a simple larch bathhouse.
Coniferous wood
When choosing wood for hangers, preference is given to coniferous wood. It contains more resinous substances and, accordingly, is much more resistant to moisture. Pine, spruce, larch, cedar - any tree is ideal for making bath fixtures.
It is worth considering one feature: at high temperatures, the resin is released much more intensely than at normal temperatures. Therefore, pine and spruce hangers are not suitable for pairs. But cedar is perfect: the material includes special resinous substances.
Hardwood
Hardwood is used only if it meets the above criteria. For example, a pear or apple tree is not suitable, since wood that is soft and prone to swelling will not last long in a bathhouse. Aspen, birch, and linden are much more suitable, that is, the wood that is used to decorate the steam room and dressing room.
In this case, the characteristics of the wood are taken into account. So, linden is prone to mold, products made from it need to be treated with antiseptics. Aspen, if chosen correctly, only hardens from water and steam and does not need treatment.
Important! It is better to choose wood for the steam room that does not get very hot: linden and aspen. This prevents possible burns
Exotic wood
Bath hangers can also be made from exotic wood, such as abashi. The wood is resistant to rotting, water and even cracking, so it can be used in a sauna, steam room, and guest room. In addition, it has a beautiful pattern. However, like any exotic wood, it costs a lot.
Bath hanger made of knots
This is a simple design from one high-quality processed board and Y-shaped knots, which is assembled as follows:
- Select knots 1.5-2 cm thick. Let the wood dry, remove the bark from it, and clean the surfaces.
- First sharpen the end of the branch on which things will hang with a rasp and then sand it with sandpaper.
- To attach the knots, a board 40 mm thick is required. To make the board look beautiful, give it an original look. It is better to draw the shape of the support board first on a blank sheet of paper; the sketch should not be larger than the size of the board. Cut out a board layout from paper, attach it to it and trace it with a pencil. Treat the workpiece with a carpenter's tool and sand it with sandpaper.
- The knots on the board should be attached to dowels, so mark the position of the holes for the fasteners on the hanger.
- Make holes in the board and knots for dowels.
- Press dowels 1.5-2 cm into the holes of the knots; they should protrude 2 cm from the knots. Secure the knots to the board using dowels and PVA glue.
- Coat the hanger with a water-repellent compound.
Hanger made of wooden chocks for a bathhouse
Such a hanger is made from oak or maple chocks with uncut branches. To make such an unusual hanger, it is advisable to find a ready-made photo of a hanger in a bathhouse with your own hands and use the picture as a visual aid. Making a hanger from chocks:
- Choose samples with branches that are similar in shape and size to hanger hooks.
- Using an axe, cut the log in half so that the part with the branches remains. The resulting pieces should be no larger than 15x15 cm in size and knots with a diameter of 3-4 cm. Meter-long logs will not work.
- Sand the side of the chip with a plane.
- Sand the surface of the workpiece to give it a noble appearance.
- Make several of these hangers; they can be installed in unlimited quantities.
- Attach the hangers directly to the wall of the bathhouse using self-tapping screws.
Means of protection
Many people believe that it is only necessary to protect the wood of a bench if it is not in a steam room. In fact, it is in the steam room that the tree needs protection most of all, but previously we had to abandon this idea, because at high temperatures any chemical tends to become volatile and poison the air that those steaming breathe.
But progress is progress - the Finns have plenty of compounds that are suitable even for their hot sauna, not to mention the much “cooler” Russian bath. Such impregnations can protect wood from water, darkening, rot, etc. In this case, the surface will not feel greasy to the touch.
IMPORTANT! Varnishes should not be used in a steam room - this is a fact.
But in all other rooms, except for the steam room, you are completely free to use any composition that can protect the wood from the action of water, bacteria, fungi, insects and rodents. If desired, you can also coat it with fire retardants - compounds that make the wood non-flammable.
Why it is necessary to protect wood in a washing room - it’s clear, water flows there. But the rest of the bath rooms are not entirely dry either. Be that as it may, the humidity in the bathhouse is high everywhere. So saturate and varnish with whatever you see fit.
Tips for assembling a hanger
Coniferous wood
A wall hanger is the simplest design option for DIY. This is an ordinary wooden sheathing made of boards laid vertically and horizontally.
A wooden hanger can be used in all functional rooms: in the dressing room - for underwear and towels, in the locker room - for clothes, in the washing area - for bath accessories.
To assemble such a structure, you will need drawings. We have selected examples of some of them.
To work you need to prepare:
- boards for horizontal fixation measuring 10 × 110 cm, thickness 2 cm – 3 pcs.;
- boards for vertical fixation measuring 10 × 120 cm, thickness 2 cm – 6 pcs.;
- board for hooks measuring 20 × 100 cm – 1 pc.;
- board for a shelf measuring 30 × 100 cm – 1 pc.;
- wood screws 3.5 cm long;
- decorative plugs for self-tapping screws;
- tools.
The hanger assembly instructions include the following steps:
- Cleaning boards with sandpaper, rounding corners and edges. Checking the quality of grinding: the surface must be smooth and even.
- 2 side boards and 3 for horizontal fixation are placed on the table. The angle of intersection of the elements with each other should be 90 degrees.
- The boards are connected with self-tapping screws, which are screwed into the lumber from the reverse side, and the heads of the screws must be completely recessed. After assembly is completed, the screws are closed with decorative plugs to match the wood.
- The remaining elements are connected in a similar way in increments of 8 cm.
- A holder for hooks is fixed to the sheathing with self-tapping screws, which are screwed into vertical boards.
- A bar or shelf is installed in the upper part of the holder.
- Holes are made in the horizontal boards to attach the hanger to the wall surface.
- The finished product is treated with a protective wood varnish and installed in the selected location.
When making your own bath hanger, it is recommended to consider the following:
- All structural elements are subject to mandatory treatment with antiseptics and water-based protective varnishes. This will ensure a long service life of the finished product.
- Taking into account the operational requirements and design features of the bathhouse, the hanger can be made of any standard size. The main requirement is to follow the assembly order.
- Carved products are subject to more thorough grinding and surface treatment.
- For work, it is necessary to use well-dried wood with a natural moisture level of no more than 10%. This will ensure the preservation of the appearance of the finished product and prevent possible deformation of the material during drying.
A wooden hanger is a stylish and practical design that is easy to assemble at home. By following the assembly instructions, any craftsman can build an original and functional hanger for a private steam room.
The next step is to make the shelf, sides and board for the hooks. All three parts of the bath hanger are quite large, so they are best made from plywood 10-12 mm thick.
The contours of each part are copied onto a plywood sheet and cut out with a jigsaw or a hand router. At the ends of the shelves, mark and drill holes for installing wooden plugs or dowels. Similar samples are drilled on the sidewalls. This is a typical furniture technique for joining and assembling wood products. This is done to ensure that the design of the bath hanger is as rigid and durable as possible.
The last stage of making a wooden bath hanger with your own hands is the most interesting. It is necessary to select hooks or hangers for clothes. This can be anything from scraps of aluminum spoons, bent fittings, knots, or simply pieces of steel wire bent in a curly arc.
All that remains is to mark a place on the wall of the bathhouse to secure the hanger.
Types of shelves in the steam room: common design options
There are several types of bath shelves, which differ from each other in their design features. The feasibility of one form or another, as well as the number of tiers, is determined depending on the size of the bathhouse and its features. This publication contains information about the most common types of canopies.
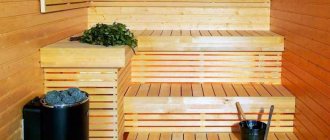
For a steam bath, complex tiered structures in three stages are often chosen
Stepped structures. Today, this option for arranging shelves is the most popular. In this case, they are installed along one of the walls (without a window) in two or three tiers. The convenience of this design lies in the increase in the degree of heating from the lower floor to the upper one.
It is important to remember that the upper tier of the stepped shelf in the steam room must be installed above the line of the boiler used to heat the room. In this case, the distance from the top floor to the ceiling must be at least 120 cm
This is necessary in order to ensure maximum comfort for a person while sitting on such a structure. The same rule applies when a traditional stove is installed in the steam room.
Corner (L-shaped) flats. A less popular option than the previous one, however, it is also very often used when organizing the interior of a steam room. It is understood that one side of the structure will be parallel to the boiler, and the second will be adjacent to one of the free walls.
Wooden shelves in the shape of the letter “L” are located on one side opposite the heating stove, and the other on one of the free walls
The height of the corner structure may vary. This parameter is selected depending on the individual characteristics of the room. Experts advise installing corner shelves when the room is small in size, since they are extremely functional and are not very difficult to do with your own hands. The canopy for this type of bathhouse is best assembled from durable wood.
Coupe curtains. This design is quite rare, but the idea itself is interesting and original. It is suitable for small rooms where it is necessary to save internal space. In this case, two shelves are placed parallel to each other. This structure is very reminiscent of compartment rooms on trains (hence the name).
The upper shelves can be designed so that they recline. The frame structure for such a canopy is usually made of support posts. These elements, similar to the legs of a bench, are joined together by wooden bridges.
The canopy-compartment composition is spatially extremely advantageous for small bathhouses
In order to choose a design suitable for your situation, it is recommended that you familiarize yourself with the photo of the shelves in the bathhouse. This will allow you to visually evaluate the advantages of one or another option.
To cover the frame, you need to select even and smooth boards from any suitable material. The main thing is that the wood is moisture-resistant, durable and can withstand high temperatures. The distance between the boards should not be less than one centimeter. The maximum recommended distance is 2 cm.
Room interior
There is no more suitable place where you can simultaneously relax after a busy work week, imbue yourself with harmony, and cleanse your body than a sauna or bathhouse, which is closer in spirit to the Russian spirit.
For many, visiting it is a tradition that is supported by every generation, and is often instilled in families from early childhood, so it is not surprising that our compatriots want to have their own bathhouse in the backyard.
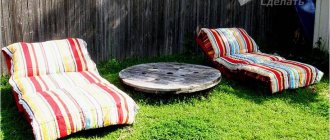
Great place to relax
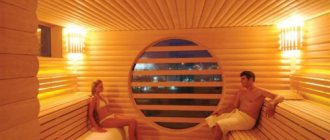
The environment inside should give harmony and tranquility. This atmosphere is achieved by the combination of all parts of the interior. You should not think that the type of Russian baths is a standard steam room with a stove and the same type of shelves. A designer interior is always distinguished by original details and decor; only by implementing an individual project can you get a stylish room for couples and relaxation.
Stylish room in oriental style with your own hands
Quality, thoughtful finishing and accompanying accessories are three pillars of internal content that will never cause you any inconvenience. For information on how to equip the interior, I will tell you today. These ideas can be used both at home, for your own needs, and for business.
Form
By design, all hangers can be divided first into the following:
- wall-mounted (have no other support other than walls);
- floor-mounted (may not be attached to walls).
In turn, wall and floor ones can be located along one of the walls, or located in the corner.
Wall mounted
The most minimalistic version of a hanger is a board, on one side of which hooks are attached (these can be wooden sticks, forks of branches, door handles, and knockers, but most likely - some kind of purchased type of holders), and on the other side there is a fastening on the wall - ears, hidden loops, other varieties.
A hanger with a shelf is not too different from it in terms of labor intensity. Everything is the same - board, holders, ears, only a shelf is added at an angle of 90 degrees, and a pair of approximately triangular-shaped sidewalls will support it in this position. You can do it without the sidewalls - glue it and put it on the screws.
The structure we conventionally call a “fence” is a little more complicated. These are several boards attached to cross slats with gaps between the boards. The upper edge is usually made smooth (because a shelf is most often attached to it), and the lower edge is either smooth, or a triangle, or rounded, or the author came up with something else.
Floor-standing
Floor designs can also be different.
For example, it could be a classic hanger in the form of a pole with a three- or four-legged support and a crown of hooks for circular placement of clothes.
Idea! A variation of such a pillar can be a felled young tree, the branches of which form “hooks”. However, first it will need to be dried thoroughly (at least a year).
In another version, it can be a frame made of round wooden elements, which rests on two “legs”:
You can turn an old door leaf into a floor hanger by attaching a shelf and hooks to it.
Corner
Corner can be either a wall or floor design. Roughly speaking, its feasibility depends on whether it is imaginable that you mentally cut the design you like so that it folds at an angle. In some cases this will not be difficult.
However, for a steam room there is no need for a floor structure, and a light wall-mounted one consists of two boards at an angle of 90 degrees and a shelf-lid in the form of a triangle or a sector of a circle. It is quite suitable for hats and towels, and if you wish, you can further decorate it.
This is interesting: A sauna with billiards is educational
Additional recommendations
To avoid making mistakes when making a wooden hanger, you need to follow the recommendations of experienced specialists:
Cedar bath hanger
Sign-hanger for a bath
Having studied all the above instructions in detail, you can forever discard the idea of coat hooks that are simply nailed to the wall in the bathhouse. They can be replaced with a unique hanger made by yourself.
Panel hanger with shelf
To make a panel with a shelf for a bathhouse, you will need to cut out more parts. Their shape and dimensions may differ from those shown. Need to cut:
- transverse horizontal strips - 2 parts. (135x12 cm);
- shelf – 1 child. (135x22 cm);
- side vertical elements – 2 parts. (80x25 cm, curly);
- internal vertical elements – 4 parts. (10x18 cm, straight).
Assembly is carried out using self-tapping screws. Through the marked and drilled holes in the plane of the crossbars, screw the fasteners into the underside of the side elements so that a strictly right angle is formed between their straight edges, and the upper ends coincide. Secure the side strips with a few more screws.
Using the same principle, secure the internal verticals, leaving a small gap between them. When you connect the top crossbar and vertical slats, you get a fairly wide base that can hold the shelf. Attach it with self-tapping screws along the rear cut along the entire length of the cross member.
When using sections of branches as hooks, you need to form a flat surface on the side adjacent to the hanger. To do this, use a knife or plane to remove the wood until the desired result is achieved.
Advice from the master!
Such hooks can be fastened using self-tapping screws screwed into the inside of the vertical strips. Plastic or metal hangers can be secured from the front side through standard holes.
Making hooks
In the bathhouse I give free rein to inspiration, so it wasn’t just a boring hanger. As a basis, I took ordinary cuttings; I have plenty of them at my dacha.
We proceed in this order:
2. Make grooves in the pieces using a router (a miter saw will also work).
3. Sand the ends and corners of the hooks.
4. Make holes at the ends for fasteners (diameter: three millimeters). This will help avoid deformation of the hooks during the process of screwing in the fasteners.
5. Attach the hooks to the holder with self-tapping screws, and treat the ends with glue.
Source
Construction device
The shelves in the bathhouse are often called a bench in the common people. They are called that for a reason, since the entire structure is a flooring of benches that differ in level. Any shelf design for a bathhouse consists of two fundamental parts:
- The frame is necessary for the correct fastening of boards for permanent decking; it is also used to support a collapsible decking system. To build it, support posts are required; they can be compared to the legs of a bench.
The racks are connected by large boards that serve as jumpers necessary for the correct, level position of the shelf. Very rarely they are built according to the stringer principle, which serves as the basis for installing a flight of stairs. If Finnish technology is used, then when creating the frame there is no need to install supports, since the entire structure can be attached to the walls of the steam room.
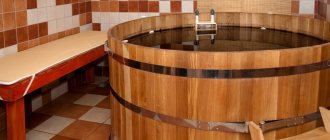
The flooring is constructed from thin planks, which are first made absolutely smooth by sanding. Their thickness is about 2 cm. It is recommended to choose linden or aspen as the material for production. The boards are stuffed with a small gap. The flooring is attached to the frame or to the ladders, which must be separately knocked together and installed on the floor.
If the flooring is not secured, it can be taken out into the fresh air for ventilation in the summer. Together with the flooring, you can build backrests for seats, devices for raising legs to a certain height, and sides of shelves.
The steam room is usually built in small sizes, since the smaller the room, the lower the heating costs and the faster it warms up to the required temperature for steaming. To set up a steam room well, you need simple, even furniture. Ladders for climbing shelves are often large and have 2-3 steps.
If the bath area is too small, it may not be possible to create a bottom shelf of a standard shape and size. In this case, you can build a triangular shelf. You should get an isosceles triangle, one of the legs of which needs to be attached to the wall, and the second is adjacent to the adjacent shelf.
Bath shelves are always multi-stage. This is due to the simplest laws of physics. The hot air gradually rises upward, part of it goes outside through the ventilation, and the rest is reflected from the pre-installed overhead system, so it returns and remains at the top of the building. Gradually, the upper part of the room becomes much warmer than the lower part, so everyone has the opportunity to choose the optimal temperature for themselves by sitting on a specific shelf.
When constructing shelves, you should adhere to the traditional configuration, designed according to the principle of a ladder. With each vape, a person will be able to independently choose a strong steam or a fairly moderate atmosphere
In addition to this aspect, the bottom shelf is of particular importance. With its help, the bathhouse attendant can easily climb to higher tiers or use it as a podium for a convenient approach to the person receiving the procedure
In the steam room you can install shelves on both two and three sides. A large number of them will allow you to invite more guests to the bathhouse. When planning the structure, it is necessary to take into account the possibility of free movement. Staying in the steam room should not cause traumatic consequences.
Another video about how to make shelves for a bathhouse.
Corner shelves
Shelves in a bathhouse can be not only horizontal, but also made with two perpendicular sides. Corner shelves are often constructed by stitching together several blocks of boards. Steam rooms look elegant where the shelves are lined up in tiers on one side, and the corner shelf is located only in the bottom row, smoothly framing the nearby wall, smoothing out the corners.
For a large steam room, you can provide for the arrangement of tiers of shelves parallel to each other, and between them place one lower shelf, which will be fastened to the adjacent ones, serving as a corner shelf for each. You can use it as a bench, stand, or put various objects on it. It will be located opposite the entrance.
Shape of shelves for bath accessories
In this case, we mean by “shape” design features. Inside the quadrangular room, shelves in the bathhouse for shampoos can be placed either along the wall or in the very corner. In addition, they can vary in support or fastening, because they can not only be screwed to the wall, but hung from the ceiling or made into a floor version (although this is already a bookcase).
Wall mounted soap
Wall-mounted options differ in the presence or absence of a support that evenly distributes the load across the entire width of the shelf. Typically, the support is a bracket - a triangle, one side of which is attached to the wall, the other supports the shelf, and the third transfers the load from the shelf to the wall and imparts rigidity to the structure.
Shelf for shampoos in the bathhouse on brackets
This is a reliable, time-tested option, but for our case it is not so important, because we are talking about shelves in the bathhouse for soap and shampoo, and they have little weight, so the bracket can be omitted, or made decorative.
ON A NOTE! Shelves on brackets are optimal if the shelf itself or the objects standing on it are heavy.
In addition to brackets, various fasteners are used to hang a wall shelf. They can be visible or hidden. You can learn more about fastenings from this article.
Wall mounted for accessories
This type involves placement along the wall and fastening directly to it. Fasteners (by the way, this applies not only to wall-mounted shelves, but also to corner shelves) can be very different: from traditional corners and eyes to different types of hidden fastening (on hidden hinges, on metal pins or wooden pins, on eccentrics).
This video shows a hidden mount for mensolo holders:
Watch this video on YouTube
And here - for eccentrics:
Watch this video on YouTube
It is important to estimate in advance the weight that will be required for the mount. It includes the weight of the shelf itself, as well as future items that you intend to place on it. IMPORTANT! Please check the “endurance” (maximum load) of fasteners when purchasing
The most important shelves are best made on brackets - triangular supports, the vertical of which is attached directly to the wall, and the corner piece transfers the load from the board to the wall across the entire width of the shelf
IMPORTANT! Please check the “endurance” (maximum load) of the fastening elements when purchasing. The most important shelves are best made on brackets - triangular supports, the vertical of which is attached directly to the wall, and the corner piece transfers the load from the board to the wall across the entire width of the shelf. The most important shelves are best made on brackets - triangular supports, the vertical of which is attached directly to the wall, and the corner piece transfers the load from the board to the wall across the entire width of the shelf
The most important shelves are best made on brackets - triangular supports, the vertical of which is attached directly to the wall, and the corner piece transfers the load from the board to the wall across the entire width of the shelf.
If we are talking about a shelf for accessories, then the weight of it with all the items will be small, and the fastening can be done in any convenient way.
Hanging
The number of fastenings can be reduced if the multi-storey wall shelf is made suspended. Thick rope, cable or metal cable are often used as suspensions. But you can also hang it on leather strips.
The hangers can be attached directly to the wall using an anchor or dowel, or they can be attached to brackets located above. The third option is ceiling mounting.
Peculiarities
It is impossible to imagine a traditional village bathhouse without shelves: often multi-tiered, reminiscent of a wide-step staircase. In another way, such shelves are called canopies. They are an integral part of any steam room.
A shelf, or canopy, is a wooden flooring - a kind of elongated multi-tiered bench located along one or more walls of the room. So that you can relax in the steam room, such shelves are made in such a way that even a large, tall person can calmly lie on them. In addition, multi-tiered shelves allow vacationers to independently choose the most comfortable temperature for them.
Bath shelves can be divided into three types. The most common option is shelves used as benches; They are suitable for both small steam rooms and spacious large rooms. Loungers are not as popular as benches, but they are also found in a variety of bathhouses. And finally, the third type of bath shelves - sun loungers. They are practically no different from beach loungers, and they can be used with equal success both as a bed and as a chair, which makes them very functional, although far from the traditional design of a bathhouse.
The design of the shelf is extremely simple. Decorative elements are not welcome, as they can cause injuries, and they simply stand out from the traditional external design of the steam room. The simplicity and small selection of shelf shapes is easily explained: it is customary to set aside a small room for a bathhouse, which can be easily, quickly and quite economically warmed up without spending extra resources. That is why the most beloved by craftsmen is the ordinary rectangular shape of the shelves.
How to make a bench for a bathhouse yourself
Before you build a bench, you need to choose one of the options that is right for you. It’s just that the size and design features of the benches will depend directly on their purpose, location and other individual characteristics.
Main types of shops:
- Two-tier. These shelves are usually installed in a steam room. The benches are attached to a blank wall. Often several of these structures are built.
- Three-tiered. Installed in spacious rooms. In this case, a distance of at least 1.3 m must be maintained from the top shelf to the ceiling.
- Small benches without backrest. Used as footrests.
- Mobile benches. Most often they are installed in the dressing room.
- Wide shelf. Ideal option for small spaces.
What does that require
For manufacturing you will need the following materials and tools:
- bars 55x55 mm;
- board 55x650 mm;
- moisture-resistant glue;
- self-tapping screws;
- electric drill;
- saw;
- screwdriver;
- Grinder.
How to choose the right material
Not every type of wood is suitable for bath furniture. It is necessary that the wood has low thermal conductivity, has good density, and is free of cracks. Therefore, benches are usually made of linden, maple, oak, alder and other coniferous and deciduous species. Their characteristics allow the use of wooden products in conditions of elevated temperatures.
Before you start, you need to get acquainted with the different types of wood:
- Birch. Quite a heavy variety, has a density of 700 kg/cm3. Thanks to this, moisture does not accumulate. Has average thermal conductivity. Due to its good viscosity, it cannot be deformed during temperature fluctuations; the material is easy to process. If the steam room has birch benches, then a good ventilation system will be required.
- Furniture made from larch can last a very long time, but the cost of the material is quite expensive.
- Pine. The most affordable. To assemble the shelves, it is advisable to use high-quality timber: without blue stains or resinous pockets. The material has medium density. During prolonged temperature and humidity fluctuations, it cracks and deforms.
- It is very convenient to work with linden; during heating, this type of wood begins to release useful substances.
- Meranti. It has a reddish tint, density 650 kg/cm3. Due to its density, wood does not heat up and can withstand sudden temperature changes. The wood is smooth, almost free of knots, and quite easy to process.
- Oak benches will decorate any bathhouse. This is the best choice for those who can afford to spend a considerable amount on decorating a bath room. Oak products are very attractive and durable.
- Maple does not crack under the influence of temperature and has low thermal conductivity.
- Abashi wood retains its texture and color for a long time. This is an ideal material, but quite expensive.
- Aspen is inexpensive and has an attractive appearance. However, this type of wood has one significant drawback - after a certain time, the beams begin to rot inside.
What do you need for work?
Since the hanger is made of wood, pre-planed hardwood boards should be used as the main material. The number and thickness of the boards will depend on the type of hanger and the pattern according to which it will be made.
What tools may be required for the job?
The work will also require the following tools and materials:
Moisture-resistant wood glue
You will also need a pencil or marker to mark the wood where you want to cut or drill. When everything you need is at hand, you can start working.