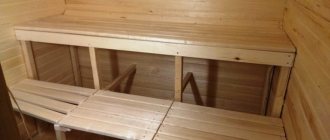
The steam room is the main room of the bathhouse, where people relieve fatigue and relax under the influence of therapeutic hot steam. Therefore, it should be equipped with comfortable shelves made of high-quality wood, designed for visitors to relax and take bath procedures. You can make bath beds yourself by choosing high-quality wood and strictly following the rules for their manufacture.
You can make sunbeds for the bath yourself. The illustration for the article is taken from open sources
DIY washcloth
Washcloths are an indispensable bath attribute, so it’s not at all surprising that their range in stores does not stop growing. Soft and hard, big and small, round and square, in the shape of a loop and a mitten - your eyes will run wild. You should choose based on your own taste preferences, not forgetting the degree of skin sensitivity. Since the body may not perfectly perceive natural and synthetic standards.
If you were unable to find a good version of this device in the store, you may be able to make it yourself.
Knitting washcloths is, in principle, an easy process. Select sheep, goat or any other wool that suits your needs in terms of texture and stiffness, and start making your own crafts. First, the handle for the washcloth is knitted, and then the fabric itself is knitted until it reaches the appropriate length.
Pay attention! Try to make the handle very strong - otherwise it will lose its appearance after the first contact with water. To release a washcloth of “initial” hardness, douse it with boiling water before first use.
To free a washcloth of “initial” hardness, douse it with boiling water before the first use.
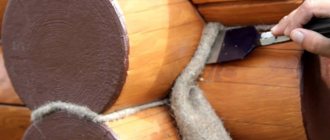
Making a mat-lounger
Mat lounger, linden
Mat-lounger
Bath mat
A wooden bath mat can be made in 2-3 hours if you prepare everything you need in advance:
- linden boards 20-25 mm thick;
- brass rods and washers;
- jigsaw;
- drilling machine.
Step 1. The boards need to be cut into equal strips 30-40 mm wide, and then sawed into bars up to 60 cm long. The workpieces should be thoroughly sanded on all sides so as not to splinter the skin later. There should be at least 50 bars, otherwise the lounger will be too short and uncomfortable.
Blanks for a lounger
Step 2. In each workpiece you need to drill two neat holes. To simplify this process, you can lay 6-7 bars flat on top of each other, align the ends with a ruler and wrap with tape around the edge. On the other side, the bars are also secured with tape. Now they are firmly fixed and will not move when drilling. Mark the holes directly on the tape with a marker and start drilling. The diameter of the hole is made 2 mm larger than the diameter of the rod. All workpieces are drilled this way.
Fastening workpieces and drilling holes in them
Step 3. Remove the tape from the bars, lay them out on a wide surface (possibly on the floor) in the form of a mat: arrange them in rows in a checkerboard pattern, aligning the holes of the blanks along straight lines.
Laying out the workpieces and using wire to fasten them together
This way you can choose the width and length of the rug that is most convenient for you, as well as determine the required length and number of rods. Please note that the rods need to be cut with a small margin, since there should be 2-3 mm gaps between the bars at the joints. If you fasten the elements very tightly, the rug will not roll up.
Step 4. According to the measurements, cut the rods to the required length and begin assembling the product. A metal rod is threaded through the first bar, the end of the rod is pushed out 5 millimeters and a washer is put on it. They are clamped in a vice and riveted so that the block does not come off during further assembly of the rug. On the other side of the rod, a washer is also put on, then a second block, again a washer, and so on until the end of the row. The washer at the second end of the rod is also riveted. Next, string the second row and all subsequent ones.
Workpiece connection diagram
At this point, the assembly of the rug is completed; all that remains is to treat its surface with protective impregnation. You can select the dimensions of the bars at your discretion, the main thing is that their thickness is greater than the diameter of the washer. This way you will never get burned or injure your skin on the metal. Instead of metal rods, you can use a heat-resistant cord, but ordinary ropes are not suitable for these purposes.
Connecting workpieces with a cord
In order for the lounger mat to retain its attractive appearance for a long time, after each visit to the steam room it must be rinsed with clean water and dried in the fresh air. The product should only be folded and stored in a dry state. Periodically, the mat must be treated with antiseptic agents.
Antiseptic for bath Neomid
What do we have?
Comfortable long chairs look completely different. And before you start working directly, you should understand what type of chaise lounge you need to make. They are:
- in the form of a rocking chair (the back is at an angle, so the relaxation process is very comfortable. You can not only sit, but also lie down and even sleep);
- in the form of a regular chair (elements of a folding bed or crib are taken as a basis; armrests can be mounted as desired);
- in the form of a monolithic product (during manual assembly, all parts are tightly fastened, so disassembly is impossible; it is strong and reliable. Back adjustment is not provided, the product itself does not fold);
- in the form of a soldered product with beautiful hand-made inserts (a handmade chaise longue with amazing beauty; can fit into any interior);
- in the form of a sun lounger (a strong and reliable sun lounger made of plastic or wood; beautifully sanded and varnished);
- in the form of a portable product (it is compact and reliable; a position-regulating mechanism is provided).
Board fastening options
It must be reliable, but safe, therefore, when creating bath structures, several methods of fixing elements are often used.
The first method of fixation is the most popular, as it does not involve unusual actions. Connecting elements with dowels is recommended by experts, but this technology requires precise calculations and also leads to a greater loss of time, which is now worth its weight in gold.
Types of sun loungers for a bath
Sun loungers may differ from each other, primarily in size. There are products for children in compact sizes and larger ones for adults. Some models are equipped with a special curved back with orthopedic properties. Such sun loungers have a healing effect on the musculoskeletal system.
The most comfortable sun loungers for a bath are those that allow you to set several positions at once. The option with armrests is also convenient.
In addition, sun loungers differ depending on the material from which they are made:
- Plastic sun loungers
. These are the cheapest products. Their main advantage is lightness and ease of transportation. Also, plastic is not afraid of temperature changes and high humidity. True, such a chaise lounge is not the best option for a bathhouse, because in a steam room, where, as a rule, the decoration is made of wood, the presence of a plastic attribute will cause dissonance. The cost of a plastic sun lounger is from 1.5 to 9 thousand rubles. - Wooden sun loungers
. The best option for use in saunas and baths. Wood is environmentally friendly, does not heat up much and fits perfectly into the design of the bath room. One of the varieties of sun loungers made from natural materials is a wicker rattan accessory. This product is very strong, durable and looks aesthetically pleasing. The disadvantages include high cost. On average, the price of wooden sun loungers ranges from 6 to 15 thousand rubles. - Metal sun loungers
. On sale you can find metal sun loungers with fabric inserts. Such products are more suitable for relaxing in a summer cottage rather than in a bathhouse, since the metal can heat up and cool down, and touching such a lounge chair with bare skin can be unpleasant. In addition, when the fabric gets wet, it will take a long time to dry, and lying on a wet chaise lounge is also not comfortable. Such sun loungers are also relatively inexpensive - from 1.5 thousand to 10 thousand rubles. - Sun loungers made from pallets
. Craftsmen have recently been actively using cheap and environmentally friendly wooden pallets or pallets for cargo to make various pieces of furniture. Sun loungers are no exception. Some hand-made lovers make original sun loungers for a bathhouse from pallets.
Big difference: bathhouse and sauna
A Russian bathhouse is a functional room, so it not only does not need extra “pretty things”, they are often harmful. In saunas, unlike real steam rooms, people warm themselves with dry air. It is the images of sauna bench-beds that are most often found, but such multi-stage structures-beds are not at all ideal for a traditional Russian bath. There are several explanations for this “rejection”.
Therefore, close acquaintance with such “ideal” designs often ends in various alterations. The reason is inconvenience and shortcomings that the owners of the bathhouse were not even aware of.
DIY scented soap
The finest soap for a bath with your own hands can be prepared using an opaque soap base.
Take 100 grams of base and melt in a regular water bath.
Stirring gently, add half a teaspoon of jojoba oil, a couple of drops of glycerin and two teaspoons of dried sea aquatic plants. At the very end of cooking, add 5 drops of eucalyptus or fir essential oil. If you are thirsty, you can add a greenish dye to the mixture at this time. Stir your brew well again and pour it into the molds. Don't worry, when the soap dries, it will easily separate from the containers.
If you often make “soap” devices for baths, photos of various master classes on the Internet will definitely intrigue you. So, you will be able to improve your skills and make beautiful bath gifts for friends and relatives.
What is the key trick to setting up regiments?
It is no accident that I focus on the fact that my bathhouse is Russian. The present is by no means a dry-air steam room where people come solely to sit and warm up. In the Russian sauna, the fundamental event was and remains broom massaging on the shelves. As a result, their mechanism must guarantee a comfortable approach for the steamer to the body of the person steaming. The most fundamental axiom: comfort in a Russian bath should be exclusively in its original place, and elegance and design are all secondary. The scale and length of the regiments should allow a person to stretch out on them to his full height, and the height should allow him to independently enter and exit them.
The overwhelming number of multi-stage static devices that we see on marketing brochures or on the Internet are shelves for saunas. These sun loungers are in no way suitable for a Russian steam room and for this reason:
It is impossible to get close to the working shelf (it is located in the middle or at the top of the “pyramid”) - the lower shelves are in the way. The steamer himself will need to bend over and stretch forward, and this means certain torment and an unhealthy lower back.
The shelves in saunas are traditionally narrow, therefore, a person will, in turn, lie on them like a “soldier”. And there can simply be no talk of any kind of convenience here.
Often, such designer sun loungers for saunas are covered with wooden slats at the bottom, either completely or with minor openings. The steam room does not imply the use of a broom, from which we can conclude that there should not be any flying leaves there. And in the steam room they are present, and in huge quantities. In a proper manner, after the crown massage, a large number of them are concentrated under the shelves. A covered “drawer” will in no way make it possible to carry out high-quality cleaning and tons of garbage will accumulate under the sunbeds.
To our great regret, numerous new bathhouse owners, far from fully understanding the concept of the Russian steam room, are already following the “glamorous” design delights that the manufacturers of various saunas respectfully provide them with. They purchase expensive shelves made from prestigious “Abashi” wood (there is an established opinion that this material is gaining more and more popularity, but in reality it is somehow unnatural, simply put, identical to plastic, not at all alive), with special figured cutouts and also backlighting . And after that, having suffered with them for a certain time, they reconstruct everything that has already been done to suit themselves.
How to make a bench with your own hands for a bathhouse
To make a regular portable bench for a bathhouse, there is no need to assemble a special frame. This design option is distinguished by its simplicity and ease of use.
Material selection
Only a certain type of wood is used to make bath benches. Due to the high resin content in pine, which begins to actively release under the influence of high temperatures, this type of material loses its relevance. Iron hornbeam is also not used, although it has a high level of resistance to water and moisture. Its significant disadvantage is the strong heating, which leads to burns on the skin.
Among all types of wood, it is better to give preference to:
- Linden. It practically does not heat up even in a sauna and is resistant to steam. The material has a pleasant smell, but after a while it begins to darken.
- Aspen. Its resistance to steam and water is an order of magnitude higher than that of linden, but it is inferior in smell. This variety is the most mediocre in terms of attractive appearance. Aspen is valued for its resistance to mold.
- Larch. It is noteworthy that wood under the influence of steam and water only becomes stronger and can last for ten years without changing color or texture. The disadvantage of the material is its high cost.
- Cedar. This representative of coniferous species releases resin in minimal quantities when heated. It is chosen for finishing steam rooms and making benches due to its positive effect on the lungs and the entire human respiratory system. Cedar is especially useful for people suffering from asthma, bronchitis, and lung diseases.
- Oak. This type of wood has proven itself well when used as a material for making bathhouse benches. Oak has increased resistance to water and steam, and has high decorative qualities, but products made from it are best used for dressing room equipment. Given its density, it gets very hot in the steam room.
- Birch. It is used to make benches for bathhouses because of the medicinal tar released when heated. Thanks to its healing properties, it is possible to treat even the most contagious skin diseases.
To make a bench you will need:
- wooden beam with a section of 6×7 cm;
- slats 2-2.5 cm thick and 6 cm wide (for the seat structure) in the amount of 9 pieces;
- fasteners made of wood or metal.
When decorating a bathhouse, it is not necessary to use the same material for finishing the walls and making the bench. But the option in one style looks more impressive, although playing in contrast also has its own originality.
Required Tools
To carry out the work you need to prepare the following set of tools:
- saw;
- hammer, mallet;
- pliers;
- screwdriver;
- sander;
- roulette;
- level.
Advice! It is important to prepare all the tools in advance so that you don’t get distracted when making a bath bench.
Bench manufacturing technology
Step-by-step instructions for a do-it-yourself wooden bench for a bath include the following steps:
- Cutting the timber into 4 fragments, each 40 cm long.
- Assembling U-shaped racks. Two pieces of timber 60 cm long need to be knocked down to form transverse jumpers.
- Cutting according to the specific length of slats for making a seat. It is optimal to use slats with a length of 160-170 cm.
- Assembling the bench. The prepared slats need to be stuffed onto the jumpers, avoiding a gap of less than 1 cm between them. This is necessary to remove excess moisture and to expand/contract the natural material when exposed to temperature changes and high humidity. In addition, it is recommended to retreat 20 cm from the edge in order to achieve increased stability of the structure.
- Bench strapping. To create a strong bench, the legs and stands need to be connected using the remaining slats, 10-15 cm away from the floor. Special corners are also suitable for these purposes, but it is advisable to attach them from the inside of the product, otherwise a burn will appear on the skin at the point of contact. That is why it is advisable to recess the fittings used in the manufacture of the bench by 2-3 mm.
Finishing and decor
The finished bath bench must be treated with a natural-based antiseptic composition. If you want to make it in country style, then you need to adhere to the following algorithm of actions:
- Sand the surface along the grain with a brush.
- Clean with a grinder until a relief pattern is formed.
- Apply translucent glaze in two batches.
- Wipe the surface with a dry sponge; when it dries, remove the glaze.
- Cover the bench with varnish.
Making and giving the bench the desired appearance is quite simple if you follow all the recommendations regarding assembly and finishing.
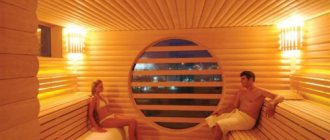
Steam room in the apartment
Let's start with the fact that you will not build a Russian bathhouse in an apartment - it is based on the use of steam, which, of course, can be obtained from a steam generator, but you would need to take much more careful care of the thermal and waterproofing of walls, floors and ceilings. A sauna is much better suited for an apartment . Or even an infrared cabin.
Ready-made cabins for a classic or infrared sauna can be purchased from the same Finns. This will not require additional insulation.
If you are planning to make a steam room in an apartment with your own hands, then start with the calculation - two cubic meters per person. With a ceiling height of 2 meters, this is a meter per meter of area. But you also need to install a stove or an infrared heater, a seat or a lounger there. So a couple of square meters of space would be better.
When a place has been chosen,
waterproof the floor with tiles, after which you can build a frame from timber, which you will cover with panels (preferably with a tongue-and-groove lock), then insulate it with mineral wool and foil according to the principle of a thermal insulation cake, and cover it with clapboard.
Remember that insulation and sheathing will reduce space, so they should be included in the calculation right away. The door should also be insulated and sealed. All that remains is to install a stove or other heater, put up shelves, preferably folding ones.
In essence, the frame of an apartment sauna is not much different from the frame for thermal insulation or the principle of frame construction in general. You will also need to think through the elements that will hold the geometry in the future, in particular the straps. These are the transverse fastenings of the frame.
with water - it can be poured in small quantities onto the heater of an electric stove, but nothing more. Humidity in the sauna is maintained at 5-15%.
***
If you have any pressing questions that we haven’t answered, we recommend using the search or asking a question.
Interior decoration of the steam room and sink: how to decorate it, what options are there, examples with photos
Finishing is the final stage of construction. It is incorrect to include insulation work in it. When it comes to tiling floors, walls, ceilings, installing doors and windows, painting surfaces, this can be called finishing. We need to somehow define the terms if we want mutual understanding.
This article will focus mainly on the finishing inside the steam room, but the finishing of the washing room will also be partially touched upon. If the site contains thematic articles that cover a particular issue on the subject, read it, you will probably find useful information there, and for your convenience we have provided links.
Doors and windows
For those who decide to make a door to a steam room with their own hands , we can recommend a number of materials already available on the site, where, among all the possible options for doors in a bathhouse, the doors to a steam room are described, including advice and instructions on how to make them.
Here, starting with the material and fittings, and further - reviews on dimensions, varieties for Russian baths and saunas, and up to independent production and installation.
About the windows here.
Making a built-in bench for a sauna with your own hands: detailed instructions
Before starting work, it is useful to familiarize yourself with the presented photo and video materials. As a rule, they show approximate diagrams and drawings of do-it-yourself bathhouse benches. This will help you better understand the principle of arrangement of components when assembling bath furniture.
When deciding to make a bench for a bathhouse with your own hands, you don’t have to make the drawings yourself. The scheme of actions is quite simple, and you can limit yourself to the detailed instructions given below.
In order to assemble a regular portable wooden bench for a bathhouse, you will need:
- wooden beam with a section of 6×7 cm;
- slats for the seat in the amount of 9 pieces, 6 cm wide and 2–2.5 cm thick;
- fittings for fastening (wooden or metal);
- necessary tools (saw, hammer and mallet, screwdriver, pliers, angle grinder with circular saw and attachments for it, tape measure, level).
When all materials are prepared, you can begin assembly:
- Cut the timber so that you get 4 pieces, about 40 cm each, for future bench legs;
- Take 2 pieces of timber, 60 cm each, and use these parts to knock down U-shaped racks for cross lintels;
- Make the slats for the seat approximately 160–170 cm in length, this is the optimal size that will allow you to steam while lying down on the bench;
- Start assembling the bench by stepping back 20 cm from the edge of the lintels and stuffing slats on them, maintaining a gap of 1 cm. This will not only ensure the strength of the structure, but will also not interfere with the drainage of moisture and the process of contraction-expansion of wood under the influence of water and high temperatures .
- Connect the legs and uprights with the remaining slats, making a kind of strapping for the bench 10–15 cm from the floor, which will give the structure additional stability. You can also use special corners for fastening. Then they should be stuffed from the inside, since in the steam room the metal parts become very hot, and there is a risk of getting burned. For the same reason, the fittings are recessed into the wood by several millimeters.
Pre-compiled approximate do-it-yourself sauna bench drawings will help you decide on the desired shape of the product and the location of the parts. It should be noted that, just like portable bath furniture, built-in benches for a bath with your own hands should be made with lattice.
For this you will need:
- timber with a section of 5×6 cm;
- strips 10 cm long and 5 cm wide;
- flooring boards;
- fastening fittings;
- necessary tools (saw, angle grinder with circular saw and attachments for it, hammer and mallet, screwdriver, pliers, tape measure, level).
The instructions below will make assembly much easier. So:
- To install a multi-tiered bench, the most suitable place would be a blank wall, to which you need to attach the bench frames themselves. In a small room, a steam bench can be placed along the wall, along its entire length, which will significantly simplify further work.
- Attach 30 cm long planks to the walls, in 1 m increments, with anchors in order to secure the frame to them, and begin assembling it.
- For the lower bench, fasten the beams together with anchors or fastening angles, and recess the fittings into the wood. The width of the resulting structure should be 1 m 20 cm. For greater reliability, it must be mounted at a height of 50 cm from the floor on the base of the retaining strips. Nail the decking boards onto the frame, leaving a 1 cm gap between them.
- Make the upper tier in a similar way, only the frame for it needs to be made twice as big. As a result, the distance between the upper and lower tiers should be at least 70 cm. You can put planks on the wall above the second tier of the bench with a sheathing of polished boards. This will allow you to rely on a kind of backrest during bath procedures and create additional comfort.
Rules for constructing shelves for a steam room
The recommendations below, which explain how to properly install shelves in a bathhouse with a steam room, will ensure the comfort of steaming, guarantee safety and extend the service life of the finishing and bath furniture:
- There should be a ventilation gap of 10 cm between the walls of the steam room and the shelves. When the steps are permanently attached to the walls, this gap is ensured by installing pieces of timber. More precisely, first a beam cut into pieces is attached to the wall, then the frame elements are screwed to it with self-tapping screws with heads recessed into the array.
- The recommended dimensions of the timber for constructing the frame are 50 × 70 mm. The thickness of the board should be four times less than its width so that the wood can dry completely.
- The number of supports is determined by the thickness of the planks. If the thickness of the board is 22 cm, then there should be at least 0.6 m between the supports.
- To ensure stability, it is advisable to tie the frame supports with a board both at the top and bottom along the entire length.
- Rubber pads must be nailed to the bottom surface of the legs of all stationary steps and portable benches.
- Instead of self-tapping screws, it is recommended to use wooden pins, driven into holes drilled for them, or wooden nails as fasteners for flooring boards. If you can’t find anything other than self-tapping screws, it is better to fasten it from the back so that the metal parts do not burn users. Metal heats up much stronger and faster than wood. If there is no way out and you have to fasten it from the outside, be sure to bury the metal caps in a secret place.
- There should be a gap of at least 1 cm between the planks of all elements of the flooring of the bench seats.
The sides of steam room shelves, made in accordance with Finnish sauna rules, are made with ventilation gaps by analogy with the technology for constructing the entire flooring. However, in Russian bathhouses the sides were sewn up tightly with boards to reduce the cubic meters of space heated by wasted steam. Of course, a steam room reduced by this method will heat up faster, but the wood of the floor and wall decoration hidden under the furniture will also dry out worse. The owner will choose what is more practical.
There are no special tricks in how to make a bathhouse bench or shelves for a bathhouse. The shop will be the same in Africa. The main thing is not to forget about the peculiarities of constructing a multi-stage bath structure and get down to business responsibly.
Classic fabric lounger
This chaise lounge is one of the simplest relaxation products among those that you can make with your own hands. It is lightweight, easy to assemble and carry, and does not take up much space when stored. Assembly details are in the video. Sun lounger materials:
- rectangular beam 25×60 cm, 2 pcs. length 62 cm, 110 cm and 120 cm;
- rectangular beam or round plank of smaller section - 2 pcs. 55 cm long, 2 pcs. — 60 cm, 1 pc. - 65 cm;
- durable, wear-resistant fabric (mattress, denim, tarpaulin, camouflage, canvas to choose from) - 200x50 cm;
- nails, screws, nuts, bolts.
The procedure for doing the work yourself:
- Prepare and sand the wooden parts of the chaise longue.
- From the available wooden blocks, fasten 3 frames: 120x60 cm, 110x55 cm and 62x65 cm. The last frame includes only one thin crossbar (65 cm).
- Drill 2 8 mm holes in the longitudinal bars of the largest frame. The distance from one edge is 40 cm (point A), and then another 30 cm (point B). Sand with a round file.
- In the middle-sized part, cut 3 notches-indentations. The distance from the edge is 7-10 cm. The interval is 3-4 cm. The depth of each notch is 5-7 cm. Closer to the edge from which the cut was made, the cut should have a strictly perpendicular cut. From the other end - inclined, at 45°. These recesses will help you change the position of the back of the lounge chair in the future.
- At point B, attach the open side without a jumper of the smallest frame. At point A, connect the two large ones with screws. The notched frame will be on the bottom, and the crossbar of the small frame will move freely from the cut groove to the groove.
- Unfold the chair. Place the fabric tautly against it. Mark and then cut to the desired length. Don't forget to leave some extra space for the edge.
Advice. Wrap the fabric around the outer slats of the back and seat of the chaise lounge. Secure the material with many small nails. Pre-coat with glue. A good alternative is to make the fabric removable with hinges.
Wood selection and processing
You need to choose wood (preferably hardwood) so that no resin is released when heated. The wood must not only be resistant to elevated temperatures and moisture resistant, but also have low thermal conductivity so as not to burn the skin. The most accessible types of wood are aspen, poplar and linden . You can also use African oak , but it is expensive.
Steam room conditions require fluctuations in high temperatures and high humidity, therefore, before making furniture for a bath, the wood must be treated with special means to avoid possible rotting or proliferation of microorganisms in the wood.
It is strictly forbidden to treat bath furniture with paints, varnishes, or impregnate with drying oil.
To make shelves for the steam room you will need the following tools :
To secure the structure, you must use pins or wooden nails. If the fastening is made with self-tapping screws, they need to be placed on the inside or the screw should be deepened into the countersunk part. Boards for deck chairs must be carefully sanded.
The thickness of the boards should be 4 times less than the width
Lounger assembly process
All corners of the prepared wood must be smoothed. For fastening, instead of metal parts, oak wedges . The assembly process will be more labor-intensive, but it will protect the bathhouse visitor from touching the hot metal. It is desirable that the structure of the sun lounger can be easily assembled and disassembled. This is useful for periodically drying the elements.
Sauna beds are assembled from support posts and a frame . The support posts are made of thick beams placed vertically. Between them, crossbars are attached, which are inserted into the beams in the upper part, maintaining an interval along the entire length of about 50 cm. The thickness of the planks is determined by the number of supports. For example, with a board thickness of 22 cm, the distance between the supports should be about 60 cm.
choosing a compressor for home and garden
For the frame, take a beam with dimensions of 50x70 mm. It is sheathed with boards in increments of 1-2 cm for good ventilation and water drainage. The seat should have a slight tilt, also for better water drainage.
You can attach the flooring to the frame either longitudinally or transversely, although it is advisable to make the backrests longitudinal
The most optimal dimensions of a sun lounger are 180 cm in length and 90 cm in width. It is necessary to take into account that there should be at least 125 cm between the upper lounger and the ceiling, the distance to the wall should not be less than 10 cm - this is a kind of ventilation gap. Each subsequent level can be lowered by 40-60 cm. All portable sun loungers and benches must be reinforced from below with rubber gaskets. For ease of floor cleaning and ventilation, the lower structures should be as open as possible.
It is important to remember that if the bathhouse has windows, then you cannot place sun loungers along them. Glass can crack due to high temperature and injure people from fragments.
As you can see, setting up a bathhouse with your own hands is not at all difficult, even without certain construction skills. By following the tips, you can make excellent steam room loungers yourself.
Source
Step by Step Actions
Builders know how to make a sunbed using available materials. They recommend setting up 1 shelf 280 cm long. This will require 8 boards 13.5 cm wide. An additional board is placed on the front side (an angle of 45° is maintained). The total width of a hand-made sauna bed should not exceed 130 cm.
Homemade frame for bath shelves
It is recommended to install wooden sheathing on the floor. Its thickness should not be more than 5 cm. The shelves are installed at a level of 105 cm from the floor and about 100 cm from the ceiling. You will need to make 2 steps with your own hands. One is opposite the entrance (to quickly climb onto the shelves), the second is long, for the steamer. The first step should be made at a height of 45 cm, and the other - 25 cm from the floor.
Experts recommend making frameless shelves yourself. This bath lounger rests not on the floor, but on bars attached to the wall. 2 boards are screwed to the side surfaces in relation to the structure using screws. Gaps are created between them and the wall. It is recommended to use nuts for this.
Boards of the main structure are laid on such ribs. To give the lounger greater strength, the slats are fastened with cross beams. In this case, a gap of 1 cm is maintained. Thus, you should get a sunbed-shield, which is fixed to the side supports with self-tapping screws.
The next step involves assembling the steps. Each step in the steam room is made of 3 boards. An important point when creating a lounger is its impregnation with a special protective compound. In the bathhouse you can also install a more complex shelf, made in the form of the letters “G” or “P”.
Insulation, cladding, processing
Even if the owner of the bathhouse has decided what he wants the steam room to look like in the end, he still has to make a number of choices related to the technological processes of its arrangement. That is, making a steam room correctly also means properly insulating it, sheathing it and treating the surfaces with protective compounds.
Insulation comes down to creating a certain thermal insulation “pie”, a diagram of which is given here
this article, and the scheme itself is the same for any structural wall materials. It will be remembered better if you understand the principle of its creation.
After the insulation stage is completed, you can proceed to covering the walls and ceiling. You can read about what materials are used for this and what the technical nuances of this type of work are.
The sheathed walls and ceiling, as well as the finished floor, are wooden surfaces, and wood, as you know, swells from water, then can crack when dry, and if moisture remains in it for a long time (with poor ventilation, for example), wood becomes a breeding ground for bacteria and fungi. In addition, moisture leads to darkening of the wood, and prolonged use of the sauna leads to the absorption of odors.
Therefore, even in the steam room it is worth using some compounds whose harmlessness is somehow certified and indicated on the label. Walls and ceilings can be impregnated with special oils and oil waxes, as well as certain acrylic compounds. Read more about acceptable coatings for wood in this article.
Design elements of bath shelves
The bath shelf has another name - a bench. The benches come in different heights and are arranged according to a certain pattern.
They consist of two main elements:
- The frame, which is the base to which the flooring boards are attached. The flooring can be fixed or dismountable. The most common is a frame made of support posts that resemble bench legs, connected by wooden crosspieces. There is also another option, when the frame is made as a stair stringer, to which the steps of the shelves are attached. Sometimes the frame is built in the likeness of the frames in a sauna. In this case, there are no supports, and the frame looks like a railway shelf fixed to the walls of the steam room.
- Flooring made of well-polished linden or aspen planks. There should be a small distance of 1-2 cm between the planks. The flooring is either fixed to the frame or consists of separate elements. Loose flooring can be taken outside to dry. It can also be used as a seat, a couch or a podium for the bath attendant. In the same way as the flooring, the backs and sides of the shelves, headrests, and devices allowing you to lie down so that your legs are located at head level or higher are made. You can make a headrest for a bathhouse with your own hands, drawings are available.
As a rule, a steam room is small in size, since it is easier, faster and more economical to heat a small room to the desired temperature, so the shelves have a simple rectangular shape (read: “What are the optimal sizes of a steam room”). Usually the shelves in a steam room look like a staircase with 2-3 degrees. Such steps can be similar to chaise lounges or corner sofas with a rounded shape. However, something like this can only be done in a large steam room.
Features of shelves for a bath or steam room
As a rule, these designs are not distinguished by any special decorative delights, so if you have certain carpentry skills, you can make them yourself. However, in order for these products to be truly convenient and functional, it is first recommended to carefully study their main design features and varieties.
It is also necessary to take a very responsible approach to the choice of the material used, since the wood used must be very resistant to both extremely high temperatures and significantly increased humidity.
Device
All bath shelves usually have a very simple structure. Most often they are a wooden bench placed along one or several blank walls of the steam room. The main frame is usually made of a narrow wooden deck with small vertical supports and horizontal lintels.
In modern baths, as in saunas, the shelves can be multi-tiered. In this case, they are usually installed according to the principle of a stair stringer or simply like benches with legs one above the other. The lower shelves are usually used for sitting, while the upper ones are mainly used for lying down.
Requirements for shelves
Making shelves for a bathhouse is a simple process, but there are special requirements for these products.
Requirements that must be taken into account when creating a design:
- To avoid injury, all wood decking must have slightly rounded corners.
- The supporting frame must be as strong as possible. It must withstand fairly high weight loads.
- To prevent accidental burns, the surface of the shelves must be completely free of metal parts.
As a rule, shelves in steam rooms are not mounted flush against the walls. To ensure water drainage and uniform circulation of hot steam, it is necessary to provide a small gap of approximately 10 cm.
The requirements for the wood used deserve special attention:
- First of all, it must be of very high quality. Be sure to choose cleanly planed and carefully sanded boards without any defects.
- Suitable wood must withstand both high humidity and constant exposure to hot steam. It should also be very resistant to deformation and rot.
- To avoid burns, choose a decking material with very low thermal conductivity.
In extreme bath conditions, it is prohibited to use boards with a paint coating. To protect wood, only special water-repellent and natural-based antifungal preparations can be used. The use of artificial synthetic drugs is extremely undesirable, since under the influence of hot steam they can emit fumes that are harmful to health.
Subtleties of choice
The choice of rugs is wide. Therefore, when purchasing, it is better to find out the features of each product:
If you need a floor mat for a sauna, then the best option is a wooden grate made of wood with low thermal conductivity. No need to take coniferous wood. The places from which resin will be released when heated are even visually determined.
A lounger for a steam room needs to be of such a size that it can completely fit on it. It should be flexible so that it can be rolled up and carried away easily. Rugs made of cork or felt are highly absorbent products. Suitable for use in a steam room. And in washing and shower areas it is better to use flexible rubber products. Modern rugs have a rubberized base and a top made of fabric. They don't slip and are comfortable for the pool.
A simple homespun rug is often used in the dressing room of a wooden bathhouse. It fits well into the interior. Sometimes a sheepskin is laid in the dressing room or rest room for warmth. But this is impractical - the wool gets wet and a specific smell appears.
How to do it right: dimensions, layout, design, structure
Let’s make a reservation right away, it is understood that we do not touch upon questions about the foundation, the choice of wall material and issues with the roof; they were discussed in other articles (following the links).
To make a steam room in a bathhouse correctly, you need to start with the correct formulation of the problem: how many people will usually steam, how often will they take the procedures, what kind of procedures will they be - lying down with a broom or just sweat while sitting (in other words, is your bathhouse Russian or Finnish) . When certainty has been achieved on these issues, you can read material on the ergonomics of a steam room (rational and comfortable organization of space) and an article on calculating the area of a steam room in accordance with the number of people staying there at the same time.
After you have understood the principles of ergonomics and can already estimate how much space one person needs to lie, sit, and stand in a steam room, you can upgrade the proposed diagrams into a design project for the layout of your own steam room . And an article about the layout of the bathhouse as a whole will help you with this (we hope so).
When the space is allocated for practical reasons, you can think about how to decorate it all, so that an elegant bathhouse will evoke the admiration of your guests and the desire to make one for yourself. design tips and a photo gallery of examples of how to make a steam room in a bathhouse in this article.
In general, the arrangement of the steam room is described in another material on our website. It will help those who would like to get a holistic picture of all the components that make up the steam room.
Do-it-yourself lounger in the bath: determine the size and position
Obviously, the height of the working lounger in the bathhouse should allow the steamer to massage with a broom while standing. At the same time, its position should be as comfortable as possible and not cause tension and discomfort in the back. Based on this, it is clear that you need to focus on the growth of the hairdresser. You can also determine a comfortable location by looking at a regular kitchen table. Its height will correspond to the optimal height of the working bed.
The following indicators will help you correctly design shelves in a Russian bath:
For the convenience of calculating the estimated width of a wooden bath bed, you can use the following example. In a steam room with a ceiling height of 205 cm and a wooden grate 5 cm high located on the floor, the working shelf will presumably be located at a height of 105 cm from the floor (or 100 cm from the ceiling).
This is quite high, which means that it would be advisable to install steps. In this case, it will be enough to make two of them: one, 45 cm high, placing it opposite the entrance, so that it is more convenient for the steamer to climb onto the lounger, and the second, 25 cm high, long, for the comfort of the steamer.
For a comfortable full-wall shelf, 280 cm long, you will need 8 boards, the width of which will be 13.5 cm. Taking into account the 1 cm gaps between them, the width of the lounger will be: 13.5 cm × 8 pcs + 7 cm = 115 cm. If you place another board on the side of the front side at an angle of 45°, the total width will be 115 cm + 13 cm + 1 cm (gap) = 129 cm.
The main components of the interior
If the reader is only interested in the question of how to make a ceiling or floor in a steam room, we will provide a brief description and links to more detailed materials.
Ceiling
In principle, the ceiling in the steam room is done in exactly the same way as in all other rooms of the bathhouse. The owner decides what will be above them - a cold attic or an insulated one. For the first option, a flat ceiling is sufficient, which can be insulated from below if the heat does not hold. For the second, a false ceiling is made, which is usually insulated from above, from the attic or attic side. In this case, insulation materials such as expanded clay, ecowool, etc. are usually used. More details here.
Floor
Floors in the bathhouse also come in several types, from which you will have to choose the most suitable one. These are either wet or dry floors.
A pouring floor means that the used water flows either into the drainage directly under the bathhouse (an option for summer bathhouses), or flows down a concrete screed into a pit, from where it is discharged outside the bathhouse - into a septic tank or drainage field.
Dry floors also imply the removal of liquid outside the bathhouse, but drainage is organized differently. There is no longer a direct need for a concrete screed under the floor. It is done only if the floor is finished with ceramic tiles. Otherwise, a wooden floor is made from tongue-and-groove boards with a slight slope towards the drain, from where the water enters a pipe leading outside the bathhouse.
Read more about steam room floors here.
Lounger with adjustable backrest
It is very convenient if the lounger has an adjustable backrest, then you can sit and lie down. In principle, most designs provide such a mechanism; it is not difficult to make it yourself. The photos below show the assembly order
Pay attention in the last photo to how the lounger will look in a horizontal position, the dowel sits above the last bar on the back. And also, after finishing the work, fill the holes with wood filler or plugs
Photo source www.ana-white.com
...on wheels
If we talk about comfort, then it would be nice to add wheels to our lounger with an adjustable backrest. Of course, you can change the shape a little; step-by-step photos show how the structure is made. In principle, the scheme is the same, only we add wheels for transportation.
Here it should be taken into account that the front and rear legs will be of different heights so that wheels can be attached. Then you will need to calculate the height of the wheels and drill a hole in the back of the legs at a distance that is equal to the same distance as the bottom of the wheel to the hole axis
Note that the hole should be slightly larger in diameter than the axle you are using. Like this, it doesn’t spoil the view, but it’s more convenient to use
Photos used from www.thedesignconfidential.com
Sizing
They depend only on the area of the bathhouse, on the room in which the sunbeds will have to be located. It would be ideal to select sizes in exact accordance with the parameters of the room. Therefore, the first step in the manufacture of bath furniture is to measure the area that is intended for it.
Height
It is also chosen more based on the height of the room. If we talk about the lower lounger, then its average height from the floor is 500-600 mm. To make it convenient for everyone (those who are soaring and those who are doing it), it is recommended to distance the upper bench from the ceiling at a distance of 1200 mm. However, the master in this case is the owner.
Length Width
To determine these parameters, it is better to refer to the standards, which can be slightly changed if required by any features of the room. When choosing the width, you need to consider that:
The usual length of sun loungers is 2100-2400 mm, but more often they are made to cover the entire wall of the steam room, so the owners choose (measure) this size themselves.
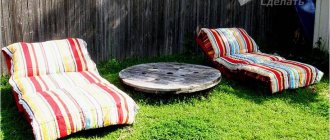
Original ideas
Original chaise lounge
We bring to your attention a review of the original design of the chaise lounge. To make it you will need logs Ø75–120 mm. To do this you will need to prepare the following tool:
- logs;
- electric saw;
- drill;
- self-tapping screws;
- staples;
- set of drills.
Electric saw
The manufacturing process is as follows:
- First, cut the logs 45 cm long.
- Then you create a layout of the future structure. To do this, take electrical tape and use it to draw an outline directly on the floor.
Drawing contours
Next, make holes in the cut logs.
Making holes
All elements are connected to each other. 4 long self-tapping screws are screwed into each log. You can use a socket wrench to tighten them.
Connecting elements
- Now you can turn the resulting design over and test it. If it is unstable, then eliminate this defect.
- To give the chaise lounge greater stability, fix the brackets on the back side.
Final stage
Although this work process is quite troublesome and time-consuming, the result will please your eye. At the same time, such a chaise lounge will be a wonderful addition to a summer cottage.