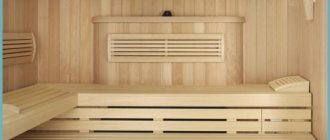
Blueprints
If you decided to make a shelf for a bathhouse with your own hands, then first you need to draw up a drawing of it.
To make a clear diagram, first of all, you should take into account the dimensions of the room, the location of the future structure, as well as the height of the ceiling in the steam room. In order to make your plans a reality, you should familiarize yourself with the standard dimensions of such structures:
- To lie on a shelf with your knees bent, you will need a bench 1.5 m long.
- The 1.8 m long bench will allow any average user to lie down on it without bending their knees. In this case, a lot depends on the individual parameters of the person - sometimes even a two-meter bench may not be enough.
- The shelves can have a minimum width of 40 cm. This parameter most often belongs to the lower tier, which is usually used as a footrest. This step is comfortable to stand on, but you can also sit down.
- Most often, bath benches have a width of 60 cm. This parameter is optimal, but is not entirely suitable for steaming in a supine position.
- To sit sitting (with your legs pressed) across the bench, you will need a structure with a width of 90 cm. A user with any physiological parameters will be able to lie on such a bed.
- The widest wooden shelf is 150 cm in size. It is comfortable not only to sit on, but also to lie on.
When designing shelves for a bath, it is important to take into account the installation height of all components:
- 1.1-1.2 m - experts recommend maintaining this distance between the lowest step and the second shelf.
- 40-60 cm - this gap is optimal if done between the first and second shelves.
- 20 cm is the minimum permitted distance that should be left between the floor and the step located at the very bottom.
- 1.5-1.8 m - these dimensional values are the minimum for the length of the bath shelf.
When drawing up a design project for a steam room, you need to pay special attention to the layout of the shelves in the room:
- There are 1-3 rows along one of the walls of the room, while the shelves can be installed one above the other.
- There are also L-shaped designs. In such options, any number of steps is possible. For example, there may be two or three along each partition. The upper and lower parts can be located along the longest wall, and the middle one along the shorter one located next door.
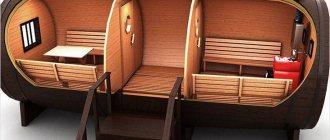
- There are also models in which there are two parallel structures located along walls opposite each other. These options are reminiscent of a compartment in a train carriage. These shelves can be either symmetrical or uneven with signs of asymmetry.
After this, it will be more convenient for the owner to choose the optimal solution. Moreover, you can correctly calculate the required volume of lumber based on the size of the benches.
It is not difficult to draw up a design for bath benches - to do this, you just need to take into account all the parameters and the expected location of the structure. If you have doubts about the correctness of your actions, then it is better to hire specialists who will prepare a finished drawing.
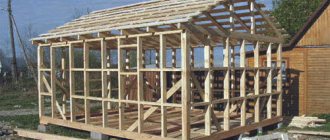
Requirements for basic parameters
A Russian bath, like a Finnish sauna, requires maintaining perfect order in the steam room. This rule primarily applies to torn leaves from birch and oak brooms. In order for the room to be fresh and have a pleasant aroma, and not the smell of musty leaves, cleaning should be carried out especially carefully, including behind the benches. Therefore, when calculating floor parameters, the gap between the boards and the floor must be taken into account. It would seem like such a trifle, but it must be taken into account in construction.
In fact, the requirements for the main parameters of shops are:
- Compliance with rational dimensions for the height of steps;
- Compliance with the dimensions of the width of the benches;
- Taking into account the requirements for the length of sunbeds;
- Ensuring the structural strength of the floors, their functionality and rationality of location in the steam room.
The benches in the bathhouse must comply with the width dimensions.
But before moving on to revealing each of the parameters, it is worth briefly considering what the design of the benches in the steam room consists of.
The simplest and most functional is the frame structure of the floors. The basis is a slatted frame, one side of which is built from bars, the second side is made in the form of planks, tightly attached to the load-bearing walls. The boards of the benches are attached at one end to the frame, and at the other, they lie on a block against the wall. The lower steps have two support points - one on the post of the upper tier step, the second support point is a smaller post.
This scheme allows you to build a durable structure that will provide not only strength, but also functionality. Everything else is just subtleties that will be considered during the work process.
Floor height
Correct selection of floor height parameters is very important for a steam room. Typically, the ceiling height of a steam room is usually taken at the level of 2.1-2.25 m. A high ceiling creates an additional volume that needs to be heated, and the temperature there will be higher, while at the level of 1.2-1.6 meters the temperature for comfortable steam will not be enough. That's why 2.10-2.45 are the most optimal parameters for ceiling height. And if so, then the parameters for the height of the floors will be:
- The lower tier of the beds is 40-45 cm.
- Middle tier 80 cm;
- The upper tier is 120 cm from the floor level.
Thus, from the top point of the floor to the ceiling there remains 1.2 meters (with a ceiling height of 2.45), which is quite enough for normal steam and working with a broom.
The height of the lower tier of 40-45 cm is determined by two parameters - the first, practical, this height is enough to remove debris after procedures using cleaning equipment. The second indicator is related to the height of the rise - it is equal to the height of three steps of a regular staircase.
The height of the second and third tiers is associated with the possibility of the most effective bathing procedures. On the top shelf, the temperature promotes the maximum beneficial effect, and it is more convenient for the bathhouse attendant to work with brooms from the first step; there is no need to reach out to whip the steamer.
Width
The standard width of the shelves is determined depending on the purpose of the tier. The lower tier is usually not used in the steam room for procedures, or is used by those who do not like to steam with a broom, but at the same time do not deny themselves the pleasure of receiving a portion of warm water steam. Oh, yes, this place is to the liking of children, here they are comfortable both in terms of the height of the shelf and the temperature in the steam room. Therefore, despite the small height of the step, its width should ensure that both an adult and a child can sit down. The width of such a bench should be from 30 to 45 cm.
The second tier is usually used by adults to warm up. But it is not recommended to make it too wide. 40-45 cm is enough.
The upper tier is the most popular, so its width should be larger; there should be enough space to lie down and sit down normally. The optimal width of such a tier is 1.2-1.4 meters.
For those who build a bathhouse themselves, the width of the widest flooring may be different; in this case, experts recommend using a simple method for calculation - measure your height, divide the result by half and add 20 cm. The result obtained will be optimal for determining the width of the top shelf.
Cavity length
This parameter is usually overlooked, especially if the steam room is made “for yourself”, that is, it is enough to be content with the fact that you can just sit and warm yourself and whip yourself with a broom. Alas, you won’t really get pleasure from such a bathhouse. Therefore, when determining sizes you need to take into account:
- The minimum length should provide the ability to lie down and bend your legs;
- The average length of a bed is equal to the average height of a person plus 15 cm;
- The optimal length is 220 cm.
Layout
The area of the bathhouse is an important factor for determining the location of the canopy and the number of its tiers. After all, when they create a canopy in a bathhouse with their own hands, they focus on the longest wall. But with the obligatory consideration of the absence of direct steam from the stove into the steaming space, as well as drafts. Depending on the size, the bath canopy allows you to sit, recline or lie down.
Typically, canopies are made of two or three levels to allow you to choose a more comfortable temperature zone. In the classic three-stage version, the middle tier is made stationary. The collapsible design, where the upper and lower shelves are removable, allows for better drying of the wooden parts of the bathhouse.
Along one wall there can be stepped and compartment options for the arrangement of shelves. The most economical option for arranging the canopy is like in a sleeping car compartment, one shelf above the other. They are attached with the ability to fold, freeing up space in the bathhouse if necessary. With the third L-shaped method, one of the shelves is located on the adjacent wall.
Regiment options
In addition to the above variations in height and number of tiers, you can also vary the location of the shelves relative to the walls. Parallel and angular placement is possible, as well as several options for attaching the decking, which make it removable, folding or retractable. Let's consider everything listed sequentially.
Angular
A frequently implemented design. at least one sitting and one lying place perpendicularly
When you watch videos that talk about installing the frame of a corner shelf in a bathhouse, pay attention to how the joint is created in each specific case.
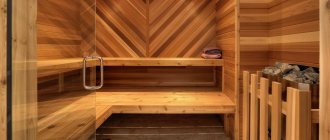
What material is best to make a bath shelf from?
Many people advise using material made from leaf trees for these purposes. The reason for this choice is quite simple to explain: coniferous boards at high temperatures release resin, which, if heated strongly, can not only stain the body, but also cause a burn.
Experts recommend choosing boards made of material that has low thermal conductivity. Such wood has a heating limit. If the boards do not get very hot, then you can sit and lie on them without experiencing discomfort. Let's consider what types of wood are most often used to make a bathhouse shelf with your own hands.
The work should begin with the choice of wood for the shelf
Aspen. Aspen is a deciduous tree. This material is common, so it is not difficult to find and buy. Many people note the healing properties of such boards. Among the technical characteristics of such material are strength, resistance to rotting and long service life.
Linden. Boards made from this wood are considered the best in terms of price-quality ratio. Another advantage of linden products is that they have low thermal conductivity and a presentable appearance. Shelves made of linden boards are aesthetically pleasing and pleasing to the eye.
Products made from such material are easy to process, so it is recommended to buy them for people who have no previous experience in working with wood. Making a linden shelf in a bathhouse with your own hands is easier than constructing it from another material. When heated, linden boards emit a very light and pleasant woody smell, which has a calming effect. In addition, they are easy to care for. One of the disadvantages of this material is that it darkens over time. However, this does not in any way affect the performance characteristics of the tree.
Maple. Many experts note that this tree species is a good alternative to linden boards. Products made from this material are more durable and therefore practically do not deform over time. Like linden boards, elements made from maple are great for shelf organization.
It is recommended to use hardwood for the manufacture of shelves and benches.
Poplar. This material is distinguished by its whitish tint and is easy to process. For beginners, this is one of the best options, but products made from this wood are not strong enough. Therefore, it is recommended to use poplar for the manufacture of decorative shelf elements.
Abashi (African oak). Bathroom furniture is often made from this material. African oak is also suitable for a shelf in a sauna. This material is highly resistant to moisture and high temperatures. In addition, African oak boards have low thermal conductivity, which contributes to the ease of use of furniture.
The surface of products made from such wood is very smooth, and its structure favors quick drying. Many experts put this material first in the ratings of the most suitable tree species for shelving.
It is important to choose wood that is resistant to high temperatures and moisture, in which case the shelves can last for many years
Alder. Durable and reliable material, which is highly resistant to deformation. The thermal conductivity of alder boards is one of the lowest, so this wood is an excellent solution for bath furniture.
The choice of a particular material depends on several factors. First of all, this is a financial component. In addition, bath furniture must be able to withstand high temperatures and high humidity, as well as be durable and comfortable. Individual preferences play a big role when choosing material for shelves and benches.
Information about the material and number of boards is recorded in a do-it-yourself diagram. How to make shelves in a bathhouse is a question that many people ask. The answer to this can be obtained by studying the types of bath benches, their features and assembly instructions.
Floor boards: types of material used as flooring
Several types of wood flooring are used to finish the floor. And each of them has its own characteristics, advantages and disadvantages. Beautiful and high-quality flooring not only determines the appearance of the room, but also withstands heavy loads
This type of material can be used not only as a rough coating, but also as a finishing coating. It is made from solid wood or by gluing several elements together. Visually, this material looks like a milled board. To make a floor from a floorboard, you can use ordinary material or one made according to European standards, the so-called Euroboard. For its production, special technologies and special European equipment are used.
The quality of the second type of floor covering is usually noticeably higher. On the one hand, it has lower humidity, and on the other, high standards do not allow the presence of even small defects, for example, holes, knots, stains, etc. This surface is smoother, ideally polished, but this material is noticeably more expensive.
Obviously, it is better to purchase a Euroboard if you plan to use it for a finished floor. But ordinary material is more often used just as a rough covering, on top of which laminate or linoleum will be laid. Whether it is worth spending money on buying Euroboards is up to each buyer to decide for himself. It is recommended that you familiarize yourself with both material options to choose the most suitable one.
Solid wood floorboards may contain knots, resin, and small bluish spots
This type of floorboard is always fastened into a groove, so the only question is how to make the installation procedure as simple as possible. Rectangular tenons are common, but mating them with grooves is quite difficult, especially if there is even a slight curvature. Laying closely in this case is a complex procedure. Sometimes, in order to make the task easier, the boards are sawn into pieces. But the appearance of the floor covering is greatly deteriorated.
A good option for fixation is quarters. In this case, one of the boards is cut half the width at the top, and the other - in the same way at the bottom. This is a very simple way of fixing, and this floor looks really beautiful.
Glued laminated boards are made from several elements, glued together in such a way as to provide additional strength. In this case, the fibers are arranged so that throughout the entire period of use, each element does not lose its original appearance and characteristics.
Glued-laminated floorboards have a high price due to the complex manufacturing technology
Drying of such boards is almost completely eliminated, which allows the floor to remain level. Laying such a coating is a rather labor-intensive procedure. In addition, laminated wood has a high cost due to complex manufacturing technology.
The main advantage of glued boards is its high resistance to heavy loads. That is, in rooms where there is heavy furniture or high foot traffic, this option will be simply irreplaceable. In addition, this material is often used to decorate children's rooms to provide the floor with an attractive appearance and the necessary durability.
Due to its structure, laminated boards tolerate moisture well. And although it should not be placed in a bathroom or bathhouse, where the humidity is too high and almost constant, it is perfect for ordinary living spaces, even for the kitchen.
The decking board is characterized by a special wavy surface. This is an ideal option for arranging rooms with high humidity, for example, a bathroom, bathhouse. In addition to being highly resistant to moisture, the rough surface reduces the risk of slipping and falling on wet floors.
Among the features of these boards, it is worth noting the presence of special compensation grooves, which are small in size (only a few millimeters), but perfectly relieve excess stress. This is necessary due to exposure to precipitation and sun.
Layout
The area of the bathhouse is an important factor for determining the location of the canopy and the number of its tiers. After all, when they create a canopy in a bathhouse with their own hands, they focus on the longest wall. But with the obligatory consideration of the absence of direct steam from the stove into the steaming space, as well as drafts. Depending on the size, the bath canopy allows you to sit, recline or lie down.
Typically, canopies are made of two or three levels to allow you to choose a more comfortable temperature zone. In the classic three-stage version, the middle tier is made stationary. The collapsible design, where the upper and lower shelves are removable, allows for better drying of the wooden parts of the bathhouse.
Along one wall there can be stepped and compartment options for the arrangement of shelves. The most economical option for arranging the canopy is like in a sleeping car compartment, one shelf above the other. They are attached with the ability to fold, freeing up space in the bathhouse if necessary. With the third L-shaped method, one of the shelves is located on the adjacent wall.
The ideal length for the canopy so that the average person can lie on it freely at full height without bending their legs. Typically the minimum bench length dimensions used are:
- sun lounger – 180–220 cm;
- recliner – 150 cm;
- seat – 40–90 cm.
The most important dimensions for the height of the canopy tiers are the distance from the floor and ceiling of the bathhouse, the optimal location of the upper and lower shelves. The main point of these dimensions is that there is enough space so that an average adult can sit down without hindrance when taking a steam bath. And also so that the steamer or massage therapist does not take uncomfortable, crooked positions during the procedures. Recommended height:
- from the ceiling to the top canopy – 110 cm;
- interlevel height – 60–80 cm.
The standard width of the canopy is considered to be 60 cm, but the upper bed should have a larger transverse dimension - 90 cm. It is quite acceptable to reduce or increase all dimensions to suit the existing standards of the bathhouse room. If the width of the main canopy is designed for two steamers, then this will already be paid. How to make a canopy in a bathhouse to suit the needs of a particular family is up to the owner to decide.
The constituent elements of any standard canopy are:
- frame - support post made of beams;
- the surface of sun loungers, seats made of boards;
- backrest for sitting on the top bunk.
All parts of the canopy must be from the same type of wood.
It is not advisable to use material made from coniferous trees, since with constant heating they begin to release resins that will stick to the bodies of vacationers. The minimum resin content of such popular hardwood species in our country:
- Linden - healing properties, homogeneous structure, darkens over time under the influence of steam and humidity.
- Aspen is relatively inexpensive, has a healing effect, is resistant to moisture, and never rots.
- Alder is a dense wood with healing properties.
- Poplar has a uniform texture; after drying, the wood becomes hard.
The wood of these trees tolerates high humidity, frequent temperature changes, and has a low level of thermal conductivity. Despite all these wonderful properties, they are additionally treated with special natural oils to protect against mold. Under no circumstances should it be impregnated with any chemicals or varnished.
Experienced craftsmen know that wood material is classified by quality. We recommend making your own canopy only from “Extra” or “A” quality wood. In appearance, this smoothly planed wood is distinguished by the absence of knots, chips and cracks. The more knots there are on the material, the more susceptible it will be to rapid destruction under extreme steam room conditions.
In sanded wood, all sharp corners should be smoothed with a chamfer to protect the skin of bathhouse visitors from possible cuts. Boards for flooring sunbeds and seats will last a long time if their width does not exceed four times the thickness. That is, in order for the boards to dry quickly and not crack, they must be thin enough.
To prevent the structure from swaying and creaking, the racks-bars for the canopy frame should have a cross-sectional size of 50×70 mm or 65×15 mm. Fasteners must be made of galvanized iron. When choosing the old fastening method, it will be necessary to drill holes at the joints for oak wedges - tenons. To avoid burns, the heads of metal screws - self-tapping screws or anchor bolts - are buried deep in the wood and protected with special decorative caps.
Assembly and installation of workpieces
Now let's look at how to properly make a canopy in a steam room.
To do this, you must adhere to the following sequence of actions:
- Installation should begin from the top shelves.
- The support beam is located on the canopy base along the entire length of the rectangular shape, the bars are attached 65-85 cm from each other.
- The rack bars are connected to the frame for the canopy in the bathhouse using special self-tapping screws. To ensure greater reliability of the structure, another row of beams can be screwed between the support posts. Self-tapping screws and metal corners are used to firmly connect the frame elements.
- The finished frame is installed in the steam room. Rubber pads are attached to the bars below. They will give the structure greater stability and provide protection from moisture.
- Next is the flooring. The boards should begin to be attached from the bottom.
- The best option is seats with a slight slope, which will allow water to drain better.
- There should be a gap of 1 cm between the seat boards, which is necessary for water to drain and the bench to dry out faster.
- When making canopies, you can use wooden nails or pins, metal nails and self-tapping screws. Metal caps must be buried in the wood. This is done to prevent burns. If it is not possible to drown the caps in the wood, then plastic protective caps should be put on them.
- You can also cover the gap between the rows of canopy with boards. You need to think about this in advance in order to purchase the right amount of material. The space between the floor and the bottom shelf should not be sheathed, otherwise air circulation will be difficult, the steam room will not dry well and cleaning will become more difficult.
- You can also create a collapsible design that allows you to remove the seats and take them out of the steam room to dry.
- For the top row, you can make backrests and headrests (for more details: “How to make a headrest in a bathhouse - proven methods”). You can also make supplies for your feet and small benches. All this makes your stay in the steam room even more comfortable.
- If necessary, you can round off sharp corners.
- When all the work is completed, it is necessary to examine the surface of the seats and sand where it needs to be sanded.
DIY bath canopy
To have a pleasant steam bath and warm up your body once or twice a week, you also need furniture in the bathhouse. If you do it yourself, you can save a lot and enjoy the work done.
The cost of constructing a canopy yourself is primarily in the choice of wood. To decorate the bathhouse, only natural wood is used; the leaders in this area are: linden, aspen, birch, poplar, but not coniferous wood, which emit sticky resin for many years.
When constructing a canopy for a bathhouse with your own hands, you must follow some of the recommendations listed below.
- the height of the canopy from the floor level should not be less than 110 cm, from the ceiling to the canopy 120-140 cm.
- boards used for the canopy must be of high quality: planed and thoroughly sanded, without knots, cracks or burrs,
- the canopy flooring and supports are assembled from the same type of wood,
- rubber gaskets are placed under the support bars, which are necessary for protection from moisture and stability of the structure,
- the required distance between the support bars must be at least 60 cm.
- In order for the boards to dry quickly and not crack, it is necessary to select boards that are not very thick and not very wide.
- they should not be stuffed close to each other, but it is advisable to leave a small gap of 0.5-1.0 cm,
- the length of the canopy should be suitable for the person’s height, so that one can lie down comfortably,
- The canopy flooring is assembled without screws or nails, using wooden spikes that are driven into prepared drilled holes.
Frame assembly
The support bars on which the frame will be held are securely fastened to the walls; they are secured using anchor bolts or long self-tapping screws.
Now let's try to figure out how to make a frame.
The longitudinal bars in the design are chosen with a size of 50x100 mm, the required length of the canopy
A reliable frame is assembled from longitudinal, vertical and transverse bars. The transverse bars are fixed to the longitudinal bars, at a distance of 60 cm, and deepened by 5 cm into previously prepared cuts.
The assembled frame is installed on support bars previously fixed to the walls. For reliability, the frame is additionally attached to the walls with long self-tapping screws or anchor bolts.
The canopy flooring is installed using prepared wooden tenons. The joints must be sanded. Typically, the distance between the shelves is covered with the same boards as for flooring, leaving a gap of up to 2 cm between them, necessary for air circulation.
Many craftsmen do not advise sewing the canopy all the way to the floor, otherwise the structure will quickly rot and limit access to cleaning the room. See the photos above.
Impregnation of frame and canopy
All structural elements are coated with a special impregnation for baths, for the manufacture of which natural oils are used. Impregnation will create a protective film on the wooden structure, which during operation protects it from the formation of mold and premature rotting.
Some people find it easier to buy a canopy than to fuss with it in the evenings or on weekends, while others enjoy making it themselves.
Frame and decking
Support - a canopy frame made of timber for subsequent flooring with boards can be fixed both on the floor and on the wall.
The floor frame makes cleaning a little more difficult, and the wall frame may become deformed due to shrinkage of the walls. A reliable frame is assembled from vertical posts, longitudinal and transverse crossbars - jumpers. To make a safe canopy for a bathhouse with your own hands, experienced craftsmen recommend starting work from the top tier, installing two beams horizontally across the width of the canopy. These beams form a support post, and between them transverse struts are placed every 50 cm, like stiffening ribs. When installing a system of vertical racks, all surfaces of parts in contact with the floor are insulated using specialized rubberized gaskets. In addition, this gives additional stability to the structure.
A deck made of boards is attached to a frame made of beams, where air should circulate freely and water should drain freely. When installing, a gap of 5–20 mm is left between the edges of all boards, the principle of which is also preserved for the floor and walls. The boards are supposed to be slightly tilted so that water does not stagnate and is not absorbed into the wood. The inter-level vertical space is also covered with boards while maintaining gaps, providing access under the canopy for cleaning.
For those owners who are at least a little familiar with carpentry, this bath canopy is a simple structure similar to a bench. How creatively you can approach the process of creating an ordinary canopy can be seen from the many images on the Internet. Warm colors and the smell of natural wood in themselves already create comfort in any room. And the master’s ability to put a piece of his soul into his works will give the steam room an atmosphere of hospitality and care.
Features of the steam room and furniture for it
Everyone knows that the smaller the steam room, the warmer it will be. Current heating costs will be lower, since a small room will need to produce less steam. Therefore, for a good arrangement of the steam room, simple and simply even furniture is always useful. Often, ladders to climb onto shelves have several steps at once. It's convenient and simple.
If the room for the steam room also allows you to create a separate area for a sofa and a chaise lounge, then you can easily recreate this yourself. A small sofa with a rounded shape will look attractive.
What to do with a fairly small steam room?
It doesn’t matter if the steam room is so small that an ordinary shelf can only take up space, and it simply won’t be convenient to use such a room. In this case, rather non-standard shelf dimensions help out. It could be just a small triangular structure in the corner of such a room. The triangle should only be made isosceles. You just need to make it in such a way that it does not take up much space, but is also convenient to use.
Video
This video describes in detail how to assemble the canopy in the steam room:
Corner canopy in the bathhouse
Canopy in the steam room
Located in the corner
A simple option Canopy in the bathhouse
Made from logs
DIY bathhouse shelves: step-by-step guide
If you are planning to make shelves for a bath yourself, you should choose a suitable tree (usually one species is used for sun loungers and wall decoration): linden, aspen or alder. It is worth noting that of these three species, alder has the most attractive appearance, aspen is most suitable in terms of performance indicators, and linden is the most budget-friendly solution.
The following are taken into account:
- the expected number of visitors, their weight and dimensions;
- size and shape of the steam room;
- type of seats (stationary, reclining, retractable);
- planned temperature regime (and humidity level);
- the preferred option for staying in the steam room is sitting, lying down, with active treatment with a broom, supply of steam;
- methods of preparing materials.
Below is a shelf in a bathhouse (drawing) with a side view and isometric view.
The indicated dimensions and heights of the shelves in the bathhouse are standard; they can be slightly changed in accordance with personal preferences.
The installation stages (how to make shelves in a bathhouse) are shown in step-by-step photos and a short video.
After choosing a design, you need to decide where to attach the shelf - on the wall (as in the step-by-step guide) or the floor. At the same time, we should not forget about the need for frequent cleaning.
Do-it-yourself bathhouse curtains are made using wooden fasteners or fastened with metal parts so that they are hidden under the tree. Otherwise, the metal may severely burn your skin. Typically, self-tapping screws with plugs (wooden or plastic), corners “from the inside out,” oak or pegs made from the same wood are used for fastening.
Important:
- Untreated, poorly dried, wood with knots or cracks cannot be used for shelves;
- the material of the frame and the flooring must match;
- the wall material at the attachment point must be processed no less carefully than the wood for the sun loungers;
- The dimensions of the shelves in the steam room are selected individually, but with a focus on standards.
How to care for shelves?
Not only the shelves, but also the entire steam room room must be kept clean, ventilated and dried. It is very good to dry the beds in the sun. And in this sense, it makes more sense to make them removable.
To clean them, you must use only clean warm water. And to dry the shelves as quickly as possible, you should wipe them with a dry, moisture-absorbing cloth and ventilate the sauna room after each use.
- Enter the parameters of your sauna or simply leave a request
- We will receive an estimate for your project from each of our contractors
- We will choose the best offer and contact you
- You will get a sauna at the best price
Your promo code: “Sauna for you”! Tell it to our employee and the surveyor’s visit will be free for you.
How many cubes are there in a floorboard and how to figure out how much it is: 1 cube of material
For the convenience of buyers, there is a special classification of wood by type and class, which makes it easy to select the required material.
| Class | Quality |
| Extra | Maximum smooth surface without knots or any defects |
| A | Smooth surface without cracks or chips. Minor knots are allowed, no more than every 150 cm. Small blue spots may occur, no more than two surface cracks, resin |
| IN | No more than 4 knots per 150 cm, no more than 2 surface cracks, light defects and damage, resin |
| WITH | The lowest class, as a result of which the presence of surface cracks, 2 knots, contrasting color stripes, blue stains and even some mechanical damage is allowed |
Understanding what types of boards there are, you can easily choose the option that is suitable for a particular type of housing. After all, it is completely pointless to overpay for extra-class if you plan to rough-finish the floor, and it is also not recommended to make the final coating from a low-quality material. The table will help you decide on the required class of material, choose it wisely and plan costs.
Floorboards, like all other lumber, are measured in cubes. However, not all buyers understand how many boards are contained in 1 cube and how to determine how much material is needed for a particular room. Let's look at how to deal with these issues using a simple calculation example.
We invite you to familiarize yourself with the floor made from regular edged boards
To calculate the amount of material in 1 m³, you need to know the volume of one board. Determining this is quite simple: the thickness of the board is multiplied by its width and length. As an example, consider a product with dimensions of 35x100x6000 mm. For convenience, all indicators need to be converted into meters and multiplied: 0.035 * 0.1 * 6 = 0.021 m³ - as a result of performing arithmetic operations, we found out that the volume of one board is 0.021 m³.
To find out the volume of one board, you need to multiply the thickness by the width and length
For the convenience of buyers, there is also a special table of standard indicators, which shows how many boards 6 meters long are in one cubic meter.
| Board size (mm) | Volume(m³) | Quantity per 1 m³ (pcs.) |
| 25x100 | 0,015 | 66,6 |
| 25x150 | 0,0225 | 44,4 |
| 25x200 | 0,03 | 33,3 |
| 40x100 | 0,024 | 41,6 |
| 40x150 | 0,036 | 27,7 |
| 40x200 | 0,048 | 20,8 |
| 50x50 | 0,015 | 66,6 |
Multi-stage
At first glance, the arrangement of shelves may raise some questions, for example, why they are almost always a multi-stage design.
The reason, in fact, is very ordinary. When heated, water vapor and hot air rise upward, while the temperature near the floor is significantly lower. Thus, each user will be able to independently choose in which temperature regime it is more convenient for him to be: at the bottom, where it is not so hot, or at the very top of the steam room “pyramid”, where the temperature is very high. Therefore, if the owner of the steam room decided to make shelves with his own hands, then it is absolutely not recommended to deviate from the usual stepped structure.
It is worth seeing that in small steam rooms the lower tier is often located almost at floor level, which allows for natural ventilation and makes it more effective. It is also important to keep in mind that the upper tier will be made larger than the lower ones (so that it can be used as a bed), while the distance to the ceiling from the bed should not be less than 100-120 cm.
Surface treatment
Wood impregnations
After installation of the canopies, you will need to worry about protecting their surface from destruction, as well as giving the finished structure a more attractive appearance. But before treating the surfaces of the shelves using any of the known methods, you need to carefully sand them using a special grinding tool. When choosing a protective decorative composition, you should take into account the fact that not all known types of wood coatings can be used at elevated temperatures.
Thus, standard paint and varnish impregnations are completely unacceptable for steam rooms, since at high temperatures they form a film on the surface of the wood.
It is for this reason that steam rooms use special compounds and impregnations that are resistant to high temperatures and moisture and do not form a film. As an example of such a coating, we can consider the universal composition of the brand “Supi Saunavaha” (Tikkurila), made on the basis of natural wax.
Material selection
Edged boards
When choosing a material, you should take into account the characteristic features of various wood species, as well as the specific conditions of their practical use. To ensure comfortable operating conditions, the following requirements apply to the wood used to make shelves:
- low level of thermal conductivity;
- strength of the fibrous structure;
- absence of resin secretions;
- resistance to high temperatures and moisture.
Of all the types of wood familiar to us, the specified requirements are fully satisfied by such varieties as cedar, linden, alder and aspen. When choosing a specific material from the specified range, as a rule, preference is given to linden.
Standard design of steam room shelves
It’s not for nothing that a bath shelf is often simply called a bench. Yes, these are benches of different heights, arranged according to a special pattern. Their design includes two main elements:
- A frame that serves as the basis for attaching planks to a stationary deck or as a support for a dismountable deck system. Most often, the frame is constructed from support posts, reminiscent of bench legs, and connected by transverse jumper boards. Less commonly, the frame is made according to the principle of a stair stringer, to which the steps of the bath shelves are mounted. Using technology borrowed from Finnish dry steam lovers, the frame is sometimes built without supports in the form of a railway shelf attached to the walls of the steam room.
- The flooring is made of linden or aspen boards, carefully sanded with gaps of 1.0-2.0 cm. As already mentioned, it is either attached to the frame or individual components are knocked together, like floor ladders. It is more convenient to remove and ventilate loose flooring outside the walls of the steam room. It serves as a seat, a bed, and a podium for the tireless bathhouse attendant, who treats the mortal bodies of his clients with a fragrant broom. According to the principle of constructing the flooring, they also knock together: seat backs, sides of shelves, special “bath pillows” and devices for taking a relaxed “lying” pose with the legs positioned at head level or higher.
Since the steam room is usually small in size, since a small room is easier, more economical and quicker to bring to the required condition, the furniture for its arrangement has an extremely simple rectangular geometry in plan, profile and frontal view. The imagination of craftsmen usually justifiably draws the semblance of a staircase with two or three large steps. True, these steps may resemble chaise lounges or corner sofas with a rounded shape. But such delights are indulged mainly by the owners of bathhouses with large steam rooms, who do not mind taking up space with their personal quirks.
Why are the bath shelves multi-stage?
According to the laws of physics familiar from school, steam and heated air tend to rush upward. Having given off the healing hot power and cooled under the ceiling, the air flow is partially expelled by the ventilation system of the steam room, and partially returns down, reflected from the upper ceiling by a special ceiling system. That’s why it’s much hotter at the top than at the bottom of the sauna “pyramid.”
Multi-stage functionality allows users to independently choose the optimal steaming mode for them with the appropriate temperature background. Craftsmen who decide to build shelves in a bathhouse with their own hands will have to adhere to the traditional “staircase” configuration in order to ensure the opportunity to both enjoy the most intense steam and a gentle microclimate.
In Russian steam rooms, two regiments were most often arranged. But no one forbids making three, as long as there is enough space to install them. In the sense that there is space left for the movement of people receiving bath procedures without traumatic consequences.
Layout and height
The height of the shelf in the bathhouse from the floor depends on the chosen variety. Typically, the shelving is placed along one wall - either the one without windows, or located on the side of the door.
This is necessary so that the cold air from it when leaving and entering does not destroy the atmosphere for those who are in the steam room. The choice of option undoubtedly depends on the owner. But before making a decision, it is better to listen to the authoritative opinion of a specialist in order to make the height of the shelves correctly.
- The linear design is the simplest and is the standard design used most frequently. It is installed under one wall and represents a kind of steps with gradually increasing degrees and consistency of steam. Each shelf is designed for a more resilient visitor. The steam room can have two or three tiers; the height of the bottom shelf is recommended to be at least 50–60 cm.
- In total, the shelves should not be higher than 2 m, but this height can only be made in a high room. It is believed that a seat with a height of less than 60 cm is uncomfortable not only for the person sitting on it, but also for the steamer with a broom. He will not be able to work at full capacity.
- The height of the shelves in the steam room of any Russian bath varies from 30–35 cm to 60. But the lower limit is acceptable only for low buildings. Making them too low means causing inconvenience to both your guests and yourself.
- A completely workable arrangement option is in the form of the letter G. It is arranged in the corner, between adjacent walls - in the form of one shelf, which must be hung on both walls, at a height of no more than 60 cm. It can be two- or three-stage. There is an option for arranging the upper and lower shelves near one wall, and the middle one against the other.
The drawing of such an arrangement of shelves, usually called a compartment by analogy with a train, where the lying places are also located one opposite the other, implies both the usual three steps and one for a full-fledged bath procedure.
In this case, the width and height of the shelves can be variable, although within the recommended standard. Of course, there are also unusual designs, but only a good specialist can use them. Many of them willingly share their experience in arranging shelves in a video, which can be viewed at the end of the article.
Parallel structures are good for a small bathhouse. As you can see in the photo below, this is a convenient option for shelves for a company intent on business or friendly communication.
The dimensions of the shelves in the bathhouse depend not only on the type chosen. Although sometimes they are influenced by certain factors. This is the configuration and shape of the room, its dimensions, the designer’s imagination or the personal preferences of the amateur designer.
The dependence of standard parameters on human size and the conventional concept of normal in various body positions or certain activities is undeniable.
Criteria for selecting electric current consumers and fittings
For each bathhouse room, you need to select devices taking into account operating conditions. According to the international classification, the housing is marked with the IPXX code. XX – two numbers indicating the degree of protection against penetration of foreign objects (first) and moisture (second). Get acquainted with the proposed tables, they will help you choose the optimal devices for each bath room.
Class of housing protection against penetration of foreign objects and dust
Housing protection class against water penetration
Let us determine, for example, which lamps need to be chosen for the most “complex” room in the bathhouse – the steam room. There is no dust there, it is enough that the case protects against penetration of objects ≥ 2.5 mm (the first digit on the code should be “3”). In the steam room you can not only take a steam bath, but also pour water over your body. This means that the housing must protect against such influence; according to the table, the digital designation corresponds to “5”. This means that the lamp housing in the steam room must be designated IP35. We talk in such detail about the different protection classes not only because it directly affects safety, but also because the protection class of the housing significantly changes the price of the devices.
The same parameters should be used to select mounting boxes, sockets, etc.
Recommendations from experts
- In certain conditions, the most convenient option for making a shelf is a collapsible design, which allows the elements included in its composition to be dried in the fresh air.
- When attaching shelf elements, you should not place them close to the wall of the steam room, leaving a small gap (about 5–7 cm). For these purposes, you can use special wooden spacers placed between the boards and the wall (watch the video).
- Structural elements in direct contact with the floor must be protected from moisture. Gaskets cut from a piece of rubber can be used as such insulators.
Design, manufacturing and equipment
To begin with, after all, a little theory and even linguistics. It’s not a fact that you will read all the materials about shelves, so let’s repeat:
ON A NOTE! It is most correct to say: in the singular “shelves”, not “shelf” and not “canopy” (there is a shelf in our room, but a canopy above the bed), in the plural – “shelves” (shelves in the closet, shelves in the steam room , yes in the army).
The structure of a shelf can be described as a wooden platform, a lounger or even a conditional perch, consisting of one or several tiers, which, in turn, can consist of separate parts, or can form a monolithic stationary structure.
Moreover, parts can be either individual tiers or their components. In the latter case, we are talking about a solid frame and removable flooring.
The simplest shelf is a high lounger with a step for ease of climbing onto it. An excellent solution for lovers of Russian baths, who are frequented by professional steamers.
But the prevalence of the sauna in Russia has led to the fact that the shelves in the bathhouse and steam room began to be multi-tiered, under the ceiling, and the vertical parts of the “steps” were sewn up tightly. All this is correct and appropriate, but only for a Finnish bath.
This is not the place or time to discuss the winning (or losing) of the bathhouse option, in which the owner is trying to combine two modes; for this, you can read something from the section on stoves, where a lot was said about the modes and their compatibility. But, as a fact, many make shelves in the bathhouse with their own hands for both types.
IMPORTANT! In a Russian bath, the preferred position is lying down, but you can also sit. In the sauna, it is preferable to sit higher and sweat profusely, but lying down is also not prohibited. Of course, the difference between a lounger and a seat is only in width
You can’t lie on a narrow shelf; on a shelf that’s too wide, it’s uncomfortable to lean on the backrest; it’s too far away
Of course, the difference between a lounger and a seat is only in width. You can’t lie on a narrow shelf; on a shelf that’s too wide, it’s uncomfortable to lean on the backrest; it’s too far away.
Arrangement of shelves in a bathhouse: this is more comfortable to lie on
And sit on these
As for how to build shelves in a bathhouse with your own hands, more on this a little later, but now we can say that the work is not too difficult, especially if you don’t bother, put everything on screws with a screwdriver and don’t worry too much about the future, in which the metal joints in the wood will definitely become loose.
BY THE WAY! Here is an important point of self-determination - should it be attached to the wall or made as a separate structure? The price of the issue is rot, which forms in a poorly drying joint with the wall.
Frame and decking
Support - a canopy frame made of timber for subsequent flooring with boards can be fixed both on the floor and on the wall. The floor frame makes cleaning a little more difficult, and the wall frame may become deformed due to shrinkage of the walls. A reliable frame is assembled from vertical posts, longitudinal and transverse crossbars - jumpers.
To make a safe canopy for a bathhouse with your own hands, experienced craftsmen recommend starting work from the top tier, installing two beams horizontally across the width of the canopy. These beams form a support post, and between them transverse struts are placed every 50 cm, like stiffening ribs. When installing a system of vertical racks, all surfaces of parts in contact with the floor are insulated using specialized rubberized gaskets. In addition, this gives additional stability to the structure.
For those owners who are at least a little familiar with carpentry, this bath canopy is a simple structure similar to a bench. How creatively you can approach the process of creating an ordinary canopy can be seen from the many images on the Internet. Warm colors and the smell of natural wood in themselves already create comfort in any room. And the master’s ability to put a piece of his soul into his works will give the steam room an atmosphere of hospitality and care.
Several options for a comfortable bath canopy
A deck made of boards is attached to a frame made of beams, where air should circulate freely and water should drain freely. When installing, a gap of 5–20 mm is left between the edges of all boards, the principle of which is also preserved for the floor and walls. The boards are supposed to be slightly tilted so that water does not stagnate and is not absorbed into the wood. The inter-level vertical space is also covered with boards while maintaining gaps, providing access under the canopy for cleaning.
We suggest you read: How to properly make lining in a bathhouse
Peculiarities
If you have decided to install a bathhouse on your property, you should remember that it should be as comfortable as possible. To do this, it is necessary to competently equip the resulting structure, equipping it with all the necessary components.
Elements such as shelves are very important for a bath structure. These parts are designed for installation in a steam room. Most often they have several tiers.
Their design features primarily depend on the area of the room and its height. It is customary to place shelves for a steam room either along one of the walls, or near two walls that are parallel to each other. There are also corner structures in which the arrangement of tiers is completely different.
In real Russian baths, shelves with three tiers are usually installed. It is also known from physics lessons at school that heat always rushes upward, so it is always cooler on the bottom shelf in the steam room than on the top one.
When designing shelves for a steam room, it is necessary to take into account that an adult should easily fit on the top tier without resting against the ceiling - this is another important feature that should not be underestimated when arranging a bath room.
A high-quality shelf in a bathhouse should have low thermal conductivity, otherwise it will be impossible to stand on it, as it will become very hot in the steam room. That is why such structures are made of wood and not metal, because it heats up very quickly.
Also, well-made shelves made of suitable materials can easily withstand high temperatures and temperature changes. Under such conditions, these structures do not deform, rot or collapse.
There are many options for placing a shelf in a steam room. It is possible to build a suitable structure for a room of any layout and size. For example, for a compact steam room it is permissible to make corner benches that take up little free space, but remain convenient for users to spend their time comfortably.
Traditions and recommendations
Despite the lack of a uniform standard, there are traditional ways to determine ceiling height. Typically, a Russian bathhouse was built individually, for the family living in the house. Therefore, to determine the required parameter, the tallest member of the family stood on the floor and raised a broom upward.
The tip of the bunch of branches in the outstretched hand was the boundary on which the ceiling was built. In modern conditions, such a building can be used for commercial purposes or for recreation with friends and colleagues.
The method of determining the height dimension has become less common, so experts prefer to recommend when building a bathhouse a height in the range from 2.1 meters (but not less, otherwise the steamer will be uncomfortable) to 2.40 m.
These are the parameters that are considered optimal:
- the steam room warms up quickly enough, and the consumption of firewood does not exceed the normal amount;
- with a height of up to 2.4 m, even an electric oven does not require a lot of electricity consumption to properly warm up the workspace;
- if there is a tall person in the family, you can use his arm extended upward as a standard - this will ensure that those taking a steam bath will not experience discomfort in any position;
- sometimes you can find advice to add half a meter from the tip of the middle finger of an outstretched hand, but if the height is greater than 5 m, then more fuel will be required and the steam will go to the ceiling;
- 200 cm will already lead to the accumulation of steam almost at the level of the respiratory organs, in such an atmosphere it will be difficult to breathe;
- in a compact structure, a ceiling of 20 m is sufficient, but if a structure is being built for commercial use, with a large number of visitors and steam volumes, the ceiling should be at least 3 m.
What to make better from: choosing the material
What is better to make? It is clear that it is made from wood, to which, in fact, there is no alternative, but which species are most suitable? We have already written about this, so now it will be very brief.
Coniferous species should absolutely not be used in a sauna where the temperatures are high, in a Russian bath - if desired, and in mixed modes it is also not worth using at all.
Cheap aspen and linden are worthy competitors of expensive abash, because in addition to low thermal conductivity, it is not highly resistant to water, mushrooms, etc.
You can experiment with other hardwoods, taking into account their thermal conductivity (the higher the density, the higher the thermal conductivity - the easiest way to decide by eye), resistance to rotting and other characteristics. For example, oak is dense, but does not deteriorate in water. Like larch, which, by the way, does not emit resin.
Determination of optimal parameters
When designing vaping devices, it is necessary to find a consensus between standardized requirements and the presence of individual characteristics of family members or regular visitors.
The comfort of staying in the bathhouse depends on pre-calibrated meters and centimeters. This data is also important when purchasing building materials.
Therefore, it is necessary to decide what the distance of the shelves in the bathhouse should be at the design stage.
To do this, it is recommended to first measure the expected space, and then choose the configuration and depth of the shelves that you like or that is optimal for the room. The parameters should be correlated with the requirements of convenience and comfort of those who will be here for the purpose of washing or healing.
When taking measurements, take into account the following:
- the length of the shelf can vary from 1.8 to 2 m - the latter parameter will allow you to receive guests of almost any height, and saving on length will make the lying position uncomfortable for a tall person;
- you can limit yourself to 1.5 m, but on such a step you can only lie with half-bent legs or in a fetal position, which makes it doubtful to get real pleasure from the steam room;
- the minimum for the bottom shelf is 40 cm, usually it is used as a footrest, but this width allows a beginner or someone who does not perceive heat well to sit with sufficient comfort;
- the middle and top ones are usually made at least 60 cm, in such a space you can sit in different positions for quite a long time.
It is also worth noting:
- if the shelves are 90 cm wide, it is convenient to take a lying position on them both on your back and on your stomach;
- the height calculation begins not from the bottom, but from the top shelf, while the main reference point in a Russian bath is the steam door of the stove, but the bottom bench should not be lower than 30 cm from the floor;
- the fastening of vertical supports should be at least 60 cm so that the structure does not sag even with significant weight of the person lying or sitting, although it may vary slightly depending on the thickness of the wood used;
- the height of the top shelf should be measured from the ceiling above - at least a meter is left from the head of the person sitting on the top bench to the ceiling, so it is important how much the height of the bathhouse is.
Nuances of height
The dimensions of the shelves in the sauna may differ from the parameters recommended for the Russian steam room. It is enough to compare the method of heating air and the conventional vaping method to be convinced of this.
Shelves in the sauna on the balcony.
- that the apartment will not be burdened with sauna ventilation aspects.
- As for the screams about the fire. So, any purple household appliance (for example, an electric stove) can also start a fire in the kitchen. The same cable has the same probability of short circuit and fire. And what if something happens on the balcony? the author will even be able to pour it in more easily from a fire extinguisher.
- This is a balcony. The apartment will be a little off to the side. In case of force majeure. extremely good.
- block off half the balcony with a wooden box,
- block natural light,
- leave the hood window in the direction of the glass (you’ll appreciate it in winter),
- complete lack of ventilation on the balcony
- A household extension cord was used as the power cable.
Sources:
https://saunaljux.ru/stroim-banju/polok-dlia-bani-svoimi-rykami.html https://www.novamett.ru/banya/polok
Stages of manufacturing a bath shelf
You can make a bath shelf yourself
You can make bath shelves yourself if you follow a simple sequence of installing beams and boards, carefully process the material, and securely fasten the structural parts together.
IMPORTANT: the top boards of the couch must be attached to the supporting beams using oak wedges driven into pre-drilled holes in the parts. The use of metal nails or screws to assemble the deck chair is unacceptable. Hot steel caps can cause serious burns to the surface of the body.
Shelf installation diagram
Installation of racks
The racks on which the bath lounger is located must ensure the stability and strength of the entire structure. Typically, for the manufacture of the top row of beds, 4 to 6 racks are used, 1.05-1.15 m long, with a cross-section of 50x100 mm or 100x100 mm each, depending on the length of the shelf.
Start of installation of shelves
Support beam for shelves
Fastening the support bars
Frame of bath shelves (one of the options)
The racks are connected to each other along the perimeter by rectangular bars 50X100 mm, onto which the load-bearing bars and boards of the bench are subsequently attached. The racks are attached to the wall with long (20 cm) dowel screws.
The timber for the upper seat posts can be used unpolished, without cracks or chips. A gap of 0.1 m is made between the wall and the adjacent rack - inserting pieces of thick boards for better circulation of hot air and improved ventilation of the shelf.
Making a frame for bathhouse shelves
Assembling the load-bearing structure of the shelf
The supporting structure of the upper shelf must withstand the weight of the planks of the couch plus the mass of the people on top, so it is better to use a supporting beam with a cross-section of 50x100 mm or 50x120 mm.
Bath shelf frame
The top row of supporting beams with a cross-section of 50x50 mm is attached across the length of the upper plane of the shelf every 0.5-0.6 m, depending on the thickness of the upper boards. The thinner the board, the more often the supporting bars should be located so that the boards do not sag under the weight of people sitting on them.
IMPORTANT: the bars must be attached with a slight slope (1-2°) from the wall towards the steam room, for better drainage of moisture from the wooden surface of the bath lounger.
The top shelf is covered with boards
The width of the top shelf is ideally made 0.9 meters for the convenience of steamers, but the size can be reduced to 0.6 m.
Fastening can be done either using nails or self-tapping screws.
Upper bed arrangement
Smoothly planed and polished boards of the bench, from 3 cm to 6 cm thick and from 0.1 m to 0.24 m wide each, are laid on the supporting bars at intervals of 1-2 cm, ensuring the free passage of hot air.
The boards must be fastened to the supporting structure using wooden (oak) wedges in pre-drilled holes.
Boards arranged along the length of the bed look more aesthetically pleasing, but you can attach the boards of the top row across the bed. In this case, material is saved, since there is no need to pierce the load-bearing bars.
IMPORTANT: do not fasten the boards of the bench with nails or screws, leaving the caps on the surface of the benches. Only by recessing the metal parts of the fasteners 5-10 mm deep into the board can the steamer be protected from possible burns.
Bottom shelf arrangement
When the height of the upper bath seat is 1.1 meters above the floor surface, for the convenience of the bath attendant working with a broom, the lower bench is lowered by 0.7 m.
The bottom shelf should be made at a distance of at least 0.3 meters from the floor - if it is used not only as a step for the bath attendant, but also as a full-fledged bath bench.
In the photo there are three tiers of shelves, each of which is suitable for a lying position
Most often in a Russian bath, the bottom step is made in the form of an attached bench on legs, which is removed while the steam room is being cleaned. But the installation of a fixed lower shelf is quite acceptable.
To do this, it is necessary to attach four load-bearing wooden beams with a cross-section of 50x100 mm to the posts of the upper bench at a height of 0.4 m from the floor surface, making a kind of rectangle out of them - the frame of the lower bench. This is done so that one part of the load-bearing rectangle protrudes beyond the surface of the upper shelf to a length of 0.4-0.6 m.
The supporting frame of the lower step can be attached to the main posts with 12 cm long nails or self-tapping screws. In the corner and in the middle of the frame of the lower bench, four racks with a cross section of 50x100 mm or 100x100 mm resting on the floor are fastened with self-tapping screws or nails.
Every 0.5 m, load-bearing bars with a cross section of 50x50 mm are packed. The boards of the lower shelf are attached to them using wooden wedges driven into pre-drilled holes.
How to make shelves in a bathhouse - types of flooring for shelves
IMPORTANT: the surface of the benches is carefully sanded. The boards should not have sharp corners, chips or cracks.
The boards should not be too wide; the optimal ratio of width to thickness is four. The fifty board should ideally be 0.2 meters wide.
Video - Assembling a bath shelf with your own hands
How much does a shelf for a turnkey bath cost?
If you don’t want to waste your time building a bathhouse canopy yourself, you can buy a ready-made version.
The price of the finished product will depend on the material and size. Alder and aspen are the cheapest, and African oak is the most expensive.
The most durable canopies are made from the highest grade wood . This type of wood has no knots or significant changes in color on both visible sides.
The size of purchased sauna curtains can vary: from 0.5 to 1.7 m. A short bench is usually 1.5 times cheaper than a long one. Steps and backrests are usually made from it.
The comfort of staying in the bathhouse depends on the design of the canopy and its location. If the steam room is uncomfortable, then you are unlikely to be able to fully relax. You can create favorable conditions for visiting the steam room with the help of benches and sunbeds, which you can easily build yourself.
Canopy arrangement
The steam room is the central place in a bathhouse or sauna, and the quality of the procedures performed there depends on how correctly and rationally its space is organized. The location and number of benches in the steam room depends on the size of the steam room and the needs of the owners. The canopies can be either single- or multi-tiered, go in a circle or be opposite.
How to make shelves in a bathhouse
Types of bench structures for steam rooms
Despite the great diversity, three main groups of designs can be distinguished.
- Stepped
. The most popular type of canopies used to organize steam rooms. With this arrangement, the shelves are placed along one wall in several tiers, most often two or three. The degree of heating of the shelves increases from bottom to top. According to the rules for placing such structures, the top row of benches is located above the stove and heating boiler, but with sufficient height to the ceiling, allowing you to sit on the shelf while sitting. Stepped canopies are most suitable for large steam rooms. This is the ideal placement for a quality procedure: starting from the bottom row, gradually moving to the top. It is noteworthy that on the very last row it is very comfortable to steam in a lying position. - L-shaped.
This type of structure is characterized by the location of one or two shelves on the wall opposite the one where the stove is located, and another shelf is located on any of the free walls. In this case, the height of the shelves is selected individually. The best option for large steam rooms, as well as steam rooms combined with washing rooms.
How to make shelves in a bathhouse
Canopy sizes and shapes
Canopy sizes and shapes
The dimensions of the canopies are determined in each specific case, based on the area of the steam room. We should not forget about comfort during a person’s stay, therefore the length and width of the canopy should allow one to sit on it both sitting and lying down.
As for the shape of the benches, here you can give preference to the classic bench type of canopies, and it is possible to make sun loungers or even wooden sun loungers. The main criterion is the capacity of the steam room and the ability to place certain structures in it. Compactness is the guiding principle in placing canopies; benches should warm up well and not take up extra space.
Canopy Care
Impregnate the canopy with a special oil, for example, linseed. This is necessary to protect the wood from overheating.
Before applying oil, rinse the boards thoroughly and wipe them dry. Lubricate the canopy using a brush or sponge. Leave the canopy in this state for a day, and then remove excess oil with a cloth.
This way you will protect the wood from the possible formation of various stains. Never clean a shelf with a hard brush to avoid damaging the wood structure.