The bathhouse is a great place to have a good time and relax. One of the main features of the bathhouse is special bath signs, which are also used for the sauna. They are used in many ways, for example, to indicate the way or simply decorate a bath room. You can make signs for the bath yourself in this article IVF heart will tell you how to make them and what types there are.
Bath panel ideas
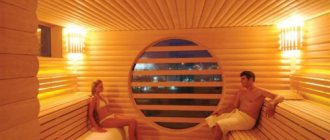
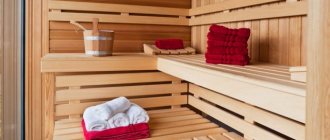
Modern baths increasingly represent not only a steam room and a small dressing room, but also a full-fledged room for relaxation. And to make spending time in it enjoyable in every sense, you should take care of the appropriate design of the space. For example, panels will look very beautiful on wooden walls.
Cool wooden signs
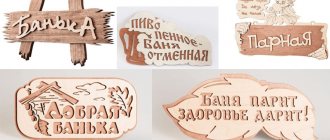
The sign “There are no generals in the bathhouse”, “You come in if anything”, “You go to the bathhouse” and others fit perfectly into a real Russian bathhouse. These photos show examples that have uniqueness and a sense of humor, which not only helps create a fun atmosphere, but also makes them stand out from the rest.
Design options
The choice of design for a bath panel is determined, rather, not by the interior itself, but by the preferences of the owners of the vacation spot. Some will like traditional options for decorating the space using images of people, including naked ones, in the bathing process, as well as demonstrations of various scenes taking place in the bathhouse.
Some may limit themselves to a panel with a laconic inscription emphasizing some folk bath wisdom. For lovers of calm interiors, a panel made of saw cuts or salt tiles, a landscape or a still life made using the carving technique will be suitable.
If the recreation area is designed in a certain style, then the decor used should correspond to it.
Do-it-yourself bath step-by-step instructions
Step I - preparing the place you have chosen
You will need to remove all debris, bushes, stumps and anything else that will get in the way when working on the foundation.
Step II - building the foundation
If you have a bathhouse made of timber, then a columnar foundation is suitable for it; it is not expensive and is excellent for the construction of small wooden and frame structures.
To create it, you need to dig a certain number of holes for installing supports. We will now calculate how many holes we will need as follows - supports are placed in the corners and at the intersections of the walls of the structure and with a certain step along the perimeter.
View this post on Instagram
Publication from HOUSE.BATH.STAIRS.SYNDICAT (@syndicat_individual)
To choose the right step, you need to take into account the type of soil and the total load of your structure. The depth of the hole should be 1-1.5 m; the depth of freezing in your area also depends and it can affect the depth of the funnel. The material you need is asbestos-cement pipes and fittings.
Fill the bottom of the funnel with a mixture of sand and gravel about 10-15 cm. Then install an asbestos-cement pipe of the required length into the hole vertically and secure it. Place the reinforcement rods inside the pipe and secure them.
Then prepare a cement mortar and pour it into the hole and into the pipe itself. After you have poured the concrete solution, wait about a couple of days for the concrete to completely harden. Then lay out a wall about half a brick thick between your pillars.
View this post on Instagram
Publication from Vladimir STROY/Building houses. (@vladimir.stroy)
Step III - Construction of walls and roofing
The standard material for the construction of walls is timber measuring 150x150 mm. Before installation, you must install waterproofing. You need to treat the lower part of the beam with an antiseptic. Often laying timber is the “Into the paw” method
You need to make the first installation even to the geometric parameters - all your angles must be strictly 90 degrees. When you lay out a wall, do not forget about the future of windows and doors, do not forget to insulate each row of timber with heat-insulating material. Use metal or wooden pins to connect the beams to each other.
After the walls have been erected, proceed to the roof. You need to fix the rafters, which are attached to the upper crown with brackets.
If you are installing a single-pitched roof, then the supports are secured either with two external ones, or with one external and one internal support. When choosing a gable roof, you need to fasten the rafters so that all support is on the wall, and connect them together from above.
You mount boards across the fixed supports (lathing), then lay insulation, waterproofing, and vapor barrier. The final stage of our roof is that all that remains is to lay the roofing material you have chosen.
Step IV - Interior work
The first step in interior decoration is to start with communications - water, sewerage, electricity.
It is necessary to lay the sewer system at the stage of drawings or construction of the foundation. Next to your future bathhouse, you need to dig a drainage well into which a sewer pipe will be laid at an angle from the bathhouse to remove wastewater from the washing compartment.
After completing installation work with the sewerage system, we make a finishing floor; it is usually made of wood or concrete. A concrete floor will last longer and is most often covered with tiles or porcelain tiles.
If you choose a wooden floor, then such a floor must be made to leak, the boards must be made with a small gap so that the water can drain, or a small drain must be made in the floor. Make the floor with a slight slope towards the drain.
Then you need to insulate and vapor barrier the walls and ceiling using the materials you have chosen. Make high-quality wiring and plumbing.
Next, we install windows and doors, and perform final finishing using lining or other materials. After completing the interior decoration, install the necessary electrical appliances that you have chosen.
Step V - Installation of the Oven and Shelves
There are many ways to place shelves, keep the correct dimensions, they need to be made from hardwood. Installation is easy - create a frame from timber and attach boards to it.
The installation of the stove must comply with all fire safety regulations. Wooden devices should not be exposed to the high temperature of the stove and chimney. If the stove is heavy, it needs a foundation.
You choose the oven according to your preferences. This is a standard stove on stones and wood, an electric or even a gas stove for a bath.
Materials
A bath panel cannot be created from paper , but otherwise there are no restrictions. The main problem with even the thickest cardboard is that the increased humidity of the bath will sooner or later lead to damage. We must not forget that paper is a fire hazard. In most cases, a bath panel is made of wood . This eco-friendly material harmonizes with any decoration and can withstand high humidity and temperature fluctuations.
In addition, not only the works themselves can be made of wood, but also the frame for them. An interesting fact is that at high temperatures, some types of wood (for example, conifers) begin to release resins and essential oils, which have a beneficial effect on the condition of the body. Thus, even just relaxing after water procedures in a room decorated with wooden panels, you can heal your body. To create bath decor, non-trivial materials such as straw and birch bark can be used.
The salt panel for the bath deserves special attention, characterized by the presence of a pronounced structural pattern and a variety of natural shades.
Advantages and Benefits
Wooden signs are a good decoration for a bath room. They not only create a cheerful atmosphere and decorate the bathhouse, but also have practical benefits. Their original appearance can give the bath an original look. Below are the advantages and benefits :
- For example, they can indicate where the steam room and any other room is located. This function is especially relevant if the bathhouse has a large area or simply does not have a standard layout.
- They give the room a complete look and act as decor. It's no secret that beauty is in the little things. Signs for the bath and other small interior items not only create beauty and comfort in the bath, but also give it a complete look. In addition, they create a special atmosphere.
- I hide my shortcomings. Construction is a rather complex process that requires a lot of attention and precision. It is very difficult to build a house without a single defect or unevenness. In this sense, the bathhouse is no exception. Bath signs will help hide all present defects and shortcomings.
How to do it?
Having carving skills, you can make a variety of bath panels with your own hands. They are created according to the same principle.
- First, the drawing is prepared on a paper stencil.
- Then a wooden board prepared to the required dimensions - the basis of the future panel - is carefully sanded on the front side.
- The intended design is transferred to the base, after which all contours and patterns are cut out using a knife.
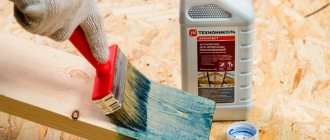
- The carved areas are treated with stain (always water-based), and the rest - with a solution of linseed oil or turpentine.
- For ease of mounting on the wall, appropriate fittings are attached to the back of the work.
Having purchased the required amount of salt tiles, it will be easy to lay out the salt panel yourself . In fact, the fragments in a thoughtful sequence will simply need to be fixed to the wall with construction adhesive that does not contain water. You can mount it either closely or through a small gap, and the emerging seams can be rubbed with the same salt.
Wood carving for beginners
In order to master the skill of turning objects from ordinary wood into works of art over time, you need to gradually go through lessons, moving from simple to complex.
To learn how to create decorative wooden elements, you need to know the technology of work and possess the necessary tools, without neglecting safety precautions.
Masters advise beginners, especially children, to first master the basics of contour carving. For it you will need:
- wooden canvas or object for decoration;
- set of chisels;
- blunt knife;
- pencils;
- sketch (drawing);
- sandpaper.
First, using a sample, you need to check how to work with each of the chisels, see what it is needed for, and practice.
Then the sketch from the paper needs to be transferred to the workpiece.
Only after studying the basic principles of working with the tool can you proceed to testing the products.
The most common are sketches with images of flora and fauna, and landscape sketches.
After applying the pattern, the wood must be sanded and varnished.
Beautiful examples
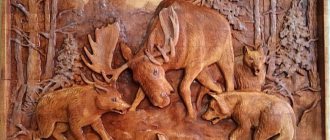
Quite typical is a bath panel made using the carving technique . The deliberate roughness of the work only gives it a certain zest. The panel depicts the interior of the steam room itself with traditional brooms and tubs surrounded by steam, the unusualness of which is added by the crayfish lying on the bench. The composition is made in natural shades, and therefore will easily fit into any bath interior.
A more modern solution would be to decorate the recreation area with a panel of saw cuts , designed in the form of a figure of a large bear. The work uses both large and very small wooden blanks.
To learn how to make a bathhouse panel with your own hands, see the following video.
Source
Door handle
We will make this wooden handle for the door to the bathhouse from a piece of board 26cm long, 10cm wide and 5cm thick. Exactly 26 cm in length and 10 cm in width turned out to be the handle for the door to the bathhouse, which I drew on a sheet of checkered paper. I wanted to draw some unusual, rounded pen. To do this, I took a round plate and a round cup of the sizes I needed. Here's what I got.
Now I transferred the drawing to the board and cut out along the contour with a jigsaw. I used a metal saw and the mode that is used when sawing metal. In this case, an even and clean cut is obtained. A sawn handle for a bathhouse door can be rounded off by removing the chamfers, you can apply a carved design to the surface of the handle, just as in the recent past you can apply a design by burning, remember there used to be such devices, the contours were outlined with a hot wire nozzle. A groove remained, and these grooves formed a pattern. It is best to secure a wooden handle with screws. And further. It is best to use hardwood to make a handle for a bathhouse door; there will be no resin on your hands. Among deciduous trees, linden is a very soft wood that can be easily processed. I would recommend birch. This will be a very strong handle. Just remember the butts for hand-held firearms - everything is like one made of birch! And I think it’s no coincidence!
Well, now, as always, according to the good tradition, illustrations for the article:
View of a wooden door to a bathhouse. The homemade pen is in its place.
This is such a necessary, original, and essentially free wooden handle for the door to the bathhouse.
Manufacturing technology of carved panels for baths
Wood carving is often used to decorate tables and chairs in the recreation room, as well as for various panels. Before you start working on carved paintings, you need to decide on the design. Here you can fully express your imagination and sketch out a personal sketch or use any other ready-made drawing.
Most often, a bath attendant with equipment or plump ladies in a steam room are carved on wooden panels for decorating a steam room. Also very popular are interesting cut-out sayings about the bathhouse: “To wash in a bathhouse is to be reborn” or “The fragrant steam heals not only the body, but also the soul.”
You can purchase such a product in a store or from folk craftsmen, but with minimal artistic skills you can make a panel using wood carving with your own hands. To do this you will need a piece of a block of any wood and a sharp knife.
We carry out the work in the following sequence:
- We grind the block from the inside.
Cut out the design with a knife.
We cover the cut out elements with water stain.
We treat the rest with a solution of linseed oil and turpentine.
This product can be used to decorate a dressing room or a rest room.
Tools for work
Truly high demands are placed on specialized carver tools. The skill of the performer plays an important role. But only with correctly selected and carefully sharpened tools will a master be able to demonstrate his skills in full force.
And if a professional easily and at first glance determines the quality of devices for work, then a beginner is invariably lost and can make a mistake.
First of all, you should purchase:
- quality knives;
- chisels (several pieces);
- needle files;
- hacksaws cutting metal;
- clamping device;
- sandpaper of different grain sizes;
- drill and several types of drills;
- wooden bars.
Knives
It is best to buy knives in a specialized store of goods for creativity and hand-made goods. They must be made from high quality steel. If funds are limited, you can temporarily buy simpler knives, but sharpen them well.
Experts speak positively about tools from the Tatyana, Narex and Kogatana brands.
Chisels
At first, instead of chisels, you can use a sharpened screwdriver and file.
When purchasing chisels, pay attention to the following types:
- Flat - a chisel in the shape of an elongated rod with a cutting edge at the end; it is needed during the initial processing of wood.
- Semicircular is one of the most popular types; it can be of varying degrees of roundness: medium, round or sloping.
- V-shaped - necessary when making geometric threads.
Machine
Carving on a machine has enormous potential, simplifying this work and turning it into pleasure. Modern models are not cheap at all, but professionals characterize them from the best side.
The machines can simplify many labor-intensive operations familiar to carvers:
- surface treatment at different angles;
- drilling recesses, grooves and grooves;
- milling;
- the actual carving.
There are huge differences in the sizes of machine models and in the technology of their operation:
- manual;
- milling and engraving;
- laser;
- CNC machines.
To simplify many operations of artistic carving, professionals advise purchasing a CNC machine. But if a novice craftsman just wants to try himself and see if this hobby is suitable for him, a manual machine is quite enough.
Specifics of making plywood bath decorations
If it is difficult to make a wooden bath panel, then you can use plywood as an alternative. Such decorative elements, if properly designed, will perfectly complement the interior of the steam room.
To make the product yourself, follow the following instructions:
We draw on paper the pattern with which we want to decorate the bath room.
Kinds
Bath signs come in different types and are made from different materials. Before choosing, consider whether they will fit the design of your bathhouse. Different types look different and may not fit into your bathhouse.
Thermo
The thermal plate performs several functions at once. The main feature of this plate is the presence of a thermometer and a special screen. As soon as the temperature in the bathhouse reaches a certain point, an invitation like “Time to go to the bathhouse” will be displayed on the screen. This is very convenient, because while the steam room is heating, you can do other things at the same time, without worrying that the bathhouse will overheat or, on the contrary, not warm up. The temperature will always be before your eyes.
From plywood
A plywood sign is the most classic look. At the same time, they are good because you can make them yourself and depict whatever you want on them, pictures and various inscriptions. They are cut out of ordinary plywood with a jigsaw, then processed and coated with special products.
From the array
Solid wood signs differ from others in that they are made from a single piece of wood. The material can be any wood suitable for cutting.
Instructions for making bath panels using a burner
Very often, the natural texture of wood becomes the basis for applying a design using a burner. If you do not have special artistic abilities, we recommend doing the work in this order:
- We transfer the desired pattern onto the block using carbon paper and a simple pencil.
We use a burner to repeat the outline of the design.
We cover the surface with colorless varnish in several layers.
To draw a bright, contrasting line, you need to press the tool harder. Draw secondary lines with moderate pressure. Make essays with light movements.
Mistakes and how to avoid them
It takes a lot of time to master carving. And it goes not only to learning how to work with a tool, but also to coping with the consequences of failures and mistakes that are made due to inexperience.
Professionals advise paying attention to these “little things” that can ruin the final result:
- Only well-dried wood should be used.
- You should not hastily delve into the surface of the workpiece; all movements should be made smoothly and with minimal pressure on the tool.
- It is necessary to take into account the specifics of different types of wood, having studied it additionally, with different types of wood and you need to work differently.
- You can’t start working without a sketch; a beginner should give up improvising.
- You can’t grab onto everything at once and try to complete complex tasks; you need to gradually move from the simplest tasks to more complex ones.
Features of making a mosaic panel for a bath
Recently, mosaics have become increasingly popular in decorating the walls of bathhouses. Most often it is used for the internal lining of a Turkish bath, since with its help it can be used to emphasize the national oriental flavor. However, in traditional Russian baths this decorative element is also popular.
Before creating a mosaic panel for a bathhouse, you need to decide on the size, shape, relief, image and shades of the design.
The mosaic panel is installed in this order:
- We fix individual parts on a special mesh. Please note that at this stage elements can easily be torn off from the overall canvas and replaced with others. This allows you to create an original drawing.
We number the grids in order to simplify the installation of large canvases.
We level the walls and prepare the surface for installing the panels.
We glue the individual mosaic fragments using white adhesive.
A mosaic panel can visually expand a small room. The market offers many production models of mosaics with 3D effect. You can decorate your bathhouse with a pattern of any geometric shape. Please note that a mosaic panel is not the main finishing coating, but a decorative element. Therefore, it should stand out on the wall, and not merge with the overall cladding.
Self-production
Working with wood is easy and pleasant.
You can make some simple products yourself. We will demonstrate how to quickly and easily assemble such a necessary item as a wooden bath grate.
The instructions are compiled in the form of a step-by-step guide:
- To make the grating we use nyato wood, it has a high resin content and is quite durable. We will need a four-meter board 14.5 cm wide and 2 cm thick;
We use nyato decking boards.
- We fix the board on the table with a clamp and mark a 60 cm segment on it. We cut off the first part with a hacksaw, then cut off three more of the same. Sawing nyato is not easy; for convenience, you should first pull the hacksaw back several times to form an even groove;
We fix the board with a clamp and cut off the parts.
- Then we cut two pieces 58 cm long. They will be used as fastening crossbars and are designed to hold our structure. Four sixty-centimeter boards will be placed on two short boards so that they protrude one centimeter on each side;
We complete the cutting.
- Using a ruler, mark a line at a distance of 13.5 cm from one and the other end of the short board (which has a length of 58 cm), and from these marks we put 15.2 cm towards the center of the part. We do the same with the second 58-centimeter plank, thus we will mark the location of the top four boards, the distance between which will be about 6 mm;
We make markings.
- On one of the short boards we mark the locations of the screws. There will be two screws for each top strip, for a total of 8 holes. We arrange the holes in a checkerboard pattern for greater strength, and do the same with the second crossbar;
Mark the locations for the holes for the screws.
- We drill holes for self-tapping screws in the crossbars;
Drill holes according to the marks.
- We lay out the parts with the smooth side down and fasten them with crossbars, carefully controlling the geometry of the product. We use screws of such length that they go halfway into the thickness of the boards;
We use self-tapping screws with an anti-corrosion coating and a small head.
- In order not to spoil the tiles, and also to prevent slipping, we supplement the crossbar with rubber feet. They are easy to find in any hardware store and attached with self-tapping screws;
We use rubber feet.
- We sand all the ends and places of cuts with sandpaper;
We sand the ends with sandpaper.
- We treat the outer side of the boards with special oil. The product is ready for use.
Selection of wood species for the production of handles
Devices mounted on entrance doors must be made of strong wood. Some experts recommend using conifers, which, when heated, emit a pleasant smell that is suitable for human health. But hardwoods, which are distinguished by their excellent textured pattern and good mechanical resistance, are no less in demand.
Advice. It is better to make door handles from deciduous trees so that no resin remains on your hands when gripping them.
For making door handles with your own hands, the following are suitable:
- Oak – characterized by strength, resistance to external influences and hardness. Oak products look respectable and generous, and are amazingly suitable for furnishing suburban mansions and apartments.
- Beech is a desirable species, similar in many qualities to oak. The wood has an unusual pinkish color with a uniform texture.
- Poplar - has very pronounced bactericidal qualities, which is why it is often used when decorating a steam room.
- Linden – has an anti-inflammatory and calming effect on the human body.