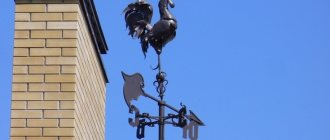
A weather vane is a special device used to measure the strength and direction of the wind. It has long migrated from meteorological laboratories, where more precise electronic instruments appeared, to the roofs of houses, becoming a successful and useful element of decor. Windmills in the shape of exotic animals or birds with moving parts driven by a light breeze look elegant and always attract attention. It is easier to buy complex forged products or order them from an experienced craftsman, and we will tell you how, with a creative approach and a plastic bottle, you can make a weather vane with a propeller with your own hands.
History of the weather vane
The exact time of invention of this simple device is unknown, but historians know the fact that the first could be a weather vane made in Athens in 48 BC. astronomer Andronik. It was installed on the roof of a tall octagonal tower. The appearance of the weather vane resembled the image of the Greek god of depth, Triton.
To add grandeur to the tower, smaller weather vanes with allegorical images of the wind of ancient times were installed on each of its faces.
The names of the weather vanes corresponded to the direction of the wind:
- Boreas - north wind.
- Kekiy – northeastern.
- Apeliot - eastern.
- Eurus - southeastern.
- Not - south wind.
- Lips - southwestern.
- Zephyr is Western.
- Skiron - northwestern.
At all times, weather vanes were considered not only a meteorological instrument, but also a symbolic object for cities. Images of various animals were used as a rotating weather vane, which were assigned mystical powers. To a greater extent, weather vanes were considered a talisman.
For example:
Rooster – scared away evil spirits, prevented mass diseases and fires.- The witch protected the room from the evil eye.
- Eagle is a talisman against enemies.
- A cat is a guarantee of safety and home comfort.
- Leo is omnipotent.
- The ship is purposeful.
- Raven - agility.
- Dragon – generosity, wisdom, strength.
In the modern world, a weather vane is in 90% of cases a decorative element of the roofing part of a house.
Purpose and principle of operation
The compact flag rotates around an axis due to gusts of air. The design simultaneously plays a practical and decorative role. Previously, the device was used to measure wind force, then it became an original roof decoration.
What is a weather vane
A weather vane is a simple meteorological instrument that, under the influence of air, rotates in the direction of less resistance. The design clearly shows the strength and direction of the wind. The device protects the chimney from gusts and prevents smog from returning to the home.
Design with a dogSource orgpage.ru
Traditionally, weather vanes were installed on the roofs of houses in Europe. A memorable detail was rarely repeated, so each home became original. The elements visually emphasized the type of activity of the property owners or had a protective function.
Components
The design of the weather vane consists of mandatory parts. A flag is a memorable, decorative part of the device, which is placed on a vertical axis. To balance the weather vane, a counterweight is needed on the opposite side. The elements have the same mass, so they stand level when installed.
The body is used as a support for the weather vane. The vertical axis of the structure is installed in the frame. The supporting rod (mast) holds the weight of the decorative part and does not break in strong winds. Bearings (balls, cylinders) inside the device ensure free rotation.
What does a windmill consist ofSource build-experts.ru
The protective cap is made in the shape of a cone or sphere and is placed above the frame. The task of the element is to protect the housing and moving parts from moisture and debris. To fix the device on the roof, use the following fasteners:
- corners;
- overlays;
- bottles;
- nuts
The wind rose is an indicator of the cardinal directions, which is attached under the flag. The part consists of two even rods connected at right angles. Rumbas with letter symbols are mounted on the 4 ends. The wind speed will be determined by a propeller made from plates. Modern devices additionally install electronic sensors (encoders).
Types of structures
The choice of weather vane design depends on the role that the device will play. Functionality is divided into 6 types:
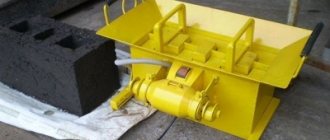
- Anemorummeters. Meteorological models measure wind speed and direction. Professional devices have power supplies and sensors that convert air characteristics into signals. They record accurate readings and transmit the data to the equipment via cable.
- Wild weather vanes. Mechanical structures for measuring wind direction and strength at home. Additionally they have a decorative function.
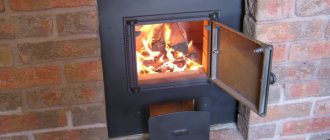
- Chimneys. Mounted above the hole, blocking access to the wind. By rotating the device, they prevent backdraft in the pipe and protect the room from the penetration of combustion products.
- Scarecrow. Weather vanes make unpleasant sounds that scare away birds from nesting in pipes or landing on the site.
- From rodents. Devices with a propeller are mounted in the ground on a support. The rotating fan blades create vibrations that are transmitted into the soil and drive away mice, shrews and moles.
- Power plants. During operation, wind vanes generate electricity.
Professional anemorum meterSource ru.lifehackk.com
The devices are installed on the canopy of the house, on the roof of the veranda or gazebo. Often designs combine 2-3 functions, saving space on the roof. Bird repellent options are mounted on a pipe or trees. It is recommended to place several devices against rodents in different places of the site (along the perimeter, in the center).
Model for a pipe holeSource odymohodah.ru
Weather vane-scarecrow from birdsSource m-dachnik.com
Simple weather vane
Depending on your preferences and financial capabilities, you can make a country weather vane with your own hands from various materials and of any complexity. But, if you don’t pick too much on the structural elements, you can make it from improvised means, which you always have at your dacha. Moreover, the work will take no more than an hour.
One difference from a standard weather vane is its location, namely, it will be mounted not on the roof, but on the ground.
For a ground weather vane you will need:
- Tools: drill, riveter, drills No. 3 and 3.5, metal scissors, file, ruler and pencil, knife, hammer, compass.
- Materials: round stick with a diameter of 35 - 40 mm and a length of 1.5 - 2 m, a cane with a diameter of 6 - 8 mm and a length of 70 - 80 mm, a copper plate 1 mm thick, wire 30 - 40 mm and a diameter of 3 mm, varnish and a brush, wine cork.
Manufacturing stages:
- First, a drawing is made. A triangle with sides 10, 10 and 5 cm is drawn on the surface of the copper plate . You also need to draw a rectangle with dimensions of 15x5 cm. Shapes are cut out along the marked lines using metal scissors. To prevent the edges from being sharp and cutting, they need to be slightly rounded and cleaned with a file.
- Take a wooden cane and make cuts (3-4cm) at the ends with a knife . During this process, care must be taken to ensure that the cane does not split and that the cut lines are in the same plane.
- On one side, a copper triangle (tip) is carefully inserted into the cut so that the cane is exactly in the middle of the lower side of the triangle. Next, stepping back 1 cm from the edge of the cane, a hole is drilled through, into which a rivet is installed using a riveter. At the other end, an identical procedure occurs, but only with a rectangular figure. To prevent the cane from deteriorating, its surface must be varnished.
- In order for the “arrow” to be functional , it is necessary to drill a hole in the middle with a slightly larger diameter than the thickness of the wire - this will allow it to rotate freely from the influence of the wind. If the wire thickness is 3mm, then the hole should be at least 3.5mm. The hole should be in the same plane as the copper figures.
- In one of the sides of a thick stick (base), a hole 8–10 cm deep is drilled in the center with the same diameter as the wire. Next, a wire is inserted into it.
- The weather vane flag will not work for long if it moves down along the wire and comes into contact with the holder. To prevent this from happening, you need to take a wine cork and make a conical one from its cylindrical shape. Next, this figure is placed on the wire, approximately to its middle.
- Afterwards, an “arrow” is attached to the wire - thus, the weather vane is ready. All that remains is to choose the installation location and secure the wooden holder in the ground (hammer it into the ground or dig a hole).
- To know exactly the direction of the wind , which the budget weather vane will show, you should take a compass and, according to its indicators, mark on the ground where north, south, west and east are. Markers can be laid out stones or wooden pegs driven into the ground.
Despite its simplicity, this weather vane works great.
Work order
Let's take the figure of a cat as an example.
First of all, the outline of the future weather vane is displayed on the surface of the metal sheet. Before you start cutting out the shape, you need to secure the sheet well to eliminate the possibility of it moving during work. To do this, it is better to use metalwork clamps, through which the material is securely fixed on the workbench.
You can get rid of the formed burrs after cutting with a grinder and a grinding wheel. To process hard-to-reach areas, it is better to use a thin, wide file.
Securely fix the metal product on the workbench, then drill small holes in it for the mustache, eyes and nose. You can use drills 12-15 millimeters in diameter.
You can achieve the characteristic oval shape for a cat's eyes using a needle file or a semicircular file. With their help, the holes made are gradually expanded to the desired size.
Steel wire with a diameter of 3 millimeters must be cut into pieces of 100-120 millimeters. Next, a 10-20 mm indentation is made, after which it is necessary to make an L-shaped bend. As a result of these actions, we will obtain blanks for the weather vane.
To make the nose, a 20-mm round rolled metal will be useful. Next, using an angle grinder, the edges of the rod are rounded.
To replicate the features and shape of a cat's nose as closely as possible, you need to use a chisel. To do this, appropriate marks are made on the workpiece.
Read also: How to illuminate the work area in the kitchen
The next step is to cut out the prepared fragment of the required size.
It is necessary to install the nose using a welding machine: a mustache is inserted into the holes made in front, which are then welded on the back side.
After completing the welding work, do not forget to use a grinder to sand the seams. As a result, you should get the most smooth and even surface possible.
The work is carried out in the same order if you are planning to create a weather vane in the shape of a rooster with your own hands.
The next step is to move on to making an arrow, which will indicate the direction of the wind. Contours are drawn on the surface of the workpiece, according to which a figure is then cut out using a jigsaw.
The base of the boom can be a pair of square rods 15 by 15 millimeters. Moreover, one element is welded to the tip part, and the second - to the tail. After welding, the surface is carefully cleaned.
To make a rotating unit, it is necessary to drill holes with a diameter of 13 mm in the steel ball and the cover of the future weather vane. After this, the lid is welded to a 5-centimeter pipe.
Flats are created on both sides of the steel truss - this is the name given to small recesses designed for a more secure fit of the ends of the arrow. Next, a rod with a spherical component is attached to the base of the turning unit, after which the attachment point is processed by welding.
As soon as the ball and arrow are fixed together, you can proceed to fastening the product. To fix a weather vane with a spherical part, a semicircular cutout is made at the base of the workpiece. Obviously, this area is welded at the end.
During the welding process, metal splashes should be avoided on the surface of the figure. To do this, the element should be covered with a sheet of tin.
When doing the work yourself, it is very important to accurately compare all the elements of the future weather vane with each other, and the angle between the rotating mechanism and the arrow itself must be 90 degrees. Reliability of installation of the figure is ensured thanks to the fastening areas, where the hind legs must be welded to the base of the pointer, and the front legs directly to the steel sphere
Reliability of installation of the figure is ensured thanks to the fastening areas where the hind legs must be welded to the base of the pointer, and the front legs directly to the steel sphere.
For support you need to use a piece of round rod, thanks to this the weather vane can rotate freely under the force of the wind.
Make sure that the support rod fits exactly into the pipe, after which you can weld the edges of the elements.
Next, the ball necessary for the free rotation of the cat figure should be lubricated with any viscous mixture, after which all that remains is to insert it into a wide pipe. At the end there is a brass or copper pipe.
Upon completion of the weather vane assembly, the element is painted and decorated, if necessary, and then placed on the roof of the house.
Weather vane with propellers made from a plastic bottle
One option for creating a weather vane is to use a plastic bottle as a material. A weather vane can be either with or without propellers, but if you add a little effort and time, you can build a masterpiece.
It is suitable both as a device showing wind directions and as a craft for a child. This type of weather vane is often called an airplane weather vane.
Tools and materials:
4 plastic bottles with a volume of 1.5 dm³.- 2 bottles with a volume of 0.5 dm³.
- Super glue.
- Scissors.
- Knife.
- Screwdriver.
- 3 self-tapping screws measuring 25x2.5 mm.
- Waterproof paint and brush.
- A strip of plastic or polycarbonate.
Manufacturing stages:
- First, you need to cut off the bottom of 3 bottles (1.5 l) using a knife or scissors. Using a pencil or marker, lines are drawn on their surface so that the blades can be visually recognized, like those of a real airplane. It is desirable that one line runs along the convex part of the face of the bottom, and the second in the recessed part (between the faces). The lines should not be straight, but slightly rounded.
- Unnecessary areas are cut out with scissors or a knife . The result of the work done should be a pinwheel. This procedure must be carried out with the remaining bottoms of the bottles.
- In order for the propellers to rotate in windy weather , it is necessary to make a small hole in their central part. A hot awl will help with this, or you can drill with a drill (a diameter of 3.5 mm is sufficient).
- When the turntables are ready, you should make a weather vane body . To begin with, you need to cut a 350x40 mm piece from a strip of plastic or polycarbonate sheet, which will serve as wings, on which additional turntables will be located in the future.
- The cut piece is placed against the middle of a solid plastic bottle (1.5 l) and its surface is outlined. This procedure is also necessary on the opposite side of the bottle. Holes are cut in the designated places with a knife.
- Next , a piece of plastic is passed through these holes, and it is necessary to ensure that the wings are equally spaced relative to the body of the bottle.
- On smaller bottles (0.5 l), an identical hole is marked and cut, but only on one side.
- After this, the bottles are put on plastic wings. To ensure that all elements hold tightly, all joints are generously filled with super glue and the structure is left until the glue completely hardens.
- Next, a hole is made in the main bottle , which should coincide with the diameter of the ballpoint pen. It will serve as an axis. To attach the body of the handle to the weather vane, you need to apply glue to its end and push it all the way (towards the plastic base) through the hole. Next, the circumference of the hole must be filled with glue, which will give the joints rigidity and stability to the entire weather vane.
- When the base is dry, attach the pinwheels to the bottle caps. To do this, insert a self-tapping screw into a pre-made hole in the pinwheel and use a screwdriver to screw it into the middle of the plug, but it cannot be completely tightened. The space left between them is necessary for the smooth rotation of the turntable. Having combined the pinwheels with the caps, they are screwed onto the necks of the bottles.
- To rotate the entire weather vane, a tail section must be added to its surface . For this task, it is necessary to cut 2 pieces (rectangular) with dimensions 120x50 mm from the flat part of the bottle. Their attachment to the main bottle is carried out using 2 cuts in the rear part of the corresponding length and in the same plane. Having placed the “tails” in the holes, the joints are treated with glue.
- The assembled structure may not initially look very aesthetically pleasing . You can give it a beautiful look using spray paint.
After going through all the processes, it can be placed on a summer cottage, where all the propellers will rotate, and the tail of the airplane weather vane will show the direction of the wind, turning the entire structure in its direction.
Homemade products turned a monkey into a human
With the onset of spring, everyone begins to restore order and beauty in the yard, at the dacha. I want to do something interesting with my own hands. Alternatively, it could be a weather vane, but not made of wood, as in ancient times, but made of plastic bottles. Weathervane airplane-starship. Materials and tools: • Plastic bottles 1.5 l. 4 things. and 0.5l. 2 pcs. • Bulgarian. • Thermal glue gun. • Scissors, knife, screwdriver, screws 3 pcs. Step 1. Making propellers. For the owner of a mechanism for opening bottles into a shrink cord, this will be an additional idea for recycling accumulated bottle bottoms. For those who don’t know what I’m talking about, we simply take three 1.5-2.5 liter bottles and cut off the bottoms of them as in the photo.
If you immediately find bottles with the original color, then you will not need further painting with nitro paint. On the resulting bottoms there are markings for cutting.
We cut out the propellers along these lines. You can cut with a knife or scissors, but it’s easiest with a grinder, because... The central thickening is very difficult to cut through.
Before cutting, you can plan in which direction the future propeller will spin and change the design in advance. After cutting with a grinder, there will be very large edges of baked chips that need to be cut off with a knife and scissors.
You get these turntables (propellers).
Now we make a hole in the center of each spinner for a self-tapping screw on which it will rotate. To do this, it is convenient to use a heated awl or you can immediately drill with a drill.
The turntables are ready. Step 2. Airplane body. Now we will make an airplane body from two small and one large bottles.
And from a piece of polycarbonate the wing is 400x40 mm.
On the body of a large bottle we mark two holes for drawing the wing through and cut through.
We try on how the wing goes, if necessary we trim off the excess.
On small bottles we make a slot only on one side.
We assemble the plane and use glue from a gun to seal everything hermetically. The structure should be rigid. We find the balance point and drill a hole for the pin on which the weather vane will turn in the wind. We drill first with a thin drill and then with a thick drill.
For the axis we use an old helium pen or another. We insert it all the way and secure it firmly with thermal glue.
Punch holes in the center of the lids with an awl for screwing in self-tapping screws. Good screws of this type.
We screw the turntables onto the lids, do not tighten them, check that they rotate easily from a light blow.
From the flat part of the bottle we cut out two rectangles 50x120 mm, for the tail of the plane, it will turn the plane towards the wind. We fold the rectangles in half and glue both tails, top and bottom, to the rear of the fuselage.
If the bottom of the propeller has a dip, a bad shape for rotation, put on a piece of tube.
We check how everything rotates and screw the caps with propellers onto the bottles.
We will make an exhaust pipe from the neck of the bottle and glue it with t.glue.
The weather vane is almost ready, we take it outside and check how everything works, if everything spins and rotates well, then we can start painting. If there are problems, you need to fix them, you may need to add additional weight for balance, this can be done by screwing self-tapping screws from the desired side into the body of the bottle.
Step 3. Painting. We paint the body with enamel for exterior use, you can also decorate it to your taste.
Step 4. Installation. We install the weather vane in a well-ventilated place. For the axle, you can use a steel knitting needle; you can hammer it a little into the handle and put a weather vane on top.
Many owners are trying to find a highlight for the exterior of their home, but there are not many such devices. A weather vane is ideal for this. It simultaneously performs both practical and aesthetic functions.
Now we will make an airplane body from two small and one large bottles.
Weather vane without propeller
A weather vane made from a plastic bottle also has a more simplified version - without propellers. It can be done very quickly and without special knowledge of aerodynamics.
Tools and materials:
Two liter bottle.- Scissors or knife.
- A piece of foam.
- Long knitting needle or rod.
- A bead with a hole through it, like a knitting needle.
- Regular thread.
Manufacturing stages:
- First, you need to cut off the bottom and neck of the plastic bottle to get an ideal cylinder shape.
- On one side of the plastic cylinder, it is necessary to drill two uniaxial holes through which a twig or knitting needle must be passed.
- When they are combined, it is necessary to check that the bottle rotates smoothly around the axis (no snags should be felt).
- The upper end of the knitting needle needs to be slightly bent to the side so that the light weather vane does not blow away in a gust of wind.
- bead is put on the back of needle and brought to the bottom edge of the bottle. If a bead slips off the knitting needle, it must be glued, but so that this does not interfere with the free rotation of the weather vane around its axis.
- In order to see the intensity of the wind, a piece of foam plastic must be attached inside the weather vane. To do this, its edge is pierced with an awl, and a thread is threaded into the resulting hole. The edge of the thread is attached to the top of the knitting needle. The piece of foam plastic should be located exactly in the middle of the cylinder.
This weather vane is secured by sticking a spoke into the ground, but the distance between the weather vane and the ground should not be less than 10 - 15 cm.
Materials
Rooftop windmills are made from a wide variety of materials. In most cases, this issue is resolved by the financial capabilities of the buyer. The main thing is that the material used is not afraid of moisture, has high resistance to ultraviolet rays, and also does not weigh too much. Traditionally, windmills are made from:
- Metal. Sheet metal is lightweight, mechanically strong, and does not burn. Stainless steel, which has an affordable price, as well as other non-corrosive alloys, are well suited for the manufacture of a windmill. The copper cockerel windmill is an exclusive product, for the production of which the customer can pay 10-15 thousand rubles, but it will serve for more than 100 years. Only windmills made of copper and steel can be installed on a chimney pipe, as they do not burn and can withstand the effects of aggressive chemical compounds.
- Tree. Windmills made of wood are often made by hand, cutting out wind vanes from plywood with a jigsaw. The advantages of this material are light weight, low cost, and ease of processing. However, wood does not have high moisture resistance, so the service life of such a product does not exceed 1-2 seasons, after which the windmill darkens, becomes moldy and breaks. You can extend the life of a plywood weather vane by treating the surface with protective varnish or paint. True, the paintwork will have to be renewed every 2-3 years, as it fades, cracks, and then is destroyed by ultraviolet radiation.
- Available materials. A simple windmill for children's entertainment is made from scrap materials that can be found in every home. Plastic bottles, cups, and unused discs are suitable for work. However, these crafts are of a purely maternity nature and are installed on a fence or directly on the ground. It is prohibited to mount plastic windmills on a chimney pipe, as they burn, releasing harmful fumes into the atmosphere.
Stages of creation
Making a weather vane is quite a responsible and troublesome task.
The incorrect shape of even one seemingly unimportant part will lead to the device not working properly. Therefore, it is better to entrust the production of such a device to real professionals.
For those who have some experience, you can offer an example of the following instructions on how to make a weather vane from a stainless steel sheet yourself:
- A drawing of the weather vane design is made.
- Draw the main figure in full scale on a large sheet of paper.
- Then the figure is cut out with scissors.
- The resulting stencil is applied on top of a suitable size stainless steel sheet about 2 mm thick.
- Draw the outlines of the figure with a marker/pencil/chalk.
- Then the sheet is clamped in the layout table.
- After this, using an electric jigsaw, the required figure is cut out exactly along the outlined contour.
- Next, burrs are removed from the edges, irregularities are removed, and corners are adjusted.
- The cut out contour is given elements of artistic processing - eyes, mouth, nose, mustache, etc. are made.
- After this, a weather vane is made from a metal rod with a counterweight.
Which option to choose
Today you can find a huge number of weather vanes on sale, but all of them are not creative. A custom weathervane that the owner makes himself will look much better.
Today you can choose from several main types of weather vanes:
Meteorological is a classic option for those who have not believed forecasts for a long time. This option can be produced through professional forging. This device has its own name - anemobarometer. It can even determine the strength of the wind.
Vilde weather vane - has a special plate on the tip that indicates the strength of the wind. Additionally, a wind rose is included, which will indicate the direction.
The second purpose of an oscillating plate or rod with a flag is to scare away birds whose vital activity spoils the appearance of the roof.
Chimney - will protect the pipe from blowing and excess dust.
Decorative - often has a symbolic nature, in this case there are no rules, you can make any design from improvised objects.
Each owner decides which option to choose. However, the useful purpose of the device cannot be dismissed. To make the device look complete and work correctly, you can use a current weather vane drawing.