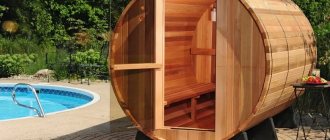
Some city citizens have their own country house with a plot of land, while most just have a summer house with a vegetable garden. As a rule, various equipment and technical means are used to cultivate the land and clean the area. To store them, a shed or small outbuilding must be built on any site. Summer residents try to build such structures themselves in order to save their own money. Therefore, many of them are interested in how to make a door from boards with their own hands.
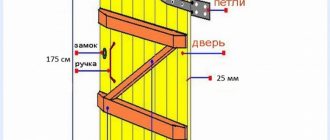
Panel entrance door: different methods of making it yourself
The design is quite simple. At the base is a shield assembled from boards of equal width, length, and thickness. Blanks must be processed so as not to hurt your hands during production and use. If there are boards of different lengths, they must be sawn to the desired size. For the shield, you can use a solid sheet of plywood or chipboard if the block will be refined in the future.
The panel door can be assembled in different ways.
Dowels and struts are one of the options for fastening the canvas. For assembly you will need timber, which will be sawn into parts for strapping: dowels, strut.
- Dowels are horizontal elements to which the shield is attached. There should be two keys for the top and bottom of the shield.
- A strut is a connecting element installed diagonally against the dowels. If the wooden entrance door is made of boards, a brace will ensure that the proportions of the structure are preserved. The canvas will not move or warp.
- If you use only dowels to stiffen the door, they will have to be installed around the perimeter of the panel, which will increase the load on the hinges and frame.
Selecting suitable loops. Their range is quite large. Consider the opening method (right or left) and the weight of the door. The hinges must be secure.
Prepare the lock and handle for installation on the canvas after assembling the structure. The choice depends on its functionality. It will fence a house, a bathhouse, a barn, a garage.
We prepare the material according to pre-made measurements of the entrance opening.
Select boards of the same size, lay them out on the floor and connect them into a single piece with dowels and bracing.
We lay out the parts on the floor and start assembling.
- The traditional way to assemble a panel door is to connect the elements with nails and a hammer.
- Modern technologies make it possible to speed up the process and provide better adhesion between the boards and the bars. Take a drill, a screwdriver and wood screws of the required size. Assemble the shield into a single door, checking all stages with a level and tape measure.
- In the old days, experienced carpenters assembled the product without nails, making a special cut in the boards for installing dowels in the recess. This technology requires experience in handling metalwork objects and a good eye.
Do-it-yourself entrance structure made from solid sheets
Panel types of facades also include sets assembled from solid sheets. Let's take plywood as an example.
- We file the sheets and timber according to the dimensions of the opening.
- We make the strapping of dowels around the perimeter.
- We secure the strut diagonally across the box.
- We attach the outer sheet of plywood to the frame.
- We lay insulation and an insulating layer inside the future door.
- We sew up the frame with a second sheet of plywood. The one-piece panel structure is ready.
The facing material can be any building sheet that can give an aesthetic appearance.
A panel door can be assembled without nails if you know how to handle milling tools and have a good eye.
A wooden panel door requires treatment with agents against rot and moisture. After all, wood, due to its properties, is exposed to the influence of the environment, from which it must be protected in order to extend its service life. You can use clear varnish or special wood paint.
After the assembly is completed. You can safely install it in the opening. (see Installing a wooden door).
This door design is not reliable due to the weakness of the facade. To thoroughly protect your home from strangers, a more modern and durable wooden entrance door is required. You can also make it yourself, but with more effort and using a stronger array. Let's look at the panel door.
Materials used
The product is based on natural wood or its analogues. As for the situation with the box, it is recommended to use the same wood or MDF.
Metal is used to make hinges, handles, embed and insert a lock, and assemble the finished structure in a box.
If it's natural wood, the smartest thing to do is simply open it up with 1-2 coats of clear varnish. Some paint the doors, but then the natural beauty of the wood is hidden. And the point in using expensive material is lost.
Therefore, to finish doors that do not look particularly attractive without coating, lamination, veneering and painting are used.
Light frame door with your own hands
Making simple frame products is easy and profitable, since few materials are consumed and defects in wooden structures are not visible, since they will be hidden by the outer cladding.
The main task in the manufacture of a panel door leaf is to accurately maintain the dimensions, right angles and make a strong frame.
This is an easy-to-use and inexpensive option for arranging entrances to outbuildings - a barn, basement or attic. External surfaces are sheathed with decorative MDF boards or plastic.
Step-by-step production looks like this:
- We cut 2 long pieces of timber and 3 short ones, equal to the dimensions of the door frame minus 5 mm.
- We make a light frame from beams, in which the third beam is a jumper between the long posts. The method of fastening the beams is arbitrary - with self-tapping screws, tongue-and-groove or in half a tree.
- We coat the joints with wood glue, assemble the structure and let it dry.
- We cover one side of the frame with the previously selected material - plywood, lining, fiberboard or laminate, securing it to the frame with screws or nails. When sheathing with individual elements such as lining, the frame must be made more rigid using bevels.
- Inside the frame we fill it with insulation, sound insulation, low-quality bars or boards from scrap materials. We reinforce the place where the lock is inserted with an additional block.
- We sew up the other side and fasten the fittings.
We carry out further decorative cladding in accordance with our desires and expediency. It is enough to cover the lining with several layers of varnish, and cover the plywood with plastic or laminate.
How to treat wood
Now we need to make the structure resistant to various external factors - atmosphere, moisture, cold. At this stage, it acquires not only reliability, but also its complete individual appearance.
Coloring
Preparation for painting begins with sanding. You need to sand in the direction along the grain. Then treat the surface with an antiseptic. Dents and chips should be filled with putty. As you apply the putty, you need to let it dry and then sand it again.
Before painting, you need to clean the surface from dust. To obtain a high-quality painted door, apply 2-3 layers of paint and avoid smudges.
Cladding with decorative panels
Decorative panels for cladding can be made of plastic, siding, veneer, laminate and other materials. They are solid massive canvases. They are mounted on a wooden surface using glue or self-tapping screws.
Instructions for making wooden doors
Necessary measurements for making a door
The door block manufacturing process consists of several sequential operations:
- measuring the size of the opening in the wall;
- drawing development;
- frame manufacturing;
- canvas assembly;
- decorative finishing;
- installation and adjustment;
- installation of fittings.
Before starting work, materials are purchased and tools are prepared.
Tools for making wooden children
To make a door from boards with your own hands you will need:
- a router for making grooves and selecting a pattern;
- hacksaw or jigsaw - for precise cutting, the teeth of the tool or files must be small;
- plane and sander;
- hammer, mallet;
- a set of chisels for selecting grooves for locks and hinges;
- screwdriver or drill;
- a workbench larger than the door leaf;
- clamps of different sizes;
- wood glue, brushes, sandpaper, stain, varnish or paint.
Depending on the desired appearance, veneer, MDF, and other finishing materials may be needed.
Frame making
Making a door frame
If you plan to coat the door with clear varnish, choose the same type of wood for the door leaf and frame.
For tying, a timber with a thickness of 4 cm or more is used so that you can select a groove for the canvas.
The external size of the box is chosen 2–3 cm less than the minimum dimensions of the opening. This will allow you to have a reserve of space during installation, which will be needed to fit the door block.
Longitudinal and transverse planks are secured with self-tapping screws, or by making half-board cuts.
Whether or not to make a bottom crossbar at the frame depends on the purpose of the door. In the entrance doors, a bottom strip is made with a recess of half the thickness of the timber to prevent drafts.
Solid wood canvas
To get the desired color, use stain
For production, blanks with a thickness of more than 25 mm are used. Purchase tongue and groove boards or make the joints yourself.
The grooves and tenons in the boards must be at least ½ the thickness of the material in height and depth.
The trim boards should be flat on one side. The grooves and tenons are removed with a plane.
Step-by-step instruction:
- Select high-quality material without cracks and large knots.
- Dry the wood indoors, avoiding direct sunlight.
- The boards are cut according to the size of the blade, taking into account the width of the upper and lower crossbars, if provided.
- The canvas is assembled on a workbench, and the joints are treated with wood glue.
- The resulting structure is compressed with clamps and left until completely dry.
- If necessary, use a router to select a pattern.
- Mark and select surfaces for mounting hinges and locks.
- Clean the surface first with coarse and then fine sandpaper.
- Treat the surface with stain or tinting impregnation. Before painting with opaque paints, treat the surface with an antiseptic.
- Cover the surface with transparent varnish or paint of the desired color.
After drying, install the door leaf into the frame, regulate the opening of the door and the operation of the locks.
Panel
Door made of wooden frame and laminated veneer lumber
A simple manufacturing option involves assembling the frame and then filling the internal space.
Algorithm for assembling a panel door with continuous filling:
- The outer frame is assembled - the frame of the canvas. To do this, the side bars are connected to jumpers - upper, lower, central. To create a rigid structure, use tongue-and-groove joints or make cuts half the thickness of the bar parts.
- On one side of the frame, sheathing made of laminated MDF 10 mm thick, fiberboard or plywood is glued.
- The cavities inside the frame are filled with bars, which are attached to the cladding with wood glue.
- Glue the second facing panel.
- They cut in hinges, locks, and handles.
- Install the door into the frame.
During the assembly process, MDF is glued end-to-end to the surface, and for stability, blocks of wood 10-15 cm long are laid between the strips. The result is a kind of fence.
Tools for work
Tools you will need:
- to create grooves and holes, you will need a router;
- hacksaw;
- to sand the ends of the doors, you will need a plane;
- chisels;
- hammer;
- screwdriver
Standard set of tools for making doors
To assemble doors you will need the following materials:
- tongue and groove boards;
- self-tapping screws;
- glue.
The purchased wood is additionally dried. The boards are laid so that they do not touch each other.
We make it from clapboard
Making a door from clapboard yourself is more difficult than from plywood, since working with drawings becomes much more complicated, and there are many more elements. Products made from lining are very popular in country houses and baths. Due to its properties, wood retains moisture well and retains heat, but only with proper processing.
To make a door structure from lining, you will need the following tools:
- electric drill;
- saw or jigsaw;
- measuring instruments - level, tape measure;
- primer;
- hammer.
Materials:
- wooden boards;
- fittings and fasteners.
Agree, the list is quite short and consists mainly of improvised means, and all its components can be easily found at home. The creation of a door begins, as always, with the door frame and measurements of all quantities. Since wood is a fairly heavy material, the box must meet these parameters and be very durable. If the door frame is weak, then it is recommended to strengthen it with a wooden beam up to 10 cm thick. After creating the door frame, you can begin making the door itself.
The existing boards are cut into two elements that will become the end part of the door; their length should be the required height of the door structure, say, 180 cm. Appropriate holes are cut out on the boards for attaching other structural elements, similar to the construction set. Then you can start manufacturing horizontal structural elements; there may be several of them, but definitely at least two. These parts are inserted into the grooves of the vertical elements and secured with nails.
After the base of the structure has been created, you can begin to fill it; for this, at least 40 boards are cut, provided they are horizontal. These elements also need to be inserted into the grooves of the main structure and secured with nails. Afterwards, the holes for the fittings are cut, if necessary, the door is coated with specialized compounds, for example a primer, varnished, decorated, and only after that all the fittings and fixing elements are attached, and the hinges are inserted.
In addition to the classic door structure from lining, you can also make sliding doors, which will require a minimum of effort, skills and material costs. First, you need to create the basis of the sliding structure; for this, boards with a section of 10x2 cm are used, respectively, the size of the structure depends purely on the parameters of the doorway. After making the frame, the remaining elements are prepared. For the door leaf, the lining is cut to the appropriate parameters and glued together, boards are also attached to the bottom and top, and it is recommended to attach a horizontal crossbar to the front side of the door, or position it diagonally, this will give the structure additional strength and also serve as a decorative element. The entire structure is fixed using self-tapping screws, including fasteners, and is put on the main frame, equipped with guides and rollers, which allow the door leaf to move.
Before painting, the wood panel must be coated with primer; painting can also be done only after drying.
Painting
At the next stage, the finished structure is processed and decorated. It is recommended to adhere to the following plan:
- processing the coating with sandpaper or a grinding machine;
- impregnation of wood with antiseptic. The first layer should dry well. The processing is then repeated;
- the canvas is covered with a special putty, which can be replaced with a primer. In this case, the canvas is processed 2 times. But each applied layer must dry well. This will take about 2 days;
- Paint, varnish, and stain are used to finish the coating. The stain must be applied over the primer. Taking into account the desired shade, the appropriate number of layers of stain is applied. Each layer will take 4 hours to dry. To fix the result, the stain is coated with two layers of varnish.
To finish the door, paint, varnish, and stain are used
Experts advise treating the door with special protective agents against moisture and pests . If the door leaf will be installed in an apartment, then it is coated with a fire retardant. To perform a more complex decoration option, you will need the help of a specialist. Read more about painting and treating doors in the article “Painting wooden doors.”
Overview of some options
We will talk about two types of products, one of them is simpler, and the second is more complex; the choice depends on the structure for which the product is made.
Simple design
The instructions for carrying out work in this case are as follows:
- To work, you will need a board with a thickness of 40 mm or more. Most often, a door is constructed from a floorboard, since the elements fit well together and are suitable in thickness;
- First of all, it is necessary to take all the required dimensions in order to make a rough sketch of the structure. This is necessary so that you clearly understand the end result, since in this case it is much easier to carry out the work;
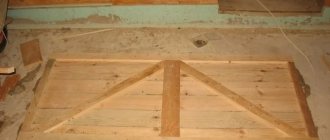
- If you need a simple door for a barn, then the following option is suitable: a shield of the required size is folded from the boards, after which it is simply connected by two crossbars and a strut. The result is a fairly durable structure, the construction of which will require minimal time and money; in the end, all you have to do is apply a protective compound to it;
This is the simplest option that is indispensable for outbuildings
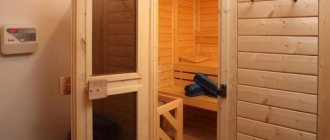
If you need to make a door to a steam room, then a suitable option is to use dowels, which are crossbars that are not located on top of the boards, but go into the grooves, this provides a more reliable and durable connection. At the same time, in order to prevent deformation of the material due to changes in temperature and humidity, the elements should be located at an angle to each other, the photo below shows the correct option;
This option is great for steam rooms, as it provides excellent resistance to deformation.
For all other rooms, a different type of structure is used; if we consider how to make them, the work is in many ways similar to the option described above, but in contrast to it, the dowels are arranged symmetrically, and for additional reinforcement, a strut is strengthened between them. The keys may differ in their configuration, so you need to stock up on a cutter of the desired shape in advance.
The key allows you to achieve high reliability
More complex option
Let's look at how to make an attractive door from a tongue-and-groove board with your own hands:
- You will need a board of the required height from which you need to make a wooden sheet. to do this, you need to lubricate all the joints with PVA glue, plus you can additionally screw short-length self-tapping screws into the groove for additional reinforcement; you need to leave the structure to dry for 2-3 days;
- At this time, you need to make a profile for the strapping, which is made in such a way that at the end there is a groove along the thickness of the door leaf with a depth of 25-30 mm, but due to the fact that the surface will be sheathed with clapboard, another wider recess is made with a depth of one to one and a half centimeters. In words, the description of how to make this element yourself looks complicated, but according to the diagram below, it is very easy to understand the configuration of the element;
An option that is suitable for board thickness of 26 mm and use for cladding lining 17 mm thick
As for clapboard cladding, it can be positioned horizontally, vertically or at an angle
In this case, the work is carried out as follows: first, a frame is drawn around the perimeter with an indentation of 15 mm from the edge, it is along this line that the sheathing should be located, the elements are first cut, and then fastened into a tenon using self-tapping screws, it is important to do all this as carefully as possible; Advice! For cladding, you can use attractive wood, which will give the product a more attractive appearance.
Advice! For cladding, you can use attractive wood, which will give the product a more attractive appearance.
Next, the pre-made harness is attached. Remember that the vertical elements are made along the entire length, and the upper and lower elements are adjusted to size after attaching the long parts;
This is what a homemade door looks like in cross section
Next you need to make a box, which can be either simple or curly; below are some profiles that are the most popular. You can use a sealant to improve heat and sound insulation properties;
If you have a router, then making a box will not be difficult
If you need to fill the opening above the front door with boards, then you should remember one nuance: the space must be reinforced with a block, especially at the lower end, since the frame will be attached to it and the element must be reliable.
The price of any of the above options is low, but the end result is excellent, the main thing is to do everything carefully. The video in this article will help you understand the process even better.
Panel assembly
The most complex and beautiful version of doors. This door consists of a frame made of solid wood and internal inserts with a milled pattern (panels) and geometry made of the same wood. The whole structure comes together like a puzzle. As a result, you get a beautiful and durable product.
- For the frame, the vertical components of the frame are first made. And then the jumpers. Top, middle and bottom.
- Process the vertical posts with a router along the edges. And also make a groove for inserting crossbars and panels.
- The counter strips are milled on the horizontal strips. They should fit into the grooves of the verticals.
- Make panels. Leave the groove at the edges 2 mm thicker than the groove in the verticals.
- Assemble the entire structure using wood glue.
- This is precision jewelry work. Be careful when calculating sizes.
Door with panels
Design options for self-production
A door block is a structure that includes a frame (frame), a leaf, locking devices and canopies (hinges). Additionally, an opening angle limiter and a peephole are installed.
Solid wood doors
Parts for making solid doors
Solid wood products can serve as an external door - they are durable, burglary-resistant, and have a long service life.
Doors are made from boards joined using the tongue-and-groove method or processed by planing with a fit that eliminates gaps between individual elements.
Separate nodes are secured with transverse jumpers.
Entrance groups are made of oak, cedar or larch - they do not deform in conditions of high humidity and freezing temperatures. Pine is not suitable for outdoor use.
For bath complexes, including doors to the steam room, pine, linden and alder are used.
The advantages of solid wood canvases include:
- good heat and sound insulating properties;
- durability;
- ease of restoration giving the original appearance;
- presentable appearance, use in several types of design;
- the possibility of making recesses and decorative carvings;
- giving any color using stains, stains (stain that requires dilution), mordants and tint varnishes.
Disadvantages include rapid destruction if the wrong type of wood is chosen.
Manufacturing requires specialized tools, woodworking skills, and installation practice.
Panel
Frame doors with mineral wool filling
Structures made from panels are also called frame structures.
The product consists of longitudinal and transverse frame slats, between which a honeycomb filler is located. To impart soundproofing properties, the honeycombs are filled with cardboard, foam plastic, mineral insulation, etc.
After making the frame, the canvas is sewn up on both sides with sheets of fiberboard, MDF, plywood and other similar materials.
In places where locks, handles, and hinges are installed, the width of the frame must be at least 100 mm with a height of at least 250 mm.
The advantages of panel doors include simplicity of manufacturing technology and inexpensive materials, which reduces the cost of the structure.
The design does not resist mechanical loads well and cannot be used for installation at the entrance to a home.
There are panel doors that are completely filled with slats or bars. The front side of the canvases is sewn up with sheet materials. The products have increased weight and require the manufacture of a reinforced frame.
Tsargovye
Drawer door assembly diagram
The special design of prefabricated doors is called drawer doors.
The longitudinal boards are connected by several wide crossbars. Part of the canvas can be filled with glass, plastic and other materials. The entire surface is treated with finishing material, there are no bulges or recesses.
Tsar blocks are used as interior structures.
Paneled
Paneled doors are similar in design to drawer doors, but are more difficult to construct and require special tools for manufacturing.
The structure consists of longitudinal and transverse frame beams, the space between which is filled with small shaped parts - panels.
Pine canvases are used only in the interior space. Larch, oak are suitable for external doors.
Keyed
Timber keyed doors
A door made of boards assembled with dowels is called a dowel door. It is a structure made of timber 40–50 mm thick, which fit tightly. To connect the fabric, keyways are made.
The structure is fastened with curly dowels.
The appearance of keyed doors fits perfectly into the interiors of a bathhouse or workshop. In residential rooms, this design is rarely used or in very exotic antique interior design solutions.
Veneered
Thin sheets of wood are called veneer
Veneer refers to thinly sliced sheets of wood raw materials. The thickness of the plates is from 0.1 to 1 cm. The color depends on the type of wood and the method of finishing the raw materials.
Finished solid infill doors are covered with veneer.
Combinations of decorative materials made from different types of wood can give the interior an exclusive look.
It is not advisable to install veneered doors in places where physical impact on the structure is possible or in places where pets are kept. It is extremely difficult to restore the surface from scratches and damage on your own.
Currently, there are artificial types of veneer based on polymer films on sale.
Sometimes inexpensive material imitates elite wood species is imitated by staining.
Classification of insulation
The construction market offers the following types of insulation:
- Felt is processed animal wool. It has excellent properties to retain heat and is absolutely safe for human or animal health.
- Polystyrene foam - it is sold in sheets. Easily cut and fixed on the door leaf. Does not slip, does not absorb moisture. It is both insulation and soundproofing material. Can only be used for insulating metal doors. When installing foam plastic, the gaps are closed with mounting foam or using liquid nails.
- Foam rubber is a soft material. The main disadvantage of this material is that if it is used to insulate a wooden street door (private house), it will soon crumble due to temperature changes. Foam rubber is produced either in rolls or in sheets.
- Mineral wool is a soft insulation with positive characteristics. It has high thermal insulation properties and also creates sound insulation. The material has its drawbacks - moisture absorption. If you insulate the door from the street side, then you need to use polyethylene. When moisture is absorbed by the cotton wool, the door will become heavy, which will lead to deformation and improper operation of the door leaf.
- Isolon is sold in rolls. One of the most expensive materials. The base of the insulation is foamed polyethylene. The disadvantage of this material is the pricing policy. But, given his qualities, this can not be taken into account.
- Polyurethane foam is foam that can be pumped into the door cavity. The hardening time is less than a day. The only drawback of this material is that it is not possible to pump the foam yourself. You should call the experts who will do this carefully and quickly. The insulation retains heat, creates silence, and is not poisonous.
Selecting insulation thickness
The thickness of the material depends on the size of the door. Let’s say if the door is empty inside, then you should simply put insulation there and cover it with the top layer of the door leaf.
If the door does not have voids, then you need to stuff an additional frame on the inside of the door, which is filled with material and then sewn up with upholstery (leather substitute). The nuance here is the fact that the thickness of the insulation should not exceed the thickness of the door leaf.
How to make and install it yourself: step-by-step instructions
In order to make a wooden door yourself, you will need to choose the right material and the appropriate tool, as well as calculate all the dimensions. If the product will serve at the entrance of a home, then a thick door will be the right choice. A simple but insulated design model will protect the house from cold air currents and drafts.
Door installation can be done in various ways, depending on the type of structure. For example, the installation of swing models differs from the insertion of sliding products. The same applies to entrance and interior doors. The process of their manufacture and fastening are almost the same, but there is a difference - entrance structures require a threshold. In addition, a wooden frame must be attached to the front door.
Installation work consists of the following stages:
- Doorway fastenings. The box is fixed using wooden wedges. To ensure that the door is positioned correctly, its position is checked with a building level. The side crossbars are placed vertically, and the threshold and top crossbar are placed horizontally. After the marks are set on the opening, the box is removed to drill holes for the fasteners.
- Fixing the box. Dowels are hammered into the resulting holes, self-tapping screws are inserted and tightened along all diagonals.
- Loop fastenings. The distance between them should be at least 20 cm. After this, the structure is considered ready, it is hung on the hinges and securely screwed. The master will only have to put the canvas in the box and secure it.
Coniferous wood
- Pine. The most popular type of conifer. It is soft and a pleasure to work with. But as we remember, soft rocks do not tolerate moisture well and begin to rot. This breed is almost always used for making home doors.
- Larch. The beautiful texture and high resin content make this wood an ideal material for entrance doors.
- Spruce. Similar in properties to pine. Only spruce is even softer and less durable.
How to prepare
It would seem that the modern market is so wide that you can find a door of any shape, size and quality. But this is not always the case. Especially when it comes to something exclusive, a special type of wood, spectacular stained glass, or an extraordinary form. Buying a standard factory design is boring and mediocre. And making a door with your own hands is not a difficult task at all, especially if you have a suitable canvas, a pair of skillful hands and a little time.
First you need to prepare all the materials and tools that you will need for the job. After all, the final result is influenced not only by the quality of the raw materials themselves, but also by the quality and reliability of the auxiliary tools and materials that were used during the assembly and installation of the door. And for this you will need:
- milling machine with manual mechanism. It is used to process a wooden product, give it a shape, and grind the groove elements;
- circular saw with manual mechanism;
- Bulgarian. In this case it will be used to sand wood;
- screwdriver for door installation;
- building level and tape measure;
- hammer;
- pencil or marker.
Regardless of what type of product needs to be made, be it interior doors, entrance doors, or doors for a country shed, the same technology is used for all. Therefore, after studying this article, you can easily make homemade doors for any needs. In addition to the tools, you will also need the material itself. As a rule, they choose an array of different types of wood: oak, ash, birch, larch, pine.
Some prefer exotic species: mahogany, wenge, beech. The choice depends on personal preferences, the type of room and the overall concept of the interior.
When making a structure with your own hands, you need to take into account that the wooden canvas will require pre-treatment, especially for hard wood
When choosing a wooden panel, you need to focus on ensuring that the wood is even and smooth. There should be no cracks or holes from knots
The selected board is first dried in a well-ventilated area at a temperature of about 25 ° C.
You can dry it outside, but only in dry weather, preferably in the summer in central Russia. Depending on the type of wood and its initial condition, drying the canvas can take up to ten days.
Hardwood
- Oak. Noble and beautiful. It is a hard rock, but is prone to splitting.
- Beech. Moisture and dampness are its main enemies. But despite this it has high strength.
- Birch. It has a beautiful natural pattern and is pleasant to touch. It is a hard rock, which means it will be difficult to work with.
- Maple. Medium hardness, works well. Moisture resistance is average.
- Nut. The sinuous natural pattern of the tree attracts the eye. Moisture resistant and easy to work with.
- Alder. Belongs to soft breeds. Suitable for home doors where there is no moisture and is always dry.
For street doors, beech and oak are most often chosen.
Beam made of oak (left) and beech (right)
Doorway or jamb
Homemade doors, if you have the necessary tools, will cost much less than those purchased or ordered from a workshop. The consumption and quality of the material will depend on the functionality of the room and the type of structure being manufactured. A door for insulated rooms will cost more than a simple door for a barn, but still, making it yourself will result in significant savings compared to those purchased in a store. For more complex designs, it is necessary to have some experience and a set of tools.
The front door for a house is a rather complex structure and must be manufactured with the proper quality. In the absence of the necessary experience, it is advisable to purchase it in a specialized store.
For the manufacture of doors, it is necessary to use well-dried material. During the manufacturing process and after final assembly, the product must be coated with protective solutions against moisture. Otherwise, the door will change its size depending on weather conditions.
Coating the door with protective solutions against moisture
To make the simplest door for a summer house, you will need the following tool:
- wood hacksaw;
- electric or manual plane;
- screwdriver or hammer;
- emery cloth;
- meter ruler or tape measure.
Before starting work, you should determine whether the doorway needs to be installed or whether the door can be fixed to the wall. You also need to consider which way the door will open, outward or inward. If the room has wooden walls, in some cases door hinges can be attached to the wall. It is advisable to install a stop on the second side so that the door does not fall in the opposite direction.
Manufacturing should begin with the doorway, if there is a need for it. From a block of the required section you need to cut two vertical posts and horizontal crossbars. When determining the size, be sure to take into account the type of connection of the bars: end-to-end or half-timber. A door made of boards can be made recessed; the outer or inner surface of the door must coincide with the corresponding plane of the doorway. To do this, quarters are selected in the block - special grooves where the door will fit. This operation can be performed on an electric plane or woodworking machine. If you have some experience, the grooves can be cut with a circular saw, precisely adjusting the depth of the cut. It is advisable to plan all lumber before cutting. For planed surfaces, the consumption of protective coating is less. If it is impossible to plan the whole material, you can process cut pieces.
Installing a doorway
With an overlay design, when closed, the door rests on the surface of the doorway.
The blanks for the opening must be connected to each other using the chosen method. For fastening, you can use wood glue, screws or nails. When using glue, you need to wait the required period of time for it to harden. During assembly, it is necessary to strictly control the position of the corners of the structure.
Reviews
If you install a good wooden entrance door made of solid wood on ridges, and not a paneled one for 1200 rubles, and cover it 5 times with a good varnish, and not some crap “Pinotex”, then you won’t have to bother with any metal . Besides, what is the point of installing a metal door in a wooden house? If they don’t open the door, they’ll cut out a piece of the wall and climb in (as one of my friends did at her dacha).
Sources
- https://USA-dba.ru/sdelat-tpluyu-dver-svoimi-rukami/
- https://legkovmeste.ru/stroitelstvo-i-remont/dveri/dveri-vhodnyie-derevyannyie-uteplennyie.html
- https://odstroy.ru/dveri-vhodnye-derevannye-uteplennye-kak-sdelat-samostoatelno/
- https://roomester.ru/dekor/dveri/derevyannaya-dver-svoimi-rukami.html
- https://gorodverey.ru/derevyannaya-dver-svoimi-rukami-chertezhi.html
- https://BestDoor.guru/izgotovlenie/mezhkomnatnye-dveri-svoimi-rukami.html
- https://dveri365.house/po-materialam/derevyannye/derevyannaya-dver-svoimi-rukami.html
- https://dekoriko.ru/dveri/vhodnye/svoimi-rukami-kak-sdelat/
- https://vitdoors.ru/dveri/poshagovaya-instrukciya-izgotovleniya-derevyannoy-dveri-svoimi-rukami-kakie-instrumenty-potrebuyutsya-7.html
- https://ODveryah.ru/uluchshenie/uteplit-vhodnuyu-derevyannuyu-dver-svoimi-rukami-v-chastnom-dome
- https://stroy-podskazka.ru/dveri/mezhkomnatnye/izgotovlenie-derevyannoy/
- https://VseoDveri.ru/vhodnye-dveri/vhodnaya-dver-svoimi-rukami/
Installation
First, install the box using polyurethane foam. After hardening, begin installing the canvas. For wooden structures, it is better to choose removable hinges. They can withstand heavy weight and are easy to install. Such hinges are suitable for a barn door, entrance or interior structure.
Adjustment
If the door cannot be closed due to the frame being skewed, you should remove the panel and check the joints of the beams. An angle of 90° must be maintained. If necessary, the box is corrected. When hinges become the cause, the attachment point is deepened or completely changed. The last option is suitable when there is no way to correct the current location of the loops.
Eliminating gaps using a sealant
When choosing how to insulate a wooden entrance door, you should not ignore different types of sealing elements, but to determine the best one, it is better to consult with the seller. Seals are specially designed products whose function is to maximally fill the gaps and cracks between the door elements: the frame and the wooden leaf. In addition to thermal protection, the insulation serves as soundproofing for the entrance door to an apartment or house.
Installing a seal and sealing reduces the overall heat loss through a wooden door, solving the insulation issue by about 60%.
Types intended for wooden doors
To insulate wooden entrance doors, different types of doorway seals are used:
- tubular made of porous rubber;
- silicone;
- foam rubber.
There are options for attaching the seal: to the adhesive layer applied by the manufacturer or using small nails with your own hands. When choosing sealing strips for a wooden door, you should take into account the performance characteristics and durability of the material. The best choice is a rubber seal.