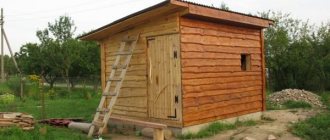
The vast majority of floors in both private and apartment buildings are made of wood. The support for a multi-layer, pie-like wood structure is most often logs. Logs are long bars made of wood (less often metal and reinforced concrete) laid transversely to the finishing flooring, serving as its solid foundation. This structure is installed both on a monolithic concrete floor and on supporting posts and beams. Installing floors on wooden joists is very profitable due to the relatively low price of materials and ease of installation.
Conditions for long-term use of wooden floor planks.
Since plank floors and joists are often susceptible to damage by pests and disease, all wooden elements require proper treatment with protective agents and an antiseptic. To maintain service life for a long time.
If a wooden floor made of planks along joists is made on the ground floor and rests on brick or concrete pillars (columns), then the air under the floor should circulate freely in the warm season. It is imperative to put waterproofing under the joists on the pillars.
If there is damp soil or a floor slab, it is necessary to lay a hydro-vapor barrier material under the logs. For example, thick polyethylene, the overlaps should be at least 10 cm, glue with tape.
Attachment to base
When the owners of a private house or apartment need to replace or install floors from scratch, the log structure will be universal for any type of foundation. It is perfect for such types of base as:
- wooden;
- concrete;
- unpaved.
In order to choose one of the types, it is necessary to take into account the operational features of the finished surface. The only thing that remains virtually unchanged is the installation principle. All technology is suitable for any base.
Wooden base
Installation of joists under wooden floors can be performed in a wide variety of buildings. This could be a house made of brick, wood or reinforced concrete panels. This type of foundation requires a competent approach and consideration of climatic conditions.
You can use plywood or OSB boards as the base. This configuration allows you to deploy special insulation in free space:
- Styrofoam;
- glass wool;
- mineral wool.
If you have insulation material, you should take care of waterproofing.
The first stage of installation is taking measurements and applying markings. Having prepared all the necessary tools, you can gradually install the logs. Professional advice: a beginner should never rush. Correcting errors will significantly prolong the floor installation process.
Installation starts from the edge of the room. Using metal squares, you can speed up work and also make the structure as stable as possible. When adjusting one end of the joist, you need to follow the marks on the wall. If you do not tighten the screws of the outer beams, they can be adjusted relative to the plane in the future.
After installing the end products, you should tighten the threads or rope. The rest of the beams are installed on them.
After fixing the products, you need to lay out all the thermal insulation along with waterproofing materials.
Concrete base
It is worth immediately emphasizing that this type of base is highly labor-intensive, expensive and difficult to install. Under no circumstances should a wooden structure be allowed to come into direct contact with concrete. If this rule is not followed, the floors will quickly fail.
Protecting wood involves the use of special compounds - impregnations. These chemicals have proven to be the best because this treatment allows the materials to last for many years. However, such materials can no longer be called environmentally friendly.
As a rule, logs are laid directly on concrete along the entire perimeter of the room. Based on this, the owners need to spend money on additional waterproofing.
The most suitable fastening material is a metal square. Using this part you can adjust the distance between the wood and the base.
Depending on the length of the lag, markings are made. Then you need to drill holes along it to strengthen the angles. After this, the outer beam is attached to metal products and adjusted by level.
The option of laying beams directly on concrete cannot be ruled out. But in this case it is worth using bitumen-based insulation.
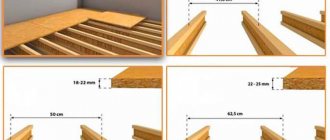
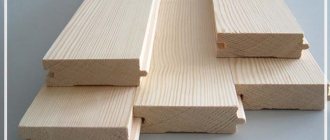
Boards for laying wooden floors on joists.
Simple carpentry floors should be laid from dry pine boards 4 cm thick. If the distance between the beams is 50 cm, their thickness can be 3 cm.
The width should be no more than 13-15 cm, since wide boards warp greatly, as a result of which the floor becomes uneven.
For all residential buildings, the recommended thickness of floor boards for flooring is at least 0.28 cm.
Significantly denser wooden floors are obtained by using tongue and groove boards, which, when laid well and correctly, do not create cracks.
In addition, tongue-and-groove ones have a small recess in the bottom middle, a recess. This ensures a tighter connection between each floorboard and joists or beams.
Floorboards of greater thickness are intended for flooring in rooms where the load on the floor is significant.
Installing a wooden floor using planks along joists with your own hands is quite simple if you follow the installation instructions.
Location rules
The first and last lags from the wall should be at a distance of no more than 20 cm. If, while observing the calculated step, the outermost lags are located further, their number is increased and the step is reduced.
They are placed either along the wall in which the door is located, or perpendicular to it. If one wall is much longer than the other, then it is along this long wall that the logs are placed. If the room is square or similar in shape, then the location of the window may influence the choice: floorboards look best if they are located along the flow of light. That is, in this case, the logs are placed along the wall in which there is a window.
Installing joists for laying wooden floors from boards with your own hands.
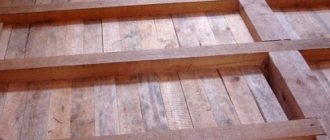
The logs should be made of durable wood, but not poplar or linden. Under the logs, either 50x50 mm timber is used. or boards 50×100 or 50×150 mm.
The lags are laid on concrete floor slabs, brick or monolithic columns (columns) according to the level. If necessary, to maintain the level, planks and bars of the required thickness are placed under them for leveling. You can use the corners for leveling, attaching them on both sides to the joists in increments of no more than 50 cm. You will get a kind of adjustable floors.
The logs are attached in different ways, using special anchors measuring 8x200 or 10x250 mm, with corners, on threaded studs and nuts (adjustable floors). In some cases, the logs are not secured at all, they are simply placed on the base.
Laying the floor boards is done across the joists, so when installing the joists on the base, they need to be laid so that when laying the floor boards, they are long enough to cover the entire width of the room.
If the length of the flooring boards is not sufficient, then they are laid in a “running start”. First long, then short, the next one from the same edge short, then long. The logs are also laid with a “running start”
If the logs rest on pillars, then they must be laid on edge. This way they will hardly sag under heavy weight. When laying wooden logs on a flat concrete base without using leveling pads, you can lay them lying down or on their edges.
Before installing logs for a wooden floor made of boards with your own hands, it is recommended to apply a layer of waterproofing to a concrete or brick base; you can use roofing felt.
The distance between the lags is 50-60 cm - this is the best option, in this case the structure will not sag. If in the future it is planned to insulate wooden floors from planks, then the logs are usually installed to match the width of the insulation, for example mineral wool.
How to independently calculate the required distance between lags?
When you install a floor on logs, use the rule: the thicker the floor board, the wider the installation and the farther apart the logs are located.
For example, for a board whose size is 5 cm, you can make a step (the distance between the lags) of one and a half meters.
If you use thin boards, you can take small steps so that the board does not sag. The most common step length between joists is 50-70 cm.
The distance between the lags is most often 50-70 cm
Also keep in mind that you will need additional space to make it convenient to lay the insulation inside. If the size of the base does not correspond to the values in the table, then it is calculated upward.
Installation of wooden flooring from boards along joists with your own hands.
When laying a wooden floor along joists with your own hands, place the first board with a groove against the wall, from which you need to retreat 10-15 mm. At the same time, it should be aligned as accurately as possible using a tape measure, because the entire row will go from it. And if the first board goes crooked, then the entire row will be like this, respectively, at the opposite wall you will get a wedge (triangle).
Floor boards are laid from one edge, gradually moving towards the other wall. Each board is laid in this way, after securing the first one.
But first you just need to lay them out on logs to see what happens in the end, like with laying floor tiles. Tighten them with temporary wedges, hammering them against the walls and leave them like that for two or three days for acclimatization.
The material should be adjusted carefully, without leaving gaps.
To avoid gaps between the boards, they should be pressed together with a hammer.
However, only tongue and groove boards can be pressed tightly against each other. If you tightly tighten the floorboards from a simple edged board, then at best your wooden floor will creak and no additional tightening will get rid of the creaking, and at worst, the floorboards will begin to warp. Since wood absorbs moisture well, increasing the size of the floorboards cannot be avoided.
When laying wooden floors with your own hands, the annual layers should be directed in opposite directions, as in the picture. This method provides a more even flooring, while the floors will practically not warp.
Wedges are driven between the last floor board and the wall to press the floor boards tightly together for driving nails.
If it is not possible to pull together all the boards without gaps in this way, you will have to pull them together one at a time. To do this, you can use a special tool that you probably have, an ax or a mounting tool.
The ax is slightly driven into the joist at an angle of 45 degrees and pulled towards the adjacent board.
To tighten the installation, you need to remove one or two floorboards from the previously laid out floor and placing the installation in this gap, resting it on the flooring, pull together the floor boards one by one, but placing the cuttings of the boards on both sides of the installation, so as not to spoil the flooring.
At each intersection of the joist with the floorboard, nails are nailed, two at each intersection with the joist, the heads of which must be completely buried in the wood.
They need to be driven in at an angle so that they press each board against the previous one.
When nailing wood flooring, nails are used that are 3 times the thickness of the board. Using a hammer, it is recommended to recess the caps a couple of millimeters. This way it will not interfere with planing.
Instead of nails, it is more effective to use self-tapping screws; they hold the boards better, preventing them from tearing away from the beams. Pre-drill holes, but not in the joists. This way the flooring will be pressed tighter.
Do not use black self-tapping screws; they are overheated and may burst under load or may tear off the cap when tightened.
Important! In order to bring a wooden floor as close as possible to the parquet look, you need to purchase a special material - boards made using the glued method.
Do not forget to leave gaps between the walls and floorboards, which will be covered with baseboards.
Lag function
Despite the large number of different methods for leveling the floor, joists remain one of the most effective types of construction. Their main function is to create a perfectly flat surface. It will allow subsequent work on the interior decoration of the premises.
It is also worth emphasizing that this type of coating makes it possible to maintain a certain distance between the embankment and the floor surface. It is this distance that will provide excellent ventilation and prevent the process of rotting of materials.
The biggest danger occurs when the logs are laid on the ground. In this case, the wood may fail too early. Therefore, professionals always raise the floor level a little to ensure proper ventilation. There are also several other main functions that logs perform:
- load distribution throughout the foundation;
- the ability to lay various types of communications that are undesirable to be placed above the floor;
- the appearance of free space makes it possible to use thermal insulation materials. There are a large number of them. Therefore, you can choose the most suitable one - sawdust, expanded clay, mineral wool and many other types.
If the owners of the room are not satisfied with the height of the floor, it can be adjusted to optimal levels using logs. The use of high-quality materials guarantees the reliability and immobility of the structure. Special support points provide a strong foundation for a durable floor. Simple and inexpensive materials allow anyone to install them; no specific knowledge is required for this.
Choosing materials for plank flooring
The quality of the material determines the comfort of living, the budget for repairs and operation, and the service life of the flooring.
Dimensions of tongue and groove boards
When manufacturing sheet piles, manufacturers are required to comply with the requirements of GOST 8242:
- marking BP or DP - block and floor covering board, respectively;
- lumber thickness - 2.7 cm block, 2.1 cm, 2.7 cm or 3.5 cm board;
- tongue width - 4 - 6 cm block, 6.4 - 14 cm board;
- dimensions of the locking connection - groove 6 x 7 mm for a block, 7 x 7 mm for a board 2.1 cm and 2.7 cm, 7 x 10 mm for a board 3.5 cm thick;
- board length – 2.1 – 4 m for hardwood, up to 6 m for pine.
Important! The thickness of the sheet pile affects its rigidity and strength, therefore, for the BP-27 beam and the DP-35 board, the beam pitch/jog is 0.6 m, and for the DP-21 sheet pile it is reduced to 30 cm.
Lumber quality
The tongue and groove is made from edged boards of Extra, A or B grade, the output parameters are controlled in accordance with GOST 8242:
- integrity - boards 6 - 14 cm wide are usually solid, wider products are glued using furniture board technology;
- cleanliness of processing - roughness 120 microns for varnishing, 200 microns for painting, back surfaces of lumber have 500 microns;
- humidity – 8% when packed in film or 12%;
A wide board is more convenient to work with and is usually made by gluing, so it is less susceptible to warping. Coniferous species pine/spruce are considered budget, larch and cedar are valuable species, by default impregnated with a natural antiseptic. A solid-length tongue and groove made of hardwood without splicing is always shorter than a coniferous one. This is due to the structure of the wood.
Prohibited breeds for flooring are:
- linden, poplar for the entire range;
- BP-27 and DP-27 made of aspen and alder are suitable exclusively for residential premises;
- DP-35 is not made from alder and aspen.
Important! On the back side, the tongue has several narrow or one wide cut, necessary for air circulation and compensation of internal stresses in the wood.
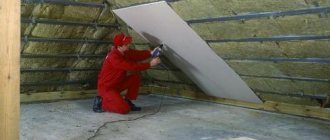
Thermal insulation
Insulation is usually carried out on the subfloor. If the floor covering is laid without installing joists, then the insulation goes immediately after the waterproofing. In cases where the installation of the logs is completed, heat-insulating materials fill the free space between the bars.
For these purposes you can use:
- expanded clay;
- sawdust;
- Styrofoam;
- mineral wool;
- roll materials.
To avoid condensation, a vapor barrier layer is laid on top of the insulation.
How to determine the thickness of floor insulation
The thickness of the floor insulation is selected according to calculation, providing standard heat transfer resistance R = 4-5 m2oK/W. If the base is not insulated, then the thickness of the floor insulation is determined from the condition that the temperature of the space under the floor is equal to the temperature of the outside air. The recommended thickness of mineral wool insulation in this case is no less than 150-200 mm.
For a house with an insulated foundation and plinth, the thickness of the floor insulation can be reduced so that the sum of the heat transfer resistance of the plinth + floor is no less than the standard (see above).
how to calculate the thickness of floor (floor) thermal insulation here.
A sheathing of bars with a thickness of at least 50 mm is laid across the joists. Another layer of insulation is placed between the sheathing bars. This two-layer insulation design ensures that the insulation covers the cold bridges through the joists. The distance between the sheathing bars is chosen in the range of 300-600 mm, a multiple of the width of the subfloor covering slabs.
This two-layer construction of the floor base (joists + sheathing bars) allows you to conveniently place both insulation boards and floor covering slabs (CBF, plywood, etc.).
The insulation with the lathing on top is covered with a vapor barrier film. The joints of the film panels are sealed. The junctions of the film to the walls are connected to the waterproofing of the walls and the same is sealed.
It is recommended to choose the thickness of the sheathing bars at 25-30 mm. greater than the thickness of the top layer of insulation. This will allow, by lowering the film on both sides of each sheathing bar, to create a ventilated gap between the vapor barrier film and the floor covering.
Floor on poles
When installing a wooden floor on pillars, there is a subfloor. It may be insulated or not. The floor can also be cold or insulated in any of the options.
Floor posts
Floor columns are made of brick, small concrete blocks, or ready-made concrete blocks of the “FL” type are used. You can use bitumen-impregnated wooden blocks as posts. Some people place boulders of suitable size with a flat top on the base. Boulders are good support, but attaching logs to them is problematic.
Each column has its own foundation. The size of the base is 2-10 cm larger than the column. The depth of the foundation depends on the type of soil, but usually 10 cm is enough.
If groundwater is located close, the logs are raised. They make supports for them - brick pillars
There are two options for making bases for posts: make formwork for each separately, or fill it with a single tape. The first method is more economical in terms of material consumption, but the second takes less time: making one or two general formworks is faster than making many small ones.
The location of the supports is marked with a pencil on the foundation or on the lower crown (on the element to which the logs will be attached). Then the threads are stretched between the marks, and the formwork for the posts is already knocked down along them. There are other marking methods, but this one is the fastest and most accurate.
The dimensions of the formwork for the posts are 2-10 cm larger than the post itself, the height is 10 cm. Several bars of smooth reinforcement are laid inside, on the compacted soil, and they are filled with standard cement-sand mortar. Wait for the solution to set for at least 3 days, then you can lay out columns on the base.
The dimensions of the supports for the logs can be approximately as follows
When pouring, it is necessary to monitor the height of the foundations: it must be the same. In principle, it can then be corrected by adding a solution, but again you will have to wait 3 days. Therefore, try to immediately make them the same height.
Ruberoid is laid on the finished base, possibly in two layers. Then the columns are folded. It is recommended to put roofing felt on top of them, and then also a three-centimeter wooden board impregnated with antibacterial compounds. The logs will already be laid on it.
As you can see, it takes a long time to make floor posts. If you need to speed up the process, you can put ready-made concrete blocks or beams, or you can lay asbestos-cement pipes on a well-compacted bedding. Some people put up boulders or tarred logs. There is another option - drive pieces of metal or asbestos-cement pipes into the ground, stick several bars of reinforcement into them and fill them with concrete. There is probably more than one option, because our craftsmen are famous for their ingenuity.
This is what the finished joists look like
By the way, there is another option, but without support: hanging logs. Such arrangement of a wooden floor is possible in narrow rooms, which is not always the case (take the step of laying the joists a little more often than in versions with supports).
Hanging logs - a super fast option
Warm and cold underground
If the logs are raised above the ground, there is free space underneath them. There are two ways out. Leave the subfloor uninsulated or insulate it. Moreover, in each of the options it is still possible to insulate the floor structure or not, and it itself can be single or double. So there are a lot of options here.
An uninsulated subfloor can be made with a single or double plank floor. Some options are shown in the figure. Moreover, the insulated floor is only available in one version - at the bottom right.
Floor options for joists with subfloor
You can insulate the subfloor very simply: lay any non-hygroscopic insulation on a layer of waterproofing (roofing felt, roofing felt, film, etc.). Expanded clay is often used; among modern materials, slab foam propylene has performed very well; polystyrene foam behaves a little worse, but it costs less, so it is also used often. Sometimes the space is filled with foamed polyethylene - all the insulation takes several hours, but they do this only with special devices, so you either have to rent them or pay a specialist for the work.
When using any of these insulation materials for ventilation of a wooden floor, it is necessary to leave a gap of at least 5 cm to the rough or finishing coating.
Scheme of a heated floor on pillars in combination with a cold subfloor
Warm and cold floor
Cold plank flooring with joists can be single or double. Warm - only double: the insulation needs to be laid on something. One of the options is shown in the photo.
A cranial block is attached to the joists on the sides below, and boards of the rough (skull) floor are laid on it. The bars should be thick enough to easily nail the decking. You can use an unedged board on the subfloor, but just be sure to remove the bark and soak it well with antiseptics: woodworm larvae often nest under the bark.
Next, waterproofing (membrane or film) is laid, and insulation is placed on top. Here you can use all the same materials as for subfloor insulation, plus mineral wool (if you are satisfied with their ecology). But in the case of laying mineral wool, they must also be covered with waterproofing on top - they really do not like water, and when wet they lose their properties. The entire cake should take up so much space that there is 5 cm left to the floor boards.
Finished floor installation
Problems usually do not arise here: the installation technology is quite simple and intuitive. To begin with, the first board is laid. The part is placed in such a way that it does not fit flush against the wall: there should be a two-centimeter gap at the end and long side.
The board is fixed with a bracket, and the next floorboards begin to fit to it. To achieve maximum density of elements, the boards are carefully tapped with a mallet. When the floor is finished, the remaining gap at the edges is closed with a plinth.
Benefits of use
In a private house, insulation - mineral wool - is laid between the joists.
Insulating layers are laid in the space between the bars of the joist sheathing. They install insulation to protect the room from the entry of earthen cold. In the gap, waterproofing and a vapor membrane are placed to prevent ground moisture from reaching the finished floor structure, and household vapor from reaching the floor beams. The air gap also serves as insulation.
The area between the bars is used for installing sewer and water pipes and other communications. The collapsible design of the log will provide access for repairs if necessary. But this only applies to plank floors. It is impossible to dismantle a chipboard covering with tiles without damaging the covering material.
Advantages of floor joist support:
- reduces the level of incoming noise due to the air gap;
- evenly distributes and transfers the load on the foundation of the house and the foundation, because of this there is no displacement of the supports of the house and the service life is extended;
- creates a flat area for the final finishing layer;
- increases the strength of the floor structure;
- serves as the basis for making a subfloor;
- working with wood is not difficult;
- Its efficiency is not inferior to that of a floating or self-leveling coating system, but costs less.
The cost of installing a log includes the price of wood, which in the regions of Russia is significantly lower than other artificial materials. If creaking or sagging of the boards occurs, you can repair the problem area with joists, rather than re-laying the entire covering.
Immediately after installing the support bars, you can install the finishing flooring; there is no need to wait for the wet screed to dry and for the hardened mortar to gain strength.
When choosing a coating on joists, you need to take into account the rise of the surface and the decrease in the height of the room. When installing floors, you need to make careful markings so as not to make mistakes when cutting off dimensions and installing joists at the required distance.