Today we will find out what influences the choice of location of the stove in the house.
Where to place the stove in your home
- 1 Things to know before choosing a location. General provisions
- 2 Where to place a brick oven. Basic recommendations
- 3 How to place the stove for maximum heat transfer?
- 4 Methods for installing brick kilns according to the layout 4.1 Option one. How to choose a place to heat several rooms at the same time
- 4.2 Option two. How to choose a place for the stove if only one room will be heated
- 4.3 Video - Laying a brick oven
- 4.4 Option three. How to choose a place for a metal wood-burning stove
- 4.5 Video – Secrets of the furnace business
Types of metal furnaces
Recently, metal stoves have been in greatest demand.
A metal stove is a long-burning apparatus. It can be used periodically or continuously. The body of the product is made of alloys that conduct heat well, so this heater warms up the house much faster than a standard brick stove.
The advantage of iron structures is additional functions. Based on their purpose, they are divided into 3 types.
- Heating - used only for heating. The stove itself conducts heat. However, the device can be equipped with air pipes that transfer heat to adjacent rooms.
- Cooking and heating - more often found in dachas. The design is equipped with a hob, sometimes even an oven. It can be used as a kitchen gas oven and cook food on it.
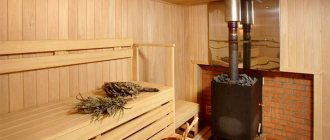
- Household - this is the name of the most compact models designed for quick heating of the room. They are placed in a garage, barn, bathhouse, that is, in rooms where there is no need to maintain a comfortable temperature for a long time.
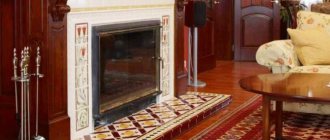
There are other modifications of the stove. For example, products with firebox doors made of heat-resistant transparent glass are popular: the model replaces a fireplace. For the steam room, choose products with nets for stones.
Cast iron stove
Furnaces are also differentiated according to the material they are made of.
- Ordinary steel is used more often for household structures. With prolonged use, the body will burn out. Maximum heating temperature + 400°C. If you use the model for less than 2 hours, then +600°C.
- Heat-resistant steel – can withstand prolonged heating up to +800°C. For the furnace, use steel with a thickness of at least 3 mm. Models made of heat-resistant alloy are used as heaters and kitchen appliances. They are compact, very light compared to brick ones, and can be installed anywhere in the room, but must be equipped with a chimney.
- Cast iron is an alloy that conducts heat well and accumulates it to some extent. Cast iron is very durable, does not rust and is not afraid of water and steam. However, such a stove weighs much more: for production they take material with a thickness of 6 to 25 mm. In addition, it is effective on an area of no more than 60 m².
All metal stoves are a fire hazard for a wooden house, since the body of such models becomes very hot.
Ready-made designs
If you do not want to make a protective structure yourself, ready-made solutions will come to the rescue. They are a protective screen consisting of several layers. This finishing of the walls around the stove is carried out in the shortest possible time and is not too expensive. An important point is that almost all structures of this type combine the properties of heat-reflecting materials - stainless steel on the outside and an inner layer of high-temperature-resistant filler.
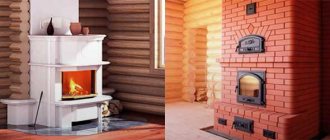
Where is the best place to put a stove in a wooden house?
A stove is placed in an interior partition if it heats several rooms.
How to install a metal stove in a house depends on several factors.
- Purpose - an air heating stove, like the Buleryan, is mounted so that convection air flows move freely throughout the room. If it heats several rooms, it is mounted in the interior partition and air pipes are connected. A model with a water heat exchanger must be installed so that it protrudes at the lowest point of the heating system.
- The stove should be installed so that connecting the chimney can be done with the least difficulty. The latter should go straight onto the roof and preferably without turning.
- To heat the stove and clean it, you need space. This is provided for when choosing.
- The body should be 110–125 cm away from heating surfaces, especially wooden ones. There should be a free space of at least 125 cm in front of the firebox.
If the stove is equipped with a firebox with a transparent door, it is worth placing it so that you can admire the flames.
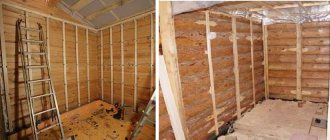
Construction rules
A homemade stove must meet fire safety requirements. Therefore, special attention must be paid to preparation for construction.
- Decide on the location of the oven.
- Prepare the correct drawing.
- Buy quality materials for construction.
- Purchase of tools.
- Create a cost estimate.
Correctly drawn up drawings will become your main assistants, since it is the drawings of a homemade brick oven that help you avoid many mistakes. Ready-made plans can be found on the Internet.
When choosing an installation location, you need to take into account the area of the room and the type of oven. It’s difficult to calculate everything yourself, so it’s easier to use a reduced model of a brick oven, a photo of which is available on the Internet.
Fire safety rules
The walls from the stove are protected with heat-resistant material.
Wood is a flammable material. When installing a steel or cast iron stove in a house, you must strictly follow fire safety rules.
- Installation is carried out on a protected floor: a metal sheet, a fragment of the floor lined with ceramics, a mineralite substrate. The dimensions of such a surface exceed the dimensions of the body by 50–70 cm around the perimeter.
- A distance of 60–100 cm should be maintained between the wooden wall or furniture and the wall of the housing.
- Protecting the wall from a stove in a wooden house is done with a heat-resistant material, like Superizol, an asbestos sheet. In this case, the distance between the body and the wall is reduced from 1 m to 20 cm.
- The chimney is exhausted through the ceilings and roof using metal sleeves filled with non-combustible material. It is recommended that the ceiling where the pipe passes through is also insulated with asbestos or metal sheets.
- Leave a distance of 1.2 m, no less, between the ceiling and the top of the stove. There must be at least 1.3 m from the firebox door to the opposite wall.
If there are small children in the family, it is recommended to cover the metal case with a decorative fence. The best solution in this case is brick cladding.
Reflective wall cladding
You can assemble this version of protective casing yourself. To do this, you will need a non-flammable thermal insulation material, which will be discussed in more detail below, as well as a sheet of stainless steel.
Stainless steel can be replaced with a cheaper option - galvanization, however, when heated, it can release harmful substances, so we strongly do not recommend using it. When starting work, secure the insulation to the wall, and then cover it with a metal sheet.
To ensure that such thermal insulation for a sauna stove is as productive as possible, polish the metal surface. This will allow IR rays to be better reflected back into the steam room, and the reflected rays will be better perceived by humans.
You can use the following materials as thermal insulation:
- Basalt wool is absolutely safe for baths. It retains heat well, in addition, it is highly hygroscopic and does not burn at all;
- Basalt cardboard is a good option for a bathhouse. It consists of thin sheets of basalt fiber that retain heat well and do not burn;
- Asbestos cardboard is a strong and durable heat insulator, which is also suitable for a bathhouse;
- Minerite for baths is also an excellent material. Non-combustible plates are specially manufactured for shielding hot surfaces in baths and saunas;
Before covering the wall near the stove in the bathhouse, familiarize yourself with the correct technology for its construction. The most important thing is the installation order and compliance with the gaps.
The ideal design has the following structure:
- Wall;
- The ventilation gap is 2-3 cm;
- Insulation 1-2 cm;
- Stainless steel sheet.
Remember that the total distance from the wall to the stove must be more than 38 cm. For fastening, use ceramic bushings that will help form ventilation gaps. If the distance between the wall and the stove is minimal, then it is necessary to use two layers of mineralite slabs, between which a gap must also be left.
The need for a foundation for a metal furnace
If the stove weighs more than 750 kg, it is necessary to build a foundation for it. Often a cast iron heater with a three-dimensional mesh weighs 900 kg. With a weight of 600 kg, it is also recommended to make a foundation, since over time, under the weight of the unit, the floor will deform and the stove may warp.
Types of foundations for a furnace
The most reliable foundation for a metal furnace is a monolithic one.
A weight of 750 kg or more as a load for the foundation is not that great. However, the specifics of the design itself limits the choice. There are 3 options.
- Monolithic is the most popular. The depth should be below the freezing point, in most cases 50 cm is sufficient. The dimensions of the base exceed the dimensions of the furnace body by 30 cm around the perimeter. Such a foundation ensures absolute stability of the apparatus. In northern latitudes, the depth can reach 2 m. In this case, most of the pit is filled with sand and crushed stone and compacted, and the slab itself is made ordinary.
- Tape - involves digging a trench around the perimeter of the base and constructing formwork. In this case, less materials are consumed, but the need to construct complex formwork and reinforcement eliminates the advantages of a lightweight foundation.
- Block - a hole for the foundation is dug as for a monolithic foundation, but filled with bricks or, more often, large ready-made blocks. The cheapest option.
It is possible to install a stove on a foundation in a finished building, but to do this you will have to first disassemble the floors.
Principles of foundation installation
Sand and crushed stone are compacted at the bottom of the pit.
The construction technology is the most common.
- A pit is dug under the stove with a depth of about 50 cm or more and dimensions exceeding the dimensions of the body by 20–30 cm.
- A layer of sand and crushed stone at least 20 cm thick is compacted onto the bottom.
- Formwork is made from boards or plywood and secured inside the pit.
- Lay out the bottom layer of large pieces of rubble 30 cm thick and fill the voids with small crushed stone.
- Fill the formwork with liquid cement-sand mortar.
- Lay out the next layer and fill it with cement again. The operation is repeated with your own hands until 6–7 cm remains to the floor surface.
- Fill the last layer with concrete screed. Until the concrete sets - 3 weeks, it is periodically moistened and covered with polyethylene.
Foundation waterproofing is often done with roofing felt.
Masonry process
The masonry mixture is prepared from sifted sand and clay. The clay is left in water for a couple of hours, after which it is sifted through a sieve. Currently, there is no need to prepare this mixture yourself. A number of companies offer ready-made masonry mixtures in various packaging. Using such masonry mixtures is preferable to making them yourself.
Industrial sieves sift a finer fraction of sand and clay, which makes it possible to obtain a more plastic and homogeneous mixture. This mixture will eliminate the formation of voids and air bubbles in the seams during laying.
First, the outer layer, which consists of bricks, is assembled, and then the middle. There should be no voids in the seams, so fill them with a clay mixture.
The first rows are built using solid bricks. The first row of stitches requires dressing. After the first rows are ready, the brick will have to be cut.
The chopped side of the brick should be inside the masonry. This rule is also used when constructing smoke ducts. The chimney is built from red burnt brick. And the opening of the firebox is created using a metal corner, a “lock” layout.
Before the first fire, it is recommended to wait 3 weeks.
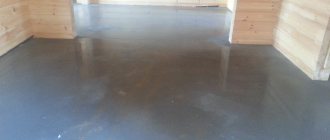
Installing the stove on the floor
If the stove is light, it is installed without a foundation, but with thermal insulation.
If the model weighs little, it can be placed directly on the floor, but taking care of sufficient thermal insulation.
A sheet of iron, asbestos, or mineralite is placed under the device body. You can lay out a square on the floor with ceramics, facing bricks, or clinker. The dimensions of the sheet exceed the dimensions of the product by 30–50 cm.
How to decorate the wall behind the stove in a wooden house depends on the nature of the country house. In the bathhouse, the fragment is covered with a screen made of metal or asbestos. However, in the living room it is recommended to use more decorative materials, for example, ceramic cladding, natural stone, brick.
Protection in the form of a brick barrier - cutting, or a protective screen made of mineralite, which is installed around the stove with the exception of the firebox side, is allowed.
Often the stove in a bathhouse or kitchen is covered with brick, but this increases the overall weight of the heater. A foundation may be needed.
Materials
The heat transfer and durability of the stove will depend on the material used in construction. Therefore this stage is very important.
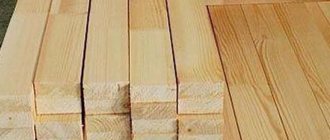
For cladding, ceramic bricks are used - grade M-500. It is insensitive to temperature changes. And the combustion chamber needs to be laid out only from refractory bricks.
In addition to bricks, the following is used:
- Sifted sand.
- Clay – normal fat content.
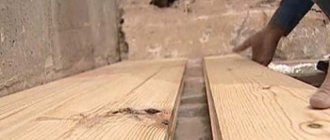
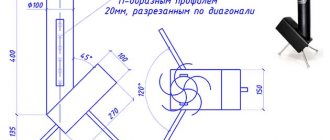
Installation of a chimney in a wooden house
The floor and ceiling of the attic are covered with metal plates.
The chimney for an iron stove is chosen from special steel that can withstand high heat and the action of chemically aggressive substances. The chimney can go either horizontally or vertically, and even with turns, but it is more profitable to place it vertically: better draft and less hassle with cleaning.
- Holes for the pipe in the ceiling are made right before installation.
- Adapters - glasses - are inserted into the hole in the ceiling.
- The ceiling and floor in the attic, if the chimney goes through the attic space, are sealed with a metal plate at the transition point.
- Pass the chimney pipe through the sleeve and in the same way lead it to the roof - through a glass. The space around the channel on the roof is also sealed with metal.
You can also bring the chimney outside through the wall. The technology is the same.
Manufacturers and prices
- Basalt fiber panels cost of 1 sq. meter - from 390 to 690 rubles. depending on the decor of the front side, produced by ESCAPLAT;
On a photo panel made of basalt fiber - Rolled Fireproof Nonwoven Fabric – cost of 1 linear meter from 112 rubles, produced by OgneuporEnergoHolding, LLC, Moscow;
Photo Roll Fireproof Nonwoven Fabric - Non-flammable composition for plastering walls with a volume of 20 liters at a price of 410 rubles per bucket, produced by a company from Perm.
How to cover the walls and ceiling when installing an iron stove
Stone panel
How to protect wooden walls from a stove in a house is determined by the style of the room, purpose and budget. Finishing does not exclude the construction of a protective screen. But if the stove is located far enough - 100 cm, it is allowed not to install thermal insulation, but to select a finishing material.
- The most obvious solution is to treat this part of the wall with fire retardants. This does not provide a 100% guarantee, but it reduces the potential for fire.
- A panel made of natural or artificial stone looks beautiful.
- In a room in a loft, techno or rustic style, facing with brick - textured or facing - is quite suitable.
- A sheet of plasterboard provides sufficient protection.
It is prohibited to use flammable coatings for finishing, such as oil impregnation, varnishes, or oil wax.
Sheet coverings
Such solutions include the familiar drywall of the appropriate variety, labeled as fire-resistant, as well as sheets made of a special material - mineralite. Both types of finishes will perform their function perfectly, but have one significant drawback - they do not look particularly beautiful. Therefore, such a design usually involves external decor.
It can be done in several ways. You can simply paint the surface with a special heat-resistant paint or line it with a material that is resistant to high temperatures. Most often, this is artificial or natural stone, porcelain stoneware, ceramic or terracotta tiles. An air gap between the fireproof sheet and the wall surface will increase the efficiency of the structure.
Advice from professionals
If the stove is mounted in a wall, it is sealed with brick.
Steel and especially cast iron stoves can have a very beautiful design. Such products should not be covered with bricks or protected with a screen. You need to worry about their successful placement in advance.
- A structure for heating several rooms can be placed directly in a wall or partition. This installation is more complicated and requires bricking.
- When installing the stove and chimney, carefully ensure that all structural components are freely accessible. There should be no difficulty in cleaning and inspecting the elements.
Heating a wooden building with a metal stove is a completely rational solution for a country house or cottage. The structures are light, compact, and very effective, but during installation a number of rules must be followed.
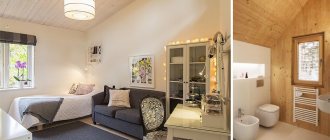
Built-in fireplaces with double-sided firebox
Fireplaces with double-sided fireboxes are usually rectangular in shape. Externally, they look like part of a wall, the surface of which is made of glass. There's a fire burning inside her. Such a hearth often plays a decorative role. If you install it in a wall connecting adjacent rooms, it will heat both rooms, but the amount of heat generated will be small.
Built-in hearth with double-sided firebox
Double-sided fireboxes must be closed with glass doors, otherwise the fireplace may start to smoke. The good thing about these doors is that you can add wood to the fire from any room.
The built-in hearth takes up little space and fits perfectly into any interior. This is a great choice for any home.
[ads-pc-2][ads-mob-2]
Selection of bricks, sand, mortar
In order for the stove to serve for a long time, you need to select all the materials correctly. There are three types of bricks:
- Ceramic - can be used to build a stove.
- Silicate ones are generally not suitable in this case, even double M150.
- Fireproof - ideal, but they are often used only for fireboxes and fireplaces, varieties: fireclay, refractory bricks, etc.
Advice: when choosing a brick for a stove, you need to completely abandon the hollow types.
The solution is made from clay. Red clay is suitable if the stove is made of red brick; when using fireclay, special fireclay clay is required. Some stove makers still make their own mortar in the old fashioned way from river sand with a grain size of 1–1.5 mm, clay (in a ratio of 2.5:1) and water. It is advisable to use angular quarry sand without foreign inclusions and the so-called fatty clay. However, it is easier and more reliable to buy a ready-made baking mixture in the store, preparing it according to the instructions.
From the accessories you need to purchase grates, blower and combustion doors, soot cleaners, valves or dampers.
How to determine the required thermal power of a sauna stove?
The power of heating devices is measured in kilowatts. However, manufacturers of sauna stoves take a different approach - they indicate how much steam room volume this model will be guaranteed to be able to heat to a level corresponding to the required microclimate in the steam room. Naturally, subject to high-quality thermal insulation of the latter.
This is usually indicated in passports - for rooms, for example, from 10 to 16 m³.
It would seem that everything is very simple. It is not difficult to determine the volume of the steam room, and it will be just as easy to choose a model. However, the features of the arrangement of the bathhouse can make their own adjustments.
Below is a calculator that will calculate, so to speak, the conditional or reduced “volume” of your steam room, that is, taking into account all the necessary amendments. Based on this value, it will be possible to more accurately select the optimal oven.
For example, if the result is that a stove of 11 m³ is needed, then they try to choose so that this value is approximately in the middle of the range of capabilities of the purchased model. That is, say, a stove designed to heat from 8 to 14 m³.
Calculator for calculating the conditional power of a sauna stove
Go to calculations
A few explanations on the calculation.
- It is clear that first of all the actual volume of the steam room is taken into account. To do this, you need to indicate its linear dimensions: length, width, height.
- Sauna stoves are designed for operation in high-quality insulated rooms. But in practice, it happens that log or timber bathhouses are not insulated from the inside. In this case, a fairly significant part of the heat will be spent on heating the walls, which have considerable heat capacity. Therefore, an amendment is necessary.
- If the stove is located entirely in the steam room, then all the heat generated remains inside this room. But if the firebox is made external (just on the topic of this publication), then part of the thermal energy will involuntarily be wasted on warming up the dressing room and the entire created structure of the “inset” of the stove into the wall. That is, it will also be appropriate to adjust the result.
- The quality of the door leading to the steam room is of great importance. If this is a well-insulated door with a good fit, then significant heat losses through it are not expected. But ordinary panel doors are often installed, as well as glass doors that are becoming fashionable. Of course, their thermal insulation qualities are much lower, and this will also be taken into account when carrying out calculations.
- A window to the street is not a mandatory element of the steam room interior, but it is still often present. That is, another loophole appears for heat leakage. Both the quality of the window and its area matter here. If the window is taken into account, then additional fields for entering this data will appear in the calculator.
- Areas in the steam room (on its walls or floor) lined with ceramic tiles, bricks, and stones can also play a role. Warming up such heat-intensive surfaces will require additional furnace power.
- The result will be shown in standard cubic meters, which should be used as a guide when choosing the optimal sauna stove model.