Wood twists and bends, which can cause warping and damage to windows and doors. To prevent shrinkage of the house from leading to deformation of window structures and doors, you need to make a frame or casing.
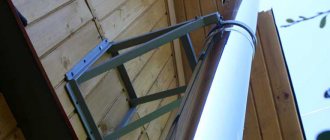
The cap protects the openings from pressure from above and creates the gap necessary for shrinkage. The side parts of the pigtail have poses that create vertical sliding. Most often, the pigtail is made from coniferous wood. It consists of a top, sides and a window sill (threshold).
Important! The casing must be installed before caulking works.
Types of casing (casing)
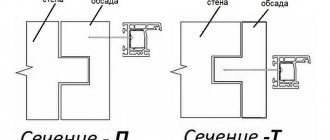
U-shaped pigtail (in a deck)
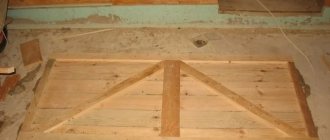
Classic pigtail. To perform this, a tenon is cut out at the end of the wall, a vertical part of the casing with a groove is installed on it, along which the frame moves vertically due to shrinkage.
Thanks to this, no pressure is placed on the door and window structure, which guarantees their correct functioning and durability. The casing is treated with an antiseptic, and soft insulation is placed between the tenon and groove.
A wind lock provides protection against blowing under the window sill. The gaps above the top of the pigtail are closed with soft insulating material.
T-shaped socket (in a spike)
The T-shaped frame is made as follows: a groove is cut at the end of the opening, and the side parts of the casing have T-shaped profiles. Bars are glued into the grooves on the risers of the frame, which act as stiffeners; they guarantee the stability of the shape of the casing and uniform shrinkage of the walls.
More on the topic How to insulate windows. Review of insulation materials
When installing a T-type pigtail, strict adherence to technology is required. For example, if you secure a block with nails or self-tapping screws, there is a possibility of freezing or blowing through the window and door opening. An important role in casing is played by antiseptic treatment and insulation of seams with compressible material.
A U- or T-shaped pigtail is selected depending on the house. When visiting the site, the surveyor will tell you the most suitable type of casing. Our craftsmen professionally perform the full range of work on the manufacture and installation of casing in wooden houses.
How to make a casing with your own hands
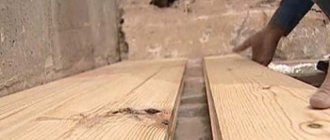
Making clean casing blocks for plastic windows yourself is difficult, but possible. To do this, you will need a planed dry timber or carriage with a thickness of 50 - 100 mm and a width equal to the thickness of the walls in your house. And also jute tape, PVA glue, self-tapping screws, wood sealant, antiseptic impregnation, brush. Construction stapler to secure jute to the wall.
Simple tools you will need are a hammer, a chisel, a construction level, a hacksaw, a pencil or marker, a ruler, and a corner. Power tools include a chain saw or circular saw, an electric planer, and a hand router. The help of one or two friends will not be superfluous.
Before starting work, decide which casing you will do - P or T type. The size of the opening depends on this.
How to cut a casing profile
In a timber house we will make a T-frame, as it is easier to make with our own hands. Here you can do without a router, just use one hand-held circular saw, which you can rent.
Cutting a T casing from solid timber is too wasteful. There will be a lot of waste left. Therefore, we will use the option of gluing a tenon into the sides. On the market, such casing is also called a monolith spike.
The final result of the work.
In a house made of profiled timber 150 x 150 mm, we will need a planed board 150 x 50 mm and a block 50 x 50 mm to make a frame. We mark the drawing as follows: on each part there is a quarter section with a width equal (!) to the thickness of the window profile and a depth of 25 mm, on the sides there is an additional 53x10 mm groove for the tenon.
Important: when marking a groove in the frame for installing a window frame, find out the thickness of the profile of this frame. For example, the Rehau profile comes in thicknesses of 60, 70 and 80 mm, Veka - 58, 70, 82 mm.
For the top we take a beam 150 x 50 mm.
Windowsill. With a wind lock made of 150x90 mm timber and without a wind lock made of 150x50 mm timber.
Longitudinal cuts are made with a circular saw. If the cutting depth is not enough, carefully cut out the remaining wood with a chisel. We also select the groove for the wind lock using a chisel or a router.
And this is what a drawing of the sides of a classic casing deck looks like. The top and window sill are marked in the same way as the T-view.
Dimensional tolerance table
| Quarter Sampling for installation of frames | The width will be equal to the thickness of the window frame. The depth when casing a window opening depends on the height of the blind profile to the glazing bead and to the hinges. If the hinge is close to the casing, then it will not be possible to open the window completely. Usually the frame extends into the quarter by 10-15 mm, another 10 mm is left for the mounting angles. |
| Groove for tenon insertion Side parts of T-casing | - 2-3 mm wider than the block - depth 5-15 mm, depending on the thickness of the casing board. |
| Groove for the wind lock in the bottom board | - 2-3 mm wider than the wind strip - depth 5-15 mm. On a thin window sill, the wind lock is not cut out. |
| Groove in the end of the house wall | The depth is 10 mm deeper than the tenon. The width is 5 mm wider than the spike. |
| Spike at the end of the house wall | The width is 5 mm less than the groove in the pigtail. The height is 5 mm less than the depth of the groove. |
Making the right casing is not easy. Leave it to the professionals. You can buy ready-made casing (custom made to your dimensions) and install it yourself. Send window sizes to whatsapp to calculate the cost - click to start chat We ship casing throughout the Russian Federation by transport companies (we are located in the Moscow region).
Installation of classic P-casing
The technology for installing a pigtail in a timber house is as follows:
- We mark and cut out openings
- We mark a groove at the ends of the cut openings. Let's choose it. Or we form a spike if you chose a P casing.
- We impregnate the openings and the adjacent part of the casing with an antiseptic, for example Veres Base
- We insulate the opening with jute tape
- We install the bottom part, then the sides and finish by installing the top
- Checking the geometry
- We fill the free space above the tops tightly with jute
It seems simple, but as usual, the devil is in the details. I’ll try to show the process of installing casing in a house made of 150x150 mm timber. If it is unclear, ask in the comments.
When marking openings, remember the golden rule “measure twice, cut once.”
Slowly and carefully form a tenon on the side walls of the opening.
Use a building level. The window sill must be strictly horizontal, the sides must be vertical.
When marking openings, proceed from the planned window sizes. Add to these dimensions the thickness of the casing (taking into account the selected quarter) and the gaps for the jute. The sufficient width of the groove for a wall thickness of 150 mm will be 55 mm. I wrote below on the page how to correctly calculate the dimensions of the opening.
The groove is always 5 mm larger than the tenon. It won’t dangle, you still need to insulate the opening with 1-2 layers of jute tape.
First, we insulate the lower part and install the window sill, then we insulate the remaining perimeter and install the sides. We close the casing by installing the top.
We coat the locks with wood sealant. No self-tapping screws!
At the final stage, we stuff the protruding jute into the seams. We also tightly plug the space above the top with it.
Let's check the geometry again. Profit!
The result of the work.
Installation video - very detailed
In the video, the house is not entirely made of timber. It is a fire monitor, but also with smooth walls. All stages of casing installation were well filmed. A bonus is the visual installation of plastic windows and doors.
We will install turnkey casing and windows in 1 day! Clean, beautiful and with a lifetime guarantee! There will be no draft from the windows, and there will be no need to finish the slopes either. Send window sizes to WhatsApp to calculate the cost - click to start chat We work in Moscow and neighboring regions. We ship casing throughout Russia.
Video timing:
- marking openings in the wall 0:20 - 1:07
- sawing 1:10 – 2:20
- marking the tenon at the end of the opening - 3:30 - 4:05
- sawing out a tenon - 4:10 - 6:11
- impregnation of the opening with an antiseptic - 6:13 - 6:55
- impregnation of the casing with an antiseptic - 6:56 - 7:06
- installation of casing with insulation of the opening with jute - from 7:08
- how the last part of the casing is mounted - the top - 7:54 - 8:05 and 8:20 - 8:30
- installation of doors and windows - from 8:35
- caulking seams with jute - from 11:06
Installation of T-casing in a timber house
The technology differs only in that a groove is selected at the end of the openings. And the spike is formed on the side of the casing adjacent to the wall.
It’s not difficult to make a groove in a beam or, simply put, a groove. In the drawing I showed the top view of the groove. After marking, you make two vertical cuts, then two more 45-degree cuts. Remove the cut triangles and clean the middle with the tip of the chain. Or a chisel if you are not confident in your abilities.
How and how to cut a groove in a beam - top view of the opening.
To make straight cuts with a chain saw you need experience, a good eye and strong hands. You can also cut the groove with a hand-held circular saw, and where it won’t reach, finish it with a chisel.
Both types of pigtails are equally reliable. P-casing is a classic, time-tested option. T-casing appeared relatively recently; it is used for installation in houses with grooves cut during the construction of walls.
Advice: The cost of installing a frame for 1 opening in a log house from different companies is now in the range of 3,500 - 7,000 rubles. At the same time, you can order the production of casing without a proprietary installation.
Thus, you will receive ready-made casing profiles of the shape and size you need. To leisurely install them in your free time, saving tens of thousands of rubles.
An additional bonus when ordering a ready-made joint is the choice of options, the independent implementation of which is very expensive. For example, you can order casing to widen the openings into the house - this visually enlarges the openings and provides more light. Or order a clean window sill.
How to connect the parts of a pigtail - lock options
The locks connecting the parts of the casing vary in complexity of execution. The correct lock prevents the parts of the box from moving relative to each other. Both during the installation of a window or door, and during the period of shrinkage of the house. It also prevents connections from blowing out.
Options:
- quarter connection. The simplest to implement, often used for self-installation. Requires additional fixation with corners.
- quarter joint with reverse corners. A more rigid option also requires additional fixation. Blown through
- dovetail or box tenon connection
- designer locks from companies that manufacture and install casing.
A quarter is the simplest and most unreliable lock.
On the left is a box plier, on the right is a casing with a designer lock.
The upper and lower locks in the casing are usually different in shape.
Factory cut top lock.
Stages of installing a casing (casing)
1. The opening cut is made at a distance of 80-90 cm from the floor; when determining this distance, the person’s height is taken into account.
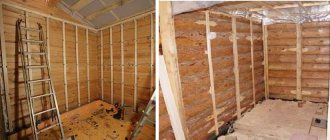
Between the opening and the window or door structure, you need to make a shrinkage gap of 35-60 mm. 2. Preparing the opening. Using a chainsaw, depending on the type of socket, a groove or ridge is cut in the opening.
3. Treatment and insulation. After installing the frame, its surfaces are treated with an antiseptic, and insulation is placed in the gaps. When installing the frame, you cannot use foam, since the window structure must move freely vertically.
4. Installation of wooden elements. At the end, the installation of wooden elements is carried out, namely the window sill, sidewalls and top.
Manufacturing of casing
The casing is manufactured by specialists in stages.
The first stage is cutting an opening in the log house. First, mark it using a level and plumb line. The distance from the floor to the opening is 80-90 cm. Cut out the opening. They saw the log under the window sill. align the structure first horizontally and then vertically.
Sectional diagram
The second stage is the production of tenons and grooves.
- on the sides of the opening, mark a tenon line using a construction ruler, if it is a P-casing;
- then they pass with a saw along the marking lines on the sides of the opening;
- make markings from the side of the wall;
- cut out excess wood from the log along the intended line;
- at the same distance from the side of the opening, pencil marks are placed on the side of the facade;
- connect them together using a ruler;
- cut off excess;
- the groove is made in the sides of the casing. Mark the location for the groove;
- make several cuts;
- use a chisel to break out and remove excess wood;
- When the groove is ready, it is cleaned with a chisel.
At stage 3, antiseptic and staining is performed. They brush off the dust. An antiseptic destroys pathogenic organisms and prevents their reappearance. Such wood does not rot, and insects do not breed in it.
Stage 4—installation of thermal insulation. To seal and eliminate cold bridges, jute tape is used, which is laid under the casing. It is secured with a construction stapler. A layer of jute is placed under the window sill, then a wind block is attached, and a layer of jute is placed on top again.
Stage 5. Installation of casing. All its parts are prepared. Align the edges of the boards with a miter saw. A one-third cut is made from the end of the board for the groove. The excess is chopped off with an ax. The second side casing is prepared in the same way. Align the groove with a cutter. Place the sidewalls, then the top into the spacer, having previously treated them with sealant. Sealant is necessary in order to avoid leakage and blowing. There is a shrinkage gap between the top and the top log. Place the top until it stops. The gap is insulated with tow.
Installing a socket requires a serious attitude to work and knowledge of the nuances of wood processing. Highly qualified specialists with extensive experience in construction work know how to make a socket in a wooden house.
What affects the price of casing?
1. Wall thickness: wooden houses are built from logs and timber, so the wall thickness can be from 140 to 300 mm. The dimensions of the parts of the frame correspond in width to the walls of the house, or slightly exceed it. You also need to consider the width of the window sill.
2. Size of the opening: the larger the opening, the more material will be required to make the frame and the time to work. The shape of the opening also affects the price of the casing: a standard rectangular design or a complex polygonal one.
3. Quality of a wooden house: if the walls are assembled without connecting elements, the curvature of the walls occurs in the cut out openings. Then you have to additionally straighten the walls, which leads to additional costs.
Houses made of timber are assembled using nails that meet at 300 mm. Because of this, additional money and time are required to sharpen chainsaw chains or purchase new ones.
Source: sotdel.ru/okosyachka-obsada.html
How much does it cost to install a casing?
The price of a joint is approximately the same in all regions. The main factors influencing its cost:
- Availability of material. (The price is lower from my own material).
- Wall thickness and opening height.
- Type of timber (Building a house from profiled and laminated timber implies the installation of more expensive casing).
- Availability of electricity (the cost of renting a generator is added).
- Is it necessary to finish the casing with platband?
- Remoteness from the city limits. (fare).
- Qualifications of workers (wages for specialists are higher).
Average price for a joint with work:
| Type of pigtail | Box thickness (cm) | |||||||||||||||
| Up to 15 | 15-20 | 20-25 | 25-30 | |||||||||||||
| Price, rub./p.m. | ||||||||||||||||
| installations | material | installations | material | installations | material | installations | material | |||||||||
| height | width | height | width | height | width | height | width | height | width | height | width | height | width | height | width | |
| In the embedded block | 870 | 125 | 300 | 190 | 915 | 125 | 350 | 250 | 950 | 125 | 350 | 250 | 990 | 125 | 350 | 250 |
| In the thorn-monalite, in the deck | 1115 | 125 | 410 | 190 | 1150 | 125 | 500 | 250 | 1190 | 125 | 500 | 250 | 1240 | 125 | 500 | 250 |
Knowing these numbers, it is easy to calculate how much it will cost to install casing using your own material or without installation. Companies offer as an addition a number of installation robots for an additional price:
| Type of installation work | Price, rub./l.m of boxes of various thicknesses (cm) | |||
| Up to 15 | 15-20 | 20-25 | 25-30 | |
| Horizontal cutting in a log house | 190 | 250 | 320 | 370 |
| Platband installation | 130 | 130 | 130 | 130 |
| Installing a window sill up to 30 cm thick | 330 | 330 | 330 | 330 |
| Treatment with antiseptics | 380 | 380 | 380 | 380 |
| Insulating the gap for shrinkage | 140 | 140 | 140 | 140 |
If you decide to entrust the installation of the pigtail to specialists, then it is better to order additional services. Only with them you will receive high-quality casing with a guarantee of 1 to 3 years. And this is enough to completely shrink a timber house.
DIY pigtail in a wooden house
Modern life, with its busy pace of life, pushes people to look for an alternative place of residence or recreation.
In this regard, a wooden house is a suitable option for a city dweller. A wooden house provides the opportunity to enjoy the naturalness and naturalness of an ecological structure.
Wooden houses, due to their natural characteristics, are environmentally friendly and energy efficient, which is why today the number of adherents of building houses made of wood is growing all over the world.
When building a wooden house, special attention must be paid to the installation of windows and doors, due to their tendency to shrink, which is a characteristic seasonal phenomenon. This phenomenon is due to the fact that wood has such characteristics as drying out and shrinkage.
In this regard, when installing window and door openings, it is important to remember that shrinkage of the building can last up to five years from the date of construction, and, consequently, the openings of windows and doors change.
More on the topic Panoramic windows in a private house
To prevent this deformation, window and door openings are installed in a special flashing, which is otherwise called a casing. A frame in a wooden house allows the natural shrinkage of the house to avoid damaging windows and doors and ensure safe living.
The casing in a wooden house contains 3 components:
- Sidewall;
- Vershnik,
- Window sill board (threshold).
The technology for making a pigtail depends on its type; in order to install a pigeon yourself, you need to carefully study the manufacturing technologies of each type and choose the most suitable one for yourself.
What is a wooden window casing?
In the modern construction market lately, houses made of logs, panels or timber have often been found. These include bathhouses, country houses, and country houses. Despite the fact that new technologies make it possible to create innovative building materials, environmentally friendly wood remains in demand. In addition, such structures have a beautiful appearance.
A feature of wooden buildings, which is called shrinkage, occurs under the influence of temperature factors. Wood can absorb water and dry out over time. The most vulnerable modules of the house are windows and doors, or rather, their openings. Such building movements can impair their functionality or lead to complete destruction. To avoid this, a special technology for their installation is used, in which a window frame is inserted into the opening . It is a wooden box made in a special way.
The technology for installing windows in wooden houses involves installing a frame
The casing includes: a window sill board, a top and two sidewalls. The boards used for its manufacture are about 25 cm in size. Choose a material that has a moisture content of approximately 10%. You should not take drier wood, as it may have cracks invisible to the eye, as a result of which it will begin to collapse as the building shrinks.
The main types of pigtails in a wooden house and their manufacturing technology
The pigtail “in the embedded block”.
This type is a prefabricated structure. A block measuring 50 cm x 50 cm is installed in a cut-out groove prepared in advance. This block will be the main guide for moving the log house vertically. In a wooden house, the frame (casing) is made up of edged boards measuring 50 mm x 150 mm or 50 mm x 200 mm, based on the thickness of the logs.
This technology is highly popular for 2 reasons: 1) due to rapid production and subsequent assembly, 2) due to its relative low cost.
Okosyachka "In Shim Monolith". This technology involves making a casing in a wooden house from a solid rectangular profile beam. Its installation is carried out in a groove in the log house, which is cut in advance. The function of the top (upper horizontal jumper) is performed by an edged board, the thickness of which is 50 millimeters.
The “in the deck” socket is the most common method of casing among the people. Installation involves cutting a groove into a monolithic casing, which is made of rectangular profile timber. The function of the top is performed by an edged board with a thickness of 50 millimeters.
The ridge, which is cut into the end of the log house, serves as a guide for moving the log house. The racks on the sides are also made of timber. At the same time, “blocks” are made, inside of which a groove is cut in the center (50mmx50mm in size); when making them, it is important to take into account the thickness of the logs.
Having laid the thermal insulation in advance, the decks are placed on the ridge, and the racks are attached to the lower supporting crown using pins or wooden dowels. The top is placed on top in a spacer; it is secured with self-tapping screws to the side casing posts.
Pit "in a spike with a ready-made slope." A groove is cut at the end of the opening. A block (50x50 mm) is installed into it through the seal. This block is a guide for the vertical movement of the log house.
More on the topic Standard sizes of plastic windows according to GOST
To make the pigtail, this method uses a glued carriage, which is made from coniferous trees, its thickness is 50 millimeters. Then, on the frame, an “internal quarter” is made from laminated veneer lumber for the installation of window structures. The frame is secured to the opening using self-tapping screws.
In order to facilitate the process of installing a window frame in a wooden house yourself, we present its main stages.
Okosyachka: cost and pricing
Manufacturing costs can vary greatly, since the cost of a joint depends on a large number of factors. This is influenced by the quality of the wood, types of casing, its shape, the presence of decorative details, opening parameters, as well as the material into which the installation will take place. Of course, the final cost will be affected by quantitative indicators, how many pieces or meters.
The type of casing will have a big impact on the cost. All types differ from each other in technical features:
- “In a embedded block” is considered the most economical option. Made from edged boards. A groove is cut out on the inner wall into which a block with a square cross-section is placed. Due to quick assembly and attractive cost, this option is popular;
- “Spike” is a more expensive option, but differs from the previous variety in higher quality. This timber is produced with a cross-section shaped like the letter “T”;
- “Into the deck” - has almost the same cost as the previous option. To do this, a tenon is cut into the sides of the opening, onto which a deck shaped like the letter “P” is placed.
Prices for trimming by different companies:
| Company | Installation according to technology | Unit from. | Cost with material (rub.) | Cost including customer's materials (RUB) |
| "Department" | In the embedded block | m.p. | 1560 | 1100 |
| To the deck | m.p. | 2650 | 1200 | |
| In the thorn-monolith | m.p. | 1850 | 1250 | |
| "Nareevo" | In the embedded block | m.p. | 1600 | 1200 |
| To the deck | m.p. | 2700 | 1250 | |
| In the thorn-monolith | m.p. | 1950 | 1350 | |
| "Okosyachka" | In the embedded block | m.p. | 1450 | 1000 |
| To the deck | m.p. | 2550 | 1150 | |
| In the thorn-monolith | m.p. | 1750 | 1100 | |
| "Beaver's House" | In the embedded block | m.p. | 1600 | 1200 |
| To the deck | m.p. | 2700 | 1250 | |
| In the thorn-monolith | m.p. | 1750 | 1100 | |
| "Carpenter-And-House" | In the embedded block | m.p. | 1560 | 1100 |
| To the deck | m.p. | 2650 | 1200 | |
| In the thorn-monolith | m.p. | 1850 | 1250 |
To make a pigtail with your own hands, in addition to applying physical effort, you need to have certain skills. Installation done professionally will help avoid deformation during shrinkage. This is a kind of guarantee of a safe home.
The main stages of making a pigtail
Cutting the opening
First, it is necessary to clarify the size of the opening and its distance from the floor. As a rule, this distance ranges from 80 to 90 centimeters. When determining this distance, it is necessary to take into account the height of future residents.
Then markings are made using special construction tools (plumb and level). In this case, the dimensions of the opening must be larger than the dimensions of the window structure, due to the fact that there must be shrinkage gaps (compensation) from 40 to 60 millimeters above the casing. Next comes the cutting of the opening.
Preparing the opening
This stage involves making a groove (or ridge), taking into account the technology of the socket.
Production and installation of pigtails
This stage is carried out based on the specifics of the production of various types of pigtails. Because different technologies have different rules and production sequence.
Direct installation of windows
It is important to know that the installation of a socket in a wooden house is installed if the house is not older than ten years. It is possible to install the pigtail with your own hands, but to do this you need to acquire certain knowledge and skills.
What is casing and how does it work
The casing is a frame installed in a log or timber house. It compensates for the expansion and drying of wood. prevents the impact of shrinkage on the opening. Another name for it is pigtail.
It is made from boards 20-25 cm wide. Using a tongue-and-groove connection, the structure slides along the end of the opening. A non-fixed connection helps the parts move depending on the expansion or contraction of the log house by 7cm. The casing compensates for the expansion or shrinkage of the wood.
A log in a wooden house has a humidity of 12% to avoid cracks in it. The casing for windows consists of 4 parts: top, bottom and sides. The top fixes the sidewalls in a static position. A shrinkage gap is formed above the top. Its height is 5-8 cm. It compensates for the processes occurring in the house during shrinkage. Mineral wool or tow is placed in this gap.
Some novice builders foam the shrinkage gap, not knowing that this should not be done.
The foam hardens and becomes rigid, putting pressure on the casing. The casing may become distorted under load. The adhesive properties of foam have an adverse effect on it. They firmly fix the components of the pigtail, preventing its mobility.
The main tasks solved by the pigtail
The formation of a gap between the upper beam and the window opening, which ranges from 5 to 8 centimeters.
Organization of a strong connection of logs located horizontally in the window area. Organizations of structures intended for installation of windows.
Important. The casing in a wooden house does not rigidly tie the structure to the house; it can move freely if the house shrinks.
Installing a frame (casing) in a wooden house is a necessary and important event that should not be neglected. By installing the joint on time, you will save yourself from problems that may arise in the future.
Source: profibrus.ru/okosyachka-svoimi-rukami-v-derevyannom-dome.html
Types of casing
The casing is the supporting structure of a wooden structure and requires special attention when choosing.
A window frame or casing on the doors of a wooden house is equally important for strengthening walls and preparing openings. There are several types of pigtails:
The pigtail in the embedded block.
In the 90s, when wooden houses made of timber, chopped and rounded logs began to “grow up like mushrooms after rain” in villages and summer cottages, this type of socket, known as an embedded block, became widespread.
With this installation method, a groove is selected at the ends of the window opening logs, into which a 50x50 mm block is driven through jute.
Next, a 50x150mm, or 50x200mm board is nailed to it or turned on self-tapping screws. The top is also covered with screws or nails with a board of the appropriate size.
This is the cheapest type of casing. It appeared, most likely, out of hopelessness among builders, since in those years there was nowhere to buy the right pigtail, and making it by hand was too expensive and labor-intensive. The socket in the embedded block turns out to be fragile, the connection angles of the structure itself are not airtight, there are still many disadvantages and only one advantage - it is inexpensive.
Casing (width) in an embedded block or in a deck
For the correct installation of windows and doors in wooden houses (made of profiled timber or rounded logs), openings for installation undergo preliminary preparation. The essence of these measures comes down to creating a reliable connection between the crowns of the wall logs and the window itself. To do this, they produce a socket - creating a flat and uniform surface for installation. The actual frame or casing is a special wooden box that prevents the logs from moving in the horizontal plane during operation of the house, but does not interfere with the safe mixing in the vertical plane, which can occur during the shrinkage process. And there are actually several ways to install these boxes.
Today, the most common casing methods are the following types: in an embedded block or in a deck. A joint is produced, the price of which directly depends on the method in which it is produced. After the house shrinks, when the logs or beams have already dried, the house will shrink according to design and will be ready for finishing work. Sometimes, if particularly necessary, even window openings are cut out after shrinkage. Therefore, it is not recommended to prepare boxes for casing in advance. So, what is the difference between these two methods and when is each used?
The casing into the embedded block is made using a special beam measuring 50 by 50 millimeters. In advance, along a marked strictly vertical line in the opening through all the crowns of the logs, a special groove is cut out for the specified beam. In this case, you should calculate the dew point for each specific building in order to subsequently install windows at the optimal distance from the outer surface. This will achieve maximum heat conservation and prevent excessive moisture formation on the window glass indoors. The embedded beam is installed in the prepared groove. And the casing is already attached to it, which is a board (or beam), the width of which is equal to the thickness of the wall. The price of such a frame is low, the work does not require jewelry precision, but in the future it will require finishing - installation of platbands and slopes.
When fitting into an embedded beam, the casing is attached using nails or self-tapping screws directly to the beam. At the same time, you need to be careful not to attach it directly to the logs, otherwise this will not allow the walls of the house to “breathe” and at some point will cause the beam to bulge (due to compression by the logs). The consequence of this may even be the destruction of the window, which will ultimately cause significant unforeseen costs to eliminate the consequences. The embedded block is installed in the groove through a special seal, which also functions as a waterproofing material. And horizontal casing elements are installed without deepening and fixing to the wall, performing the functions of spacers. When installing the upper part of the box (top), a technological gap is provided, which is necessary so that the upper log does not squeeze the window or door during shrinkage. After installing the window, you can begin finishing. This kind of pigtail, at the cost of its simplicity in execution, has gained the greatest popularity. This method has a variation - a “finish” casing box, which uses an already profiled beam as a box, which contains both quarters and platbands. It is used if additional wall finishing is no longer planned.
The second option - a joint in the deck - is much more complicated and looks much more massive in appearance. In fact, this is what it is: the elements of such casing are stronger, thicker and more reliable. But the process of completing the work is much more complicated. The essence of the casing in the deck comes down to the fact that at the vertical ends of the walls a so-called ridge is formed - a protrusion, onto which the casing elements will then be placed. The latter are a beam with a U-shaped notch, which is made according to the dimensions of the ridge. Such timber also shrinks through a seal, and subsequently serves as a guide for the walls of the house during seasonal shrinkage. The top is also attached with a technological gap (as is the case with the socket in the embedded timber), which will allow the house to breathe. This type of edging, the price of which is significantly higher, is appropriate to perform in cases where houses have several floors, their weight (of the houses) is quite large and the walls can significantly change their geometry during operation in winter and summer. Due to the massiveness and strength of the casing elements, it is the frame in the deck that can technologically ensure safe shrinkage without consequences for the house in general and windows (doors) in particular.
Among the standard methods of casing, you can also recall the spiked socket. With it, a groove is made at the ends of the wall, just as in the case of an embedded block, and a tenon according to its size is made on the casing. Technologically, this type of staking is done only in factory conditions, with the preparation of logs during their production, and, therefore, with strict adherence to the assembly of the structure. This method of construction and, accordingly, frames, is used extremely rarely, since most construction organizations prefer to build houses according to individual projects, and, therefore, the preparation of openings for windows and doors is carried out after the construction of the house itself.
www.d-forest.ru
T-shaped pigtail
The T-shaped jamb, the installation of which is carried out similarly to the casing in the embedded block, has a significant difference that makes it much stronger than the previous method described.
The difference is that the block is glued into the base of the workpiece or is made from a single material. The pigtail itself has a thickness of at least 65 mm. and this is enough to create sufficient rigidity of the structure.
This T-shaped casing can withstand horizontal and vertical loads well and reliably protects the windows and doors of a wooden house from distortions and mechanical damage during shrinkage of the log house.
We most often use a T-shaped frame when replacing a poorly installed embedment bar
Pit (casing) in embedded block at competitive prices
Casing is a concept that is hardly familiar to residents of multi-story buildings. Owners of private wooden buildings often face various problems regarding their integrity. The socket in the embedded block is used in wooden houses when the housing undergoes changes over time.
Professional casing on door and window openings prevents changes in the shape of doors and damage to glass, increases the safety and durability of housing. In addition, a well-placed socket placed in a block will improve ventilation.
Why do you need a socket in the embedded block?
New wooden houses can shrink over time, even if specialists built them from properly processed wood and followed all technological standards. A specialist will tell you exactly what kind of socket is needed when inspecting the house.
Shrinkage of about 4% is enough for doors with double-glazed windows to fall into the risk zone. Timely and correct trimming will protect the house from damage and maintain its integrity. In our company, the procedure is carried out in accordance with all safety standards.
It is not recommended to carry out such work on your own without special knowledge and skills, otherwise you can only aggravate the situation. It is better to trust construction work to specialists, professional installers and builders.
When casing into a block is not required:
- ● your house is not wooden;
- ● more than 10 years have passed and the material cannot change;
- ● you installed a new door with a frame.
In some cases, the house needs to sit for about three years before it stops shrinking significantly. Then you may not need a joint, but not everyone has that much time. In this case, the procedure is still worth carrying out.
Shrinkage refers to a change in the dimensions of the house. This is a natural process for housing made of timber, nothing can be done about it. The degree of change depends on the construction, size, and material. The average shrinkage of a wooden building is 3-4%. Calibrated logs shrink the most. The least shrinkage is observed in laminated veneer lumber.
For example: in a two-story house about six meters high, the material shrinks by about a couple of centimeters per year.
Casing in an embedded block is the best option
A window frame is a type of wooden box that isolates doors and windows from the rest of the structure so that the material does not touch them when shrinking. There are several options for the procedure, but in all cases, as a rule, the production of a deck is required. This is a complex procedure. For correct operation of door structures and windows, the frame is installed in the opening with moderate rigidity. After this, a groove is cut in the box or opening.
Let's consider the main manufacturing options:
- ● Into the deck. To do this, cut out a tenon in the opening (side parts). The finished product has a U-shaped appearance. The deck is put on a spike.
- ● In spike. The timber is processed and a T-shaped section is created. The "T" leg is placed in the groove, the top serving as the window slope.
- ● Economical option - embedded in a block. A groove is cut on the inside of the opening, then a block is laid, securing the whole thing on top with a finishing board. Slopes with this procedure must be finished. Due to the inexpensive cost of raw materials, this method is the most profitable.
Which one to choose? Professional builders will be able to suggest the right option, since everything depends on the specific case: the type of material, the size of the building, the requirements and wishes of the customer. For example, it is not rational to use the “in the deck” method for a change room. Hammering boards into a block in a presentable cottage is also not recommended.
Offers high-quality and efficient construction services. Our specialists will come to the site free of charge and advise on the upcoming work.
srub-otdelka.ru
U-shaped pigtail
U-shaped pigtail is a classic type of pigtail. Someone claims that this is a special development of their company and only they install it this way. Not true. The U-shaped casing appeared a long time ago and it will not be possible to reinvent it again.
The production of the pigtail is carried out from solid wood or laminated veneer lumber with a large cross-section by mechanical processing. The result is a rigid, reliable structure that can withstand high loads in any direction.
Ideal for large plastic and wooden windows as well as for installation of metal entrance doors.
In our company you can buy a U-shaped window frame and install it yourself
Finishing casing
The finishing casing can be made from solid wood or glued blanks.
Finish okosyachka differs from other types in that it does not require additional decorative finishing. The corner joints of the casing structure are sawn by hand so that the gaps at the junction of the hanger, risers and window sill are minimal, which gives the window opening an impeccable appearance.
The surface of the parts is polished and only needs painting.
It is best to order such a pigtail for a wooden house, in which there will be no interior decoration, where the walls remain as they are.
What is the difference between casing technologies “into the embedded block” and “into the deck”
Historically, there were two basic types of pigtails. There are installation technologies “in the deck” and “in the embedded block”.
Scheme of casing installation “in the deck”
The “in the deck” casing is one of the oldest casing technologies.
It consists in the fact that a protrusion is formed in the timber of the house - a “ridge”, on which a U-shaped profiled board or timber is placed. Moreover, the sample size corresponds to the size of the “ridge”. Rolled insulation, most often flax, is laid between the ridge and the casing. The casing “in the deck” is assembled from parts directly in the opening. Assembling the casing “into a deck” proceeds from the bottom up. First, a beam or window sill board is laid at the bottom, followed by vertical casing elements. And the whole structure is completed by a “top”, which is installed as a spacer between the vertical elements of the casing.
In the upper part of the casing, between the “top” and the beam, there must be a shrinkage gap. It ensures the safety of window structures during severe shrinkage of the house. This gap must be closed with an elastic seal, but in no case with polyurethane foam.
The resulting casing allows the house to breathe. The vertical elements serve as guides for the movement of logs or beams of the house, and the upper gap ensures the safety of the structure when the house shrinks. It is very important that during installation the elements of the casing and the house are not rigidly connected to each other. Therefore, the use of foam or nails/screws connecting the casing and the house is not permissible.
The casing “in the deck” can be made with a small sample for the outer quarter, which will simplify the installation of window structures, since there will be no need for interior finishing of the opening. It must be remembered that when the window is moved forward in relation to the warm zone of the opening, the condensation zone may enter the room. In the old days, this technology was justified, since for the winter a second line of glazing in the form of a “winter frame” was installed in wooden houses. Nowadays, they install one line and when installing it, it is necessary to take into account the presence of cold and warm zones.
Among the disadvantages of casing “in the deck”, it should be noted that it is quite massive, which can sometimes lead to a refusal to choose it for aesthetic reasons.
Scheme for installing the casing “into the embedded block”
The pigtail “in the embedded block” visually looks lighter.
This occurs due to the fact that some of the casing elements are hidden inside the walls of the house. With this installation scheme, a groove is selected in the middle of the opening in the timber for a 50x50 mm timber. It is installed in the groove through rolled flax-type insulation. Next, the casing is attached to it, which, unlike the “in the deck” option, can be brought to the site in finished form. The casing is secured to the beam using screws. The main thing is to check that the connection between the casing and the block did not affect the house itself and that the screw did not secure the casing into the house. It is also important to check that the length of the block is less than the height of the opening, so that when the house sinks, the upper crown does not lie on the block and it does not bend under load.
There are many casing options in this design. Particular attention is drawn to the technology of the pigtail with adhesive carriage. In this case, a special dried laminated veneer lumber is used, in which a “quarter” is profiled. Most often, an internal quarter is used, which allows you to close the installation seam of the window from the outside, and from the inside the window foam is covered with strips. This option is used when installing casing in houses made of rounded timber or beautiful profiled timber.
www.bauplast.ru
- Rough casing
- What is casing
- U-shaped casing
- KP 40 aluminum profile sial
- Do you need a window frame in a house made of profiled timber?
- Reinforcement for PVC profiles
- Profile lg official website lg
- Glass door in aluminum profile
- A profile dimensions
- mastech aluminum profile
- Aluminum profile extrusion
Rough casing
For a house built from unplaned timber, it is better to order a rough frame made from solid wood. It will reliably strengthen the walls of the house and protect the windows from the negative consequences of the shrinkage process.
Subsequently, the rough frame is covered with internal and external finishing.
You should not pay special attention to the appearance of such a pigtail, but the installation must be carried out according to all the rules.
In log houses, when installing this type of window frame, it is necessary to use a window sill board with a thickness of at least 65 mm.
In houses built from timber, the window sill board may not be used; in this case, the riser frames are cut into the underlying timber.
Purpose of casing in the construction of wooden structures
Such an element is mandatory in the design of the entire house. Its absence leads to the fact that the window opening can completely collapse under the influence of shrinkage of the house. In addition, if the wood dries out significantly, cracks and gaps will appear between the frames and the wall of the building, which will lead to large heat loss and drafts.
It is very important to use a socket if there is a small distance between the windows . A design made according to all the rules will become a decoration for your wooden house.
The window frame protects the window opening from destruction when the house shrinks
Please note that casing for a wooden window is not always suitable for PVC frames. If you decide to replace old wooden windows in a wooden house with plastic frames, you need to pay attention to the frame during dismantling. If it is not suitable for a new plastic window, then it must be dismantled and a new one installed, carefully following the technology.
Properly installed frames made of PVC material will serve you for a long period of time. And if you choose the color of the film covering the plastic structure, which resembles natural wood, this will allow the products to look harmonious, combining with the entire wooden structure.
Pit from an array
Making a casing from solid wood does not take much time and effort, but preparing the material for such casing is quite difficult.
In the case of a rough casing, where appearance does not play a huge role, the finishing casing, on the contrary, should look flawless. To do this, selected carriages or timber must undergo a soft drying process in order to relieve internal stresses in the wood and, at the same time, the formation of cracks in the workpieces should be minimal.
This work takes a lot of time and not everyone takes it on. If the preparation of the material is not carried out efficiently, then be prepared for warping and cracking of such a frame. Of course it won't fall apart, but the appearance will be ruined.
The pigtail can be made of solid pine, larch or oak.
Glued pigtail
Glued sash is made from lamellas of small cross-section. This material dries well and quickly in drying chambers. There are no internal stresses in such a pigtail. It does not lead, no cracks appear on it.
A laminated timber frame is not made from laminated wall timber. During the production process of blanks for glued casing, a more stringent selection of material is carried out. It is impossible to hide wood defects inside the workpiece, which is why the price of a socket is much higher than the cost of a wall beam.
Particular attention should be paid to the glue used in the manufacture of glued frames. Only glue intended for this work and compliance with all gluing standards can guarantee the quality of the resulting product.
If all production standards are met, the glued frame turns out to be stronger and more reliable than the solid wood. This type of finishing trim is ideal for wooden houses made of profiled timber or chopped logs.
Each type of casing has the same purpose: to strengthen the walls, maintain the functionality of windows and doors, and not interfere with the shrinkage of the log house. Only the cost and appearance are different.
Window frames for wooden houses, the price of which depends on the type, material and complexity of installation, are made according to individual sizes, which are determined by the master during measurement. This takes into account the thickness of the walls, the unevenness of the walls, the size of the shrinkage gap, the height of the lower and upper cut, the thickness of the tenon or groove at the ends of the logs, sometimes the slope of the roof, the alignment of window openings on the first and second floors...
Only a person with extensive experience in the construction and glazing of wooden houses can carry out the correct measurement and installation of the frame.
Casing in an embedded block: inexpensive and problematic
Wanting to save money when installing windows and doors in a wooden house and ordering rough casing, you often do not think about further problems and costs.
Today a man came to our office again and showed him a photo of the casing made from a block installed to him with the question “HOW TO CHANGE THIS?”
Rough casing from private craftsmen and some companies consists of a block installed in a groove and a board nailed to it. How will this structure perform its assigned functions of forcefully holding logs and beams from twisting and maintaining the geometry of the opening? Subsequently, the window is attached to this “super” structure, called the rough casing, using fastening plates or mounting tape.
The casing is made of a block installed in a groove and a board nailed to it. Photo from a client's home who came in for a remodel.
Polyurethane foam and mounting plates are sticking out from under the window and you don’t understand what to do with them. The installers installed it and left. Everything is standing, but there is no finished View. Everything needs to be finished.
Polyurethane foam, mounting plates stick out from under the window - NO finished look.
You cannot install platbands because you first need to install the extensions. The cost of work and materials adds up to a large sum. This is justified by the fact that this type of work requires meticulous preparation of each detail of the installation and its individual installation.
Rough casing also brings with it problems that extend over time.
Nails and screws used during assembly often go through and fix the wall of the house, preventing it from shrinking. The block is rested against the upper part of the block “so as not to swing.” We also met this: first, a block was nailed to the wall, and then a 50*150 board was secured to it with self-tapping screws and everything was foamed on the sides.
Problem areas in the photo on the left: the casing has no lower part, the window rests on a log. The width of the casing board is less than the thickness of the wall; additional pieces will also be needed for the platbands. The insulation between the casing and the wall is not visible. From the untestable without dismantling: how well the block is screwed to the board. We do not discuss the mounting plates, considering that the owner made a conscious choice.
This is the story the “specialists” left you, and you have already paid the money for installation and production. What happens next? You start looking at the Internet, reading, thinking about how to close it all, redo it, etc. You need to find a company that will do all this wisely. Self-respecting people do not work for free. Taking measurements, alterations and finishing touches costs more.
According to the owner of the house, the cheap casing turned out to be too expensive. A man has a timber house. On all doors and windows, gaps 5x6 mm wide appeared between the opening and the top beam. It blows between the wall of the house and the board of the house and why an iron ruler fits between the wall of the house and the board of the house. How to redo everything while maintaining the existing windows and doors?
It blew cold from under the platbands. They removed it, and there were gaps on the street between the board and the embedded beam.
What should be the correct casing?
Making the frame in production and installing the finished window into a pre-prepared groove allows you to avoid a whole bunch of problems. Yes it costs a little more. Yes, this requires highly qualified installers. You, as the Customer, receive a finished appearance and an opening ready for use. Securing the trim is no problem. There is no wall hanging. Our great-grandfathers, having meager equipment, hollowed out a groove in the deck for installation, cut out a tenon in the log and made porches for the sashes on the front side. Houses with this design are still in use today. Everything new is long-tested by our grandfathers. We use modern tools and advanced technology for drying and processing wood.
Choose the right casing - this is a guarantee of warm windows for your home!
Order a casing calculation now and receive a clear estimate with drawings. Our phone
shuvoe.ru
Making a pigtail
Making a pigtail from solid wood with your own hands is possible!
To do this you will need a number of hand tools and the ability to work with them. It is much more difficult to properly prepare and dry the material for making casing. The same work on the production of pigtails, performed on production equipment, will take much less time and will give a higher quality result. Making glued sockets at home, without special equipment, is impossible.
Buying glued material, such as furniture panels or stair strings, and using it to produce casing is also not a good idea. The adhesive used in the manufacture of such products is not intended for use in areas of constant high loads and aggressive environments (heat and cold).
A glued load-bearing beam is ideal for performing these works, but due to the high cost of such material and the large number of scraps, the price of the blanks is higher than simply buying a ready-made socket from the manufacturer.
Filing the casing
The frame for plastic windows can be of various shapes: rectangular, triangular, polygonal in the form of a trapezoid with beveled corners, balcony blocks, entrance blocks, octagon and even circle.
In each case there are features of filing the casing corners. It is the correct filing of the corner joints of the casing structure that ensures the rigidity and tightness of window openings.
Filing the corners of the frame is a labor-intensive process that requires accuracy in the dimensions of the tenons and grooves, and an even plane of contact of the risers and window sills. Maybe someone read on the Internet about a unique old Russian method.
This method is not unique, but it is the only correct one. This is done by everyone who knows how to make a joint and who cares about customer reviews. And this is the best advertising.
Jigsaw for plastic windows
The casing of window openings in a wooden house for plastic windows and the casing of wooden windows do not have a fundamental difference.
The draft version is absolutely the same. The finishing casing differs in the size of the quarter under the window.
Even for plastic windows, the sample sizes are not the same, since there is now a huge selection of window profiles on the market from different manufacturers.
The quarters in the casing for the installation of plastic or wooden windows are made individually for each profile, so it is important to decide on the choice of window structures before installing the casing.
For the same reason, you won’t be able to buy a ready-made joint in a store; you can only order it.
Features of creating and installing boxes for plastic frames
When installing a pigtail in a wooden structure, you need to know some of the features of its installation. The box can have a width of about 26 cm. It is also possible to use a larger width, but this sometimes causes cracks to appear in the casing. It is recommended to make the box using materials whose humidity is 10-12%. The drier the raw material, the more likely cracks will appear.
To install PVC windows, a complicated version of the casing is used
When installing plastic frames, a more complicated version of the casing is suitable. A carriage with grooves is made and the ridge is cut out.
The structure, assembled from timber with grooves for the comb, is called a carriage for the pigtail. The size of the grooves is made so that the frame can easily slide along the guides when the house shrinks.
The price for making casing depends not only on the size of the opening, but also on the raw materials from which the house itself is built (log house, log or timber). To get a quality product, you should order it from trusted builders. To make a casing with your own hands, you need to understand all the nuances of the process and purchase the required tool for the job.
When starting to install windows made of plastic profiles into wooden walls, please note that they cannot be inserted without a frame. It will help create conditions under which the frame will serve you for a long period of time without deforming or requiring repairs.
Turnkey okosyachka
Turnkey installation of a frame includes the following stages: manufacturing of the casing, installation, installation of windows, caulking of the outer perimeter of the frame, manufacturing and installation of the casing. Caulking the gaps between the window frame and the wall must be done.
Otherwise, the only thing that works to preserve heat in the house is the shell of the socket, the thickness of which is 5-7 centimeters.
This work is carried out before installing the casing and a couple of years after installing the casing, when the house settles and the sliding of the side logs along the risers of the frame stops, check the seams and repeat in places if necessary.
It is advisable to treat the caulk seam on the outside with yacht varnish to protect it from moisture absorption.
Where to order a joint?
Ordering a casing from the manufacturer is the best decision that will help you save time and nerves, while you can rest assured of the quality of the casing and the installation work performed.
An experienced measurer will help you decide on the type and cross-section of the frame for your country house; moreover, after the first measurement, the exact dimensions of windows and doors will be known.
By placing an order for frames and windows in one organization, you will receive a guarantee for everything from a single person. You won’t have to waste time on repeated measurements or wait three weeks for the production of colored windows, and in case of problems, the contractors will not shift the blame for the malfunction onto each other.
Order casing inexpensively
The price of a joint is not small, but there is always a way to save. The casing installation season is spring and autumn. In winter, when it’s cold and no one really wants to build, the manufacturer may offer you a discount.
For this period of the year it is better to leave internal openings and interior doors. It is better to order a window frame in the summer at the height of the holiday season. During this period, not like in winter, but there is a shortage of orders from manufacturers and you can also place an order at a discount
Source: nareevo.ru/pages/okosyachka-dlya-derevyannogo-doma