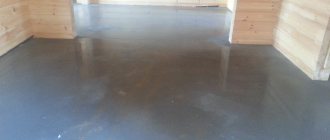
Low tide installation
The final stage of work is finishing. One of its important elements is the ebb above the windows in a wooden house: it is designed to remove rain moisture from the walls and thereby increase their durability. In addition, it covers the lower part of the casing and improves the decorative qualities of the walls.
A wooden house or bathhouse changes in size all the time - it either “sits down” a little, then rises again. Therefore, simply taking and rigidly fastening windows and doors into the openings will not work: either the frames will bend or the walls will “hang” and will not be able to sit down when they dry out. To prevent this from happening, a wooden casing (casing or casing) is installed in the opening, which is held in place only by friction. It is already possible to attach a window or door frame to the elements of this box.
First, let's look at the casing profiles. Fixation due to friction is ensured by a simple tongue-and-groove lock. In one case, a tenon is made on the logs/beam of the opening, in the other, a groove is cut out.
If your bathhouse is wooden - a frame made of logs or timber, then the technology for installing windows and doors will be exactly the same as in the house. No difference. So everything described applies to the bathhouse.
Monolithic casing boxes
The counter part is often made from a solid wooden beam. They are also called monolithic or finishing. Depending on whether the groove is cut or a tenon, the mating part is made U- or T-shaped
Please note that when installing windows or doors, the fasteners should not go into the beam/log of the wall. To ensure proper reliability, the frames are mounted in the “thickest” parts of the casing
The casing is made of timber, in which a groove is selected or a tenon is cut. Accordingly, casing/edge profiles are U- or T-shaped
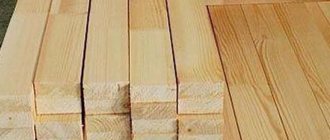
The material for the casing is monolithic or laminated veneer lumber. The use of laminated veneer lumber in bathhouses is not recommended: when using non-moisture resistant glue (and this usually happens), constant changes in humidity cause the glue to break down and the timber to crumble. Therefore, it is better to use monolithic timber of the required size
Just note that the timber must be dry - no more than 12% humidity. If wet, it will crack or lead
Order chamber-drying timber of the required size from the sawmill, or dry it yourself in the shade in a draft for 4-6 months.
This type of casing is called monolithic or capital. You can already attach a window or door frame to it. If the windows/doors are plastic, the “face” of the casing can be left flat. If you plan to install wooden products, choose a quarter for them.
Which of these two casings/pipelines is considered the best? When done correctly, both perform their tasks normally. Everyone chooses what is easier for them to do.
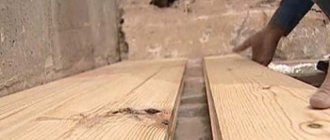
How to make a tenon on an opening
There are two options - first cut a tenon in the doorway, then make a casing block under it. The second option is to mark the tenon along the finished groove. In any case, markings are applied first.
The width and depth of the tenon should be 4-5 mm less than the dimensions of the groove. The casing is “planted” on the insulation, so space is required for it. The width is marked at the end of the logs/beams, the depth - on the side surface of the walls
When marking, it is important to maintain the verticality of the lines.
Next, take a circular saw or chain saw and make cuts according to the marks.
In this case, it is important to maintain the required cutting depth on the side surfaces and not cut off the tenon completely. If you are not very good with a chain saw, it is better to use a circular saw - you won’t be able to cut very deep there.
For an example of the formation of a spike, see the video.
Making a groove in the opening
It’s safer to make a groove: even if the cuts are too deep, you don’t have to remove the entire core; in extreme cases, you’ll make the tenon on the post larger.
Everything is simpler here: you mark the width of the groove at the end. In this case, it is 4-5 mm larger than the groove on the casing/pipe. Make two cuts and remove the middle between them. There are virtuosos who do this with a chain saw, but mostly they work with an axe, then they work part-time with a chisel.
The difference between a metal and wooden door
During finishing work, many homeowners are faced with the question of choosing a metal door. Deciding between a metal and a wooden door is not easy. Before choosing one option or another, you should familiarize yourself with their features:
- The entrance door made of wood will harmoniously fit into the log house due to the combination of the appearance of the materials. However, the modern market offers a huge variety of trims and trims for metal doorways that imitate wood. Of course, such elements cannot be compared with natural solid wood, but if the main task of the door is strength, then you can sacrifice the aesthetics of the facade.
- Thanks to various antiseptic impregnations and fire retardants, wooden doors have high resistance to precipitation and other adverse conditions. In addition, in winter the wooden massif will not freeze.
- Ordinary wood has greater thermal insulation properties than metal. Modern companies offer multilayer metal doors, with various polymer materials that increase thermal insulation properties. One of the warmest options for a street opening is insulated (wooden) entrance doors.
Advice! Metal doors will easily fit into the overall style of the building if there are similar decorative metal elements on the site or facade.
In general, steel products have high strength and safety indicators. In modern construction, 9 out of 10 doors are metal. They are installed both in log houses and in concrete buildings. Three-layer doors made of alloy steel are considered the best option for a log house.
Professionals who choose steel doors are guided by their significant advantages:
- High degree of safety and comfort. Most modern metal doors have unique fittings and locks. Among other things, the products are equipped with durable functional fasteners that do not weaken the door panel itself during operation and installation.
- Possibility of installing automation. Metal doors have special grooves or already built-in automatic control systems. In addition, they are easy to install fasteners for installing cameras and other surveillance and security devices.
- Highest degree of fire resistance. Unlike wood, metal is absolutely not flammable.
- Moisture resistance. Doors with protective coatings can be used without problems in areas with high humidity. Even with active use and lack of maintenance, the products retain their moisture-proof properties.
When choosing a steel door, you should pay attention to the quality of the coating and the multi-layer nature of the material. This ensures housing safety and heat preservation
The nuances of installing doors in a log house
In the normal case, when installing a casing system, there is no need to install the box. The exception is when wooden lining is used as a finishing material. In this case, the box is placed on polyurethane foam. After installation, the box is closed with platbands. If shrinkage occurs, they can be reattached again or new ones installed.
A very common question is: how to install a metal door in a log house? The casing installation methods remain unchanged. The only thing is that you don’t have to install the top bracket. Instead, you should leave a gap of 10 cm. This will allow shrinkage to occur naturally. In this case, the surfaces are not damaged or deformed. The advantage of a metal door is its strength. The metal box is able to withstand almost any wood pressure during shrinkage.
It is worth following the recommendations regarding the size of the doorway. The height of the opening should be 15 cm larger. This is necessary so that you can install the upper frame from a board with a section of 150 * 50. This also applies to the width of the opening. It should be 12 cm larger than the door leaf. For the manufacture of side carriages, timber is used, the size of which is 150 * 100 mm.
To prevent the formation of cold bridges, it is worth taking care of high-quality thermal insulation. To do this, the carriage is attached to the ridges (before installation) with tow. All cracks and gaps that are formed can be filled with foam.
Sometimes it happens that after the walls are erected, openings for all windows and doors are immediately cut out, leaving no fixing elements left. If casing is not done in time, such an opening will become deformed after the house shrinks. This situation can be eliminated: for this you should use a 50*100 or 100*150 mm beam with a length of at least 2 meters. It must be secured on the side where the deformation occurred. For fastening, you need to use 6x150 mm self-tapping screws. Two screws must be attached to one log
It is very important to pre-make all the holes for the screws in the timber.
To tighten and eliminate wall deformation, the timber is fastened alternately up and down, approaching the center. As a result of this work, the opening should be leveled. In order to eliminate holes from self-tapping screws, you can use veneer or special wood putty.
The difference between a metal and wooden door
Which is better, wood or metal? No material has an absolute advantage. Both metal and wooden front doors have positive and negative sides. Before choosing, you need to have a good understanding of the general characteristics
It is important to compare the advantages and determine where there are more of them. It doesn’t hurt to find an alternative to certain disadvantages
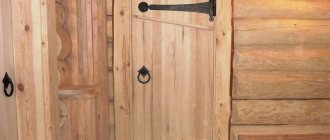
Wooden door
Many people adhere to the version that wood is the best material that can protect not only from bad weather, but also from strangers. Undoubtedly, this type of door has a large number of positive properties, but at the same time it also has negative qualities.
To give a sober assessment and make a choice, it is important to carefully consider the “pros and cons”
A wooden door looks organic and beautifulSource de.decorexpro.com
Pros:
- An ideal combination with the overall interior. The doorway merges with the overall appearance and creates the impression of a monolithic texture.
- Wood is an excellent heat insulator, which will save on heating bills.
- It is not necessary to buy a new part, as you can assemble it from scraps, thereby cutting the construction budget.
- This is an environmentally friendly material that will not cause an allergic reaction or illness (with the exception of pine needles).
Minuses:
- The design is not reliable and can be easily hacked. If this is a country house, then installing a tree as protection is highly not recommended.
- Such a door is highly susceptible to changes in weather conditions. Due to moisture and cold, it can change its size and thereby cause inconvenience.
- The surface is highly susceptible to mechanical damage and requires frequent maintenance.
- Poor sound insulation.
Advantages of a metal door
As is the case with a wooden door, a metal structure also has weaknesses. But still, installing a metal door in a wooden house is the best solution today. The main advantage is that every minus can be removed with a little modification. As a result, you can get an almost ideal input design.
A metal door can also look interestingSource moipros.ru
Pros:
- A strong structure that is difficult to damage without special equipment. Everything is complemented by internal hinges and locks with a built-in complex mechanism.
- With a special coating, a high degree of protection against moisture ingress is provided.
- With seals, there is good sound insulation and protection from drafts and dust.
- The metal is not flammable, which means it does not support combustion.
Minuses:
- The iron sheet freezes strongly and releases all the heat from the house to the street.
- Such a door stands out strongly against the background of a wooden structure and can greatly spoil the appearance.
- Installation and purchase require more time, money and effort.
Cutting methods
To cut a doorway with your own hands, you will need a tool, but you can choose it correctly after determining the method of work being carried out. The method depends on the wall material. It is not advisable to chisel and sledgehammer, as the integrity of the entire partition will be compromised. You can carefully cut the opening using diamond, laser, waterjet or oxygen cutting.
Diamond cutting
For concrete partitions, the method of diamond cutting of a doorway using a grinder or circular saw is used. The cutting element of the tool is a metal disk coated with diamond.
The diamond cutting method has many advantages:
- low level of vibration eliminates the appearance of cracks even on loose partitions;
- during the cutting process, an accurate thin cut is entrusted along the marked contour and at the desired angle;
- the noise level of a working tool does not exceed the permissible threshold specified in sanitary standards;
- a small amount of debris due to the absence of chips, which is impossible to achieve when using a hammer drill.
Among the shortcomings
highlight the costs of purchasing expensive diamond blades. During work, the concrete wall is moistened with water, but fine dust still spreads into the room.
Laser cutting
Expensive equipment is used for laser cutting of openings. Previously, it was bulky and was used only in production. Modern laser cutting equipment is compact, but its high cost and specific purpose have made it popular only among specialized repair teams. The cutting of a concrete wall is made with a laser cutter due to the gas-discharge action.
Before starting work, the parameters of the wall
:
- thickness;
- the presence of a reinforcing frame;
- passage of communications inside the partition;
- grade of reinforced concrete wall.
Additionally, the floor of the apartment building where cutting is planned is taken into account, as well as the admissibility of wetting the concrete structure with water.
Waterjet cutting
Cold cutting of an opening in a wall refers to the waterjet method. A special installation is used for work. It creates a strong stream of water at a speed of 1 thousand m/s. The liquid in the tank is mixed with abrasive particles with a diameter of about 0.4 mm. The prepared mixture is fed through a nozzle onto the reinforced concrete structure and destroys it at the point of contact. The cutting force depends on the pressure. At the maximum power of the equipment, a reinforcing frame made of steel rods is cut along with the concrete.
The waterjet cutting method has the following advantages:
- precise cutting of concrete according to markings;
- the environment is not polluted due to the absence of chemical impurities and harmful gases;
- the concrete partition is not subject to mechanical and thermal stress;
- no wall vibration;
- low noise level;
- The method allows you to cut out a section of the partition at any angle, as well as make a doorway of complex shape.
Disadvantage
is the formation of dirt, the high cost of consumables, and the large dimensions of the equipment. Waterjet cutting is used on construction sites that have not been put into operation.
Oxygen cutting
The oxygen cutting method is also called spear drilling. To cut out a doorway, a machine with a metal tube is used. Oxygen is supplied through the spear under high pressure. At the same time, the jet is heated inside the tube to a temperature of 1400°C using a gas burner. After the spear has ignited, the external heating source is turned off. When the temperature reaches 2000°C, the tube is leaned against the concrete surface and turned slightly. During cutting, you cannot move the spear away from the concrete, as it cools quickly.
The disadvantage of this method is considered to be a fire hazard, as well as the possibility of getting burned. During cutting, hot slag particles scatter throughout the room.
Tips for installing a frame under a metal door
An independent joint should be performed only when the master is confident in his professionalism. If a beginner gets down to business, he must first familiarize himself with the recommendations of professionals, otherwise all construction work may be ruined. In order to make a joint, you need to take care of a set of professional tools.
To carry out construction work, you should definitely prepare a chainsaw, circular saw, jigsaw, drill, screwdriver, and grinder.
Inexperienced builders may neglect very important points that can negatively affect the repair and provoke unpleasant consequences
When making the design of the pigtail, it is important to remember that the safety of being in the house largely depends on its quality. Advice from professionals will help you do everything right
Self-piping should only be done if the master is confident in his professionalism
Polyurethane foam must be of high quality. To seal voids, you do not need to use a sealant, which is often used when installing windows and doors
It is too hard, which ruins the whole idea of the joint. It is important to ensure that the self-tapping screw used to secure the door frame does not get into the block. Shrinkage should occur naturally, and rigidity interferes with this.
When installing the frame on metal doors, you must first install a box with grooves on the ridge. The ridge itself should be placed inside the groove. Doing renovations for the first time
It is important to pay attention to the fact that construction work is difficult to carry out and even the simplest installation methods require professional knowledge and skills
Technology for cutting window and door openings
Openings for windows and doors can be cut in two different ways:
- The openings are cut after the house has completely settled. Initially, a solid wooden frame is installed, without window or door openings. And only when the house has completed its final shrinkage (usually after 12 months), window and door openings are cut along the intended boundaries. It should be noted that due to the significant amount of waste generated, this method of cutting openings is much more expensive.
- Window and door openings are cut directly during the manufacturing process of the log house. At the same time, in the places of the openings it is necessary to make cuts for the joinery and cut vertical grooves at the ends of the walls. Bars are subsequently inserted into these grooves, the task of which is to perform a guiding function during the subsequent shrinkage of the house. The remaining gap in the upper part of the grooves is insulated. Strict adherence to construction technology guarantees smooth, beautiful and compact openings for windows and doors.
Whatever cutting technology you choose, you should mark the locations of windows and doors in advance so that it does not turn out that dowels and dowels are already installed in place of the windows or doors. Installation of dowels and dowels must be done on those walls where it is planned to cut down more than two windows. Otherwise, such a wall may sag under the weight of the roof.
Currently, cutting out window and door openings occurs as follows: they begin cutting down the log house, leaving openings that are somewhat smaller in size than required by the project. Then, in the middle of the opening, one continuous crown is passed through (as when constructing a blank wall). This is done every 3-4 crowns. These logs are cut only after the house has completely settled. It should be noted that window and door openings with this cutting method are usually made several centimeters narrower than necessary, which simplifies the process of final alignment of the openings.
Cutting out the openings is carried out using a chainsaw, while the upper and lower logs are cut only halfway, which simplifies the further implementation of the staking.
Framing is a process of casing openings, which prevents their deformation. Thanks to the socket, the crowns of the timber can move freely during vertical shrinkage, preventing the logs from being squeezed out.
What might be needed in the process?
To start work, that is, to install a door in a log house, you should prepare all the necessary tools. This will allow you to complete all the work much faster. You will need:
- saw;
- hammer;
- drill;
- circular;
- chisel;
- construction square;
- roulette;
- level;
- nails, bolts, screws.
Tools for installing the door: saw; hammer; drill; circular; chisel; construction square; roulette; level; nails; bolts; self-tapping screws
Using a saw, you need to make an opening in which the door will be installed. It is necessary to cut in such a way that in the end half of the timber remains at the top and bottom. To check the level, a conventional construction tool is not enough to obtain the most accurate result. It is better to use a plumb bob or laser level.
Using a milling cutter, a kind of groove measuring 50x50 is cut out at the end of the opening. In order to adjust the exact dimensions, it is worth using a chisel and chisel. After the groove is ready, it is necessary to install a block with a section size of 50 * 50 mm in it
It is very important to consider the length of the bar. If the log house is relatively new, then the length should be 5 cm less
If the log house has undergone hollow shrinkage, then the length should be reduced by only 2 cm.
If the walls are made of logs, then for strength it is enough to use one block. If the house is built of timber or cylinders, then such reinforcement is not enough, since too much force will act on it. To strengthen the block, a board up to 50 mm thick and a width equal to the thickness of the wall is attached to it. Very often in construction, specialists use a steel channel instead of a wooden block.
After the side bars are secured, work should begin on forming the doorway in the log house. To do this, below, to the lower logs, a board is nailed - a threshold. To achieve maximum strength, it is best to use 100 mm timber, which is cut in a T-shape.
How to embed a steel door into a log house - preparatory work
A steel door is installed in almost the same way as any other. Before installing a metal door in a log house, you need to perform preparatory work:
- prepare the opening;
- adjust its size;
- fasten the box to the opening with anchor plates, self-tapping screws or steel rods;
- foam all technological gaps;
- hang the door leaf.
Usually the block is placed flush with the plane of the wall - the door is attached using anchor plates.
If desired, it can be made recessed into the opening - the door frame-frame is fixed using anchor bolts or steel pins that can replace factory anchors.
When installing a door in a log house, a combined method is more reliable, when installation is carried out on anchors that are bent along the entire surface of the doorway, as well as on pins or bolts.
Standard sizes of anchor bolts are 10–15 cm in length and 12–15 mm in diameter. The anchors can be replaced with pieces of steel rod of identical sizes.
The frame of a steel door with the leaf removed is installed in the opening, placing wooden wedges under it along the entire perimeter for subsequent adjustment of the position of the product and fixing the frame. In addition, they will allow for technological clearances.
When checking the verticals and horizontals with the building level, the wedges are shifted in the desired direction: they are removed or driven deeper. When the correct position is found, the frame will be firmly secured with wedges so as not to move when drilling holes. Through the mounting holes, recesses are made for the anchors in the wall with the appropriate dimensions.
Then hang the door leaf to check its movement: it should open and close freely. After this, it is removed, fasteners are placed on the false side, the lintel and threshold are fixed, and hung again for re-checking. If necessary, change the position of the box, tighten or loosen the nuts.
Now they leave only the door frame in the opening and cover it with construction tape to protect it from the foam. Afterwards, all technological indentations from the wall are foamed and the resulting excess is cut off. When the polymerization of the foam is completed, you need to hide all areas treated with it by cashing.
Leaving the log house open is important
What does this phrase mean? But here's the thing - after the construction is completed, the most intense moment of shrinkage begins, which will last at least a year. During this time, if the doors and windows are already installed, they will simply be crushed.
Moreover, wood is much stronger than metal and can bend even seemingly reliable structures. To prevent something irreparable from happening, you should carefully consider what is described below.
Before starting work, you should know in advance what size the entrance and swing structures will be. Usually, if the project is standard, then all measurements are put aside on drawings and diagrams and there is no need to bother. But if the log house is installed independently, then there is something to think about and decide quickly, since it is necessary that the cut opening fits together with the entire structure.
So, the installation stages:
Before the log house has to be left to shrink, it is recommended to make the necessary openings. How to saw through a door in a log house? Actually this is not the most difficult question.
The required size is determined, and the diagonals must be taken into account, and the outline is drawn on the log house. You need to make sure that the bottom log is divided in half, and the top one too. Then 7 to 10 cm is added to these sides for shrinkage.
The thickness of the door frame ± 2-3 cm is added to the side ones. It is necessary to fill the edges of the future opening with boards to protect the short crowns from falling out. Thus, when the contours are ready, the desired size is selected with a saw.
If the log house assumes the presence of several entrances, one of which must be the front entrance, then the question of how to cut a door in the log house, when a greater distance is required, must be resolved more scrupulously. Board protection must be present on both sides - external and internal.
Also, after making the cut, it is recommended to place logs in the opening for a couple of weeks - during this time the log house will get used to the emptiness. Well, other aspects will no longer differ from an ordinary opening.
Moment of sawing
To avoid any difficulties with the question of how to cut a door in a log house, you must first determine the middle log of the opening and make slits on it. After that it is easy to knock it inside. Well, then working with a saw will no longer be difficult.
Let's move on. After the time allotted for shrinkage has passed, before installing the door, you need to measure the opening of the shrinking frame and determine the changes.
How to insert interior doors in a bathhouse
In principle, installing interior doors in a bathhouse is similar to installing an entrance door: you need to assemble the frame, equip the door leaf and frame beam with fittings, set it in the ideal position and finally secure the frame in the opening, then hang the door leaf and finish the structure with platbands.
The most painstaking installation process is the construction of the box. If it is assembled incorrectly, there will be problems with the operation of the door, so all measurements must be taken carefully. It is quite possible to make a box yourself in the shape of the letter P. To do this, you will need 3 bars for the hinge beam, the ceiling strip and the door stand. If a threshold is planned, you will need another beam for arrangement from below. Then the assembled box will look like a rectangle.
A doorway that is too large can be reduced using drywall: fill the required size bars around the entire perimeter.
At this stage, the dimensions of the canvas and the opening are accurately determined (all measurements are performed with one ruler), the dimensions of the lintel and racks are calculated, not forgetting about the technological gaps, and then the parts are correctly sawed off and connected into a single whole.
The thickness of the timber for the frame should not be less than the thickness of the door leaf. You need to measure the opening and the length of the door separately on the left and right, since they may not be identical; all deviations must be taken into account when working.
For polyurethane foam, leave a gap of 0.3 cm on the side of the false, loop and lintel beams and on their inside. If the door frame has a threshold, then the gap should go around the entire perimeter. If the door frame is U-shaped, a gap of 1 cm is provided between the floor and the lower plane of the leaf.
To cut timber for a door frame, you will need a cross-cutting machine (it can also be replaced with a miter box with a hand saw). The individual elements of the box are connected at an angle of 45°. This method is quite complicated for a non-professional, but careful joining looks great. To connect individual elements, you will need self-tapping screws. For them, holes are drilled through, which should run perpendicular to the cut.
All holes for screws in the door structure are made in advance. They are not drilled completely with a drill measuring 3/4 of the diameter of the fastener being mounted. Self-tapping screws must be threaded throughout the entire barrel.
Another way to connect box parts is with a 90° angle using a fine-toothed hacksaw.
The dimensions of the internal vertical line of the wooden blocks are equal to the sum of the lengths of the door leaf. If the door has a threshold, you need to provide 3 mm at the top and 3 mm at the bottom.
If the door does not have a threshold, about 10 mm should be left below. The lintel crossbar is attached to the posts using two self-tapping screws on each side. The timber for the threshold is cut exclusively at a right angle. The box is assembled on a horizontal surface (for example, on a floor covered with cardboard, or on two tables placed close to each other).
When installing door hinges, remember that according to the standard, 20 cm are deviated from the bottom and top edges. If there is a third hinge, then you need to place it at a distance of 50 cm from the top of the leaf. When attaching hinges to the box, take into account the technological gaps.
The “landing areas” for door hinges should be such that the flag is flush with the door leaf and frame.
It is advisable to fasten all the fittings before the box is assembled, since it is necessary to provide veneer for the hinges on the hinged timber.
As for the handle with a latch, according to standards it should be located at a distance of 0.9-1.2 m from the floor.
It is recommended to close the anchors for fixing the box in the opening on top with a lock strike plate and hinge flags. Then the door structure will hold perfectly on three long screws. To screw in screws, holes are made in the frame beam.
When the door frame is assembled, it is carefully lifted and placed in the opening. To leave gaps, wedges cut from leftover wood material are inserted between the wall and the frame. When the base is leveled vertically and horizontally using a plumb line and a building level, you can screw in the screws, hang the door leaf on the hinges and check the operation of the entire door structure: there should be no distortions or differences in the gap between the leaf and the frame. The box is sealed with construction tape along the future layer of foam. Then cardboard is inserted into the gap around the perimeter of the entire canvas and the door is closed. After this, carefully foam all the cavities around the door frame (until the foam has completely hardened, the door cannot be used).
All that remains is to cover all the seams with platbands, and the installation of the interior door is complete. All doors in the bathhouse are installed in the same way.
Additional elements when installing a second door
An important element when installing a door block is the threshold. Without installing the threshold, cold bridges arise, the house has to be additionally insulated, sound insulation properties are reduced, and foreign odors penetrate into the house.
You can install a second door made of wood, it will be warmer and quieter. Most often, a handle with a regular latch is installed on the second door, but it is best to install a locking mechanism, which will create an additional obstacle to entering the house.
Between the doors in the opening, additional elements made of planed boards are also installed around the perimeter of the opening. They are puttied with wood putty and painted.
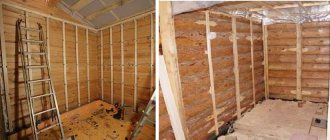
How to make a doorway in a wooden wall
To cut a doorway in a wooden house you will need a chainsaw or electric saw.
Additionally, they stock up with bars with a cross-section of 10*10 cm. The length of the blanks is equal to the height of the room. The bars are needed to strengthen the wall. When cutting out a doorway, the wooden partition can bend. To avoid deformation of the structure, the bars are placed vertically on both sides of the wall near the slots for the future passage. Through holes are drilled in the racks and partition and the structure is tightened with long bolts.
To properly make an opening for a house made of logs, make sure that there is a solid element on top of the passage. This will be the load-bearing jumper. The markings are applied so that an additional 1/5 of the thickness of the whole log remains at the bottom and top of the passage during cutting.
Sawing laminated veneer lumber with a chainsaw can result in the boards delaminating. To prevent destruction of the material, nail the bars with long nails near the cut site. At the end of sawing, the passage is strengthened and the temporary bars are removed.
To arrange a doorway in a frame house, the sheathing along with the internal insulation is first dismantled. After cutting, a timber frame is installed around the perimeter of the passage. The thermal insulation along with the sheathing is returned to its place.
Installing a door frame
To carry out high-quality installation work, you must have the following set of tools:
- long measuring device;
- sharpened axe;
- chisel;
- hacksaw for wood;
- screwdriver
The wooden walls of a log house have a distinctive feature in the form of an uneven structure, since after installation such a structure usually settles. To install the box, 4 beams are used. Along the vertical ends of the doorway, grooves are cut for the ridges on the doorway. At the ends of the beams, fastenings are prepared taking into account the thickness of the door leaf. The door frame is fixed using a tongue-and-groove system and is additionally secured with screws or dowels.
How to make a doorway in a brick wall
The steps involved in punching an opening in a brick wall are different from cutting a concrete panel. The masonry consists of rows with bandaged seams. The top of the doorway should line up with the joint. You cannot cut bricks lengthwise. Such actions will weaken the tub and cracks will appear along the partition.
After applying the markings, they begin to strengthen the opening in the brick wall by inserting the upper lintel. A row of bricks is selected above the marked line. A lintel longer than the width of the passage is built into the void.
Further actions are aimed at cutting an opening in a brick wall with the selected tool. If the masonry can be disassembled, then it is wiser to pick out the bricks with a pry bar. The seams are drilled with an electric drill. Uneven protrusions at the ends of the doorway are leveled with a grinder.
Leaving the log house open is important
What does this phrase mean? But here's the thing - after the construction is completed, the most intense moment of shrinkage begins, which will last at least a year. During this time, if the doors and windows are already installed, they will simply be crushed.
Moreover, wood is much stronger than metal and can bend even seemingly reliable structures. To prevent something irreparable from happening, you should carefully consider what is described below.
Before starting work, you should know in advance what size the entrance and swing structures will be. Usually, if the project is standard, then all measurements are put aside on drawings and diagrams and there is no need to bother. But if the log house is installed independently, then there is something to think about and decide quickly, since it is necessary that the cut opening fits together with the entire structure.
So, the installation stages:
Before the log house has to be left to shrink, it is recommended to make the necessary openings. How to saw through a door in a log house? Actually this is not the most difficult question.
The required size is determined, and the diagonals must be taken into account, and the outline is drawn on the log house. You need to make sure that the bottom log is divided in half, and the top one too. Then 7 to 10 cm is added to these sides for shrinkage.
The thickness of the door frame ± 2-3 cm is added to the side ones. It is necessary to fill the edges of the future opening with boards to protect the short crowns from falling out. Thus, when the contours are ready, the desired size is selected with a saw.
If the log house assumes the presence of several entrances, one of which must be the front entrance, then the question of how to cut a door in the log house, when a greater distance is required, must be resolved more scrupulously. Board protection must be present on both sides - external and internal.
Also, after making the cut, it is recommended to place logs in the opening for a couple of weeks - during this time the log house will get used to the emptiness. Well, other aspects will no longer differ from an ordinary opening.
Moment of sawing
To avoid any difficulties with the question of how to cut a door in a log house, you must first determine the middle log of the opening and make slits on it. After that it is easy to knock it inside. Well, then working with a saw will no longer be difficult.
Let's move on. After the time allotted for shrinkage has passed, before installing the door, you need to measure the opening of the shrinking frame and determine the changes.
Installing an entrance door to a log house
There are several options for installing entrance doors in a wooden house. The most common are the following:
- using casing;
- installation on bars;
- installation of a metal door.
When using the first method, the entrance doors to a log house are installed in a casing. It, in turn, is attached to the wall using a special longitudinal tenon (its width is 5 cm, height is 3.8 cm), installed in a pre-made groove. It is made using a milling cutter, and then compacted with tow using a chisel.
The second method differs slightly from the first. Instead of a tenon pre-installed in the box, a beam with a cross section of 5*5 cm is used. It is also fixed in grooves pre-sealed with tow, and then the box is attached to it. This connection is less reliable and durable, but cheaper.
The third method, installing an iron entrance door in a log house, has become more and more common lately. The reasons for this are quite clear - steel products are rightly considered the most reliable and durable, allowing to achieve the highest possible level of safety.
In this case, there is no need to perform any additional grooves or other auxiliary work. The metal door frame is fastened using a conventional hammer drill and anchor bolts. Naturally, during installation you should carefully check the verticality of the mounted racks and other elements.
Since the mass of a metal entrance door is quite large, it is recommended to hang the door after the frame is installed and finally secured in the opening. This will somewhat facilitate the installation procedure and subsequent alignment of the structure.
Whatever installation method the future owner chooses, when installing the front door in a log house, several basic points should be observed:
- Before installing door and window fillings, it is necessary to give the house time to shrink;
- Before installing structures, you should check the geometric dimensions of the openings, their verticality and horizontality;
- before starting work, you should first decide on the method of installing the front door, and then fully equip the object with everything necessary;
- It is advisable to install entrance doors with one or two assistants. This is especially true when installing metal doors. It is also recommended to involve specialists, since the work in question is extremely important and is not simple.
The next important question is how to install the door
in a bathhouse with your own hands with walls made of rounded logs, for example, with a diameter of 200 mm. Moreover, its walls are built from rounded logs, say ø200 mm. The technology for installing such doors in bathhouses, and even more so in a steam room, has its own characteristics. This is what we will look at in this article.
Features of timber casing
Scheme of installing a door into a casing box.
An equally popular method today for installing a door in a wooden house is installing a casing made of timber. Getting started with cutting out the opening is no different from the first method. Just as in the first option, it is necessary to make a spike, the width of which should be 50 mm and the height – about 38 mm. For casing it is necessary to use timber measuring 100x100. In the middle of the block it is worth cutting a groove 50 mm wide and 40 mm deep. In order to make a groove, it is best to use a cutter. The height of the block should also be selected depending on the shrinkage of the house. If the structure has not completely shrinked, then you should retreat 5 cm from the top of the opening. If the structure has given maximum shrinkage, then the gap between the block and the top can be no more than 2 cm.
At the top, the casing can be fixed in two different ways. The first option is to use a board with a cross-section of 50x200 mm, which is installed by surprise. To secure it, you should use self-tapping screws. The second option involves installing the top bar above the side bars. Thus, there is no need to use screws and other fasteners.
How to strengthen a lintel over an opening
Before starting the construction of the opening, it is necessary to install a lintel.
A part of the wall will rest on it, which will remain above the future opening, which will remain from:
- Floor resting on the wall.
- Walls of the upper floor.
- Roof structures.
The safety of the wall structure and the entire house depends on the rigidity of the lintel. When developing lintel drawings, it is necessary, in addition to previously obtained information, to take into account several more factors, which should be:
- The dimensions of the opening relative to the entire wall area.
- The distance between the opening and adjacent walls.
- Dimensions from the ceiling to the upper border of the opening.
- Type and placement of floor slabs.
There are several ways to strengthen the lintel.
Most popular:
From two channels.
When making an opening in the wall, you can build a prefabricated reinforced concrete lintel, which will consist of two profile corner sections. For this:
- a niche is cleared in places where the corners will rest on both sides;
- a thick layer of cement mortar no lower than grade M100 is applied;
- a reinforced concrete beam is laid;
- after the mortar has set, the voids between the wall and the beam are filled with cement mortar, the grade of which is at least M50.
- after the solution has hardened, the opening can be knocked out;
- wrap it with mesh, as in the photo, and plaster it (see).
How to make an opening in a load-bearing wall
It's easier to make a hole in a brick wall.
Wherein:
- It is enough to remove one row of brickwork
- All remaining rows can be removed without much difficulty.
Reinforced concrete is more difficult to dismantle.
You will need:
- Bulgarian.
- Hammer.
Instructions for cutting the opening:
- The grinder disk is immersed into the wall to its full depth.
- Vertical slits are made in increments of approximately 60 centimeters.
- Horizontal lines are then cut with the same step.
- The resulting cubes are knocked out with a puncher.
- The following layers are removed in the same way.
- If the thickness of the load-bearing wall is standard, such notches are made on both sides. In this case, the internal residue is removed in one cut.
This method is used for internal load-bearing walls located in panel houses. In external load-bearing walls, cutting will need to be done several times on each side.
Final design of the opening
The final completion of the reinforcement of the metal structure is as follows:
- They are connected by welding with transverse channel plates on both sides of the wall. Plates are used with a thickness of at least 4 millimeters and a width of more than 5 centimeters, which depends on the instructions in the developed project and technical specifications.
- The elements are distributed in increments of 30-40 centimeters along the entire perimeter of the completed opening.
- At the same time, the channel is welded in previously inaccessible places until the opening has been cut.
- The inside of the opening is plastered and a reinforcing metal mesh is installed, which will be welded onto the channel.
Main assembly steps
All operations for the production of pigtails are strictly regulated and are usually performed in the following order:
- preparation (marking and cutting) of the corresponding opening;
- its design to match the casing option you have chosen;
- installation of the casing itself;
- installation of a window or door block in it.
Stages of installation of the frame
When preparing the seat, it is necessary to clarify its dimensions, taking into account the distance to the floor level. For windows, in particular, it should be about 80–90 cm. After this, the opening is marked with the obligatory use of the simplest tools for checking - a plumb line and a level.
Depending on the manufacturing technology you choose, the work on designing the opening for the frame includes preparing a groove or ridge in it. The installation of the casing is also carried out taking into account the characteristics of the selected type of casing technology, that is, in compliance with all the rules and assembly procedures for this structure. At the final stage of the work, the window or door block is directly installed in the prepared casing.
Custom shaped window frame
Video
This video shows how to make a casing on a plastic window in a log house:
Watch this video on YouTube
Watch this video on YouTube
Features of choosing a door
Arriving at a furniture store, a potential buyer will be amazed at the variety of models. Externally, the doors look perfect, but inside there may be serious flaws. We are talking about geometric parameters. Even a slight difference in the lengths of the sides of the leaf of 1-2 mm can seriously complicate the installation of the door. If your time and investment are valuable to you, do not be lazy to measure the canvas right in the store
The next stage is purchasing a door frame. Some of them form a single set with doors, but some are sold separately. It is much easier to install interior doors if you purchase a door leaf with a frame from one manufacturer, rather than making the latter yourself.
If it is impossible to buy a box for financial or other reasons, you can create it yourself by purchasing a special timber (boxed). A homemade box will consist of two vertical posts and one horizontal one on top (lintel). The purchased timber should not have knots, unevenness, or roughness. The thickness of the purchased timber is equal to the thickness of the door leaf, otherwise installation will be impossible.