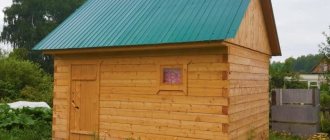
In recent years, stove heating has become very popular. It not only saves money on heating a country home, but is also a colorful addition to the interior decoration. A stone stove is chosen by owners who have good taste and wealth. To build such a system, of course, it is better to invite a specialist, but in the modern world the profession of a stove maker is almost forgotten. Since it is quite difficult to find a master, many owners decide to construct a stone stove with their own hands. How to deal with this, what knowledge, materials, etc. are required? Read about all this below.
What is the difference between a Dutch woman and a Swedish woman, I confuse them
The Dutch oven was created specifically as a heating stove, but now they are making a hob in it. This device is much simpler than a Russian stove: a combustion chamber with a labyrinth of smoke ducts on top. The smoke travels along this winding path for a long time, and thanks to this the heat does not escape. In our country, Dutch was traditionally decorated with tiles - this option is considered a classic.
The Swedish stove is an improved version of the Dutch stove with a vertical system of smoke circulation channels. Swedish scientists optimized it in the mid-18th century by expanding the lower part and adding an oven to the side.
The Swedish oven is the result of careful calculations. With its quite compact size, it warms up quickly, allowing you to cook food, heat the house, etc. The efficiency of the Swedish stove is slightly inferior to that of the Russian stove, but this design requires precise calculations. They drown the Swede twice a day.
Russian brick stove
This is a multifunctional device that everyone is familiar with from children's fairy tales. It has a resting space in the upper part in the form of a couch, where you can sleep fully. In addition to it, a real Russian oven has a cooking chamber, in other words, a firebox. It is arranged under a bed, so it becomes more comfortable to rest in this place. During the fire, this place warms up well.
The cooking space has a vaulted system; bread is baked well inside and dishes that require a long simmer are prepared. A tile is installed near the cooking chamber, and a blower is installed under it, ensuring the continuous process of burning wood. Some also install an additional cavity in the stone oven to keep food hot.
A classic brick oven has the following dimensions:
- Height – 200 centimeters.
- Length – 250 centimeters.
- Width – 150 centimeters.
The impressive dimensions of the stove allow you to heat a space of up to 40 square meters. Perhaps the only and significant drawback of the Russian stove is its high fuel consumption.
Can a fireplace be installed in any room of the house or are there restrictions?
There are a lot of restrictions. It is not allowed on the second floor (usually the ceilings are not designed to support the weight of even a small fireplace), in a regularly shaped room with an area of at least 20 square meters with three-meter ceilings, so that the volume of air is sufficient for normal combustion. But a fireplace that is too small will not be able to heat a large room. For masonry fireplaces there is a rule:
area of the combustion window = 1/50 of the area of the room.
The firebox window should “look” into the middle of the room.
Preparation of material
Any stove is built from brick (a photo of a stone stove can be seen below), so you cannot skimp on this material. There are four types of this stone:
- Hand molding.
- Refractory.
- Ceramic.
- Silicate.
Ceramic bricks are used for facing work. Experts recommend using the M-500 brand; it can withstand constant temperature changes (heating and cooling). Only fire-resistant material is suitable for lining the combustion chamber.
In addition, to build a stone wood stove you will need:
- Sand. It must be completely pure, without impurities. To be safe, it needs to be sifted.
- Clay. The quantity depends on the variety. It is best to use material with normal fat content.
I made a foundation for the fireplace stove, tied to the main tape. Am I right?
No. The stove, like a cat, loves to walk on its own, and the foundations for heating structures must be autonomous. This will protect the foundation from frozen groundwater, movement and any lateral loads.
Exceptions are made in two cases:
- quicksand soil;
- piles.
In the case of an abutment, a soft insert is installed between the furnace foundation and the tape. But not a wooden shield, for example, or sand. The simplest soft insert around the perimeter of the foundation under the stove can be made from a foam plastic board 5 cm thick.
If you nevertheless decide to make a common foundation for the house and the stove, you need to take into account the uneven load and install additional reinforcement in the concrete monolith between the main perimeter and the platform along the foundation of the stove.
Preparing tools
When laying the stove, you will need construction, measuring and auxiliary tools. This list includes:
- Shovel
- Jointing to compact the composition in masonry joints and give them a beautiful appearance. This is only necessary if the stove is not intended to be finished with facing material or plaster.
- Bulgarian.
- A metal sieve with cells no larger than 2 mm.
- Trowel.
- Perforator with mixer attachment.
- Hammer-pick.
- Roulette.
- Plumb.
- Special ruler for the oven.
- Building level.
- Rags, mops, buckets, etc.
Isn't a stove dangerous? A spark falls from the tank, or the wall overheats - and that’s it, there’s a fire!
For safety, fire safety cuts and retreats have long been calculated. Setback is the safe distance of the stove from the wall (the wall must be protected from overheating and fire, and the distance can be either closed or open).
Cutting is performed at the intersection of combustible house structures with a stove or chimney and represents a completely non-combustible space.
You can read more about fire protection using the link at the end of the article.
DIY furnace construction
Regardless of which design of the stone stove is chosen, it must in any case meet fire safety requirements. Therefore, the preparatory stage must be given great importance. And it consists of the following steps:
- Development of a detailed drawing.
- Choosing a location for installing the furnace.
- Selection and purchase of building materials.
- Preparing tools.
- Drawing up an estimate of expected expenses.
One of the most important stages is the preparation of drawings. The final result depends on how well they are done. You can buy a ready-made project from a special organization, developed by specialists, or save money and draw up a diagram yourself based on an example from specialized literature.
When choosing an installation location, the type of room, its area and the type of structure chosen play a huge role. There are a large number of nuances in this process, so experienced specialists recommend that novice craftsmen create a small copy of a stone stove for a bathhouse or home; this will help to understand the intricacies of masonry and eliminate mistakes during the work process.
What you need for work
To make a fireplace for a home, two types of bricks are used: solid and fire-resistant. The inside is laid out last because it can withstand high temperatures. In addition, this type of brick is capable of storing heat for a long time and warms up slowly. For the solution, use a mixture that is sold in special stores or you can make it yourself using clay and sand. The consistency should be like thick sour cream.
If a wood-burning fireplace for a summer house is built with a closed firebox, then you will need doors made of metal and fire-resistant glass. You also need to buy a damper, a vent door and a cleaning door. For the chimney you will need a steel pipe.
Tools include a spatula, a construction level, a grinding machine, a tape measure, a container for mixing the mortar, a trowel, and fittings.
Note! For beginners, when cutting and chopping bricks, it is better to use a grinder with a circle along the concrete thread. Then there will be less waste and translation of material.
As soon as everything for the work has been assembled, they begin installing a wood-burning fireplace for the dacha with their own hands.
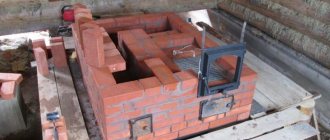
Laying out the oven with your own hands. Styling tips
The principle of stove construction is based on the following steps:
- Preparing the foundation.
- Arrangement of the oven.
- Brick laying in rows according to the chosen pattern.
- Grate arrangement.
- Fitting bricks.
- Installation of the combustion door.
The recommendations of stove masonry professionals include the following:
- The grate in the furnace should be installed without resting on the internal walls. Otherwise, the lattice will expand during heating and the walls will deform.
- The foundation must be provided with waterproofing.
- The base of the foundation should protrude at least 10 cm.
- The oven is usually made in the form of a separate space on the front wall of the oven with a hole for storing equipment.
- The bricks must be adjusted to each other during the laying process. There cannot be gaps between them, since they must reliably block the smoke channel from the rear. Covering the holes with clay will not help. The bricks from the blower must be moved to the side by 3 cm, and the left block is also moved forward 1.5 cm. It is customary to wrap the tank door at all fastening points with asbestos cord in several layers. The fire door is secured with three layers of galvanized wire. Using high-quality bricks significantly reduces the risk of cracks forming.
- Before laying, bricks should be dipped in water and laid on the foundation without mortar to create a sample. This will help check the quality of laying out the corners and walls of the structure under construction. All corners and walls should be made straight and even; for this, a building level is used.
Laying the foundation
The best option is if the foundation was laid in advance, while the house was being built. If there is no ready-made foundation, then the most reliable technique is to dig a pit and fill it with concrete, in accordance with the size of the furnace. After drying, lay out the base of the stone stove for a wood-burning home using bricks. The foundation must be 15–20 cm wider than the structure itself on each side. An indispensable condition is waterproofing, made of two layers of roofing felt laid on a concrete base.
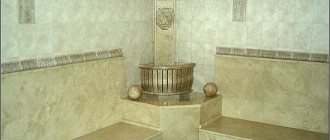
Types of stone for finishing a fireplace
Fireplace made of natural stone
Fireplace cladding is traditionally made from natural or artificial stone. Each material has its own characteristics and you need to know about them.
Cladding the fireplace with artificial stone
A relatively cheap analogue of natural material, made of gypsum and colored concrete. Cladding a fireplace with artificial stone has:
- presentable appearance,
- heat resistance,
- ease of installation,
- relatively light weight.
Of course, a fireplace made of decorative stone will be cheaper, but it is in many ways inferior to its natural counterpart. Finishing a fireplace with artificial stone has the disadvantage of being susceptible to mechanical stress. The cladding is performed using heat-resistant glue.
Fireplaces made of natural stone
The ideal option for all characteristics is fireplaces made of natural stone.
The following types of natural stone are used:
- marble is perfect for interior and exterior decoration, it can be processed well,
- granite is used mainly for exterior decoration,
- slate is distinguished by a variety of colors and durability,
- shell rock has a beautiful porous structure, but is susceptible to mechanical damage,
- rubble stone - a cobblestone that allows you to create the perfect pattern,
- limestone is one of the most common budget options,
- sandstone meets all the requirements for facing fireplaces, gives an oriental flavor to the room,
- Quartzite is highly durable and has a luxurious appearance.
The choice of materials for cladding affects the cost of the fireplace. Granite and marble are expensive; sandstone, rubble, and limestone are good alternatives.
Layout in rows
Don't know how to make a stone oven? You need to study the ordering diagram and understand how many rows your future oven consists of. Let's look at the rules of masonry using an example:
- The maximum gap between seams is 5 mm.
- The first row is laid directly on the foundation.
- After the second row, in the third, a door is installed that will cover the ash pit.
- On the fourth line, a grate device and a container for ash are installed.
- After the fifth and sixth lines, the blower door is fixed.
- After the seventh line in the eighth row a partition is made. It makes it possible to begin laying out the first line of the chimney.
- Rows eight through thirteen are laid out similarly.
- At the fourteenth, the installation of channels begins. The support for the dividing wall is the halves of bricks laid in the 15th row.
- The next three lines are laid according to the same pattern.
- On the 19th line a steam door is installed, the twentieth line is intermediate, and on the twenty-first line the door frame is closed.
- On the 23rd row, the installation of the chimney pipe begins.
Advantages of a stone fireplace
The set of advantages that a stone fireplace has is quite large, and the main one is environmental safety. A portal for a fireplace made of stone creates a favorable atmosphere, a presentable and stylish look.
Stone fireplace
Obvious advantages:
- The fire resistance of stone finishing is reliable and will not lose its visual appeal when exposed to high temperatures.
- High strength. The stone is not subject to damage from external mechanical influence.
- Durability. Even after 100 years, a stone fireplace will not lose its performance and beauty. Over the years, his appearance has not changed.
- The aesthetic appeal of the material allows it to be used in any style, organically complementing it.
- Easy to care for. An important advantage that the stone is endowed with. You can treat the surface with your usual detergents.
Cladding a fireplace with stone is a long-lasting contribution to the attractive surround of your home.
Grouting and jointing
Figure 9. Grouting seams using a ball
For aesthetic and hygienic purposes, the seams are jointed - filled with a durable heat-resistant grout mixture. There are two main options for jointing - using a rubber spatula and using a syringe (or its replacement - a regular bag with a hole).
The trowel is suitable in situations with smooth stone and thin joints. Wide joints and porous tiles are the reason to turn to another option.
The process of jointing with a spatula:
- the grout is applied with a spatula using diagonal (relative to the joints) movements;
- the fugue should fill at least 2/3 of the seam thickness;
- without allowing the grout to set, its excess is removed from the surface of the stone, and a fugue at the joints is formed using a finger or, for example, a piece of wire;
- The coating is polished using a foam sponge.
The process of jointing using a bag:
- You should fill a strong cellophane bag with the mixture and cut off one corner; it turned out to be an analogue of a syringe, with which the grout can be squeezed into the seam;
- avoiding the fugue getting on the surface of the stone, fill the joints with it;
- after filling a certain area, the joints are embroidered in the same way - using a round object of suitable diameter.
Conclusion
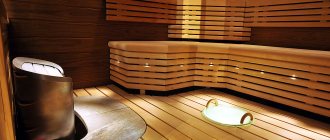
Heater in the steam room - both spirit and temperature
Currently, a large number of methods for heating a bath are offered, but only a stone stove lasts longer and brings more benefits. Our portal offers you additional information on this topic, and the video in this article will examine in detail all the nuances that we discussed in this material.
Did you like the article? Subscribe to our Yandex.Zen channel