The option to build a bathhouse from 3x4 timber with your own hands is a reasonable solution to get a place for relaxation and washing procedures in a limited space. Construction from lumber will not cause difficulties even for people without special skills. If you follow the sequence of construction stages, you can complete the work in 1-2 months, depending on the type of foundation.
Advantages of a bathhouse measuring 3x4 m
Building a bathhouse from 3x4 timber with your own hands is an undertaking that does not require large budget expenditures or the involvement of heavy construction equipment. With the help of a competent project and high-quality materials, 1-2 adult men can raise a structure in a few weeks.
Choosing a wooden block as a building material makes the process of assembling the box no more difficult than a children's construction set. The correct geometric shape makes it easy to construct elements into crowns. With reliable fasteners, construction of a high-quality foundation and insulation work, your own bathhouse will last at least 20 years with timely repairs and maintenance.
The construction of a bathhouse with dimensions of 3 by 4 m from timber material is characterized by the following advantages:
- The building area is only 13 sq. m. m with allowances for foundation protrusions and roof slopes;
- possibility of construction in limited space;
- a full-fledged building for washing and resting for 2 adults or 1 adult and 2 children;
- the ability to organize a separate steam room, washing room and dressing room;
- speed of construction;
- low consumption of materials;
- there is no need to install a strong foundation;
- It’s easier and faster to insulate, decorate, warm, and dry a small room.
The wood from which it is planned to build a mini-sauna complex on your own site is an environmentally friendly and affordable material. Thermal procedures in a room built from timber have a beneficial effect on the overall tone of the body, strengthen the immune system, have a healing effect on the pulmonary system and skin, and promote recovery from colds.
Video: Bathhouse 3 by 3 Classic Russian bathhouse in Kazan
Materials
Any material that is most available in the area where the building will be erected is suitable for construction. In Siberia, it may be cheaper to order logs from nearby sawmills. In steppe regions, buildings made of foam blocks are in great demand.
In the southern regions, bathhouses are made of frames, filling the interior space with clay mixed with straw. But, of course, nothing compares to a wooden structure.
A frame bathhouse is placed on a strip foundation; 100x100 cm timber is used for the building material. A log bathhouse is a classic of Russian architecture. The logs must first lie down and dry; during construction, insulation is used, for example, forest moss. It is difficult to lift a log house on your own; additional workers will be needed.
An excellent option is a rounded log. Beauty and quality speak for themselves. The big advantage is the absence of the need for external and internal finishing. Construction from profiled or laminated timber is the most successful option, but its cost is higher than from logs.
Profiled timber does not require additional insulation, since the grooves tightly close the surfaces, preventing heat leakage.
They also build baths from brick, but this requires special knowledge. An inexperienced builder will not be able to build a brick box efficiently and beautifully. The box itself turns out to be heavy, so the foundation is reinforced with reinforcement.
Peculiarities
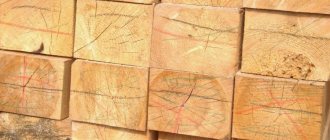
When building a compact bathhouse, use standard lumber - planed timber with a length of each product of 6 m. Manufacturers produce wooden products processed on four sides of this particular molding. When erecting walls 3 m wide, the timber will only need to be cut in half, which will speed up the construction process and make the work easier.
Important!
To comply with fire and sanitary safety, ensure the recommended distance from the facility to the adjacent territory and buildings. There must be at least 1 m between the fence and the bathhouse, and at least 15 m from neighboring buildings.
Before starting construction work and design, check out the photos of finished baths measuring 3 by 4 to choose the option that suits you. After choosing a building model, the design and construction stages will not be difficult. Due to the compactness of the bathhouse complex, carefully consider the layout of the premises, the location of the heating stove, window openings, and entrance groups.
Where is the best place to place the sink?
In a one-story 3 by 3 bathhouse with an area of 9 square meters, everything must be placed as conveniently and compactly as possible so that everyone is comfortable and the premises function according to all the rules. It is better to combine a room with a sink with a steam compartment. To make washing more convenient, it is better to attach an additional insulated dressing room to the bathhouse.
The bathhouse can be equipped to the highest standard without going beyond the planned budget.
Bathhouse 3x4 m: basic information about the project
The construction of a dacha mini-complex is classified as the construction of outbuildings on a private plot and is regulated by the state-approved document SNiP 30-02-97. Study building and sanitary standards before choosing a place to build a structure to ensure fire and hygienic safety.
You need to build your own bathhouse on the most suitable territory. To do this, you need to analyze the following aspects:
- soil type. Choose non-swampy, flat areas for construction. The choice of type of foundation layer depends on the nature of the soil;
- depth of the aquifer. Assess the area after snow melts and when groundwater levels drop. The foundation must not be washed away;
- climatic features of your region. Analyze the freezing depth of the soil substrate, the threat of flooding and seismic activity to select a reliable foundation for construction that will ensure long-term operation of the building;
- location relative to other objects on a summer cottage or private plot. Draining water from a bathhouse, drawing water, heating requires compliance with sanitary and fire safety;
- electrification. The supply of electricity must be carried out from a common panel that supplies a residential or country house and other objects on your territory;
- harmony with the overall landscape of the site. Ensure that the building fits organically into the overall appearance of the territory, its appearance is combined with neighboring objects.
The architectural aspect of construction in the area where your site is located plays a big role. When constructing a bathhouse on residential land, it is necessary to coordinate the upcoming construction activities and obtain permission from state administrative bodies before the construction process.
Selecting a location and marking
Marking the site Before starting work, you need to choose a place to build a bathhouse. It’s worth saying here that the 3x4 meter option is a fairly compact option and there shouldn’t be any problems with it. Such a bathhouse can be installed even in a small summer cottage. The only thing that needs to be taken care of in any case is water drainage. It is best if the bathhouse drain pipe is connected to a centralized sewer system, but you can get by with a septic tank or a ditch, depending on the situation.
The marking of the site for construction also needs to be taken responsibly. In simple terms, on the site proposed for construction, it is necessary to mark a 3x4 meter rectangle. To do this, you can take, for example, pieces of reinforcement and some kind of cord. First, two pieces of reinforcement are hammered in so that the distance between them is equal to the length of the larger wall and a rope is pulled from one of them to the other. Next, taking into account all the required dimensions, two more stakes are driven in and, by analogy, the outer side of the perimeter of the future foundation is designated. In order to make sure that the work is carried out correctly, it is necessary to connect the diagonally located stakes and compare the length of the ropes. When the work is done correctly, the diagonals coincide. Then, stepping back from the marking lines to the width of the future foundation, it is necessary to similarly mark the internal perimeter.
Nuances of designing basic elements
A project for the construction of a small-sized bathhouse is one of the most important documents, according to which you can systematically carry out construction processes, calculate the amount of materials, obtain a construction permit, and register the constructed structure for cadastral registration.
Proper planning of a small-sized building will allow you to obtain a large usable area and provide for all the necessary aspects. At the design stage, it is necessary to take into account all the points in order to organize consistent construction without missing deadlines.
Project
Designing your own bathhouse is an important link in the chain of construction processes. Create a competent project yourself or take ready-made options. Complete your sketch using special computer drawing programs or draw it on paper. For the drawing, take millimeter or checkered sheets and draw according to scale.
The project for which construction work is planned will require the following types:
- lateral view;
- front view;
- view from above;
- sectional view;
- view in three planes.
On all projections, indicate the dimensions of all elements - foundation, walls, rafter system, location and dimensions of windows, doors, heating stove, shelves. A well-drawn project will help to accurately calculate the estimate and become a plan for completing the work.
Foundation
A timber structure with dimensions of 3 by 4 m does not require the organization of a powerful foundation. Wooden building with an area of 12 sq. m of timber weighs from 2 to 3 tons, depending on the stage of drying of the lumber and the weight of the roof. The foundation must ensure reliable immobility of the structure. This is the main condition that will increase the service life of the building.
To build a small-sized bathhouse, the following types of foundation are used:
- monolithic filling. Dig a rectangular pit on the site with a depth of 30-40 cm, a length of 4.5 m and a width of 3.5 m. Equip the formwork from boards at a distance of 20-30 cm above the ground surface, fill the bottom with a cushion of stove and gravel, organize drainage , fill the space with concrete using M200 or M250 cement. Depending on weather conditions, it will take from 2 to 4 weeks to dry the base;
- strip base. Organize the excavation of a trench for the bathhouse foundation, repeating the perimeter of the structure being erected, 30-40 cm wide and 30-35 cm deep. Put together a formwork structure from plywood or boards with the walls rising 20-30 cm above the ground surface. Equip a drainage drain or pipe drainage for cleaning water . Fill the formwork space with a mixture of cement, sand and water. Use a cement composition of at least grade M200. To strengthen the structure, use reinforcement, pour broken bricks, stones, and coarse crushed stones into the concrete composition. It will take up to 3 weeks to dry the foundation tape;
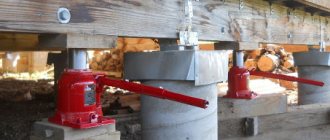
- block foundation. Level the site for construction, dig at the planned corners of the bathhouse, as well as in the middle of the length and width of the perimeter, recesses for concrete blocks. Fill the bottom of the holes with a sand and gravel cushion 10-15 cm high, lay stone elements, and compact with soil. Make sure that the level of all block racks is the same;
- pile-screw field. Make markings on the soil substrate for installation of screw support piles. Install screw-type steel supports at the corners of the building, as well as one post under each wall. When planning to build load-bearing walls inside the box, consider installing a screw pile in the middle.
Important!
At the stage of organizing the foundation for the bathhouse, provide for the removal of waste water from the washing compartment. The base must not be washed away.
When building a bathhouse with a heavy brick heating stove, consider pouring a separate foundation. In accordance with the project, make a mark on the ground in the place where the heating unit will be installed, dig a recess, organize pouring concrete formwork or placing blocks.
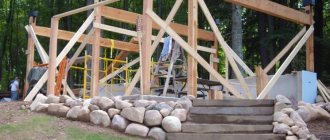
Walls
After the foundation work, begin constructing the timber box. Make a powerful tier on the base from timber of a larger cross-section than that used for the walls. Place a grillage on the pile-screw field.
Assemble the frame in the following sequence:
- lay a waterproofing layer (for example, roofing felt) on top of the foundation row;
- for the first crown, use a wooden block 200 x 200 mm or 300 x 200 mm. The first row will bear the heaviest load of the log house, so the use of thicker material is required. Treat the laid tier with antiseptics, impregnations that protect against fungus, rodents, and insects;
- lay walls from timber, collecting right angles or organizing removal. Please note that the added corner elements will require more lumber;
- between the tiers, lay insulation - jute tape or moss;
- secure the rows together with dowels;
- To save money, immediately take into account the location of windows and doors.
| Bar height, mm | 150 | 200 | 250 | 300 |
| Number of tiers | 17 | 13 | 10 | 8 |
| Number of bars | 40 | 30 | 23 | 19 |
The standard height of the box must be at least 2.5 m. The number of rows of timber depends on the selected section of lumber. To assemble a 3 x 4 log house you will need at least 6-7 cubes.
Partitions
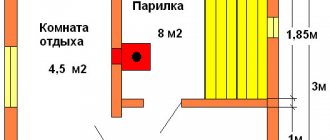
Partition structures that delimit rooms inside a log house can be made from wooden blocks of a smaller cross-section, boards, or using frame technologies. The bath space should be divided into:
- dressing room or rest room (2 by 2 m);
- washing room (1 by 2 m);
- steam room (2 by 3 m).
There is no need to construct additional load-bearing walls due to the small size of the building. The construction of solid partitions will reduce the usable area. Divide the space inside the bathhouse in compliance with tightness and fire safety to ensure complete washing procedures with rest.
Roofing system
For a small bathhouse, you can build a roof with one or two slopes. For construction, you will need an unedged board with a thickness of at least 5 cm for installing rafters, lumber of at least 2 cm for organizing the sheathing.
Install the roofing system as follows:
- Build rafters above the log house in increments of 0.7-1 m;
- Install a sheathing on top of the rafter elements, laying boards every 25-30 cm;
- secure the rafter spans with crossbars;
- lay a waterproofing layer on the sheathing;
- Lay roofing materials (slate, ondulin, corrugated sheets, tiles, etc.) on top of the waterproofing.
Provide an outlet for the chimney pipe in the roof. Equip all elements of the rafter system with reliable metal fasteners and corners. When installing roofing material, use hardware with polymer washers. After shrinking the frame, sew up the gables with boards or OSB panels.
Floors and ceilings
After assembling the box and erecting the rafter system, proceed to laying the floor. For high-quality insulation and tightness, you will need to build logs, a subfloor and a finishing coating. Provide for drainage of waste water in the washing compartment. Install a drainage ditch or pipeline under the washing area to remove wastewater from the structure.
Assemble the floor in the following sequence:
- on the protrusion of the lower tier, in specially cut recesses, lay logs with a thickness of at least 5-7 cm and a pitch of 0.5-0.7 m;
- lay a rough board under the joists, forming a continuous covering;
- lay waterproofing over the subfloor;
- put insulation (stone wool, polystyrene foam boards, etc.) in the spans between the joists;
- sew up the insulating layer with waterproofing;
- Finish with a planed floorboard.
In the washing compartment, provide a cover that reliably protects wooden materials from waste water. You can make a concrete screed under the final flooring. When covering the floor with washable tiles, arrange a slope of 3-5 degrees with the collection of wastewater into the pipeline.
Construct ceilings immediately with an insulating layer. Place logs on the top crown, and sew them up with clapboard from the inside of the room. Cover the top of the finishing in the attic with a layer of waterproofing, lay fireproof insulation on top, and cover it with a waterproofing layer. Place an unedged board on top of the insulating “pie”. Cover the smoke exhaust pipe with fire-resistant materials.
Windows and doors
Install entrance groups and window frames after shrinking the assembled box. It will take at least 1 year to completely dry the timber and stop deformation processes.
For a small bathhouse, you can install a window only in the washroom with dimensions of 50 x 50 cm or in the recreation room with dimensions of 70 x 70 cm. Due to the low temperature in the washing room, it is possible to use PVC structures. Wooden window elements will need to be treated against moisture. It is not advisable to install windows in a steam room due to the possibility of heat leakage.
Important!
When installing window frames and door structures, use fireproof foam to fill voids.
Install doors between rooms from solid aspen or larch. Use door handles with wooden linings to eliminate the risk of burns when touching metal elements. The bathhouse will require an entrance door (wooden or metal) and two entrance groups for a washing room and a steam room.
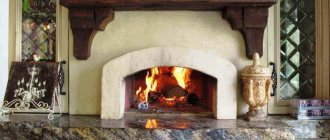
Bake
To heat a small wash room and steam room, you will need a small heating stove heated with wood. Choose compact options to get more usable space, ensure fire safety and avoid burns. Provide proper removal of smoke from the room.
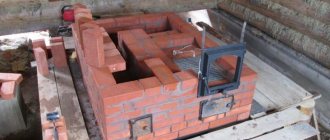
For a bath measuring 3 by 4 m, you can install:
- a brick oven with one wall removed to the washing compartment. To build a heating structure made of bricks, the foundation will need to be poured in advance;
- homemade stove from a barrel. The unit inside must be divided into compartments for combustion, smoke removal, water heating, and ash collection. When using bricks inside a structure, consider constructing a free-standing foundation;
- a finished metal stove made of steel or cast iron. Installation of factory models does not require installation of a base.
A sauna stove must perform several functions - heat the room, water, stones to create steam. Depending on the option chosen, provide fire protection for wooden elements. A flood sheet must be installed in front of the stove, and the walls adjacent to the structure must be covered with asbestos or metal. For the chimney, choose stainless steel pipes.
Wall cladding
Wall cladding
Let's start with the internal ones. For the steam room and washing room, you need to use only natural lining; for the rest room, you can use any other materials, from plywood or OSB to plastic lining. Let’s look at cladding technology using lining as an example; it’s easier to work with all other materials.
Prices for lining
lining
Preparing the supporting frame and installing the lining
This is an important operation and requires great care. For the frame, use 20x50 mm slats, make preliminary markings. The wall must be level, all large bulges must be eliminated.
Step 1. Nail the outer slats at the corners to a level, stretch a rope between them and install the remaining slats along it, the distance between them is 40÷50 cm.
Step 2. Check the distance between the floor and ceiling at the corners of the bathhouse. If there is a difference, eliminate it using the first and last rows of lining. Leave small gaps (1÷2 cm) between the lining, floor and ceiling. The gaps will be covered with baseboards. Nail ceiling plinths (baguettes) to the lining, and not to the ceiling, otherwise, during fluctuations in the size of the walls, deformation of the cladding is possible.
Step 3. To fix the lining, use nails 1.5÷2 cm long, you need to drive them into the groove of the lining.
For external cladding, you can use any materials; the stages of work are normal. If the bathhouse is small and cheap, choose inexpensive materials. Modern construction technologies allow them to be made beautiful and of good quality. Windows and doors are finished with platbands.
Cladding inside the bathhouse
Steam room lined with clapboard
Finishing direction Illustration Basic information Vertical
Vertical fastening of the lining
Vertical fastening of panels has a big drawback - the boards heat up unevenly along their length, which negatively affects their service life. Vertical cladding is optimally suited for steam rooms operated primarily in conditions of high temperature and low air humidity, i.e. in sauna mode. To ensure more efficient air circulation in the space between the insulation and the lining, several holes are usually drilled in the sheathing. Horizontal
Horizontal
In the case of a horizontal arrangement, temperature deformations of the lining material will be much less noticeable. Horizontally oriented finishing allows you to visually expand a small steam room. When the panels are fastened horizontally behind them, more efficient air circulation will be ensured - in this situation, the sheathing will be attached to a vertically oriented frame, as a result of which the gap will also be vertical. In addition, with this orientation of the frame it will be much more difficult for rodents to get into the space behind the skin. Horizontal lining is attached much faster and easier than vertical
Important! If you decide to orient the trim panels horizontally, make sure that the groove “looks” down.
Materials for building a bathhouse
To build your own mini-sauna complex you will need the following materials:
- materials for the base (concrete, formwork, brick, blocks, screw piles) depending on the selected type;
- a block of wood with a cross section of 20 x 20 or 30 x 30;
- wooden beams for walls with a cross section of 15 cm;
- lumber for partitions - a block with a section of 10 x 10;
- logs for the floor, rafters and ceiling with a thickness of at least 5 cm;
- unedged board for the subfloor, sheathing and ceiling, at least 2 cm thick;
- waterproofing;
- insulation material (stone or mineral wool, polystyrene foam, fiberglass, etc.);
- lining for interior decoration;
- edged boards for floors, ceilings, installation of shelves;
- 1 entrance and 2 internal doors;
- window;
- fittings (hinges, handles, latches, locks);
- fasteners (pins, nails, screws, rubber washers);
- metal sheet for fire safety;
- electrical wiring protected from moisture;
- heat- and moisture-resistant lighting fixtures;
- antiseptic;
- polyurethane foam;
- jute or moss for insulating a log house;
- roofing materials.
Wooden materials for high-temperature rooms should not release resin. Choose aspen lumber for finishing the steam room. Use coniferous wood in the wash room or rest room.
Foundation
We choose columnar concrete.
| Step, No. | Description |
| Marking the external contour of the foundation How to mark a columnar foundation | We make markings on the ground. In plan, the dimensions of the bathhouse are 3x3 meters, the distance between the columns is 1.5 meters. The partition between the rooms is not load-bearing; there is no need to build a foundation underneath it. Drive pegs around the perimeter and stretch ropes between them. Along the ropes, mark the position of the intermediate posts. |
| Step 2. Hole for a columnar base with a sand cushion | Dig holes 50–60 cm deep, approximately 40 cm wide, and at the bottom make a sand cushion 15–20 cm thick. |
| Step 3. Pouring concrete | If the soil is clayey, there is no need to make formwork; pour concrete directly into the holes. Give the concrete time to set approximately two weeks. |
| Step 4. Columnar foundation for the furnace in two versions Foundation for a stove in a bathhouse | Mark the location of the stove; according to our project, it will be located between the combined steam room with a washing room and the rest room - this location will allow you to heat two rooms at once. You need to make a deeper foundation for the stove, preferably to the depth of soil freezing. But if the stove is not very complex and massive, then a depth of 1 m is enough, make a sand cushion 25-30 cm thick. If you are still afraid that the foundation may “undermine” in winter, lay foam plastic slabs 2-3 cm thick around the perimeter of the pit. They will absorb the swelling forces, the foundation will remain motionless under any climatic conditions. How to lay a stove is a large and interesting topic; a separate article is needed to consider it. |
| Step 4. Laying the posts | We recommend not pouring them, but walling them with concrete blocks measuring 20x30x60 mm. First, level the concrete a little at the base, use a hydraulic level and cement-sand mortar for this. Next, place the outermost column, use a cement-sand mortar to level it in height and place intermediate columns. At the same time, use blocks to “pull up” the foundation under the stove; it should be higher than the columns by the height of the beams, floor beams and floorboards. |
Columnar foundation (with the first crown)
Work order
Consistent execution of construction processes is necessary to obtain a reliable structure that will last at least 20 years. Check out the step-by-step construction of the bathhouse in the video, which shows the main points of the construction of the structure.
The process of building a bathhouse consists of the following important steps:
- drafting;
- obtaining permission to construct a facility (for construction work on urban lands);
- calculation of construction materials estimates;
- purchasing everything necessary;
- preparation and marking of the territory;
- arrangement of a drainage pit or wastewater disposal structures;
- organization of the foundation, including for a heating stove;
- assembling a box from timber;
- construction of a rafter system;
- roof installation;
- building shrinkage;
- installing doors, windows, installing a stove;
- electrification works;
- construction of shelves, static structures;
- finishing activities.
Consistent implementation of all activities will allow you to independently build a small bathhouse for comfortable relaxation and washing procedures in a short time. Pay attention to every step to satisfy all requests. Subsequently, you can add a veranda, porch, or terrace to the structure.
Useful tips
- A bathhouse with an area of 9 square meters is preferable for small areas. It is easy to place it on an already inhabited area. The main rule is distance from flammable objects and wooden buildings. Bushes and trees, on the contrary, will not suffer from such a neighborhood. The adjacent area can be used for planting non-capricious crops that love shading, high humidity and are not afraid of slight temperature changes.
- Often they try to increase the usable area of the steam room by abandoning the classic benches. However, you can sit comfortably indoors only if the length of the tier is at least 2.2 meters. A person must fit here at full height. It is quite possible to reduce the width of the bench or its height. The more ledges, the greater the opportunities for bathhouse visitors. Even without a temperature controller, you can find a suitable zone for everyone.
- Wooden baths are often imagined as a building made of rounded timber, inside of which the circles of huge logs are clearly visible. However, this option is not very practical in the case of a small area. Such reliefs hide useful space, and visually create a not very pleasant oppressive effect. Therefore, it is better to choose straight lines and finishing materials with a small cross-section.
- Building a 3x3 bathhouse is not an easy task. It’s easy to find a place for a building on any site; you don’t have to think about investing in a capital foundation. However, the layout of the interior space and the choice of materials can cause difficulties. A successful bathhouse with a hot steam room, a comfortable relaxation area and a convenient washroom can be built from wood, brick and even expanded clay.
Frame bathhouse with attic
A fairly large building with two floors, in which the second floor is occupied by a spacious lounge with a bed. If you wish, you can arrange the upper room differently - put a sofa and billiards.
Frame building with attic.
On the ground floor there is a steam room, a shower room, a small relaxation room with a staircase to the second floor and an open veranda. The dimensions of the external walls of the building are 5x7 m. Dimensions of the internal rooms:
- Steam room – 2.5x2.5 m.
- Shower room – 2.5x2.5 m.
- The room on the first floor is 5x4.5 m.
- The room on the second floor is 5x5 m.
- The dimensions of the veranda are 2x4 m.
The design of a frame bathhouse with an attic provides for a reinforced frame, compared to single-story frame walls. For this purpose, the number of frame supports has been increased while maintaining their dimensions of 150x50 mm. The above projects can be used both for doing the work yourself and for ordering a turnkey frame bathhouse from a construction company.
Flooring
When the walls are ready, you need to lay the floor. To do this, you can take an edged board about 3–5 cm thick. If the height of the foundation is small, and this is the best way to do it, then the floor can be made on logs. We must not forget that the wooden materials that will be used for the internal surfaces of the washing room, and especially the steam room, must be chosen from hardwood, in addition, they must be treated with antiseptic and water-repellent compounds.
Sources
- https://banya-expert.com/proekti-ban/proekty-ban-iz-brusa-3×4-chertezh.html
- https://kaksdelatbanyu.ru/banya-iz-brusa-3-4-svoimi-rukami/
- https://dekoriko.ru/banya/proekty/3-na-4/
- https://9ban.ru/planirovki/361-planirovka-bani-3h4
Finishing
A frame bath should not only be strong, reliable and durable, but also beautiful. To give the object the necessary external qualities, appropriate finishing work is carried out. It is recommended to cover the outside of the frame bathhouse with boards made of hardwood. Place a layer of moisture-proofing material and insulation under the sheathing.
Bathhouse finishing with wood
The internal lining of the bathhouse will provide additional protection of the building elements from adverse influences. So, the same OSB is suitable for assembling a rough ceiling. Attach them to the floor beams on the room side. Coniferous lining is perfect for interior wall cladding.
The heart of any sauna is the stove. The installation of this element must be carried out in accordance with fire safety requirements. As a rule, a standard system is used, according to which a heating boiler is placed in the dressing room, and a heater stove is installed directly in the steam room.
Divide the resulting frame structure into zones in accordance with the previously prepared project. Select the material for partitions in accordance with the conditions of a particular room. For example, a billiard room and a recreation room can be separated even by ordinary plasterboard partitions made of moisture-resistant sheets.
Those walls that will be exposed to moisture and/or high temperature must be laid out of more resistant materials, usually brick. Cover the partitions with clapboard, blockhouse or other similar material. Cladding will give the walls a more attractive appearance.
Frame bathhouse - the most suitable solution in modern conditions
Thus, there is nothing complicated in building a frame bathhouse yourself. Having spent relatively little money and time, you will get a reliable, safe, durable and generally excellent design in terms of its performance properties.
Good luck!