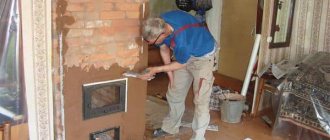
Why do you need to plaster a stove?
Any oven is based on a frame made of metal, bricks or clay. Fireplaces, unlike stoves, are also made of stone or concrete. All of these materials have different thermal conductivity and coefficient of thermal expansion, unequal service life, and differ in aesthetic properties. If the structure is not covered with a layer of finishing material on top, it can quickly lose its strength and attractiveness.
Without plastering or another type of finishing, over time the masonry joints will begin to crack. The same thing happens with the clay walls of the oven - a network of cracks appears on them, which will have to be covered regularly. The absence of a plaster layer leads to the penetration of smoke and soot through cracks and their settling on the walls of the house and furniture, which spoils the environment and pollutes the air.
Other purposes for which it is recommended to use stove plaster:
- increasing the strength of the entire structure and its resistance to destruction;
- optimization of heat transfer and improvement of thermal insulation;
- increasing the safety of using the stove;
- ensuring the tightness and durability of the masonry;
- giving the structure a neat, neat appearance or changing the design of the stove to suit the new interior.
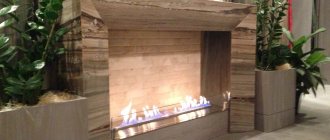
As for decorative fireplaces, their plastering is carried out primarily for aesthetic purposes. Typically, marble plaster for the fireplace, Venetian plaster or composition with the “travertine” effect are used. If the fireplace has an exhaust system and is actually used to heat the room, modern heat-resistant plasters are used for its cladding, which have many advantages:
- ease of application, low consumption;
- increased fire safety, non-flammability;
- high adhesion to any materials;
- increasing the heat capacity of the fireplace, long-term heat retention.
Fireplace finishing with marble plaster
Briefly about the main thing
The problem of how to plaster a stove to prevent it from cracking can be solved in different ways, using various compositions based on cement, clay, gypsum, asbestos or lime.
The main requirements for leveling materials: elasticity, heat resistance, safety, mechanical strength and low thermal expansion.
The plastering itself is carried out in two ways: a reinforcing mesh made of steel or fiberglass is attached to the walls, or environmentally friendly fibers are added to the solution.
The consistency of the prepared mass depends on the purpose: roughing and grouting - liquid, leveling - like cottage cheese, for installing profiles - thick. At the same time, at each stage of work it is important to comply with the permissible standards regarding the layer. Enlargement causes improper drying, flaking and cracking.
Ratings 0
Features of mixtures for plastering stoves and fireplaces
Not every building mixture is suitable as plaster for a stove. It must meet a number of requirements, otherwise it will quickly become unusable, since it is operated in extreme conditions. There is a large temperature difference inside the furnace and on its surface during combustion, and after cooling there is a sharp temperature drop. As a result, the plaster regularly expands and contracts, and in the absence of certain properties it begins to become covered with cracks.
Only special heat-resistant plaster with high elasticity will not deteriorate from such operating conditions. The material should easily withstand temperature changes, adhere securely to the base and not crumble. It is important that the heat-resistant plaster is environmentally friendly, without the admixture of toxic components, drying oil, or oil paints. When heated, harmful substances will decompose and have a negative effect on the body of residents.
Heat-resistant mixtures are used for finishing fireplaces and stoves
Advantages and disadvantages
One of the main advantages of heat-resistant plaster is its affordable cost, although due to the reinforced composition it will be a little more expensive than conventional building materials. But it has much more advantages:
- Good adhesion to any substrate;
- Resistance to cracking due to thermal expansion;
- Fire safety;
- Environmentally friendly (if the composition does not contain asbestos fiber).
This material has the only drawback - it is undesirable to use it as a finishing material. And although this is possible in principle, a boring gray color will require at least whitewashing the leveled surface, or better yet, covering it with tiles or decorative stone.
How to plaster a stove without cracks
In order for the plaster coating of the furnace to serve for a long time and not give shrinkage cracks, it must adequately respond to the process of expansion of the furnace when heated. Of all the compositions existing on the construction market, several types of clay-based products meet this requirement. In addition to clay of a certain fat content, gypsum is suitable for this purpose, but it is used much less frequently, since it also cracks without the introduction of certain additives. It is better to use gypsum as an additional binder in a ready-made clay mortar to speed up its setting and drying time.
In addition to gypsum, asbestos fiber is used as additives to clay. It helps make the plaster more flexible and durable, resistant to moisture and fireproof. This component can be added to any oven finishing product, regardless of its other composition. Instead of asbestos fiber, cheaper straw chaff is sometimes used.
Fireproof compositions for plaster
Clay-sand mixture
The most inexpensive and popular mortar for plastering stoves is clay-sand. The main raw material - clay for plaster - can be collected independently and completely free of charge if there is a quarry nearby. The main thing is that it is clean, without debris, grass, roots and other impurities. Typically, 2 parts sand are added to 1 part clay; if desired, 1/10 part asbestos is added.
The finished plaster is quite plastic, easy to apply to surfaces, and can be easily repaired if damaged. The mass is considered practically waste-free, because it can be removed, soaked and reapplied. The plaster is non-flammable, 100% environmentally friendly, and vapor permeable.
The thermal conductivity of the mixture is low, so it retains the heat of the oven for a long time. The clay hardens quite slowly, which allows you to work with it without much haste (this is very important for beginners). The disadvantages of this type of mixture for plastering stoves include the need to apply a fairly thick layer. If it is less than 1 centimeter, it will gradually fall off.
Cement-clay-sand mixture
This fire-resistant plaster has a more complex composition, but the finished coating is even stronger and more reliable. First, cement is mixed with sand (1:4-1:8), mixed well and paste-like clay is added until the mass of the desired consistency is obtained. This type of plaster is less easy to install than regular clay plaster, but lasts longer. To further enhance its strength characteristics, 1 part of liquid glass is added to the composition. As a result, the plaster layer will not be susceptible to cracks at all.
Lime-clay-sand plaster
Adding lime to a clay-sand mortar provides increased adhesion, strength, ductility, as well as resistance to cracking and biodeterioration. Usually, to make plaster, slaked lime (1 part) is added to the finished clay-sand composition (2 parts). To improve properties, it is allowed to introduce 1/10 of asbestos fiber. The use of such plaster will be even more effective if, instead of ordinary clay, it is made on the basis of fireclay, which is obtained by firing kaolin at a temperature of about +1500 degrees with further grinding.
Self-preparation of the solution
Heat-resistant plaster can be prepared from the following materials:
- cement is used to increase the strength and adhesion of the mortar, you need to take a little of it;
- clay is the main ingredient responsible for thermal conductivity, it should be relatively dry and non-greasy;
- sand is used to increase strength;
- lime acts as a plasticizer; it is prepared in advance;
- fiberglass or asbestos is used if it is necessary to achieve high strength with thick layers.
Heat-resistant plaster is mixed in different proportions . The simplest and most effective DIY preparations are:
- For 2 parts sand take 1 part clay and 0.2 parts asbestos;
- 2 parts sand, 1 part lime, 1 part clay, 0.1 part asbestos;
- 2 parts sand, 1 part clay, 1 part cement and 0.1 parts asbestos.
Valera
The voice of the construction guru
Ask a Question
When preparing the mixture, you first need to grind the clay and add water to it. Leave to infuse for 24 hours, then drain off the remaining liquid. After adding the remaining ingredients, mix thoroughly using a construction mixer. If the plaster is too dry, add water. The finished product is passed through a sieve.
Popular ready-mixes
In construction stores you can find ready-made plasters, sold in the form of dry construction mixtures and ideal for finishing stoves:
- Plaster for stoves and fireplaces “Pechnik”. It is fire-resistant up to +600 degrees, made on the basis of clay, sand, cement, gypsum, mineral and polymer additives. Has low consumption - only 1 kg/1.4-1.5 sq. m.
- Plitonit "Superfireplace Fireproof". Suitable for plastering stoves and fireplaces made of brick, since it is close to this material in terms of thermal expansion coefficient. Made on the basis of clay, cement and heat-resistant fibers. Characterized by high moisture-holding capacity.
- The Terracotta mixture is heat-resistant. Mineral plaster based on kaolin clay with a smooth texture, applied in a layer of 2.5-8 mm. Terracotta plaster can withstand heating up to +400 degrees, so it is excellent for finishing and leveling stoves, fireplaces, barbecues, and barbecue areas.
- Modeling plaster TSP-4. Contains mineral granules 0.5-1 mm in size, designed specifically for plastering stoves with the last (finishing) layer. Ideal for thin layer finishing. Withstands heating up to +200 degrees. It is highly resistant to cracking due to the presence of liquid glass.
- Plaster for fireplace KODRU. It is not afraid of heating up to +1270 degrees, does not shrink and does not crack. Due to its high elasticity, it is suitable for any heated areas, including stoves, fireplaces, and pipes.
Fireproof mixtures for fireplaces KODRU
General characteristics of heat-resistant adhesives for ovens
The main factor that determines the name of these materials is operation in high temperature conditions, sometimes in direct contact with fire. When used at high temperatures, heat-resistant adhesive must not only resist destruction, but also maintain its functionality.
General requirements for adhesives intended for furnace construction:
- sufficient resistance to high temperatures for a specific purpose;
- safety – absence of harmful emissions into the air;
- sufficient adhesion with high elasticity of the hardened mixture - to effectively neutralize temperature deformations of the furnace materials;
- ease of installation - optimal consistency, durability and curing time.
Homemade oven plaster mortar
If you wish, you can make plaster for the stove yourself. It is only important to properly prepare the clay in advance. The raw materials are soaked in water for 5 days, then washed again, removing any floating debris. Then do the following:
- the water is finally drained, but if there is small debris left in the clay, it is first filtered through a sieve;
- mix the clay until smooth, remove any lumps (they will cause cracks);
- River sand is prepared separately - sifted, washed, dried;
- fluff up asbestos, prepare milk from lime by mixing with water (if these additives are planned to be added to the plaster);
- connect the main components together, add water until you get plaster with the desired texture (like thick sour cream).
Experienced plasterers add table salt to the finished composition - 200 g per bucket of finished plaster. Salt prevents the solution from cracking, slightly slows down the hardening of the mass, and allows the coating to dry evenly. If the stove is heated with coal or peat briquettes, it is advisable to add a little fireclay clay to the plaster, which will give the mixture additional heat resistance.
How to prepare a simple solution
Clay mortar for plastering
In the process of preparing the mixture for finishing the stove, it is important to maintain the exact proportions of the components included in the composition. In a simple solution, one part of the composition falls on clay, two parts on river sand, and 1/10 of the composition consists of asbestos fibers (they can be replaced with crushed fiberglass). In this case, the proportion of clay can vary depending on its properties: if it is very oily, then the part of sand increases to 3-4 parts in relation to the clay.
The binder of the solution is very important, which explains the presence of asbestos or finely crushed glass fibers in it: their presence gives the plaster the necessary strength. Sometimes these components are replaced with straw: in this case, when heated, the stove will not emit any substances harmful to health.
Tools for applying plaster
In order to apply the plaster mixture efficiently, prepare all the necessary tools in advance, and during the work process use those that are more convenient to use. They also buy a primer that will enhance adhesion to the mortar and strengthen the masonry, metal corners, tile adhesive, beacons, and some gypsum plaster.
Here is a list of accessories that may be useful to the master:
- trowel, trowel - for applying and distributing the mortar over the surface of the oven;
- spatulas of different sizes - for applying, leveling, smoothing the composition, especially in corners and other hard-to-reach places;
- construction grater, trowel or trowel - for leveling and rubbing the surface;
- brushes and rollers - for painting dried plaster;
- chisel - for making notches on the surface before plastering, if it is too smooth and does not adhere well to the mortar, and reinforcement has not been carried out;
- hammer - for quickly beating off old mortar;
- metal scissors - for cutting reinforcing fabric;
- level and rule (plumb) - for proper leveling of the coating;
- a construction mixer and a suitable container for mixing plaster;
- hard metal brush - for removing old plaster and cleaning joints.
Plastering smooth walls
Leveling with grout
If the furnace walls are initially quite smooth, then the use of lighthouse strips is left to the discretion of the worker, depending on the thickness of the applied layer. This type of stove finishing is most conveniently implemented with solutions containing fireclay clay and crushed asbestos, which acts as a reinforcing component. The mixture is applied with a wide spatula, moving from the bottom of the walls: if there are lighthouse guides, leveling is immediately carried out using the rule. If there are no beacons, then when smoothing the solution, a flat surface is taken as a guide. To beautifully remove the corners, it is best to use a corner-type spatula. After finishing the entire area of the stove, careful leveling is carried out with grout.
How to plaster a stove: instructions
Before starting work, carefully prepare the base, because the quality and service life of the plaster layer will depend on this. The walls of the stove or fireplace are freed from the old coating - knock it down with a chisel and hammer. The seams are well cleaned with a brush to remove pieces of plaster and sweep away dust. If the masonry is fresh, remove any adhering and escaped drops of mortar, which can lead to detachment of the new plaster.
The old paint is completely removed. Irregularities and cracks in the bricks are covered up, masonry joints, on the contrary, are deepened by 5-10 mm. If the base is too smooth, small notches are made on it. The walls of the stove or fireplace are primed 2-3 times. The seams are especially well coated with primer.
Reinforcement
If the oven walls are uneven, you will have to apply several layers of plaster. In this case, the frame must be reinforced, otherwise the solution may peel off and crack. Purchase a mesh made of metal or fiberglass with medium-sized cells (1.5-2 cm). The metal material is secured using nails with wide heads, driving them directly between the bricks.
Reinforcing mesh for oven
Fiberglass is attached to a mortar or heat-resistant tile adhesive. To ensure perfect alignment, steel or aluminum corners with perforations are glued to the corners of the stove. In case of sharp unevenness of the walls, plaster is carried out along beacons, which are placed on top of the reinforcing mesh on small piles of gypsum mixture. Beacons are installed according to the level, having previously determined the point of greatest deviation of the plane.
Spray
To properly level the walls, it is necessary that the plaster layer be at least 8-10 mm - this is the only way to get rid of significant distortions. After the mesh is fixed to the surface and the beacons are placed, the oven is heated to a warm state.
Then spray the walls of the oven with water using a wide brush and make a spray. This is the first layer of plaster, up to 4-5 mm thick, which is literally thrown onto the wall. The spray solution has the consistency of medium thick sour cream. After filling the entire area, the plaster is leveled without much effort, but paying attention to the high-quality filling of masonry joints. Allow the composition to dry thoroughly.
Leveling and covering
After the first layer has dried, further work begins. Apply the solution with a spatula or trowel between the beacons, starting from the bottom of each wall, and immediately level it using a small rule. After treating one area, proceed to the next until the entire surface is covered with the solution. Allow the leveling layer to dry, then proceed to covering.
The covering layer is only 1.5-2 mm thick, so the solution for it is made more liquid. It is needed to perfectly level the surface before painting. If you plan to glue tiles, covering is not necessary. As this stage of work is completed, the beacons are removed and the holes are sealed with plaster mixture. The corners are carefully treated with an angle spatula, rounded for your own safety.
Grout
While the surface has not yet completely dried, they begin grouting work. Grinding is carried out with a construction float or matting, not forgetting to regularly moisten the device with water. Move the tool in a circular motion, increasing the pressure in the depressions and decreasing it in the pits. To reduce the risk of cracking of the layer, experienced craftsmen, after finishing plastering work, cover the oven with damp burlap. As a result, it dries more evenly, which improves the quality of the result.
Finishing technologies
Method 1. Painting or whitewashing
Whitewashing or painting is the easiest way!
The easiest way to decorate the surface of a Russian stove is to whitewash it. This technology can be called traditional, since kilns have been whitewashed, probably since the very moment of their invention.
For whitewashing you can use the following compositions:
- chalk is cheap, easy to apply, but after drying it sticks to almost any surface. This problem can be dealt with by applying protective compounds that form an impenetrable film, but then a reasonable question arises - why is there chalk in this scheme?
Chalk - cheap and cheerful!
- lime is not much more expensive than chalk, it is also quite easy to apply, but it does not crumble so much upon contact with a whitewashed surface. Both plastered and cleaned brick walls of ovens can be whitewashed with lime.
Lime is considered a more reliable option
Still, whitewashing is an outdated technique, so it’s worth paying attention to the range of paints available in the retail chain.
A Russian stove whitewashed with lime is more like yesterday than tomorrow
As a rule, in any more or less large hardware store you can find a composition intended for application to the surfaces of stoves and fireplaces.
Modern finishing method - ready-made composition
The painting technology is extremely simple:
- Dry the plastered surface or clean the brickwork.
- We dilute the paint by about 30-40% and apply the first, primer layer.
Spread, apply, admire!
- When the paint dries, apply a layer of undiluted composition. We repeat the operation 2-3 times until the desired result is achieved.
- Dry the paint and then heat the oven.
- When the structure has cooled, apply a finishing coat of paint.
The base part of the stove is painted with a heat-resistant compound
Finishing of an iron stove, as well as cast iron products, is also carried out by painting. To apply a composition that not only improves the appearance of the structure, but also protects the metal from corrosion, it is most convenient to use a sprayer - this way the pigment will lay down in an even, thin layer.
When decorating homemade metal stoves, hot painting is practiced - the so-called bluing. This technology is quite effective, but requires special skills, so without experience or at least without the supervision of a specialist who can advise you during the work process, you should not take risks.
Remember, everyone should mind their own business!
Method 2. Facing
When choosing how to decorate a brick stove, many opt for cladding with various tile materials. Of course, ordinary tiles will not work here - they simply will not withstand temperature changes and regular heating, so you will have to look for a suitable material.
Photo of majolica - glazed tiles
For decorative cladding of stoves and fireplaces, you can use a variety of products based on baked clay. I have described the most popular ones in the table below:
| Tile | Peculiarities |
| The most ancient type of ceramics, which is products made from baked compacted clay. The surface of terracotta is not covered with glaze, which is why the tile has a rough texture. Colors are natural, from creamy white to brick red. |
| The production technology is similar to the technique used to make terracotta tiles, but the surface is covered with glaze. Previously, majolica was painted exclusively by hand (and therefore cost), but now the design is applied by machine, which makes production cheaper. |
| Clinker tiles are a more user-friendly alternative to facing heat-resistant bricks. When producing clinker, fireclay and other fire-resistant components are added to the clay mixture. After firing, durable, dense panels with a thickness of 7-8 to 12-15 mm with good heat resistance are obtained. Clinker tiles are most often produced in natural colors, i.e. in shades of yellow, fawn, brown, etc. |
In addition to tiles, porcelain stoneware and some types of natural stone can also be used for cladding stoves. But you should not use artificial stone: its structure does not allow it to withstand strong heat and temperature changes.
Natural stone for a solid finish
Decorative finishing of stoves using cladding is done as follows:
- To begin with, we prepare the foundation using the technology I described above. We apply clay-cement plaster over the metal mesh (do not level or smooth the surface), drying it thoroughly.
Adhesive composition for stove lining
- Prepare a heat-resistant adhesive mixture. The result of our work largely depends on the quality of the glue, so I recommend that beginners not skimp on the material. In principle, you can glue tiles using a clay-cement mortar, but a good glue “forgives” many mistakes, so it is better for an inexperienced craftsman to use it.
Sequence of actions when tiling the stove
- Using a spatula, apply the glue diluted according to the instructions to the underside of the tile. Using the serrated side of the tool, distribute the composition so that the entire surface is covered with even beads of adhesive.
Porcelain stoneware masonry
- We apply the tile to the base and press it, leveling it. Immediately remove drops of adhesive solution that have fallen on it from the front surface of the tile.
- We carry out the laying in rows, from bottom to top. We leave gaps between the tiles and between the rows: in order for the seam width to be constant, we use spacer inserts.
Don't forget to leave space between the tiles
When facing a structure with terracotta tiles, majolica or clinker, leave seams 5–8 mm wide. In this case, it is desirable that the seam be filled with adhesive solution to approximately half the depth.
When facing, monitor the width of the seam
- The optimal cladding sequence is three to four rows per approach. After the area has been worked out, you should pause for about 20-30 minutes (just enough time to mix the next portion of glue). During this time, the tile will just “grab” on the base.
- After finishing the entire surface of the stove, we leave it for the glue to polymerize. The polymerization period depends on the brand of the composition used, but it is still not worth starting the following operations earlier than 4–6 days .
The finished surface must dry completely
The only exception is surface cleaning. As a rule, 10-12 hours after finishing the job (i.e. the next morning), I carefully clean the joints between the tiles, and then rinse the tiles to remove any remaining grout and other contaminants.
My story about how to tile a stove would be incomplete without mentioning the final stage - grouting. At this stage, all seams between the cladding elements are filled with a special grout mixture, which will protect the adhesive layer from moisture, hide the ends of the tiles and give the structure a complete appearance.
The seams are rubbed with a special compound
Approximately 3 hours after finishing the grouting, the stove is washed again with a damp soft cloth. Then you need to wait about a day and heat the oven for effective drying. You should start regularly using the lined structure no earlier than two weeks after completion of the work.
For effective drying, the oven should be heated
Method 3. Tiles
A brick oven can also be finished with special products - tiles. A tile is a heat-resistant ceramic product of a special shape, which is used exclusively for finishing stoves and fireplaces, providing them with good heat transfer, long-term temperature retention and an attractive appearance.
Different parts for different elements
The technology for installing tiles with your own hands is quite complex, so it is best to master it under the guidance of an experienced stove maker. It is for this reason that here I will give only a general outline of the work:
- First, we select tiles for cladding the structure. Despite the fact that such products cost a lot, we take them with a reserve - at least one piece of each type.
- We carefully adjust all the tiles to the same size, cleaning the edges with a rasp or an angle grinder.
Tile pump
- Before installation, we lay out the products on the floor in accordance with the future location and “shuffle” them so that the difference in shades of adjacent parts is minimal and the color transitions are as smooth as possible.
Before installation, the pattern of tiles should be laid out on the floor to match
- We wet the product, after which we fill its rear cavities - the rumps - halfway with clay mixed with filler (pebbles, gravel, brick fragments, etc.).
- We insert crutches from a rod 4-5 mm thick into the holes of the tiller, tying a piece of soft wire twisted in half to the middle of each crutch. A clay-based masonry mortar is laid on top of the crutch.
Installation diagram: 1. tile, 2. crutch, 3. binding wire, 4. bracket
- When facing, tiles are laid on the front surface of the stove or fireplace in rows, while soft wire is embedded in the seams between the bricks of the wall. Adjacent parts in rows and rows are fastened to each other with metal staples that hook onto the edges of the tillers.
Craftsmen usually fold the cladding first dry, without mortar. If all the details match, then the structure is disassembled and the tiles are reinstalled, but with clay mortar in the rums.
Decorative design of the stove
For the final lining of the stove, you can use a wide variety of materials - from inexpensive to luxury. When it comes to a fireplace in a country house, marble, granite in the form of slabs, stones, as well as coils or onyx are often used. The ideal material for fireplaces and stoves is marble, which is not afraid of sudden temperature fluctuations and has a long service life. More economical finishing options include whitewashing, painting, painting or gluing tiles.
Painting and whitewashing the stove
The simplest method of finishing a stove is whitewashing. To carry out whitewashing, prepare a solution of 100 liters of liquid lime and 100 g of non-iodized salt, you can also drop a little blue. A more modern option is to paint the stove with heat-resistant water-based paints. Oil-based paints and varnishes are not used for this purpose - they quickly darken, and can also release toxins when heated. Before whitewashing or painting, the surface of the plastered stove is primed.
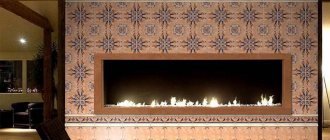
Decorative plaster for stoves and fireplaces
Decorative plaster is another easy-to-work and beautiful material that can be used to decorate a stove or fireplace. It is important to pay attention to the quality of the mixture and its suitability for finishing stoves, since not all brands are suitable for this purpose. There are heat-resistant decorative compositions from different manufacturers on sale. Also, instead of specialized products, you can choose plaster for exterior work, which is not afraid of sudden temperature changes.
Mineral-based decorative plasters can withstand high temperatures when heated, with mixtures based on clay or lime being the most suitable. Silicone or silicate compounds are also suitable for the job. As it dries, a layer of paint, varnish or wax can be applied to the decorative plaster.
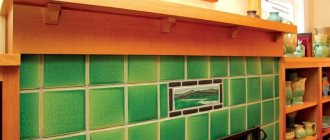
Tile
To finish the stove after plastering, terracotta or ceramic tiles are often used. It is glued to heat-resistant tile adhesive, which is designed to work with very hot substrates. The usual adhesive composition for tiles will not work - the material will quickly peel off from the stove. There are even special corner ceramic elements on sale that simplify work and make the stove beautiful and stylish.
Finishing the stove with terracotta tiles
What kind of brick is needed for laying a stove - the right choice of material
Ceramic bricks are widely used for the construction of heating stoves in individual residential buildings.
The construction industry produces a wide range of bricks for laying furnaces, but which one to choose from the proposed range? Before we consider this issue, you need to understand the fact that two types of bricks are used for laying the stove - this is a simple ceramic brick, but with certain characteristics, which is used for laying the external elements of the stove, chimneys, and fireproof or fireclay brick, which is used for furnace firebox masonry.
Kiln bricks must meet the following technical requirements:
- Resistant to high temperatures and open flames.
- The ability to accumulate heat and retain it for a long time.
- Sufficient mechanical strength.
- Resistant to significant temperature fluctuations.
Solid fuel stoves are built from ceramic bricks that meet the requirements of GOST 390-96. This standard came into force on July 1, 1997 and establishes the technical conditions that these products must comply with in shape and size. The regulatory document also defines the requirements for the use of products depending on the maximum ambient temperature.
Ceramic bricks intended for the construction of thermal units are subject to more stringent requirements than other building materials. In the firebox of furnaces, the flame temperature can exceed 1000 °C; therefore, its walls are subjected to significant thermal loads. The thermophysical parameters of the material used must be higher than the specified value.
During the operation of the furnaces, they are regularly cooled in some cases to negative temperatures. In this case, the brick is exposed to a significant temperature difference in the external environment, which leads to thermal expansion followed by compression.
The product must have a sufficient strength margin to successfully withstand this phenomenon and avoid deformation and destruction.
The brick used for laying stoves must have sufficiently high thermal conductivity and the ability to accumulate heat.
This allows you to maintain a comfortable thermal regime for a long time.
As we said earlier, a certain type of ceramic brick is used to lay the furnace; now we will look at what main characteristics this brick should have.
Brand by density. The first thing you need to look at when choosing ceramic bricks for a stove is the density grade. The grade of ceramic brick by density is established in accordance with the requirements of GOST 530-2012.
To designate it, an alphanumeric encoding is used, consisting of the letter “M” and a number from 25 to 1000. Please note that this indicator does not indicate the quality of the brick, but only shows its density when pressed. This indicator is important because the denser the brick, the slower it heats up, and therefore the slower it cools.
The fact that the brick will cool slowly is of course good, because
This indicator is important because the denser the brick, the slower it heats up, and therefore the slower it cools. The fact that the brick will cool slowly is of course good, because...
the oven will give off heat for a longer time. But it is more difficult to heat a stove made of too dense bricks, especially when it has completely cooled down.
Balance is important here, so for laying the furnace, bricks with a density not lower than M-150 and not higher than M-250 are used.
Frost resistance. Frost resistance of a product is defined as the ability to withstand a certain number of heating and cooling cycles. This indicator is denoted by the Latin letter F with the addition of a number from 25 to 300. The frost resistance indicator of ceramic bricks is important when constructing external elements of a heating furnace, such as chimneys.
The thing is that this integral part of the furnace is in very harsh conditions of constant temperature changes. This has a huge impact on the brick used to lay the pipe. For the construction of such structures, it is best to use ceramic bricks with frost resistance from F75 to F100.
Thermal conductivity. The thermal conductivity of ceramic bricks will depend on its density and for products used for laying furnaces it should be in the range from 0.59 to 0.72 W/(m×°C).
Fullness. For laying the stove, only solid ceramic bricks are used.
Ceramic stove brick.
Tips for plastering stoves
Professionals point out a number of important nuances that need to be taken into account when facing a stove or fireplace yourself:
- When the structure is heated strongly and regularly, it is important to select a special primer for the job that is heat-resistant. The use of ordinary primers may cause the mortar to detach from the oven.
- Plastering can only begin after some time has passed since the construction of the stove. It is better if it lasts at least 2-3 months, and the stove must be regularly heated throughout this period. This will reduce the risk of the coating shrinking in the future.
- After completing finishing activities, the stove can be warmed up after 3 days, when the coating stops being pressed through with a finger. For the first time, they do not heat at full power, then gradually increase the heating temperature. After heating, the vent is not closed to ensure natural evaporation of moisture from the plaster.
- Whitewashing, tiling or painting of the stove begins about a month after plastering.
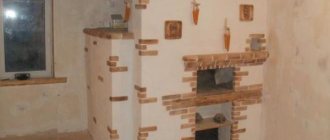
Why do you need to plaster the outside of the fireplace?
First of all, the exterior decoration gives the structure a complete look. When using ordinary red brick for masonry, a folded stove or fireplace does not look aesthetically pleasing. However, beauty is not the only factor in the importance of plastering.
Plaster gives the brick structure a finished look
The need to plaster a brick fireplace or stove is explained by two more important nuances: 1. During combustion, the brickwork of the stove becomes very hot from the fire. A similar process is typical for a fireplace. After the flame goes out, cooling occurs. Temperature changes cause the brick to undergo small movements, during which cracks appear at the seams. The solution gradually pours out, and smoke from the combustion chamber penetrates into the room. The plaster forms an airtight layer that prevents fumes from filling the living room. 2. Stoves in many private houses are built on clay. Insects like to live in natural material in the summer, when there is no need for heating. Plaster acts as a hygienic layer that protects the room from pests. Plaster simply gives neatness to the fireplace or the same stove. Without finishing, the clay solution will gradually spill out onto the floor and spread dust throughout the room.
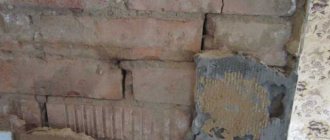
Repair of stove plaster
If cracks do appear on the stove coating, this means a violation of the plastering technology or improper operation of the structure (overheating, loosening of doors, etc.). In difficult cases, you will have to reposition the stove, but most often, “cosmetic” repairs help. The work is carried out in the following sequence:
- Completely remove old plaster and whitewash from the surface of the damaged area, remove soot, otherwise the latter will appear from under the layer of mortar in the form of rusty spots.
- Cracked bricks are restored with a special repair mixture or the cracks are filled with heat-resistant mastic. If repairs are impossible, the bricks are replaced with new ones, but plastering begins no earlier than after 7 days.
- Apply the primer with a brush and let it dry.
- Prepare the plaster composition and apply it to the area moistened with water by throwing it on. After leveling the solution, rub it with a construction trowel.
- Loose doors are reinforced with wire, and a clay composition is also applied around the fastening area. Let the stove dry.
If the plaster is made correctly, finishing the stove or repairing it can be done with your own hands. The costs of such work will be small, and the savings on wages for invited craftsmen will be significant.
Choosing the composition of the plaster
The question of how to plaster brick stove walls is the most important one when planning such an event. It should be said right away that the usual cement-sand mortar used for plastering the walls of a building is not suitable for stoves. It will simply crack in a very short time. For plaster, you can use a ready-made mixture intended specifically for this purpose, or prepare it yourself, but according to a special recipe.
To solve the question of what to plaster with, simple 2-3-component mixtures and complex compositions with the addition of various ingredients (fiberglass, asbestos, salts, plasticizers, etc.) can be used. The composition of the mortar also depends on the type of brick used for the construction of the stoves (fireclay, red brick, silicate varieties, etc.). Certain components added to the plaster increase its adhesion to the material.If you decide to use ready-made materials, then you need to purchase a stove or fireplace plaster mixture. All the necessary ingredients have already been added to it, and preparation for application consists of diluting it with water in the proportion specified in the instructions. When using them, one caveat should be taken into account: their long-term storage is undesirable, since atmospheric moisture can lead to premature hardening of the mixture in the form of poorly soluble lumps.
Most often, homemade solutions for plastering stoves are prepared of the following types:
- clay;
- lime-clay;
- calcareous-sandy-clayey,
- lime-gypsum;
- cement-sand-clay.
The practice of furnace construction shows that it is precisely such compositions that are least susceptible to cracking when heated. Other additives are also introduced to improve properties.
When preparing the solution, it is important to choose the correct proportions of ingredients. The precisely selected composition allows you to easily and evenly apply a thin layer to the stove wall. In particular, a certain consistency of the composition is used as grout
The viscosity of the solution is regulated by the proportions of water, plasticity largely depends on the amount of sand, and the more of it, the less elasticity of the mass
In particular, a certain consistency of the composition is used as grout. The viscosity of the solution is regulated by the proportions of water, the plasticity largely depends on the amount of sand, and the more sand there is, the less elasticity of the mass.
Conclusion
What is the best way to plaster a stove? No specialist can answer this question for you. Each stove maker has his own secrets and mortar compositions for plastering the surfaces of brick heaters at home.
You can make it from a mixture of clay and sand or knead a ready-made dry solution. This is a purely individual question. The main thing is to properly mix and apply a layer of plaster on the surface of the stoves.
Process Features
So, when you have decided on the choice of plaster, and the necessary tools are already at the ready, all that remains is to start creating. However, in order to properly plaster the stove, you need to follow a certain technology and sequence of processing steps.
Surface preparation
Preparatory work is an important process that ensures the quality and durability of plastering. So that all your work does not turn out to be in vain, first of all, you need to perform the following actions:
- Remove old layers of cladding using a hammer and chisel, and then clean the surface of dirt and remaining substances with a brush.
- If the stove is new, you should also clean the masonry.
- Deepen all seams by 0.5–1 cm and remove dust from them.
- Prime the walls, including the seams.
It is very important not to start cladding a structure if it has just been built. You need to wait at least 3 months for the stove to “settle” and for the materials from which it consists to adapt to operating conditions
Preparing the mixture
The solution must be prepared after all the preparatory measures have been completed, otherwise the plaster may harden and become unusable.
Before mixing all the ingredients, the sand must be sifted and cleaned of foreign impurities. The same applies to clay - it is crushed and all debris in the form of particles of rocks and plants is removed. Next, the clay is soaked in water until the liquid covers it by 10–15 cm. On average, this process takes 2–3 days. When the base is ready, it is combined with the remaining components and stirred with a mixer. In some cases, it is permissible to add water, since the consistency of the finished solution should be similar to sour cream.
Warp finishing
Sometimes old age, damage or unscrupulous work of builders can cause distortions in the walls of the stove. You can fix this this way:
- focusing on the building level, set up beacons for alignment;
- heat the stove so that it is warm;
- moisten the slanting wall with a roller or brush;
- the surface is primed and left to dry;
- the first layer of plaster is applied using the “spray” method so that the mixture covers all the seams;
- after the first layer has dried, apply the second - it should protrude about 1 cm above the beacons. Start work from the bottom, leveling the rule every half meter of the layer;
- the wet solution is polished with grout;
- To level the corners, use a special corner spatula.
Application of mesh
The use of this mesh in cladding allows not only to level and hide surface defects, but also makes the plaster coating more uniform and durable. To plaster the stove, you need:
- install the mesh near the work surface at a distance of no more than 2.5 cm;
- “spray” apply the plaster and wait for it to harden;
- cover everything with the next leveling layer;
- rub out;
- decorate.
Light plaster
The need for such work usually arises if the stove has no obvious defects or distortions, but needs cosmetic repairs. Plaster it like this:
- guide elements are fixed on a previously prepared surface so that the coating is uniform;
- apply the solution from bottom to top with a wide spatula, which is immediately leveled using the rule;
- the corners of the structure are plastered with an angle spatula;
- the result is neatly erased.