The stove has long been a reliable, and sometimes the only, source of heat and energy . In the modern world, it has not lost its significance: many people strive to settle outside the cities in a cozy and warm home. If it is impossible to use the services of a professional stove maker, don’t worry!
In this article we will tell you in detail how and what is the best way to bring your good old “heater” into proper shape, after which you can try yourself as a stove maker and restore your stove.
Advantages of plastering the stove
Without decoration, the walls of the stove do not look aesthetically pleasing, since building bricks are used for masonry without the use of neat facing bricks. Such heating structures are always finished with finishing materials. Here are a few reasons why the use of plaster is important:
- The fine-grained mortar fills the pores in the masonry mixture. This prevents carbon dioxide from entering the room.
- The leveling mixture can be used as a stand-alone coating or as a base for any heat-resistant facing material.
- Plaster is acceptable for finishing any stove or fireplace. This could be restoration, strengthening or decoration. At the same time, the universal mixture can be considered an economically advantageous choice due to its relatively low cost.
In addition, this material, to one degree or another, has insulating properties, which helps to retain the heat of the furnace walls for a longer time. The solution is easy to work with and dries quickly. You can give the oven surface a smooth, rough or decorative texture.
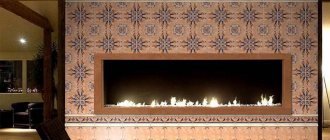
Decorative plaster on the stove Source www.elitfasad.rf
Applying the solution to a previously prepared surface
Stove plaster can be classified as one of the types of plaster for interior decoration.
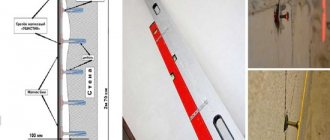
Let us remind you once again that you can only work with a previously heated stove . It is very important! But let's not forget about some other subtleties of the stove business. Thus, it is recommended to install a large-mesh metal mesh (the cells should not be larger than 2x2 cm) on the stove before applying the solution.
This will greatly strengthen the plaster layer, giving it additional strength.
Application of the solution
Do not forget that the plaster is applied in several layers (the thickness of each of them should not exceed 5 mm, and the total thickness should not exceed 1 cm). After applying each such layer, you should give it a little time to set on the surface. The solution must be applied evenly, from top to bottom.
Don't forget to rub the plaster with a special trowel to make it smooth and neat. It is recommended to do this in a circular motion, without strong pressure on the surface.
Next, you should let the plaster dry and set. Usually this takes 12 hours. If after this period you find cracks on the stove, you should carefully moisten it with water and rub it with the solution that we used earlier.
Choosing plaster for finishing the stove
The main requirement for what to plaster a stove with is resistance to regular heating and cooling. At the same time, the shape must be maintained, which means thermal expansion should be minimal. The issue of mechanical stability and wear resistance is also considered. If cladding is planned further, the coating must cope with the additional load.
All solutions are conventionally divided into simple and complex. The determining criterion is the presence of one or more binding components in the composition. This may be cement, clay, lime, gypsum or asbestos.
Cement
M150-M500 grades of cement are used for working with furnaces. A simple mixture is unacceptable, since concrete is characterized by low elasticity, fragility and poor resistance to heat. Additionally, clay pulp is added to the solution.
Clay
This material may vary in terms of fat content. The degree is determined by the sand content. The less it is, the better the adhesion, strength and resistance to temperature changes.
Checking the fat content of clay Source remont-book.com
If you prepare your own plaster mixture from clay, you must exclude stones, debris and vegetation debris. This can be done by soaking for 4-5 days and rubbing the raw materials on a metal mesh with small cells.
Among the advantages of using clay plaster for stoves and fireplaces are environmental friendliness, plasticity and long working time of the solution. It is also noteworthy that it can be applied without using a painting tool, that is, by hand. But it is important to take into account the fact that the minimum layer is 10 mm. If it is not followed, the coating will crack and peel off from the base within a short time.
Gypsum
This material is used to give the solution strength, which is especially important for the formation of stucco. But simple mixtures with its participation are not suitable for working with furnaces, since cracking of the coating occurs. As a rule, additional lime and clay are added to increase strength, elasticity, and reduce drying time. The main mineral typically hardens after 10-15 minutes, so you need to mix the solution in small portions.
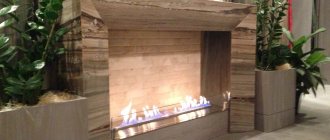
Decorating the fireplace with stucco Source masterdel.ru
See also: Catalog of house projects with a fireplace and stove
Asbestos
It is not recommended to use asbestos as the main component, since when heated it releases harmful substances. It is added to the solution as a reinforcing additive before plastering the stove to prevent the finish from cracking over time. Also, this mixture lasts a long time, is resistant to moisture, and fireproof.
Lime
This material is used to impart plasticity to the solution and increase adhesive properties. Lime also has a positive effect on the inertness of the coating to biological activity. That is, the risk of insects is reduced.
Damage diagnostics
Cracks that do not smoke can be covered up yourself.
Pay attention to the condition of the stove after the start of smoke or during a visual inspection of an unlit hearth. The number of defects is taken into account, their depth is checked with a knife blade or a thin metal ruler.
Cracks are diagnosed:
- minor damage that does not emit fumes - you can repair cracks on a brick stove yourself;
- large cracks from which smoke oozes - you need to call a specialist to determine the cause of the destruction of the stove walls.
Furnaces are whitened with lime and chalk; on such a surface the blackness from the release of carbon dioxide smoke is clearly visible. To do this, you do not need to use a gas analyzer; defects are immediately visible. Cracks are detected not only on visible stove surfaces in the room; it is important to find damage in the body of the brick chimney, which is located in the attic area.
Proportions in a self-prepared solution
To plaster stoves, you can use a simple mixture of fatty clay and sand. The classic version of the composition involves 2 parts of filler to one of binder. Additionally, you can add 1/10 of reinforcing asbestos in a fluffy state.
In the case of cement, the proportional composition looks like this: 4 parts binder, 9 sand and a third of water for the additive. With the use of asbestos, sand is halved, and the reinforcing filler occupies 10% of the total mass of the solution (no other additives except water are present).
Preparing the mixture manually Source fasad-exp.ru
Less commonly used is liquid glass or chalk. As a rule, they are relevant for facing work. Then mix dry cement, clay and chalk 1 part each, sand - 3. Then add pulp to the desired consistency and 1 part liquid glass.
Lime is added to a solution of clay and sand with asbestos reinforcement. Proportionally, it looks like this: one part each of binders, two parts each of sand and water, up to ⅕ asbestos fiber. The question of how to plaster the stove so as not to crack is also approached by using alternative materials: crushed straw or fiberglass, hemp, chaff, slag wool.
Self-preparation of the solution always begins with preliminary mixing of the dry ingredients. This way the finished mixture is as homogeneous as possible. To ensure uniform drying, reduce the risk of cracking of the coating and increase working time, add about 200 grams of table salt per bucket of the mixture.
If the stove is designed to use coal or peat briquettes, then fireclay powder is additionally added to make the plaster resistant to high heat.
Fireclay powder Source wasteinfo.ru
See also: Catalog of companies that specialize in finishing materials and installation of stoves
Purchased heat-resistant mixtures
Ready-made stove plaster can also be used for finishing. There are many varieties of such mixtures. But the most popular are “Pechnik” and “Terracotta”. The advantage of such plasters in comparison with those prepared by hand is a high degree of heat resistance. “Pechnik” and “Terracotta” are able to withstand temperatures up to 200 degrees.
Whatever mixture is used for plastering the stove, purchased or homemade, there is no need to prepare a large amount of it at once. The volume of a single serving should not exceed 8-10 liters. In any case, the solution needs to be developed in a maximum of 2-2.5 hours.
Technology for plastering a stove
To carry out work on plastering a stove, a set of tools for a mason and a painter is required. You will need a hammer and chisel to work with the base. For the solution, use a container for mixing, spatulas, trowels, graters with smoothers. For alignment, a rule and a level are used.
Additionally, a construction knife, brushes with a roller, and a brush with metal bristles may be useful. The list of consumables looks like this: mixture, water, soil, beacon and corner-forming profile, reinforcing fiber or plaster mesh, gloves, whisk attachment for a drill or hammer drill for preparing the solution. It is also necessary to provide protection for adjacent walls and floors from contamination. For this you will need film and masking tape.
Preparatory work
In the case of a new stove, it is permissible to begin finishing work only after several thorough heatings over a period of 2-3 months. Then shrinkage of the structure, which leads to cracking of the plaster coating, will be eliminated. For older units this requirement is not relevant.
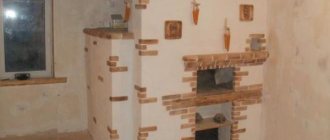
New stove for finishing Source yandex.net
Next, before plastering the stove, you need to carry out preparatory work. The working base is considered to be a clean, grease-free and flat surface. Protruding excess masonry mixture or previous decorative finishing must be removed. Damaged bricks are restored or replaced completely. The depth of the seams must be at least 10 mm. Notches are applied to a durable concrete surface.
Causes of cracks
Cracks in the stove must be repaired in a timely manner.
More often, defects are laid at the stage of constructing the fireplace. The stove structure is sinking due to an incorrectly laid foundation and insufficient insulation from moisture. Cracks appear due to poor quality masonry and poor maintenance.
The main reasons are identified:
- the plaster is applied to a damp and undried surface that is not preheated;
- incorrectly prepare the solution for plastering the outer walls, change the dosage of the components at their own discretion;
- they add a limiting volume of fuel, from which the insides of the fireplace become very hot, while the outer part does not yet have time to heat up;
- When laying, they do not take into account the different expansion coefficients of metal and brick and do not leave compensation gaps;
- they make a small firebox that does not correspond to the level of heat load.
Cracks may be on the front surface, side walls, around the hob, or around the perimeter of the door.
Briefly about the main thing
The problem of how to plaster a stove to prevent it from cracking can be solved in different ways, using various compositions based on cement, clay, gypsum, asbestos or lime.
The main requirements for leveling materials: elasticity, heat resistance, safety, mechanical strength and low thermal expansion.
The plastering itself is carried out in two ways: a reinforcing mesh made of steel or fiberglass is attached to the walls, or environmentally friendly fibers are added to the solution.
The consistency of the prepared mass depends on the purpose: roughing and grouting - liquid, leveling - like cottage cheese, for installing profiles - thick. At the same time, at each stage of work it is important to comply with the permissible standards regarding the layer. Enlargement causes improper drying, flaking and cracking.
Ratings 0
Advice from professionals
To ensure quality work when plastering a stove, professionals recommend:
- Proper mixing of the solution. To do this, you can take a small amount of the mixture and roll it into a ball in your palm. If cracks form on it, you need to add a little water.
- The mixture should be viscous so that it can be easily applied.
- Before starting work, all cracks must be repaired.
- To strengthen the plaster, use reinforcing mesh.
- After plastering, you cannot immediately heat the stove, otherwise the coating may crack. You need to wait until it dries completely.
For high-quality plastering of the stove, the main thing is to mix the solution correctly - it should not be too liquid or thick. Following the instructions will allow you to avoid common mistakes and get a durable and aesthetic lining for your home stove.
Tile installation:
- Surface preparation is standard - if the stove has old plaster or finishing, it is knocked down with a chisel and cleaned with metal brushes, and then dusted.
- Then the joints are grouted - if it is decided to install the tiles on a grid with grouting
- Prepare the adhesive composition according to the instructions. Pour the dry mixtures into the water, portionwise, with constant stirring. The speed of the drill or mixer is adjusted so that the glue does not foam; air is not needed in the structure. Leave the glue for as many minutes as indicated in the preparation instructions - usually up to 15 minutes.
- Start facing from the bottom. Apply glue or primer (if cladding is done using jointing) for four tiles horizontally. Fix the reinforcing mesh. Along cut seams - on wire staples, without cutting - on dowels.
- The adhesive is applied with a notched trowel, the first tile is pressed and slightly rotated to secure it tightly. Crosses are used to calibrate seams, but not all craftsmen recommend crosses, and some designs involve the illusion of unevenness of the seams - to imitate ancient masonry.
- Verify the horizontality of the tiles using a level, then the vertical. The first row is the most responsible. Deviations are corrected carefully by moving the tiles with light blows with a rubber hammer. Seams for different types of tiles can be from 8 to 12 mm, except for clinker ones, the thermal expansion of which is so insignificant that a neat seam of only 3 mm is possible. All tiles of the first grip are verified with a level and plumb line.
- The first three rows of tiles after laying should be left until the adhesive composition sets. Plastic adhesive may not hold heavy tiles, and the trim will slide off from its own weight. Furnace linings do not require high speeds. Pauses between grips are about three hours, depending on the properties of the glue or solution used.
- For fitting and trimming, use tile cutters or a grinder. They usually try to hide the cut tiles adjacent to the wall or in other inconspicuous areas.
- After the glue has completely set - after 24 hours, remove the crosses and clean the seams from glue deposits.
Grout the seams only after the glue has completely cured, according to the instructions for the composition, otherwise you may end up with microcracks in the grout or the tiles peeling off. Mineral grouting is done manually - with a spatula, or with a mounting gun if the seam is made convex. Grouting with silicone compounds is very sticky and is only possible with the use of mounting guns.
The first fire is possible only after the glue has completely cured, from a week to a month, depending on the composition used.
Review of popular manufacturers
Special plaster for fireplaces and stoves is produced by Russian and foreign manufacturers of building materials. The most durable, effective and safe products include the following brands:
- "Stove maker" . The brand specializes in the production of fireproof clay-cement mixtures that can withstand temperatures up to +600°C.
- "Plitonite" . The company produces very plastic plaster that can be used for finishing and laying stoves.
- "Terracotta" . Product with a strength of up to 75 kgf per cm². Used by amateur craftsmen and can easily withstand temperatures up to +400°C.
- Ortner . A composition characterized by a fine grain size of up to 0.5 mm. Suitable for finishing and leveling.
- Wolfshoher . German mixtures produced by fireclay brick factories.
- "Bossnab" . Russian mixtures for fireplaces and stoves based on red clay.
- Rath . High-strength Austrian plasters.
- Vetonit . European mixtures for masonry fireplaces have proven themselves to be highly durable and durable coatings. The composition includes multicomponent mixtures with fireclay clay, sand and cement.
Prevention of stove cracks
Precise laying of the stove will reduce the risk of cracks.
It is difficult to completely protect a folded fireplace from cracking, but there are certain recommendations to reduce this likelihood.
Some tips:
- correct design and installation of the support base for the fireplace;
- precise masonry in accordance with the procedures, replacement of metal partitions inside the furnace body with bricks on the edge;
- careful selection and preparation of plaster components, adherence to application technology.
The mode of starting the operation of a new unit, as well as the regular firing of the furnace every day, is important. Attention is paid to the smallest cracks that appear to prevent large-scale destruction.
Drying time
It is not recommended to heat the stove immediately after plastering the cracks.
It is not recommended to use the stove immediately after treatment, since heating will cause the plaster and putty to expand, so the surface will crack again. The heat-resistant ready-made solution dries within 3 – 4 hours, the exact time is indicated on the packaging. The clay composition will harden for about a day.
The first firebox includes a small amount of firewood, the amount is gradually increased with each addition. You cannot use a full load so as not to spoil the work.
Types of tile layout can be different:
- Vertical seams match. This layout is for tiles of the same size. If rectangular tiles are installed, then the layout can be both vertical and horizontal, while you can lay out colored contrasting zones and insert panels - it looks linear and neat
- Bandaging, or displacement along vertical seams. Used in geometrically complex areas so that trimmed fragments are not noticeable
- Diagonally. Artistic and complex layout, allowing for rare designs. Very original, but you will need about 10-15% more tiles, a lot of trimming and waste
- Tiles of different sizes are laid out in checkers, carpets, highlighting fragments and contrasting zones, panels and decorative elements are possible