The use of beacons is required to perfectly level the plaster mortar on the wall and create even corners. Such guides help to significantly save expensive mixtures. Beacons for plaster are made in factories from different materials, as well as by craftsmen directly at the place of repair. To get the best result in plastering walls, it is important to delve into all the nuances that are associated with the use of beacons.
Wall marking
To correctly install beacons for plaster, it is necessary to make preliminary markings of the walls.
Important! the distance between the beacons when installed on the wall = the length of the rule you will work with, minus 20-30 cm. That is with a rule length of 2 meters, guide profiles are placed every 1.7 m. This is necessary so that when leveling the plaster, you can guide the rule left and right, constantly relying on the profile.
Accordingly, you can calculate the consumption of beacons on the wall: (length of the wall / length of the rule) + 1.
The walls are marked in several steps:
- Draw strictly vertical lines from floor to ceiling using a level. They must be performed at the beginning and at the end of the wall. It is important to leave 15 cm from the floor and 30 cm from the corners.
- Measure the distance between these lines, divide it by the distance between the beacons (see above). The resulting number will indicate the required number of profiles. It is important that the beacons should be 30 cm shorter than the ceiling height.
- Draw vertical lines along the entire wall.
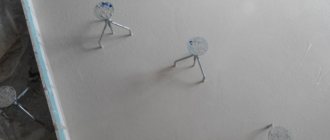
- Dowels are screwed in at the beginning, end and middle of each line. Their caps are aligned exactly vertically using a plumb line or level (bubble/laser). It is important to align the dowels on all lines in the same plane. The beacons will rest on their caps when installed on the wall.
An example of marking using a plumb line, dowels and threads
What is a plaster beacon
The lighthouse is a long strip located on top of the wall. Its upper edge specifies the location of the auxiliary plane - the future surface of the leveled wall.
That is, the beacon is an auxiliary element that makes it easier for the plasterer to process and level the surface of the walls of buildings and structures. The design, size and material of beacons vary, but their purpose is the same.
The benefits that are obtained by using beacons for plaster:
- obtaining impeccable surface geometry of a layer of rough plaster, which is otherwise impossible to obtain;
- reducing the time of leveling plastering;
- good quality of leveling by people with little plastering experience or those who do not have such experience;
- reducing the consumption of plaster materials for leveling walls.
Is it necessary to remove the guide profiles?
Experts recommend removing non-galvanized metal beacons so that they do not rust in the plaster. You can do this in the following way:
- After applying the plaster, after a couple of hours, mark the location of the beacons with a pencil.
- Dry the walls thoroughly.
- Using a hard spatula, separate the beginning of the beacon.
- Use pliers to remove the beacon, gradually bending it away from the wall.
- Cover the resulting holes with mortar, leveling with a spatula.
- Leave the plaster until completely dry.
Remove the beacons and cover the grooves with solution
Plastic beacons can be removed and left in the wall.
How to choose
The choice of beacons should be approached responsibly. If we take into account what the profiles were made of, then the plastic variety is used in cases where it is planned that the beacons must be removed after plastering or their operation will be carried out in very comfortable temperatures with no sudden changes.
Steel beacons are quite reliable, because they cannot be affected at all by temperature, humidity, chemicals and fungi. When using these guides, it is not at all necessary to remove them, both from the inside and outside of the building.
If craftsmen choose beacons by size (3 - 30 mm), then they need to buy profiles that correspond to the curvature of the walls. The thickness of the plaster layer is applied in such a way that the top one is sanded well, without reaching the guides. The length of the product ranges from 2 to 6 meters. Small ones are used for ordinary repair work in residential areas, and large ones are purchased for plastering warehouses and production workshops.
Lighthouses also differ in their shape. The T-shaped plaster beacon profile is placed in the corners of the rooms, the V-shaped one is placed on the entire wall and ceiling surface. A corner beacon is indispensable in the process of arranging a window, when there are few fastenings and materials that are strong enough are required. Metal guides are more promising in such situations; they better protect corners from damage, cracks and other types of negative impacts.
The use of homemade beacons is advisable if special profiles from the manufacturer are not available or there is not enough finance to purchase them. The simplest option in such cases is to pull the strings onto self-tapping screws. Instead, it is possible to install a wire, and then use it to remove the surface layer of the solution to ensure perfect evenness.
Useful video
Below we have selected several videos with master classes on installing beacons and plastering walls.
Quick installation using a laser level.
The next video shows the technology for plastering walls using beacons with your own hands. Leveling is carried out with gypsum mortar on brick without mesh reinforcement.
We hope that the article was useful to you. Ask questions and share your experience in the comments.
Previous
Tool Angle for plaster: types and installation rules
Next
Tools Construction floats: types and features
Types of beacons for plastering walls
“Landmarks” come in various modifications. For example, beacons for plaster can be barrier paths made of hardened mortar with a rectangular or trapezoidal cross-section. They can also be made of stretched strings supported by a mortar roller. The beacon can be a profiled corner fixed at a corner or a T-shaped metal profile. The edges of planed hewn boards or panels of plywood attached to the side of a corner or arched opening also serve as beacons.
An excellent video on the types of beacons and how to install guides. Information about the species begins at the 7th minute of the video.
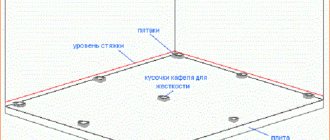
What are floor screed guides?
Beacons are special elements fixed at one mark, located horizontally and at an equal distance. Varying in design, guides provide a solid base, the top level of which serves as a guide when forming the base.
Beacons are simple devices intended for one-time use.
The location and correct installation of the fixed elements determines the level of the future floor, affects the final appearance of the decorative coating, as well as its characteristics during operation. The method of making the screed is influenced by the design features of the guides and the materials used in manufacturing.
The following types of special elements are in demand:
- rack and pinion
They are used when forming a dry base with expanded clay filler, as well as when arranging a sand-cement or concrete base using the wet method; - rappers.
Used in the manufacture of self-leveling bases. They are a structure with a height-adjustable rod fixed to a base with three support points.
Installation of beacon profiles
After the preparatory work is completed, the craftsmen install the guides.
Installation with mortar or glue
The first thing to do is prepare the solution according to the instructions on the box. When planning to plaster surfaces using cement or lime mixtures, which tend to dry for a long time, gypsum or alabaster is added to them in small quantities, which helps the solution set faster.
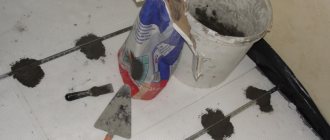
The prepared mass is applied in small volumes at a distance of 15-20 cm from each other in accordance with pre-drawn lines. Next, the trimmed beacon profiles are applied to the solution and pressed to the surface.
If the craftsman used simple markings, the guide is installed flush with the screws. If there is a laser device, the position of the beacon is checked in accordance with the previously applied marks. Excess solution is removed, after which the following products are installed.
Mounting on fasteners
To accommodate beacon profiles, fastenings made of plastic have been invented. Their installation begins with removing the retainer from the product, which is placed on self-tapping screws screwed into lines every 30 cm. After this, the beacons are attached, and the retainer is returned back to the beacon profile.
The main advantage of this method is the speed and ease of installation. However, the plaster layer thickens by 0.5 cm, and therefore the final cost of repair work increases significantly.
Using “eared ears” made of metal
More recently, painters and plasterers used one trick. They cut out legs with holes for fastenings, with the help of which plasterboard panels are installed. Beacons were placed on these metal parts. Today, such products are made from metal in large factories and are available in all hardware stores.
The installation process of the guides is not complicated. Beacons are applied to the walls, then attached to the surface with metal ears. They already have self-tapping screws that are screwed in to the required depth, which ensures the installation of a level for applying plaster. Installing beacons with special ears is easy, but removing them afterwards is much more difficult.
Types of devices
By beacon guidelines we mean 2 or more limiting lines for the rule that relies on them when removing excess solution. Before figuring out how to set up beacons for leveling walls under plaster, you need to decide directly on the type of guide elements. They can be ready to install and formed on the work surface.
Let's look at the first group in more detail. Factory products go on sale up to 3 meters long. The height of the part supporting the rule may be different, but not less than 3 mm. A constructive solution could be like this:
- Corner-forming. Samples are made of plastic or aluminum, galvanized steel. The central axis is a rounded protrusion, also known as a stiffener. The strips have perforations on the mounting plates to squeeze out excess leveler and create a more reliable fixation of the corner. Also, in order to reinforce the adjacent area, pieces of fiberglass mesh can be attached to the beacons. There is an alternative to the beacon profile - paper tape. There may also be inserts made of thin sheet metal and small holes.
Corner-forming metallized tape with perforation Source satu.kz
But their role is only to strengthen the corner and bring it to finishing.
- T-shaped beacons for plaster. Such products differ from angle-forming analogues made of steel and plastic in that the mounting plates are located in the same plane.
A separate type are arched or flexible guides. Here, the distinguishing feature from corner-forming analogues is the slots on the mounting plates. Such beacons are also installed as elements for leveling corners and walls. The only difference is the possibility of forming arched openings and other curved structures with a 90-degree turn.
Arched beacon profile with reinforcing mesh Source aspin.by
Reusable profiles are less common. They are used by professional teams. After hardening, they are dismantled and cleaned. The cost for one object may be a disadvantage, but the beacons, if the operating rules are followed, do not deform for a long time. That is, for large-scale projects, the products ultimately make it possible to reduce the cost estimate to one degree or another.
It is worth noting one feature of the metal profile. Its mounting strips are easily deformed. Such areas are unsuitable for work; craftsmen cut them out and work with the remains. Therefore, it is important to allocate a place for storing guides where damage to the products will be excluded.
Homemade beacons for plastering walls are made from various solutions and available materials. As a rule, a composition is used that is characterized by rapid hardening. Additions can include plasterboard profiles, pipes, and wooden beams.
Wooden beams with different sections Source santehkeram.ru
See also: Catalog of companies that specialize in finishing materials and related work
They are often dismantled after the leveler has dried. The resulting groove is filled with plaster mortar. Less often they are used as ready-made grooves for hidden communications (if the size allows). In any case, the area must be reinforced with mesh before finishing.
There is only one drawback here - you cannot level the structures until the mortar guides are completely dry. In the case of cement, it is enough to wait a day or two to gain strength to the required degree, so that, according to the rule, they do not wear off immediately. Otherwise, the surface will end up with indentations, which does not correspond to the expected evenness.
Sizes and shapes
There are guides of various sizes on sale - from 3 mm to 3 cm. As for the length of the products, it can be 1-6 meters. They must be selected depending on the depth of the depressions and the height of the convexities, that is, on the degree of surface roughness. The more mixture you have to apply, the larger the limiters should be. Devices 2-3 meters long are usually used for renovations in residential buildings and apartments. Six-meter profiles are more suitable for plastering warehouses, industrial premises, as well as for exterior finishing.
Straight guides are perforated products that have a V-shaped protrusion that will serve as a guide during operation. Corner beacons have the same protrusion, but in parallel they are equipped with shelves located at right angles. They are used to level and increase the strength of external corners. Corner profiles do not have great rigidity, so during installation it is necessary to regularly check the straightness of their installation.
Dimensions of plaster beacons M6 and M10
conclusions
- Beacons are necessary elements in order to make the wall smooth, without bulges or irregularities;
- Most often, beacons made of plastic and stainless steel are used in repair work. The latter are more in demand, since they do not need to be removed after the alignment procedure;
- V-shaped elements are used for corners, T-shaped ones are intermediate beacons;
- You need to select several mounting points for one beacon so that it fits tightly to the wall;
- Beacons are attached to the wall with a mixture of cement, sand and alabaster, or using regular drywall adhesive.
Preparing the surface for installation
Before installing the beacons, you need to prepare the surface itself, otherwise after a short period of time the plaster may fall off. It is necessary to remove all dirt, remove old finishes, and, if present, clean the surface of mold and fungi, and any existing metal elements. Cracks and other defects are covered.
If the surface is too smooth, then it needs to be sanded to obtain better adhesion to the material.
A primer is applied to the dry surface and, if required, the wall is reinforced.
It is necessary to remove all dirt and remove old finishes.
Materials and tools for finishing
To install the guides and apply the plaster mixture, different tools may be required depending on the specific type of product and the technology used. Typically, an exhaustive list of devices and consumables looks like this:
- building level (any) and plumb line;
- strong thread or fishing line;
- self-tapping screws;
- dowels;
- screwdriver;
- capacity;
Tools for plastering an apartment
- drill with mixer attachment;
- grater or grater;
- rule;
- spatulas;
- Master OK.
You should also purchase the beacons themselves, which are selected in accordance with the expected thickness of the coating. As for the length, it is better for beginners to take standard 3-meter products. If mechanized plastering is intended, an apparatus for applying the mixture (plaster ladle or gun) is also prepared.
Useful recommendations for quickly setting up and installing beacons
Buy rigid guides that retain or restore their shape after deformation. Flexible metal beacons can be a pain in the ass.
Mark the wall as carefully as possible. An undetected error will be much more difficult to eliminate later.
Taking into account all the mistakes and tips, you can plan the work correctly in order to rationally distribute energy, finances and time, and ultimately get smooth walls and ceilings.
Use only high-quality tools and materials.
As can be seen from the article, installing beacons requires not so much experience, but very great precision and accuracy. If you understand that you cannot do something well, it is better to seek help from a professional.
Forming a layer of plaster
Preparation of the solution
Before preparing the plaster, you should take into account the features of the wall. For example, sand-lime brick slowly absorbs moisture, which makes it possible to cover large areas with plaster. Red brick walls, on the contrary, quickly absorb water, and therefore need to be plastered in small areas.
The proportions should also be observed correctly. A solution with excessive water content will “float” along the wall. If there is not enough water, leveling the plaster will usually be difficult and slow. Determining the required solution viscosity depends on experience. Application of material
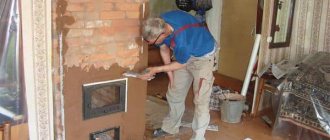
Plastering on beacons is carried out by throwing the mortar onto the wall using a trowel. After this, you should apply the rule to the nearest beacons and move it up and down with slight pressure. This will smooth out the solution and remove any excess. You cannot put too much pressure on the rule, as it will bend inward and deform the finished surface.
The excess collected by the rule should be placed in the gaps formed during casting. After processing with the rule, it is necessary to carry out final leveling of the surface with a smaller rule. If it is planned to remove the beacons, then the empty spaces at their location are leveled with a spatula in level with the rest of the surface.
Applying the solution along the beacons
The prepared mixture is applied using a trowel, spatula, or trowel between the installed beacons. It is very convenient to use a ladle for this purpose, but if you don’t have one, you can simply throw the product on with a spatula. The finished layer should protrude slightly beyond the tops of the profiles.
Next, stretch the solution using zigzag movements from bottom to top. After completing the work on the entire base and setting the coating, the beacons are removed or left, if possible. The grooves from the products are filled with plaster of a thicker consistency.
Construction of slopes and corners
The internal corners are formed with a corner spatula. They are ironed, brought to perfect evenness, checking with a level. Door and window slopes are made with inward expansion. Obtuse corners are smoothed out with a wooden lath or shaped using a special profile for slopes.
Plastering external corner
Final alignment
Rubbing is carried out as the final stage of finishing. All actions are carried out only after the solution has completely dried. You will need a similar mixture, but with a thinner consistency. The procedure is as follows:
- Sprinkle the base with a little water;
- Apply the liquid solution to a grater and spread it in a thin layer;
- place the tool at an angle of 45 degrees, carefully rub the surface literally 1-2 square meters;
- The excess solution accumulated on the grater is removed.
Finishing plaster with a trowel
If tiling is planned, then grouting work is not necessary. Irregularities will only improve the adhesion of the ceramics to the base.
Features of using beacons
To perform the work efficiently, you need to know a number of its features:
- It is necessary to install the guide profile in the deepest place, otherwise more plaster mortar will have to be used;
- Metal products should be secured securely; they may become deformed. To do this, the interval between fasteners is made small, or a solution is applied between them;
- Removing the profiles is necessary so that rust stains do not appear on the surface afterwards;
- If plastering work is done with gypsum, then the excess should be thrown directly onto the surface, or stored in a separate container. Gypsum that has been on the surface can accelerate the hardening of the entire solution if it ends up in it;
- The remaining voids after removing the profiles are filled with a more viscous mixture than was used for the main work;
- The rule is that when resting on the guides, hold it without force so as not to deform the ends of the profiles.
Metal products should be secured securely; they may become deformed.
The article explained why beacons are needed; they can greatly facilitate the work of leveling walls, ceilings and floors. Non-professionals can also get a good result, which will significantly reduce the required funds for repairs, the main thing is to act slowly. Using special fasteners and ready-made profiles will be much more convenient for independent work and will save time. Obtaining a flat surface will simplify further finishing work.
Alternative materials
Not everyone can carry out repair work well. Here it is necessary to use tools and auxiliary equipment correctly. This facilitates high-quality plastering on all surfaces on the internal and external sides of the objects being repaired.
Before the advent of modern lighthouses, wooden slats were used almost everywhere as guides. They were installed on gypsum and cement mortars, then leveled using a plumb line. However, wood is considered an inconvenient and unreliable material, because it swells over time. Strong wetting causes the surface to swell, causing the walls to become severely curved.
Another option for installing beacons was the use of shavings. These remains from cutting wood were glued together into a common mass with special substances. The result was chipboard, MDF, wood concrete. The structure of these materials (the fibers have different directions) allows the products not to deteriorate or warp from exposure to moisture, which facilitates high-quality repairs for a long time. It is only necessary to soak the products in advance with antipyrine, an antioxidant. Such glued strips of sawdust are still used as beacon guides today.
Plaster beacons are very valuable and useful products, with the help of which craftsmen achieve perfectly smooth surfaces and high-quality coatings. The main thing is to act in accordance with the above recommendations, and also remove beacons from the walls in a timely manner. After all, even expensive galvanized profiles have the unpleasant property of causing the appearance of rust spots and stripes, which will require the application of a new layer of plaster. Do not neglect effective means for marking, for example, a laser level. This device will help you quickly complete the preparatory work and begin installing beacons and further plastering.
Installing beacons in different ways
Before placing beacons on the wall, you need to choose a method:
- on plaster solution or tile adhesive;
- without solution;
- from cement or gypsum composition, etc.
The plaster beacon must be securely fixed and leveled on the wall. The work uses clips, corner elements, staples, etc.
Installation on the wall using plaster mortar or tile adhesive
Placing beacons for applying a plaster coating on an adhesive base or mortar is an affordable and easy-to-use technology. Next to the fastenings, the plaster mixture is laid out with a spatula. Round or rectangular beacons are formed from the mass.
The upper part of the elements is aligned to a single level. Beacons are placed on the hardened bases and fixed with plaster mortar or glue. The profiles are fixed using plasterboard profiles. We set the distance between the beacons taking into account the standards for the placement of fixing elements (up to 1.2 m between the beacons).
Installing beacons on a wall without mortar
A quick way to place beacons without mortar on the wall is used to decorate small spaces.
To fix profiles to self-tapping screws, several types of fasteners are used:
- clips;
- "eared ears";
- creamers;
- homemade staples;
- smarts, etc.
The advantage of these types of fastenings is the ease of installation and the absence of the need to prepare an adhesive base or solution. The elements do not move and ensure reliable alignment of the base. After installing the fasteners, begin plastering the surface.
When and how best to install mortar beacons on walls
Beacons for leveling bases can be made independently from a solution (based on cement powder or gypsum). After plastering, the beacons do not need to be removed from the wall panel. To work you will need a trowel, a set of spatulas of different shapes, sizes and a rule.
The work is carried out in stages:
- the axes of the beacons are preliminarily marked on the wall, the size of the indents is calculated taking into account the dimensions of the room;
- a laser device detects surface irregularities;
- an elastic plaster solution is prepared;
- the rule is installed on the edge and fixed;
- a trowel is applied on top of the rule;
- the bar is pressed onto the base onto the solution;
- use a trowel to adjust the angle of contact of the beacon strip with the wall;
- remove the remaining solution with a spatula;
- the rule is removed;
- the applied solution is dried for 24 hours, then a block with sandpaper is applied along the top of the beacons for grinding.
This method creates mortar paths with a width of up to 2 cm. After a day, the beacons are ready for plastering.
The technology is optimal for small unevenness and height differences. Execution requires specialist skill to accurately place elements.