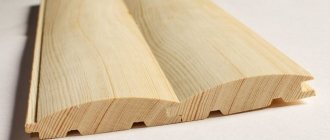
The structure of lining
Lining is a popular type of decorative design for the walls and ceilings of balconies, loggias, bathrooms, residential and office premises. This type of finishing is characterized by durability, ease of installation, a variety of colors, and attractive appearance. To obtain the expected result, it is important not only to choose high-quality material, but also to follow the fastening technology.
No. 1. Features of lining installation
It is recommended to mount the lining on a pre-installed frame . If the walls or ceiling have a perfectly flat surface, it is possible to install the lining without constructing a frame, but the lathing still helps to extend the service life of the base surface and allows you to create an additional layer in the space between the lining and the main surface for laying heat-insulating material.
The lathing is attached in increments of 50-60 cm; it is imperative to use a level to achieve a perfectly flat surface and compensate for unevenness of the base ceiling or wall. The frame can be made of metal profiles or timber. When it comes to wooden lining, it is better to choose timber. It's all about the ability of wood to absorb and release moisture, changing in volume. The lining and timber will react in a similar way, but the metal does not change in volume, and if the profile is rigidly fixed to the surface, the lining may move. Of course, this risk remains when using a wooden frame, but still to a lesser extent.
Heat-insulating material can be laid between the sheathing bars, which is important not only for residential buildings, but especially for baths and saunas.
You can install the lining in one of the following ways:
- horizontally. This is probably one of the most popular options for installing lining. Some types of material (quarter and American lining) can only be mounted in this way. If we are talking about arranging a steam room, then it is necessary to place the slats with the spike facing up. Only in this way will condensation and water roll freely down the wall. In this case, installation of the lining begins from the ceiling;
- vertically. This installation allows you to visually raise the ceiling in the room; it is often used in baths. Installation of lamellas begins from any corner, the first element is installed with the groove outward. When attaching the lining to the ceiling, it is recommended to work in the direction from the light to avoid the appearance of shadows between the boards;
- diagonally _ This is a decorative installation option that is often used when decorating walls and ceilings in living rooms;
- combined and patterned styling involves installing lining lamellas in different directions, so you can get an original design. Unlike all the others, this installation option requires proper skill and preparation, so it is not suitable for beginners.
The direction of the sheathing bars will be perpendicular to the direction of the lining, this goes without saying.
What kind of timber to use for sheathing
It all depends on whether additional insulation of the wall is planned or not. If it is assumed, then the block should be thicker. Mineral insulation boards have a standard thickness of 50 millimeters. This means that the thickness of the bar should be the same.
If insulation is not expected, you can purchase thinner material, limiting yourself to a section of 30X20 or even 20X20.
No. 2. Types of fasteners for lining
traditional ways to fasten the lining :
- using clamps. This is the most gentle method, it allows you to maintain the integrity of the lining;
- using nails that are driven into a groove or tongue. This technology requires greater caution from the performer, as there is a risk of damaging the lining;
- through fastening of self-tapping screws through the lining;
- fastening using a construction stapler.
Regardless of what type of fastening is chosen, it is recommended to install the first and last boards using nails with small heads - they can be easily recessed into the body of the lining. Attach the lining first to the middle beam, then to the two outer ones, carefully controlling verticality or horizontality. Then it is attached to the intermediate bars.
Options for the location of the lining on the plane of the wall and ceiling
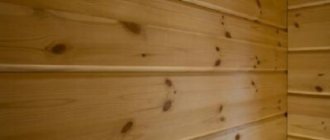
The lining on the plane of the wall (ceiling) can be positioned vertically or horizontally. Traditionally, Euro profile lining is located vertically, and Calm profile lining is horizontal. This is primarily due to the peculiarities of perception of horizontal and vertical lines. Vertical lines, especially emphasized by a wide strip of shadow from window light, due to the difference in the surface of the lining profile on the wall, visually increase the space between the floor and ceiling. The horizontal thin lines of the joint of the “calm” profile linings have no shadow and therefore create the effect of integrity. Traditionally, the ceiling is covered with clapboard in the direction of the light flow - perpendicular to the window.
No. 3. Fastening the lining using clamps
Claypers allow you to install the lining while completely maintaining its integrity. They are metal plates with a tongue and holes . The tongue is designed to hold the lining, and thanks to the holes, the clamp is attached to the frame. Such simple, but at the same time ingenious, fasteners allow for hidden fixation of the lining - no fasteners will be visible from the outside. At the same time, the wood is protected from cracks that may appear when nails are driven into it, and the entire installation process is quite simple.
The main difference between all clamps on the market is the height of the tongue . The choice of this parameter depends on what type of lining will be installed: for eurolining, the required brackets are with a tongue 4 mm high, for block-house lining - 6 mm. As for the material, clamps are made mainly from galvanized iron and steel. The consumption of this fastener depends on many factors, but on average, about 20 clamps are needed per 1 m2 of lining.
The sequence of work is as follows:
- a clamp is installed on the lining tenon;
- the board is mounted in its place, fixation occurs due to nails or screws that pass through the holes on the clamp and enter the sheathing. As a rule, there are three such holes on the element, but only two of them are allowed to be used;
- The clamp tongue is thin enough to insert the next lining panel into the groove of the previous one with the clamp already installed. The process is repeated again and again. Let us remind you that it is better to fasten the first and last boards with nails.
The boards must be installed tightly to each other, leaving no visible gaps. The last board will most likely have to be cut to fit the width. In baths and saunas, it is recommended to retreat 2-3 cm from the ceiling and floor so that the wood can easily expand.
The clamps provide detachable fastening, so if something happens, the lining can be easily dismantled and the covering can be assembled in a new place.
Stages of lathing manufacturing
During the work you will need to take the following steps:
- purchase the material and place it in the room in which it will be installed for 2-3 days. It must be dry; purchasing lumber with natural moisture is undesirable, since it can “lead” during the drying process;
- make markings. The optimal step between the bars is from 40 to 60 centimeters. If the sheathing is attached to the walls of a frame house, then the block must be attached to the frame posts. Thinner lining requires a shorter pitch between the sheathing elements;
- treat lumber with an antiseptic. This will protect against rotting and harmful insects. It would also be useful to treat it with a fire retardant compound.
- Using self-tapping screws, attach the bars to the walls, carefully checking the location of each level. If there is a need to compensate for the unevenness of the wall, this should be done using plywood backings or pieces of the block itself.
No. 4. Fastening the lining with nails
Using nails is the easiest and fastest way to secure the lining, because there is no need to use any intermediate fasteners, but there is a risk of splitting the board, so you should be prepared for a certain amount of scrap. For fastening, nails 5-6 cm long are used, they are driven in in increments of 25-30 cm, so you will need quite a lot of fastening material.
Typically, nails are driven into the groove at an angle of 45 degrees . To reduce the likelihood of damage to the lining, the nail is carefully placed in the right place using a hammer, and then hammered in with a blunt hammer. An alternative is to pre-drill the holes. During installation, the head of the nail must be thoroughly recessed into the wood so that the next element of the lining can be easily inserted into the groove.
It is allowed to drive a nail at a right angle into the tongue.
Common mistakes
To avoid mistakes, it is important to know how to properly attach the lining:
- Choose well-dried material;
- Prime and paint before installation so that there are no areas difficult to reach for finishing;
- Leave a gap between the board and the adjacent wall to compensate for shrinkage or expansion;
- Secure the first, last and outer elements firmly - with nails or self-tapping screws;
- When finishing interior decoration, insert the tenon into the groove tightly so that cracks do not form when the wood dries out;
- When sheathing the outside, gaps are left in the tongue and groove joint to compensate for moisture expansion of the wood;
- Select nails, screws and clamps according to the size of the lining;
- Clamps are not intended for fastening boards in unheated rooms and outdoors;
- Do not carry out work in the cold or in the rain;
Do not neglect treatment with antiseptics, fire retardants, and protective paint compounds.
No. 5. Fastening the lining with a stapler
This is a variation on the theme of the previous method: instead of nails and a hammer, they use a construction stapler, which has enough power to drive the staple into the lining. This device makes the job much easier, but requires some skill, so it’s better to practice first. If everything is done correctly, the bracket will fit tightly into the wood without interfering with the installation of the next lining element. The stapler can also be used when fastening with clamps.
Processing and protection
This is the final stage of lining installation, which involves covering the installed material with additional layers of a protective or decorative composition. At this stage (beginning of installation activities), initial antiseptic treatment can also be carried out if it was missed at the preparatory stage.
- Varnish compositions help preserve the original color and texture of wood over a long period of time.
- Thanks to the stain, the required color scheme of the cladding material is achieved; the number of layers of this composition can change the shade of color.
- Impregnation with wax gives the material a certain shine. After its use, the lining can be treated with paints and varnishes.
- Glaze with a UV filter is transparent, due to which the original texture of the wood is preserved and transmitted, and the wax and oil contained in its composition preserve the natural breathable properties of the material.
No. 6. Through fastening of the lining with self-tapping screws
Through fastening is usually used to install the last boards of the lining. This is also how the lining is installed in steam rooms and saunas. In this case, the fastening element does not enter the tenon, but passes through the entire lining. This is a fairly reliable and durable installation method, but if we are talking about using it in a bathhouse, then the wood must be coated with a protective compound and do not forget to renew it every three months.
Holes are first made in the boards, and then fasteners are screwed in using a screwdriver, which should go as deep as possible. To cover the resulting hole, wooden pins are used, however, over time, all attachment points can become noticeable, no matter how carefully and regularly the protective agents are applied.
This method has one interesting variation . Some experts hammer nails into the sheathing, but not to their full length, so that clapboard can be installed on them in the future. The length of the protruding elements should be less than the thickness of the lining. The nail heads are bitten off, and the clapboard panels are carefully hammered onto the protruding nails using a mallet. The result is an aesthetic surface.
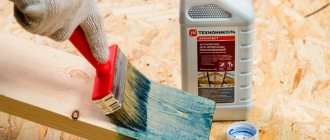
Preparatory stage
At this stage, the lining must be treated with protective compounds that prevent the formation of mold and the development of fungus, the appearance of bluish and black spots on the surface of the material, and they also provide the wood with resistance to insects. Impregnation with antiseptics is an important protective measure that gives the material additional protection and increases the degree of resistance of the lining to adverse environmental factors, such as high humidity, ultraviolet rays, and temperature changes. Such protective substances also increase the fire resistance of the wood base by reducing its flammability.
The upholstery material must be soaked on each side and then left to dry completely. The lining is also covered with decorative paint bases to achieve the optimal color effect of the surface. If a colorless protective composition was used, then at the preparatory stage, the material can be coated with stain or varnish. Painting is done in several layers on each side; it is important to cover the entire surface of the workpiece, including grooves, ends and tenons. Applying paint to a horizontal area allows you to achieve its most uniform distribution over the surface, thus avoiding drips and giving the lining an aesthetic appearance. It is not advisable to use paint bases for processing workpieces that will be used in conditions of a combination of high temperatures and high humidity, for example in a bathhouse or sauna, in which harmful vapors are released into the air.