Lining - a popular type of decorative design of walls and ceilings of balconies, loggias, bathrooms, residential and office premises. This type of finishing is characterized by durability, ease of installation, a variety of colors, and attractive appearance. To obtain the expected result, it is important not only to choose high-quality material, but also to follow the fastening technology.
How to prepare the base
It is allowed to attach the lining directly to the wall or ceiling only under the following conditions:
- if the surface is very flat and strictly level. This can be a wall made of timber, lined with OSB boards, plywood or other sheet material;
- if the temperature and humidity in the building being finished is stable throughout the year. That is, it should be a dry, heated room with a normal microclimate.
In all other cases, before attaching the lining to the wall, a frame of parallel wooden blocks is installed on it. The distance between them is 40-60 cm. This frame allows you to solve several problems at once:
- level the surface;
- level out level differences;
- create an air gap between the base and the cladding to ventilate the rear surface of the lining.
Also, the space between the wall and the finish can be filled with heat-insulating materials, which is often resorted to before installing the lining in a bathhouse or sauna.
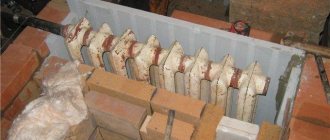
The thickness of the bars for the sheathing is selected taking into account the thickness of the insulation and the ventilation gap Source board.bau.com.ua
The frame is secured to the base with self-tapping screws or dowel nails, depending on the wall material. When installing it, the level is constantly monitored - all bars must be in the same horizontal (ceiling) or vertical (walls) plane.
Preparation of tools and materials
Here, even a beginner who has never taken on any kind of home installation is difficult to surprise with anything. The same classic set of tools:
- perforator;
- screwdriver;
- level;
- cord plumb line;
- meter;
- pencil.
And here are the necessary materials
:
- bars for sheathing;
- dowels;
- self-tapping screws;
- nails;
- clampers.
And, in fact, the lining itself. Nothing will work without her!
How to choose the direction of installation of panels
Before you start constructing the frame, you need to choose in which direction the lining boards will be attached. This is important because the sheathing guide bars must run perpendicular to the direction of the sheathing.
There are several ways:
- vertical is the most common. It allows you to visually increase the height of the room. For such wet rooms as a steam room in a bathhouse, it is also the most optimal, since water easily flows along the grooves between adjacent slats without lingering on the surface;
- horizontal - visually pushes the walls apart. Some types of lining are attached only in the horizontal direction. These include the "American" and the board with the chosen quarter;
The “American” is mounted with the tenon facing up to ensure normal water drainage from the surface Source parki48.ru
See also: Catalog of house projects with imitation timber presented at the “Low-Rise Country” exhibition.
- diagonal - used for decorative purposes on walls and ceilings;
- combined is also a decorative installation method that allows you to create patterns from multidirectional lamellas. It is the most complex of those listed, since the lining is attached to the transverse bars of the sheathing, which in turn must have a corresponding pattern.
The combined method of fastening the lining is difficult to do independently. It is better to entrust this work to specialists Source rus-teplitsa.ru
Installation of eurolining on walls or ceilings
Leading product manufacturers usually indicate how to fasten eurolining in the instructions included with the packaging. The sequence of work is as follows:
- A preliminary division of the sheathed surface into rectangular zones is carried out. This allows the boards to be optimally laid during the sheathing process.
- The required number of fastening brackets - clasps - is prepared. It is believed that 20 pieces are required per square meter of eurolining, but it makes sense to purchase clamps with a margin of 5-10%.
- Eurolining is installed from the bottom corner of the room, where there are no door or window openings. At the same time, horizontal placement of boards visually lengthens the room, and vertical placement makes it taller.
- The direction of laying the material is determined by the method of finishing the ceiling and floor: when subsequently installing skirting boards, it makes sense to move from top to bottom, and in the case of finishing with eurolining and the ceiling - from bottom to top.
When purchasing clamps, pay special attention to their quality: the clamps should not have traces of mechanical surface damage, dimensional instability, uneven thickness, etc.
It is important that when installing eurolining, clamps with a thickness of no more than 1 mm are used. The fact is that the panels of this material are thicker, and the reduction in the area of the room after covering will be more significant
It is unacceptable to use clamps that do not have a protective anti-corrosion coating.
The fact is that the panels of this material are thicker, and the reduction in the area of the room after covering will be more significant. It is unacceptable to use clamps that do not have a protective anti-corrosion coating.
How to attach
You can install wooden lining using self-tapping screws, nails or special clamps - clamps. Each method has its own characteristics and advantages. If we are talking about how to properly attach the lining, then you can choose any of them. The choice itself depends on what is preferred: the appearance of the cladding, the speed of installation, the ability to quickly and easily dismantle the cladding.
On a note . Regardless of the chosen installation method, the elements are connected to each other by tightly inserting the next tenon into the groove of the previous panel.
The tongue-and-groove connection forms a continuous surface without through gaps Source stroiremdoma.ru
Let's look at each method in detail.
Through mount
This is the fastest installation method, but not the most aesthetically pleasing, since the caps of the fastening elements remain visible on the surface of the cladding. If desired, they can be recessed into the body of the board, and the recesses can be filled with putty or closed with pins made of the same type of wood as the lining, and then sanded. However, the attachment points will still remain visible.
In the described case, you have to carefully choose how to fasten the lining. It is recommended to use corrosion-resistant galvanized self-tapping screws rather than nails, which, when driven in, have a high risk of splitting the board along the grain of the wood. Under them, in each plank at the place where it intersects with the sheathing, through holes with a diameter slightly less than the diameter of the hardware are pre-drilled.
It is better to screw in the screws in pairs, 1-1.5 cm away from the edges of the lamella Source parki48.ru
Also, through fastening is used to fix the first and last boards of the lining in the corners.
No. 5. Fastening the lining with a stapler
This is a variation on the theme of the previous method: instead of nails and a hammer, they use a construction stapler, which has enough power to drive the staple into the lining. This device makes the job much easier, but requires some skill, so it’s better to practice first. If everything is done correctly, the bracket will fit tightly into the wood without interfering with the installation of the next lining element. The stapler can also be used when fastening with clamps.
Useful tips
And finally, a few tips that will ensure the reliability, durability and aesthetic appeal of wood cladding:
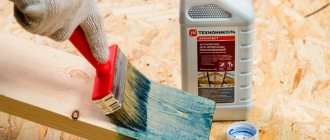
- Before installation, it is advisable to treat all wooden surfaces, including sheathing, with antiseptic impregnation, especially if clapboard is used to finish a wet room or external walls. This will prevent the spread of mold.
- When finishing interior spaces, materials must be kept in them for two to three days for acclimatization.
- The lined surface can be painted, coated with oil, wax, varnish, or stain. Pre-priming will reduce the consumption of varnish or paint.
Horizontal finishing method
Wall finishing should start from the ceiling and move towards the floor. With this method, the grooves should be installed facing downward; this, during further use, will not allow debris and moisture to accumulate in them, which, in turn, will significantly increase the service life of your finish.
The next step when laying the lining is to secure the panel to the sheathing slats. To do this, use the fastening elements you have chosen. Then install the ridge of the next panel into the groove of the profile and secure it. In this way, finish the entire space intended for sheathing. After every 4-8 installed profiles, it is imperative to check the surface for unevenness; use a level or plumb line for this.
The last panel of the lining should be adjusted in width using an ordinary hacksaw or using another tool or machine. Secure the profile with nails, and mask the gap with a decorative plinth.
After installation, wipe the surface with a damp sponge, removing dust from the surface. You can also paint the surface, but you should not do this, as the wood itself has a unique and beautiful pattern and excellent shades. If you are using a lining that imitates a rounded log, the installation should be done with the groove facing up, thus the joints will be hidden.
Installation of lining, namely the installation of individual panels, is best done with a hammer. The board should be tapped through a piece of timber; in this case, the sheathing will be done without gaps.
To install the “Blockhouse” panel, you should use self-tapping screws; they must be tightened at an angle of 45°.
Install a treated block between the profile of such a finish; this, in turn, will create an excellent coating without cracks or gaps.
Assortment of cladding profiles
With the development of industry, there are more and more varieties of lining every year. Each owner himself determines the type of profile that meets the required characteristics:
- Edged board, quarter - a wooden panel, often used for interior decoration. It, unlike other species, does not have a tongue-and-groove system. This type is the prototype for current lining connections;
- Tongue board - this profile is used exclusively for vertical finishing; it looks like tongue-and-groove construction boards, but smaller in size. Excellent for wall decoration in the office, especially in the reception area;
- Profile “Calm”, “Russian”, “Peasant Woman”, “Simple” - these are all names of the same type of panels. This type of profile already has a tongue-and-groove connection system, an ideal surface and a compensation gate. The surface is perfectly polished, but it is still not a Euro profile;
- Double-sided profile - excellent if a thin partition is required. Since it does not have a reverse side, which, however, can also be used for installation on a wall, and then you can choose the more aesthetically beautiful side of the panel;
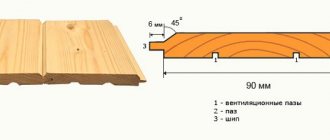
- Eurolining is the most suitable type for interior decoration. The installation of this type of lining is predetermined and quite recognizable. The tongue-and-groove system is 8 mm larger than the usual one. And on the back side of the panel there is a gateway that ensures air movement, which, in turn, prevents the formation of mold and mildew.
- Eurolining comes in two types: “Soft Line” and “Standard”. They differ from each other in that the “Standard” profile has straight chamfers above the tongue, while the “Soft Line” panels have rounded chamfers. This type defines the “soft line” of connecting elements;
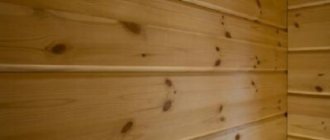
- “American” - using this coating creates the effect of laying the boards overlapping;
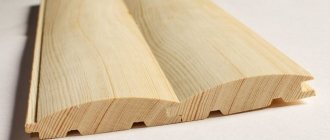
- “Block house” is a type of profile that imitates a rounded log. This coating visually makes the house look like a solid log house.