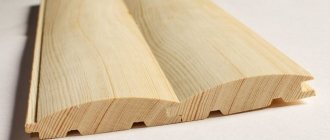
Many people think about finishing surfaces with clapboard. This material has many advantages. But to work with lining, you must follow a number of rules. The work is being carried out in stages. To properly nail the lining, you need to follow the simple instructions.
The article describes in detail the main methods of fastening, and also tells how to properly attach the lining to the wall using nails. And at the end of the article, useful recommendations from professionals are given.
Mounting methods
There are many ways to fasten the lining:
- self-tapping screws;
- nails;
- kleimers.
Using clamps is one of the best methods you can come up with. Thanks to them, the material does not deteriorate, they can be dismantled calmly and without damage. The clamp is mounted in the groove of an already installed element. Nails are then inserted into the hole. The fastening becomes very reliable.
If nails and screws are used for installation, it is worth considering their traumatic nature for the material. Unlike the first method, this method leads to deformation of the wood. The material is attached using finishing nails. Elements are allowed to be nailed from the front part. But the nails will be noticeable.
You may want to consider another option. It involves guiding the nail into the ridge of the material. Then it turns out that each next board will cover the previous one. Then the nails will not be visible.
Attention
During installation, you need to frequently check everything with a level. Don't place elements too close to each other.
There is a division into a vertical method of arranging elements and a horizontal one. How do these methods differ and for what rooms are they recommended?
Horizontal installation
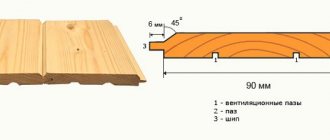
With the horizontal method, it is necessary to fasten the material with the comb upward.
This avoids the accumulation of moisture and condensation inside the structure. It is recommended that installation work be carried out from top to bottom, then the gaps between the elements of the material will not be visible. Instructions for horizontal installation:
- First, the lining is installed near the ceiling, the second is applied from below and secured with nails.
- The last element is adjusted to the required parameters.
By following simple rules, you will get excellent results.
Vertical installation
Another method of fastening the material is vertical. The elements are installed in the center of the working surface, and the sheathing of the frame begins from the corner. In this option, it is recommended to use nails, staples or screws for fastening.
Installation instructions:
- Starting from the left edge of the surface, place the ridge on the corner of the lining and secure it using the chosen method.
- Nails or screws are inserted into the grooves, the second board is placed in the first and so on until the end of the surface.
- The last strip is adjusted to the required size. It should be attached to the right edge.
Please note that on the first strip the ridge needs to be cut off so that the fasteners are not noticeable.
No. 2. Types of fasteners for lining
traditional ways to fasten the lining :
- using clamps. This is the most gentle method, it allows you to maintain the integrity of the lining;
- using nails that are driven into a groove or tongue. This technology requires greater caution from the performer, as there is a risk of damaging the lining;
- through fastening of self-tapping screws through the lining;
- fastening using a construction stapler.
Regardless of what type of fastening is chosen, it is recommended to install the first and last boards using nails with small heads - they can be easily recessed into the body of the lining. Attach the lining first to the middle beam, then to the two outer ones, carefully controlling verticality or horizontality. Then it is attached to the intermediate bars.
What is the best way to mount it to the wall?
To correctly install the lining on any surface, installation is carried out in several stages:
- The first stage is to prepare all the necessary tools and materials. It is good to use a special finisher. It will come in handy if nails are used. Thanks to the hammer, the master will not hit the wood with a hammer, and the material will not be deformed.
- At the second stage you need to build a frame. For this you will need wooden blocks. There is an important rule to remember here. For horizontal installation of boards, the frame is built vertically, and vice versa - with a vertical arrangement of the material, the frame is built horizontally. Details about why the sheathing for the lining is needed and how to properly build this frame are written here.
- The third stage is fastening the lining.
Let's consider options for fixing lining in different rooms and their features.
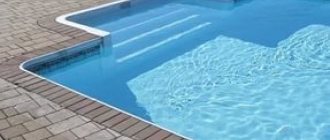
In the bath
The lining is ideal for finishing a bathhouse. Not every type of wood is suitable for cladding a steam room. The best:
- pine;
- oak;
- larch;
- birch.
Before starting work, the material must be treated with a special anti-fungal compound (how to treat lining with protective agents?).
You can attach the lining to:
- nails;
- self-tapping screws;
- clampers.
The master chooses the method.
More about that. how to line a bathhouse with clapboard is described in a separate article.
In the steam room
There is an opinion among avid bathhouse attendants that when the lining is mounted vertically, the temperature of the boards at the bottom and at the top differs. This point affects the durability of the material. If you use horizontal fastening, the boards dry out to a lesser extent. This method of cladding makes the steam room more spacious.
Vertical masonry is recommended for saunas. They combine high temperatures with dry air. To ensure that air circulates well and condensation does not accumulate, holes are drilled in the material elements.
For installation, clamps are used. Detailed instructions are given above. To save money, you can use a budget method of sheathing with fastening with nails.
Advice
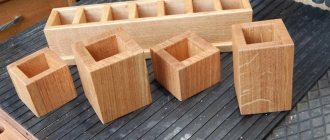
The lining is mounted on shelves and seats using self-tapping screws. Surfaces must be sanded before installation.
Types of nails
The main criterion when choosing nails is the type of protective coating. Not only the appearance, but also the durability, as well as the cost of fasteners, depends on this.
| Type of nails | Description | Application |
| Black | Steel nails without protective coating. They are the most inexpensive, but are susceptible to corrosion | Used exclusively for finishing dry rooms |
| Galvanized | Coated with a thin layer of zinc 6 microns thick. This is the most popular type of nails, because at a low cost it is highly resistant to corrosion. | Suitable for finishing all types of residential and industrial premises, as well as structures not exposed to direct contact with moisture |
| Copper plated | Copper plating provides excellent corrosion resistance. The products have a characteristic reddish tint. | Used for finishing rooms with high humidity - bathrooms, baths, dressing rooms, open balconies and terraces |
| Brass plated | Products coated with brass are absolutely not subject to corrosion and have high aesthetic properties. They have a spectacular golden hue and are distinguished by the highest price | They can be used in any conditions, but due to their cost they are most often used when finishing with expensive materials, where the main emphasis is on the decorative and aesthetic appearance of coatings |
| Chrome plated | They have excellent anti-corrosion properties and have a pleasant silver-mirror shine | They are used for fastening platbands, coverings with increased decorative requirements, as well as for assembling furniture |
| Bronze | Nails with a bronze coating are not subject to corrosion, and thanks to their dark color with a greenish tint, they become completely invisible in the wood. They are distinguished by greater weight compared to other types and a fairly high price | Used for finishing wet rooms, open terraces, balconies, door and window openings |
Prices for nails for air guns
Nails for air guns
Useful tips
In this matter, you should follow the recommendations:
- One of the useful tips for those who use nails to fasten elements. If they are driven deeply into the surface, the attachment point can be hidden behind wooden pins.
- Don't forget to check your work with a level. At any moment, elements can “go” unevenly. It is important to notice this phenomenon as early as possible and correct it.
- Do not place the boards too close to each other. Over time, the wood may swell, the lining will change shape - it will not look very aesthetically pleasing.
- When installing a block house, the first part is mounted on top, finishing is done horizontally. Periodically it is necessary to check the work with a level.
- If there is high air humidity in the room, waterproofing is needed. Usually the choice is made of roofing felt or plastic film.
- In the steam room you should use horizontal fastening of the boards.
- In some options, diagonal placement of material on surfaces is possible. It looks very nice too. Diagonal installation of the very first element must begin from the corner. Finally, the board is cut to the required size.
- When using sheathing, the step between the bars should be 40 cm. If you decide to use insulation, then the step is equal to the thickness of the insulation (read about insulating a house with clapboard here). If the walls in the house are uneven, you need to fix the frame with bolts or screws.
Lining is an excellent material with its own characteristics and advantages. All the described installation methods allow you to sheathe the surfaces of different rooms soundly, efficiently and for a long time. It is necessary to follow proven methods and methods of using lining. Then you will enjoy the positive qualities of this material for a long time.
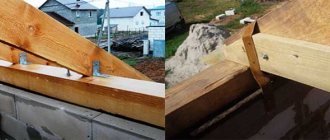
Installation of sheathing
The lathing for the lining is made of dry, even, planed pine slats with a cross-section of at least 20*40 mm.
It is advisable to treat the slats with an antiseptic composition:
- In the corner of the room we install the first rail vertically, checking its position using a plumb line. It is necessary to fasten the rail to the wall in 500 mm increments with screws of sufficient length, using plastic dowels and wooden spacers.
- In the opposite corner we similarly mount the second rail.
- We stretch two cords along the top and bottom of the wall from rail to rail, which will serve as beacons when installing the upper and lower slats.
- We strengthen the horizontal slats under the ceiling and near the floor, controlling their position along the cord.
- Stepping back 0.5 meters from the bottom rail, install the next rail horizontally.
Advice. You can also check the correct installation using the cord, stretching it between the outer slats. Or according to the rule (flat slats), resting it on the upper and lower horizontal slats.
- The rest of the sheathing slats are installed in the same way.
We do the same on other walls.
Note. When the lining is horizontal, the sheathing slats are located vertically. When laying diagonally - at right angles to the lining.
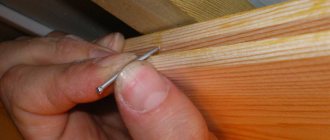
Nailing tool
To recess the nail head without damaging the finishing material, you need to choose the right working tool. Most craftsmen use a hammer - a cone-shaped metal rod.
Nail punchers
Its working end has a small diameter, so when driving it only touches the nail head and does not catch the wood. There are two types of finishers:
- with a grooved recess at the end - this rod is designed for nails with a recess on the head;
- with a recess under the head of the hardware - the rod securely grips the nail and does not slip off when struck.
The top edge of the tool is wide and flat, specially designed for hammering. The hammer is very simple to use: the end of the rod is placed on the protruding head perpendicular to the surface, the tool is held in this position with one hand, and the wide part is hit from above with a hammer with the other. As a rule, 1-2 blows are enough to sink the cap a couple of millimeters into the wood.
Homemade nail puncher
Advice. If there is no punch, it can be replaced with a large construction nail or center punch. To do this, the lower end of the product is ground down a little or cut with a grinder so that it does not slide off the hardware head. A large bolt will also work: it needs to be turned on a lathe so that the diameter of the rod matches the diameter of the nail head or is slightly smaller.
If the amount of work is large, it is very convenient to use another tool - a pneumatic nail gun. It is also called nailer and nail gun.
Pneumatic nail gun
There are special finishing nailers of various calibers designed for a certain size of nails.
Nails for air guns
This tool is quite expensive, but it has great advantages:
- reduces installation time;
- weighs little and fits comfortably in the hand;
- the nail goes in up to the head in one blow;
- fasteners do not bend, and there are practically no misfires;
- no need to exert much physical effort.
Disadvantages include the need for a compressor and connection to an energy source.
Air nailer - application
Fastening the panel with a nail gun