On a hot summer day, you just want to plunge into the cool water and beat off the sultry heat. Therefore, the popularity of private artificial reservoirs is only growing. There are a variety of designs, but in this article we will look at how to build a brick pool with your own hands.
We will also tell you what its pros and cons are.
Advantages and disadvantages of brick ponds
In our country, they prefer to build artificial reservoirs using a frame or a ready-made monolithic bowl. But a brick pool remains in demand. The material is of high quality, but not perfect – and here’s why:
- Construction times can drag on for many weeks.
- In general, buying bricks and the construction itself are not cheap. Especially if the homeowner does not have masonry skills and hires a team of specialists.
- You must understand that brick is not easy to process. Want to create a smooth curve? It is impossible to do without the use of concrete.
- Decent thermal conductivity.
- The construction technology itself is classified as complex.
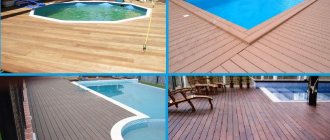
The obvious advantages of the material include high strength and durability. When using, you are not limited in the choice of shapes and sizes. There is always the opportunity to install a swimming pool made of good brick with your own hands and supplement it with peripheral devices: water slides, hydromassage or lighting.
Brick pool
Summarize. A pool built at the dacha with your own hands will serve the owner for many years. This is not temporary fun for the summer, but a solid tank designed for long-term use. Brick is rarely used for the construction of large reservoirs. And the point is not at all that this material is not suitable.
Compared to plastic or concrete, the construction is much more expensive. If you are not afraid of the price or there are a lot of unnecessary materials left after building the house, a DIY brick pool is your option. It remains to find out how to build a brick pool yourself.
What difficulties will you face?
It is quite possible to build a pool bowl without outside help. But you will immediately encounter several difficulties:
- The structure must be 100% airtight so that groundwater does not enter it. They often contain questionable and sometimes even dangerous substances.
- Since water tends to destroy even bricks, you will have to seal the structure from the inside.
- The pressure on the walls will be enormous, so they must be strong. A medium-sized artificial reservoir holds from 12 to 18 tons of water.
- Also, the walls will be under the influence of the so-called heaving force. A brick structure can be built in compliance with all the rules. But since it consists of small fragments, there may be a weak point somewhere. And then the wall will begin to collapse.
In a word, the task is not easy. Exactly the same problems can arise when building a pool from concrete blocks, but the problem with a brick wall is that it is not monolithic. And the material itself is not airtight - additional waterproofing will have to be provided.
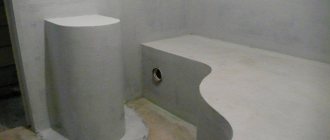
Pit for water drainage
Is it possible to improve moisture removal? Undoubtedly. A so-called pit is constructed, the depth of which exceeds the dimensions of the bowl. The drain pipe is inserted into it and a filter is installed, and overflow holes are made in the walls. They will be needed to collect water from the surface. This will maintain a stable water level and remove all dirt.
One way or another, the procedure for constructing a brick reservoir will be as follows.
Preliminary preparation: nuances
First you need to choose the dimensions of the future building. They are determined by counting the number of people for whom this pool is intended. So, for a large family you should make a large bowl.
Convenient dimensions would be a depth of 150-180 cm, with an area equal to approximately 20 m².
To get started, you should start preparing the skeleton of the structure, its foundation. Then polystyrene foam blocks are laid. It doesn’t seem difficult to lay out the walls of a pool from them. The blocks have grooves, which greatly facilitates the installation process. Even a beginner can handle the job. To lay the material correctly and clearly, you can use a hacksaw. It helps to make holes in the blocks in which the reinforcement is fixed. Then the parts are connected to fill the walls of the future reservoir.
The connection points between the pipe and the base are covered with foam, which will help avoid leaks.
Construction layout
Drawings and planning are the basis for successful execution of work. If you don’t calculate everything in advance, your money and efforts will be wasted. Decide for what purpose you are building a pool, who exactly will swim in it, and what requirements are imposed. It is advisable to put all this in writing.
Are you building a small pond for the kids? The recommended depth of such a bowl is up to 150 centimeters, and the width is three meters. For adults, a deeper tank is suitable - from two meters deep and from 4 meters in length. This way you and your guests can swim in comfort.
Scheme of building a brick pool
As additional options for a children's artificial lake, you can install several slides and springboards. Adults will definitely appreciate the hydromassage. And a convenient ladder will become a useful equipment that simplifies the use of the reservoir. Having decided on the key requirements, draw up a drawing indicating the dimensions, necessary communications, and equipment.
Type and type of pool shape
pool shapes
Once you have decided on the best place for construction, you should think about the shape of the future small reservoir. Here you can completely surrender to your desires, dreams and give free rein to your imagination, but it is best to do without excesses and heavy geometric superstructures, as this will significantly complicate the work of a novice builder. For example, you can choose the shape of a square, rectangle or square.
Well, the next step will be marking the site. To do this you will need tools such as:
- Cord.
- Ribbon.
- Pegs.
After marking, you should start digging a pit. According to construction rules, it must be one meter deeper than the pool itself, and the walls of the pit are best made with a slight slope of three to seven degrees outward. Such a small deviation is necessary, in particular, to prevent crumbling and destruction of the soil and to ensure greater reliability and stability of all structures.
Where to dig a pit?
When the plan for the future construction is already on paper, it’s time to decide on the location. The site requirements will be:
- Ideally flat place.
- Lack of trees. Firstly, the root system can affect the strength of the brick bowl. Secondly, you will have to constantly clean the water from leaves.
- Neither electricity supply nor drainage should cause any difficulties.
- There should be no residential buildings, gazebos or car parking nearby.
We begin to dig a pit trench. We mark the boundaries with a margin of one meter from the size of the tank. At the same time, we are digging pipe trenches and thinking through the optimal drainage option. The pit is always dug 50 centimeters deeper. In addition to the bowl, a slab with bedding will be installed.
Proper care. Adviсe
Maintenance of a personal pond should be both routine and general - once a month. There are different cleaning methods:
- mechanical;
- chemical;
- innovative.
The most common mechanical cleaning is wiping with a damp cloth and brush, collecting large debris with a net. To save effort and time, special devices are used - hydrovacuum cleaners, automatic remote devices, semi-automatic devices with different attachments.
Chemical methods involve disinfection by adding antibacterial and antiseptic drugs to the water, which successfully fight harmful microorganisms in the water. Until recently, the most common form of cleaning was chlorine and chlorine-containing products. But many have abandoned this chemical element due to its pungent odor and increased effect on the skin and use:
- hydrogen peroxide;
- potassium permanganate;
- bromine.
Devices that operate on the release of copper, silver, chlorine, and magnesium ions are considered innovative. Such equipment can be large in size, then it can purify all the water in the bowl. Small devices purify water over an area of one and a half to two meters from the place where they are installed. They are not cheap, so they are used much less frequently than other pool care options. Many summer residents clean their pond using the “old-fashioned” method - with a mop and a rag. But we must take into account that in this way visible dirt is partially removed from the sides of the bowl. Draining water and general cleaning are needed at least once a month.
Recommendations for constructing a foundation cushion
Before building a deep brick pool, sand and gravel are poured. This seal will protect against groundwater.
Before backfilling, the ground is leveled and geotextiles are laid. It does not allow water to pass through and can withstand even severe pressure. This option is just right for installing a swimming pool.
After laying the geotextile, it is covered with a 20-centimeter layer of crushed stone. The second layer is sand, the thickness does not exceed 10 centimeters. It is also leveled and compacted well. It is very convenient to do this using a board with a level.
The foundation has been laid
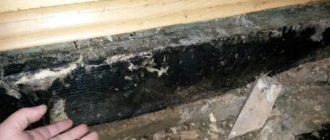
The last layer that needs to be laid on the cushion of the future pool before pouring will be waterproofing. Thanks to it, the bowl itself will be protected from groundwater. There are many options, we recommend buying a roll of waterproofing membrane. Several stripes spread at once, the edge bends.
Plastic liner lined with brick
Here the situation is simple. Buy a plastic liner for the pool. They are inexpensive and come in different sizes and shapes.
Even when purchasing, consider how the water will be drained - from below, through the bottom drain, from the sides, through nozzles, or over the edge - with a skimmer. Lay pipes according to the type of water drainage when preparing the foundation for the pool.
Installation on the ground
After you have brought the bowl to the site, prepare a flat area for it. It will be necessary to remove the fertile layer of soil with vegetation and make bedding according to all the rules - as described above.
A plastic liner lined with brick is an excellent option for a pool or bathhouse and more
When draining water from the pool at the bottom, it is advisable to make a pit where the pipe should be led out. Equipment can also be located here - pump, filter, etc. With a screamer and a side drain, the pump will in any case be below the water level, so everything is organized more simply here.
Sometimes the liner is placed directly on the sand, sometimes a podium is laid out from the same brick, and the bowl is placed on it. It all depends on the type of soil. If they are not heaving, then you can put them on sand, but on clay and loam soils you will have to make at least some kind of foundation.
If you want, you can lay polystyrene foam under the brick (or on it) - there is no such thing as excess thermal insulation. You can also cover the sides of the bowl with this material, and only then cover it with brick. Great thickness is not needed - 3-5 cm is enough.
Another option for a brick-plastic pool
The waterproofing and rigidity of the walls is ensured by the liner, so there are no special requirements for the masonry and its finishing. Do as you please.
Recessed installation
The liner can be partially buried in the ground. With this option, only the depth of the pit changes. After installing the bowl (with or without thermal insulation - decide for yourself), you will need to fill the gap between the wall of the pool and the pit. This can be previously removed soil, gravel or sand. Gravel and sand are an option for heaving soil, excavated soil is an option for normal soil. You compact the backfill and begin to cover the protruding part with bricks. Actually, that's all - finishing work remains.
Laying the foundation
Next, reinforcement is performed. The best option would be a concrete base with a diameter of 200 mm, and the thickness of the reinforcement bars - from 12 mm. The recommended step is 2 x 2 cm or 3 x 3 cm. If the soil is heaving, make two belts; if there is a low probability of movement, you can limit yourself to one belt. The first tier is placed at a height of 7 mm from the plane, the second - 15 mm. Use the brick halves to lay the belts correctly.
Base reinforcement
To prepare the mortar for pouring, use concrete class M400 or higher. To create a smooth surface, various water-repellent components are added. They will significantly extend the service life.
You can order a ready-mix machine from the factory or make the solution yourself using a concrete mixer. Of course, the solution must be level and harden well. Depending on the weather, it will take 1-2 weeks. When the material becomes solid, begin building the walls.
What is it for?
When ordering the construction of swimming pools for their dachas, people, first of all, want to add comfort to their dacha holiday. It’s no secret that today growing garden crops is, first of all, not a way to provide yourself with food, but an active recreation that allows you to forget about problems at work, the bustle of the city and get as close to nature as possible. And such a vacation is doubly pleasant if you have the opportunity to swim after useful work or simply lie down next to the surface of the water in a sun lounger.
What to consider at the very beginning
Before finding out how much it costs to build a pool on a turnkey plot, you need to analyze a number of points that directly affect the cost of the pool:
- what will be the functional purpose of the pool
(decorative, children's, for adults);
An inflatable children's pool is the most inexpensive and simplest option for a summer cottage.
- will it be stationary or collapsible
pool;
- opportunity deepening the structure
in terms of groundwater levels;
- how will it be organized drain system
and water treatment;
- how much is free area
, suitable for placing
a tank
; - which form
will be at
the bowl
.
Stationary or prefabricated
The type and size of the pool directly determines how much it costs to build a turnkey pool on a site. Permanent structures tend to be more expensive than comparable sized prefabricated bathing tanks.
In addition, maintenance and operation of collection tanks will require less money. It should be understood that if the pool is being installed for a long time and will be used frequently, then you will have to invest in a stationary structure. If you need it for short-term use on a small summer cottage area, then you can get by with a prefabricated pool.
Inflatable structures can be quite large in size, sufficient for bathing adults and children.
Non-stationary structures
These types of bowls are small or medium in size. Depending on the characteristics of the selected type of pool and the option of installing equipment (on the surface or with recess), the installation time of the structure can range from several hours to three days. There are the following main types of collapsible bowls for a summer cottage:
- rod frame
;
- sectional frame
(plastic, metal, wood);
- inflatable
.
If you need the most economical option, then it is easier to buy a ready-made inflatable bowl than to make a pool at your dacha. Its price is minimal and ranges from 2 to 16 thousand rubles. The diameter of the inflatable bowls does not exceed 5 meters, and the depth ranges from 50 cm to 120 cm. They are made of PVC film; for large-sized products, the structure is reinforced with a frame of thin-walled aluminum tubes.
Large inflatable bathing tanks may have additional supporting sides of the structure.
Some models are equipped with filters for water purification. The small volumes of the bowl allow the water in it to quickly heat up to ambient temperature. The weaknesses of inflatable products are:
- high risk of mechanical damage
due to a puncture or cut;
- the need to resolve the issue storing the bowl in winter
;
- exposure to negative influences ultraviolet
which can cause
PVC to crack
.
The next in increasing cost are prefabricated rod products. On average you will need to pay from 4 to 20 thousand rubles for them. The frame in them is a structure of vertical and horizontal posts with special fastenings. The water is retained by a PVC cover; these pools are supplied with a pump equipped with a filter. The weaknesses of rod frame tanks are the same as those of inflatable products.
To install a rod frame bowl, you need a flat base and 2-3 hours of installer work.
Sectional frame products or rigid frame pools are among the most reliable prefabricated structures. Metal, plastic or specially treated wooden elements are connected by locking, bolting or gluing. The depth of such bowls ranges from 1.2 to 2.4 meters.
Their advantage is the absence of the need for dismantling during the cold season. It is enough to simply remove the polyvinyl chloride tension element. A typical pool kit includes a pump with a water filtration unit and a skimmer (cleaning device). The average cost of frame products ranges from 40 to 100 thousand rubles.
Sectional frame pools are similar in performance to stationary bowls.
Stationary
Stationary pools are made from various materials, this in turn affects the cost of constructing the pool and its operational properties. In particular, bowls are made from:
- concrete
;
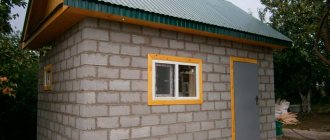
- red ceramic brick
(walls) and
concrete
(base); - metal
;
- multilayer
(composite)
fiberglass
; - polypropylene
.
Features of masonry
Creating a brick tank is much more difficult than building a pool from polystyrene foam blocks with your own hands. It has a couple of nuances:
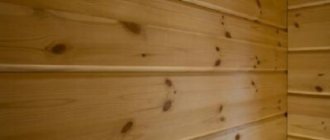
- Red ceramic brick is desirable . Silicate is discarded immediately, since it is allowed to be used for the construction of dry structures.
- A one-brick wall is built inside the bathhouse. The foundation will easily withstand the load, the water pressure will be low. But as you understand, indoors the size of the reservoir will also be modest. During construction, it is recommended to lay another brick through each row so that the wall can withstand the load. Each row is reinforced with rods (steps from 10 to 15 centimeters, wire 5 mm).
- To create a durable surface, a plasticizer, liquid glass, is added to the solution. The outer seam is made according to the classical pattern, the inner seam is half-empty. A reliable adhesion of the plaster solution to the surface is created.
- We remind you that you will need to think about the location of the pipes with nozzles for draining water. In overflow-type structures, you can do without them - just install screamers.
Small in-ground brick pool in the bathhouse
The order of work will not differ, there are only some peculiarities:
- No soil removal required.
- The layers of the substrate may be smaller - the dimensions are usually much more modest and the mass will not be so large.
- The thickness of the slab for the bottom is about 10-15 cm, the reinforcement is in one row.
- If any walls of the pool run parallel to the foundation of the building, there should be a gap between them - they should not touch.
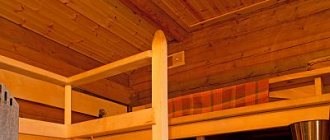
You can also make a small brick pool inside the bathhouse yourself - It is more convenient to do insulation with polystyrene foam boards and to do coating waterproofing simultaneously with the construction of the walls of the bowl. They laid out the walls to the height of the sheet, coated them with waterproofing, and installed a heat insulator.
- Where to place a pit with equipment is a difficult question. If you can do it indoors, it will be good; if not, do it outside. Although you can find attachments that will be located near the pool.
You can make a brick pool in a bathhouse with your own hands. And it won’t be so difficult: the dimensions are more modest, which means the pressure is not so great. Moreover, most of the heaving loads will be borne by the foundation, which also increases the viability of the idea. But the best solution would still be to use a plastic liner: it guarantees 100% waterproofing.
Finishing work
Plaster is applied to the inside, water-repellent components are added. Before this, the chain-link is fixed, and after the plaster has hardened, a deep penetration primer is applied. It must contain antibacterial additives. They will prevent the appearance of bacteria and algae in the bowl and will simplify the process of further cleaning the pool.
Mosaics and tiles are suitable for final finishing. They will stick well if you use water-repellent glue. Some builders use rubber paint. Its advantage lies in the comprehensive protection of walls from moisture penetration. Has a presentable appearance.
Final finishing
Don't forget about the exterior wall decoration. It is advisable to do it in 2 layers. The first will be sealing, and the second will be insulating. The coating composition is applied to the plaster; polystyrene in the form of slabs is used for insulation. The second layer completely covers the joints of the first. Thermal insulation is extremely important, as it reduces heat loss - it will not escape into the soil from the water. The joints of the 2nd row are treated with a special mastic that repels water.
The final touch is filling in the gaps. Both previously dug soil and a mixture of earth and crushed stone will do. The second option is better, as it prevents displacement.
In conclusion, we suggest you watch a thematic video on how to build a brick pool with your own hands. It is useful for experienced builders and beginners who are faced with the construction of a reservoir for the first time. In general, constructing a brick bowl and then filling it with water is not an easy task even for a professional. But if you have patience, you will get a beautiful, reliable pond with an attractive design. It’s not for nothing that they say that there are no impossible tasks!
Pros and cons of a ready-made kit for building a swimming pool
pool building kit
For a person who is not particularly versed in construction, an excellent option would be to install a ready-made set of building materials. In itself, such a construction installation kit contains all the most necessary building materials for quickly building a pool (swimming bowls, main parts for the pool, materials for waterproofing, and so on).
Its main composition includes:
- All kinds of metal fittings;.
- Special construction skimmer;
- Film for finishing the front part of the pool;
- Underwater nozzles;
- Several pieces of special water filters.
- Embedded parts.
- Powerful construction pump.
Accessories for the pool (ladder for ascending and descending into the pool, etc.).
Using the above-mentioned special ready-made kit, you can not only build a pool very quickly, but also equip it with all the necessary additional elements that will significantly simplify the process of caring for and keeping the pool clean. For example, these could be various built-in underwater lights, decorative elements and decorations that will help create a pseudo-flow of water and small waves, a protective coating, devices and devices for completely cleaning the pool, and so on.