If you have a summer cottage, then you will certainly want to arrange it in such a way that the time spent here will be remembered for a long time as vivid impressions.
Wooden terrace around the pool
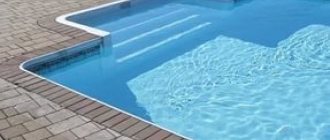
Some people make a mini football field, others a tennis court, others prefer their own garden. This article will look at how to arrange the space around the pool so that it is comfortable not only in the water, but also near the pool itself. And to do this, you can build a wooden terrace around the pool, which will accommodate a table with chairs, a sun lounger, and if you wish, you can even set up a barbecue.
Swimming pool with decking
In a word, relaxing near the water in your courtyard will brighten up your leisure time, and the guests you invite to your place will not remain indifferent to such an original solution for arranging a recreation area.
Advantages and disadvantages of cladding
The advantages of decking boards are:
the material realistically imitates natural wood and has high decorative qualities;- no harmful effects of moisture: the decking board does not get wet, does not warp or rot;
- high frost resistance allows the flooring to endure winter without loss;
- wide selection of colors, imitation types;
- the flooring does not heat up under the sun's rays, allowing users to walk barefoot and not get burned;
- installation of the material is simple and can be done independently;
- Manufacturers' warranty is up to 20 years.
- fire safety - the flooring does not burn and does not support combustion.
Flaws:
- due to solar heating, the flooring elements slightly change shape;
- many types of decking boards are similar to plastic panels, which reduces the decorative value of the flooring;
- Some manufacturers produce panels that emit a specific odor of synthetic material.
The smell from new panels disappears on its own after a few days (weeks) of use, so there is no need to worry about it.
Fitness club “World Class Kuntsevo”
Photo: World Class Kuntsevo
Another fitness club for the wealthy public, who can afford to purchase an annual subscription for 100,000 rubles. The outdoor 25-meter pool is open all year round, and in general the range of fitness programs offered at World Class Kuntsevo is standard. And thanks to its location in a cozy and green area of Moscow - in a park area and away from buildings - it creates the feeling of a country club.
st. Ivana Franko, 16
View on map
8
worldclass.ru
Which decking board to choose?
When choosing a decking board, you need to know its varieties and their features. There are three options:
- WPC (wood-polymer composite) . This is the most popular type of decking board, impervious to external influences (moisture, temperature changes, direct sunlight, etc.). Externally, it somewhat resembles plastic.
- Natural wood . As a rule, this is a deck board made of larch that has undergone special preparation. Typically used for flooring located under a canopy (veranda, terrace, etc.).
- Heat-treated board . Heat treatment removes moisture from the wood and clogs the capillaries, which makes the material resistant to moisture.
WPC is considered the optimal material option for finishing an outdoor pool. Natural types retain the ability to rot and fungal infections, which appear some time after the start of use, and WPC does not change its properties throughout its entire service life.
steps
The next step in building a wooden deck is to install the frame for the steps. The basis is the stringers, which are located at a distance of 16 inches from each other.
To calculate the size of the steps, you can use our calculator with instructions.
Scheme of stringers
To make them, use a board with a cross section of 2x10. In order for all the steps to be the same in length and height, you first need to make a pattern for one step, and then sequentially mark the steps on the blank for the stringer.
Stair stringer is a sawtooth-shaped wooden board or beam with rectangular teeth
For the convenience of ascending and descending the steps, the dimensions of each step, firstly, must be the same, and secondly, in terms of the height and depth of the step, they must be within certain limits. For height, it measures 6 to 8 inches, and for depth, it measures 12 to 16 inches.
There are, of course, non-standard sizes of steps, but most often they are made within the limits given above.
At the bottom, all stringers are connected by one board for stability of the structure. Figure 7 shows the frame of the terrace and steps.
Figure 7. Frame of the terrace and future steps
Preparatory work
Before finishing, it is necessary to carry out preparatory work. It is necessary to remove all foreign objects, plants, landscaping elements (benches, gazebos, etc.).
After this you need to do the following:
Remove the top fertile layer of soil (turf).
Remove plant roots if found. Level the site, mark it, determine the installation points for the piles.- Make nests, line them with roofing felt, install vertical supports and fill them with concrete. An alternative option is to install screw piles.
- Make a sand cushion (15-20 cm), compact it thoroughly, lay a layer of geotextile on top, and then make a top layer of sand.
At this stage, preparation can be considered complete.
Location requirements
The space requirements for a monolithic and prefabricated pool are slightly different from frame-type samples:
- For the first two, a pit is dug, and a relatively low side remains above the surface of the earth.
- Frame pools stand on the ground. The main thing is that the surface is hard and level and can support the weight of a full pool. Although the largest of them have a mirror area of no more than 50 m2, and a depth of no more than one and a half meters.
Expanded polystyrene pad under the bottom
Therefore, when choosing a site for a monolithic or prefabricated pool, it is necessary to take into account the routes of underground communications - they should not cross the construction site. There are no such restrictions for frames.
Monolithic pool project
The second point of the requirements also concerns engineering communications. They should pass close enough to the pool bowl so that pipes and cables do not have to be laid specially for it across the entire section.
Installation of an overflow pool
To operate the pool you need:
- Water pipes. The water entering the bowl must be of a quality no worse than drinking water - from a centralized or autonomous water supply system. Taking water from natural or artificial open reservoirs is prohibited.
- Sewerage. If the house on the site is connected to the central sewer system, then waste water is discharged there. If an autonomous sewage system is used, then a drainage well is installed next to the pool (so as not to overload the septic tank). It is not recommended to dump water into a storage container to use for irrigation - it contains disinfectants that are toxic to plants, such as chlorine (or bromine) and algaecide.
- Electricity. A 220 V network must be provided to connect technological equipment and lighting.
Next to the pool bowl, there should be space for a room (or, alternatively, a caisson) in which the pump, water treatment filters, and shut-off valves will be located.
The size of the room depends on the dimensions of the equipment, and they, in turn, depend on the productivity. If the water for the pool will be heated, then it is also necessary to provide space for a flow-type boiler.
The third point is recommendatory. There should be no trees or shrubs nearby - sources of biological pollution of water.
And we must not forget about the distance to the border of the site - at least 1 m.
Step-by-step instructions on how to finish a tank
Pool decking is a step-by-step process of creating a support system and laying down the deck.
Tools and materials
You need to prepare the following tools:
- power saw or jigsaw;
- electric drill or screwdriver;
- measuring instrument - ruler, tape measure, square, building level;
- grinder with cutting wheel;
- welding inverter with a set of electrodes.
The last two items are tools for working with screw piles, if used.
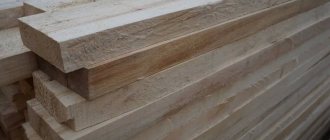
Materials:
- terrace board;
- support bars (logs) with a cross section of 45 × 80 mm (approximately);
- strips for making a strapping belt connecting the tops of the piles;
- bars for making railings, handrails or other design elements (if they are planned);
- clamps for installing decking boards;
- nails, screws.
Stages of work
The installation process is as follows:
- Make a strapping belt from bars connecting the upper parts of the supports (or screw piles). The belt will be the main supporting structure, so it is necessary to ensure complete immobility and strength of the harness.
- Lay the joists in a transverse direction to the trim strips. It is recommended to place rubber bands (or strips of roofing felt, which is somewhat worse) under the joists. The tops of the joists should form a flat, horizontal plane.
- The flooring is laid on one side of the site. The end panel is secured in a secret way, then, using clamps, other flooring elements are sequentially attached. When the canvas is laid, the edges are sheathed with transverse boards, forming the edges of the area or paths.
The installation of railings or other vertical elements is carried out at the stage of assembling the support system to ensure proper strength and immobility.
Finishing the beach area around the pool with a terrace board - in the video:
Fitness club "Vitasport"
Photo: vitaclub.ru
The elite fitness club VITASPORT on Shchukinskaya has four swimming pools, two of them - 25 meters - with spring water, outdoors, heated and open all year round. The water zone regularly hosts tournaments for adults and children, but to get into the pool, you need to be a member of the club, among which, by the way, there are many show business stars.
Club card holders can purchase additional services: rental of tennis courts, classes with a personal trainer, services of a SPA salon, restaurant or bath complex. Prices start from 150,000 rubles per year.
st. Zhivopisnaya, 21, bldg. 2
View on map
8;
vitaclub.ru
Features for bowls of different shapes
The shape of the pool affects the configuration of the support system and joists. In this regard , rectangular bowls are considered the simplest , which make fewer mistakes when marking.
If the bowl or area around it is round, you will have to use special marking techniques.
For example, mark a circle on the ground using a cord with the center in the middle of the bowl. From the point of view of installation of supports and flooring, there is not much difference . On curved shapes you will have to adjust the length of each board, but this is not particularly difficult. Otherwise there are no problems. If no mistakes are made during the marking process, the work is done quickly and efficiently.
Supports
We are considering a terrace project on supports, each of which needs an individual foundation.
Consider the option of arranging concrete supports with a diameter of 12 inches each.
| Feet | Centimeters | Inches | Centimeters |
| 1 | 30,48 | 1 | 2,54 |
| 2 | 60,96 | 2 | 5,08 |
| 3 | 60,96 | 3 | 7,62 |
| 3,5 | 106,68 | 3,5 | 8,89 |
| 4 | 121,92 | 4 | 10,16 |
| 5 | 152,4 | 5 | 12,7 |
| 10 | 304,8 | 12,7 | 32,258 |
| 11 | 335,28 | 11 | 27,94 |
| 12 | 365,76 | 12 | 30,48 |
| 15 | 457,2 | 15 | 38,1 |
| 20 | 609,6 | 20 | 50,8 |
- According to the project, holes are dug of the appropriate diameter and a depth of about 4 feet.
The holes should be the same depth when preparing - 4 feet or approximately 123 cm - Afterwards, so-called “sleeves” made of roofing material secured with adhesive tape are inserted into these holes. They should protrude approximately 1 foot above the ground surface.
Roofing felt is installed and a frame of three reinforcing rods connected with wire is placed inside - Concrete is poured into these “sleeves”, and metal connectors are installed on top, to which wooden supports will be attached.
The solution is transported by wheelbarrow and poured into the formwork with a shovel, compacting or piercing the mixture with an in-depth vibrator
An example of attaching timber to concrete supports
To avoid digging holes again, make a sketch with dimensions that will show the coordinates of each support. It’s better, of course, to do this on a site plan, especially if there are plants in the construction area or there are communications, then you won’t have to uproot a tree or repair the water supply.
Figure 2 shows the location of concrete supports (Footings), as well as their coordinates. If the support ends up on a water pipe, or if there is a tree growing nearby, simply move the support slightly to the side. It is better to calculate everything and draw it on paper rather than face unpleasant surprises during the construction process.
Figure 2. Location of supports
Having marked the location of the supports on the site, dig holes for them and concrete them. Don't forget to install post connectors into the wet concrete supports. After the concrete has hardened, secure the vertical supports in metal connectors. Use 4" x 4" cross-section posts for supports since the deck is less than 6 feet high. If the height exceeds 6 feet, posts with a cross section of 6x6 inches should be used for supports. Metal connectors should be installed in the appropriate size.
The third picture shows a diagram of the concrete supports used in this project.
Figure 3. Scheme of concrete supports
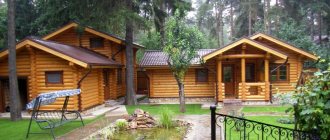
Photos of finished structures
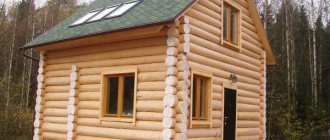
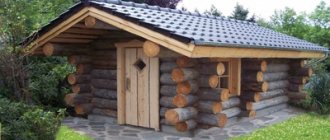
Bathhouse with a swimming pool: project and its main features
A sharp change in body temperature as a result of dipping a person into cold water after visiting a steam room has a positive effect on the body. Such a vacation not only improves your mood, but also strengthens your immune system. Therefore, in the photo of beautiful baths, along with a relaxation room, a bathroom and a washing room, you can see a pool or other body of water that optimally fits into the space and provides ideal conditions for complete relaxation.
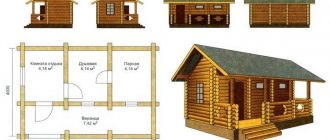
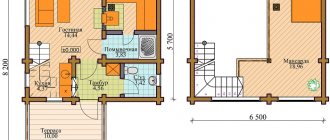
Bathhouse project measuring 12.2 by 11.3 meters with a swimming pool and terrace
Compared to developing a project for a regular bath, planning a sauna with a swimming pool may seem more complicated. Therefore, it is advisable to entrust this work to professionals.
Not every room has the conditions necessary to create such a structure. Moreover, this applies not only to projects of bathhouses with a swimming pool under one roof, where a recessed structure is installed. Difficulties arise even when working with ground-based types of products. The fact is that the presence of a swimming pool in a room causes a significant increase in air humidity. In order for the operation of the bathhouse to be comfortable and completely safe, you will have to take care of complete waterproofing. Need protection from moisture:
- walls;
- floor;
- ceiling;
- electrical wiring.
Designing a bathhouse with a swimming pool is a rather complex task, so it is better to entrust it to specialists
Projects for bathhouses with a swimming pool made of timber deserve special attention, since wood without appropriate preparation quickly deteriorates under the influence of moisture.
Note! The pool is included in the planning at the project development stage. Once the bathhouse is built, it will no longer be possible to add it to the finished building, or this procedure will be too labor-intensive and expensive.
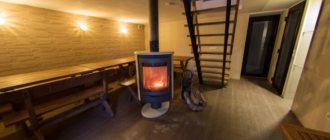
Features of the construction of a bath complex with a swimming pool
In the process of developing a project, it is imperative to think through such nuances as the type of pool, the type of foundation suitable for its construction, as well as the layout that will help create optimal operating conditions.
The construction of a bath complex must begin with a detailed layout
If a small pool in the form of a plastic bowl is used to equip a bathhouse, problems with construction usually do not arise. To install the structure, you will need to dig a pit of the appropriate size and place a sealed container in it. Most often, such products are equipped with removable communication systems, but there are also stationary varieties. Projects with cascading pools require the participation of highly qualified specialists, so in this case you cannot do it yourself.
Before making a permanent pool in a bathhouse, you will need to organize and connect its own water supply and sewerage system. It will no longer be possible to limit yourself to arranging a regular drain, as in a washroom. The task is further complicated by the fact that to build a local sewer system, you will need to obtain permission from the local administration.
How to make a pool yourself: project development
When designing a pool in a bath complex, it is necessary to take into account some important points:
Project of a bathhouse complex with a swimming pool and an outdoor barbecue area
- Pool area. The water container can be installed inside the bathhouse, outdoors, or in a room specially designated for this purpose.
- Terms of Use. If the pool will be used by elderly people and children, you need to carefully consider its depth, as well as the presence of such elements as a convenient descent and handrails.
- Capacity. In bath complexes, small containers are most often installed. The optimal dimensions of the pool are 2x3 m, 2x2 m and 3x3 m.
The decision on the choice of shape, as well as the ratio of the sizes of the bathhouse and the pool, is made by the owner, based on personal preferences. The water container can have raised walls, a corner-type design, or be placed in a bathhouse with panoramic windows from which you can observe the beauty of the surrounding landscape.
When designing a pool, you need to take into account the placement area, operating conditions and its dimensions.
Depending on the type of placement, swimming pools can be either outdoor or indoor. The choice of design largely depends on the dimensions of the bath. Even in a compact building you can build a small pool, but for this you will still need to provide a separate room in the building design. The decision depends on whether the owner of the site is ready to reduce the internal area of the bathhouse. Otherwise, it would be more advisable to install a pool outside the building.
Helpful advice! If you intend to install the pool internally, it is advisable to choose a room for its installation that is minimally distant from the steam room. This is done so that the path from the heated room to cold water takes as little time as possible.
Types of pools: photographs and design features
Existing types of pools can be divided into two categories. Some structures are mobile (so-called portable hot tubs), others are stationary. Portable products are characterized by a simple installation system. To produce such bowls, plastic with an increased safety margin is used. Thanks to the use of modern technologies, the structures are completely airtight.
Swimming pools are divided into two categories: stationary and mobile.
The range of such products is quite diverse. In the manufacturers' catalogs in the photos of sauna pools you can see plastic bowls of various depths, shapes and sizes. If desired, the owner can rebuild such a structure into an artificial heated pond. Special equipment is provided for these purposes. Water is heated by electric heating elements. Such equipment is usually accompanied by instructions, where the manufacturer gives recommendations regarding installation.
A veranda is suitable for arranging an outdoor pool. It is allowed to use a separate area for these purposes, but provided that it is located in close proximity to the bathhouse. As for stationary structures, the installation process is more complex. Stationary systems contain:
- skimmer;
- return nozzles;
- filter system and other elements.
The pool can be installed indoors, as well as on the veranda or terrace
Without experience and relevant knowledge, it will be very difficult to install a stationary pool in a bathhouse. Before you begin arranging such a structure, you will definitely have to draw up a detailed project that will reflect all the characteristics. And both the pool itself and the bathhouse as a whole.
Important! It is advisable to set up a heated mini-pool with your own hands indoors. If such a structure is located on the street, the cost of heating water will increase significantly.
How much will it cost to build a turnkey bathhouse project with a swimming pool: the price of finished buildings
Many construction companies offer ready-made solutions to owners of summer cottages. When ordering the creation of a turnkey bathhouse with a swimming pool from such a company, you can count on high-quality and fast execution, as well as a guarantee that the structure will last long enough and will comply with all standards and safety requirements.
Design of a bathhouse with a swimming pool 10.76x10.56 m, average construction price 800 thousand rubles.
Average cost of finished projects:
| Project name | Dimensions of the building, m | Area, m² | price, rub. |
| Project of a bathhouse with a swimming pool and a relaxation room | 9.44x5.92 | 45,6 | 571500 |
| Bathhouse with pool and porch | 5.5x12.2 | 55,24 | 611400 |
| Bathhouse with relaxation room and porch | 6.4x11.8 | 68 | 737600 |
| Bathhouse with two entrances | 9.4x11.8 | 74 | 796000 |
| Bathhouse project with a pool and terrace | 8.7x14.7 | 117,23 | 911400 |
| Corner bath | 12.2x13.5 | 121,1 | 925000 |
Where and approximately at what cost can I order the service?
Cladding with decking boards can be done by any construction organization specializing in working with wood.
From a technology point of view, this is a simple installation of plank flooring , which does not require special installation techniques and methods. However, the best option would be to hire specialists who work specifically on pool design. Installation of decking boards is a procedure that takes place in several stages.
Laying the flooring itself costs 750-800 rubles/m2. However, it is necessary to add here the cost of installing the supporting structure (350-600 rubles/m2), installation of piles (if necessary, from 650 rubles/m2), as well as the cost of the materials themselves.
The cost of a decking board depends on its type and is within the conventional range of 200-700 rubles/piece.
Beams. Longitudinal location
Next, according to the project, it is necessary to install beams on vertically located supports. This is the next step in building a deck around the pool.
Triple or double beams are installed according to the load. In the case where there is no more than 12 feet between adjacent beams located in one row, then double beams are installed, as in this project under consideration, where between each two nearest beams there is no more than ten feet.
The cross-section of the longitudinal beams can vary, ranging from 2x4 inches to 2x12 inches. This choice will depend on the number and distance between adjacent lines of longitudinal beams. It is best to use as few supports as possible; accordingly, there will also be fewer beam lines, and the distance between them will be greater. But then you won’t have to dig a lot of holes for supports, which are not so easy to build.
The fourth picture is a diagram of the beams. The dimensions of these items are 2 x 10 inches.
Figure 4. Beam diagram