It often seems that a sauna in an apartment is something impossible. However, in Finland, where it appeared, it is used at home. One explanation for this phenomenon is that a mini sauna does not require much space. Moreover, you can make a sauna yourself. The main thing is to know the technology, as well as adhere to fairly simple rules.
Setting up a sauna at home is much easier than setting up a Russian bathhouse. A bathhouse in an apartment is not possible, since its arrangement raises issues of waterproofing and ventilation. In our article we will tell you how to set up an apartment sauna with your own hands.
Home sauna: benefits
In our opinion, a steam room installed in an apartment is a completely affordable solution for many Russians. The most important thing is that it is also very rational, because:
- makes it possible to warm up thoroughly at any time without leaving your home;
- Preparing a home sauna and warming it up does not take much time;
- Such mini-baths in the apartment do not consume a lot of energy resources.
You cannot arrange a Transcarpathian bathhouse in a city apartment. And that's why…
Corner bath projects: features and advantages
The main distinguishing feature of corner baths is their non-standard shape. The classic version of building a bathhouse of this type involves the location of the steam room perpendicular to the rest rooms.
The main advantages of corner bath projects:
- The location of the sauna stove in the middle of the building allows you to heat all the rooms at once. In addition, with this arrangement of the furnace, heat loss is reduced. This is especially true in the winter season;
- corner baths were created primarily to save space on the site. As a rule, they are located in the corner of the site, so they do not violate the overall design picture;
- the corner design of the bathhouse can be used in problem areas, where, for example, with the help of such a building you can “bypass” a large tree or communications (electric poles, etc.);
- a building in the shape of a triangle or corner looks unusual and stylish;
- It is possible to make two entrances at once, which makes the operation of the bathhouse more convenient.
It is worth noting that, despite its size, even the most compact corner-type bathhouse will do its job perfectly - providing the owner or a group of friends with light steam and a pleasant rest.
Types of mini-saunas for a city apartment
The sauna in the apartment should most likely not be full-size, but miniature. We will now briefly tell you about the features of the four most common types of mini-saunas. Moreover, an interesting fact is that such a miniature sauna can even be purchased ready-made.
With electric heater
Construction of a sauna in your apartment usually results in the refurbishment of the bathroom, since this requires modernization of communications. Consequently, this event is inevitably accompanied by the collection of permits. However, installation can be greatly simplified by connecting using flexible hoses. In this case, running around to approval authorities can be avoided. All responsibility in this case falls on the manufacturing company.
The stove for the bath is chosen like this...
Phytobarrel
If there is a shortage of free space, a compact phyto-barrel is an excellent alternative to the classic option. This mini-sauna in the bathroom can be installed in any free corner. The area it occupies is about 1 m2. It never exceeds human height in height. The power of the heating device used in it is about 2 kW.
The most common models include barrels made of cedar wood and equipped with their own steam generator.
Although this mini-sauna is quite compact and easy to use, its installation should still be entrusted to the company from which it was purchased.
The phytobarrel is easily controlled using a special remote control. Some models have special devices that make the procedure even more enjoyable. This is, for example, a balm sprayer.
Portable sauna
Saunas of this type consist of a frame covered with fabric. The operating principle of a portable sauna is very similar to a phyto-barrel. The head in it is not exposed to heat. This device is quite cheap, lightweight and very attractively compact.
The main advantage of a portable sauna is its ease of use. The only thing needed for it to work is an outlet.
Read more about camping saunas here!
Infrared sauna
Based on the experience of recent years, we can say that this type of sauna is the optimal solution for indoor use. It, like an important steam room, is capable of removing excess fluid and toxins from the body and is capable of stimulating the functioning of all organs.
Finnish sauna
If there is enough space in the apartment, you can also think about installing a Finnish sauna. She can receive several people in one session. The steam in it is dry, it heats up to 90 - 100°C. This point is its main difference from the saunas listed above.
Turkish steam room
Hammam in our country is still exotic. Its arrangement is not possible in every apartment. In standard 2-3-room apartments it is out of the question. Now, if the housing area is large, if it is two-tiered, if there is a separate entrance, then you can think about a hammam.
The room in which this steam room will be located must be completely separate from other rooms, it must have a good exhaust hood, sewage system, hot and cold water supply.
Hammam is a good option for spacious cottages housing 2-4 families.
Do you want to know how a Russian bath, a hammam and a Finnish sauna differ from each other? Click here and you will find out!
Do you need permits?
When reconstruction work is planned in an urban residential building, you need to remember the regulatory documents dictating special conditions. This also applies to a sauna - its construction is permitted, but there are a number of regulatory standards and restrictions.
You can refer to documents such as “Residential multi-apartment buildings” or “Architectural and planning solutions for multi-apartment residential buildings”, where you will find a list of rules and recommendations for the design and construction of saunas
There is a lot of useful information there, without knowledge of which you can receive an administrative penalty in the future.
In wooden apartment buildings (1-2 storeys), the construction of a sauna is strictly prohibited, but in monolithic or brick ones with reinforced concrete floors, regardless of the number of floors and the number of entrances, it is allowed.
Particular attention is paid to the type of stove - a necessary device for sauna equipment. It is recommended to use a factory-made unit, with a passport and technical characteristics, including automatic shutdown after 8 hours of operation and when heated to 130ºС
The stove should not be gas or wood-burning, but must be electric - this is also a necessary condition. Accordingly, it is necessary to install a three-phase power cable into the room.
Any violation (burning with wood, lack of protective shutdown) is punishable by a fine with subsequent correction of the defects.
A number of requirements relate to the premises themselves. For example, if you have a studio apartment with an area of less than 38 m², you can say goodbye to the idea of a home sauna.
The area regulations apply to “two-room apartments” and “three-room apartments”: a two-room apartment is at least 54 m², a three-room apartment is 68 m². The area of the steam room itself is small.
For example, Moscow legislation regulates a “patch” of up to 2 m³, designed for a maximum of 2 people. Such a strict restriction was introduced due to a weak ventilation system, which is sufficient for residential premises, but not enough to maintain a steam room
One of the requirements relates to the materials from which the sauna casing is made. It should be environmentally friendly wood, treated against fungus and mold.
Preference is given to aspen, linden, oak, that is, deciduous species. A wooden frame must be equipped with a fire-fighting device. Usually this is a pipe with many holes, fixed like a cornice (along the perimeter of the ceiling).
It is assumed that, in the event of a fire, spraying water from the holes should extinguish the fire and prevent a fire in the apartment.
In addition, it is necessary to attach a fire sensor to the ceiling, which, in the event of force majeure, transmits a signal to the Ministry of Emergency Situations.
Before visiting the BTI, you need to collect a package of documents, which includes copies of documents for the apartment, a floor plan, an extract from the house register with a copy of the personal account, a drawing of redevelopment or other design changes (usually performed by a licensed construction company).
Be prepared that it will take a lot of patience, time and effort to visit the following authorities (without guarantee of approval):
- fire service;
- HOA or other housing authority responsible for your home;
- housing inspection;
- Rospotrebnadzor department;
- SES;
- architectural and construction supervision inspection.
This list is not final, since the number of approvals depends on the specific region. Remember that permission for conversion will be required even if you want to install a purchased sauna cabin instead of a shower stall.
Selecting a location: bathroom, closet or balcony
The first step in arranging a sauna in an apartment is choosing a location and developing a project. The following options can be considered for its placement:
- combining a bathroom and a corridor leading to the kitchen. You can also add a bathroom here;
- a pantry or balcony in cases where the sauna will have infrared heating. By the way, a sauna on the balcony is attractive because it does not reduce the living space of the apartment.
It is clear that the size of the sauna depends on the number of people. When making the appropriate calculations, at least 2 m2 of space should be allocated for each person. The ceiling height in the room being equipped should be 2 m or more.
If you decide not to purchase a ready-made mini-sauna, but to equip it yourself, then you can leave the floor that is already there. An excellent option would be tiles.
The room for the sauna must be at least 1.8 x 2 m. This will allow you to easily place a bed in it. This mini-sauna will be a convenient and practical solution for an apartment.
The location of the heater and the configuration of the shelves
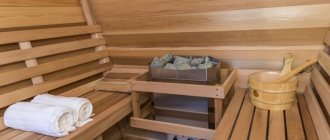
We will choose a place for the heater closer to the corner so that it does not interfere with the passage. For easy access to the shelves, it is better to place the electric heater on the opposite side of them. Because The wide wall will have an opening; we will place the heater on the short wall. Based on the size of the heater and its safe distances, you can calculate the width of the upper and lower shelves. In this sauna, along the left wall there is an upper shelf with a width of 590 mm and a lower one - 365. Along the far wall - 690 and 465, respectively. The free space allows you to make any of the shelves even wider, but I will leave these dimensions because... the result is a universal configuration of 7, 6, 5 and 4 strips. It will be comfortable for visitors with different body types and different temperature preferences. It will also be possible to steam while sitting or lying down.
The width of the shelves is calculated by the width of the strip plus 10 mm. The standard plank for sauna shelves is 90 mm. The ten-millimeter gaps are one less than the slats, hence the size. The lower shelves have the same width, with the difference that the outermost strip extends 25 mm inside under the lining.
Making a steam sauna with your own hands
When deciding how to build a sauna in your apartment, you should remember that it requires the following:
- 1.2-2 m2 of area in one of the corners;
- lining and wooden beams;
- IR heater or electric oven;
- electrical cable;
- fastening materials.
First of all, you need to lay two separate electrical lines. One of them will power the stove, the second will provide lighting. All wires must be located outside the structures, placing them in a special insulated sleeve.
Wires should be used new, straight, without kinks or twists, which is the key to safety. When choosing wires, you should assume that the power of electric furnaces is 3 kW or more, and the power of an IR heater is 1.5-2 kW.
The sauna does not need bright lighting; the light here should be calm and soft. Since its area is small, you can get by with one built-in lamp of 40-60 W.
Construction of the frame of the future steam room
How to build a sauna in an apartment with your own hands? The first thing construction begins with is the construction of a strong frame, which is the basis of the entire structure. The frame is similar in shape and size to a corner cabinet.
To erect it, you need to stock up on thick support beams 50x50 mm. Some of them are installed vertically, while others are installed horizontally. With the help of the latter, ligament and fixation are ensured. Adjacent supports must be connected by three to four transversely oriented parts.
On the ceiling perimeter, the beams are replaced with boards. To assemble the door frame, beams covered with clapboard are used. The floor can be finished with wood. But it can also remain ceramic, as in the main room.
Arrangement of thermal insulation in the sauna
How to make a sauna in an apartment so that it retains heat for a long time? To do this, it is necessary to install thermal insulation of the cabin. One of the practical and fairly inexpensive options is to use rolls or mats of universal mineral wool with a thickness of 50 mm or more. Expanded polystyrene and polystyrene foam cannot be used in a home sauna, as their heating may be accompanied by the release of harmful volatile components.
To improve the quality of thermal insulation, the mineral wool layer is covered with aluminum foil. It is attached to the beams using a construction stapler.
Lining the sauna with clapboard from the inside
Upon completion of the above work, another question arises: how to make a bathhouse in an apartment cozy. Of course, it should be sheathed. To do this, a sheathing of 20×40 mm beams is installed on the walls and ceiling lined with insulation. This is the basis for finishing using lining.
It should be remembered that coniferous wood is never used in saunas. Aspen or linden are best suited for them. By the way, these types of wood do not heat up very much and they are ideal for constructing sun loungers and benches.
Construction of a bench frame
To make the bench frame, timber is used. For greater reliability, the frame should be fixed to 3 walls at once. If necessary, it can be supplemented with a vertical stand resting on the floor. If the bench is installed above the bathtub, it is better to make it so that it can be tilted or removed.
When choosing the installation height of benches and shelves, you should proceed from the internal dimensions of the steam room, as well as your own convenience. However, in any case, it is recommended to install the top shelf at a height of 1.1 m.
Read about the intricacies of constructing bath loungers here!
Installation of electrical equipment
The cable laid inside the sauna must be in a thermostatic hose designed to protect the wiring from exposure to high temperatures. The power cable should be laid in addition to the shield. No other electrical appliances should be connected here. Please note that the electricity consumption will be almost the same as when the washing machine is running.
ATTENTION!!!
Switches must be installed outside the steam room.
To ensure safety, lamps installed in the sauna must have moisture- and heat-resistant glass. You can purchase such lamps at any electrical goods store.
How to make a sauna floor
If ceramic tiles are laid on the floor in the main room, they can also be kept inside the bathhouse. In the case when it is decided to make the floor wooden, it should be sheathed with a floorboard made of coniferous wood or larch.
Door to the sauna
The door should be installed so that it opens outward. It is advisable not to cut locks on it. A high threshold can be installed at the bottom of the doorway. Thanks to it, heat and moisture will not escape into the next room.
To make the door perimeter, the same material is used as for the walls. The central part of the door can be covered with clapboard. However, it will look more beautiful if you install impact-resistant glass. It can be transparent or matte. In addition, it may have a sandblasted pattern.
Shelves and benches in the sauna
Shelves and benches are usually made at the final stage of finishing work. They should be located like a ladder along one of the walls. If the booth is small, two benches will be enough for it.
As already noted, linden is considered the best wood for benches. This light yellow material is easy to process and does not overheat during bath procedures.
When upholstering benches, attention should be paid to the correct installation of fasteners. All screws and bolts should be installed from below. Otherwise, the metal of their heads may cause severe burns.
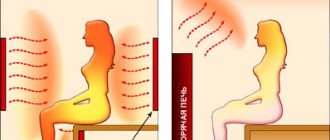
Ventilation in the sauna
The mini-sauna must have a good ventilation system. It should include both an inlet and an exhaust. The exhaust fan is installed at a distance from the stove, below the bench. If this condition is met, the fan will not draw warm steam out of the room. Ventilation options are shown in the figure.
How to sheathe
Let's consider which materials are best suited for the interior design of a home sauna:
- The best option is heat-treated wood. The best wood for a sauna is linden or aspen. They heat up the worst and are not resinous, which makes staying in the sauna more comfortable. In addition, these trees have, according to folk medicine, healing properties. The Russian traditional bathhouse is also often made from these trees.
- Arrange the paneling in vertical stripes - this visually makes the room wider, which is especially important for a mini-sauna.
- Nail the paneling using a secret technique - into the groove. This will make the room more aesthetically pleasing.
- First, you need to sheathe the ceiling in the room, then the walls.
- The floor is also made of wood - this option is best. Sometimes tiled or ceramic floors are installed, but in this case a wooden grate is still installed to prevent your feet from getting burned.
- The door is wooden. A modern version of a matte or tinted design will also look very interesting and attractive.
Wooden sauna paneling
Wooden and stone lining of the sauna
Wooden and stone finishing of the sauna
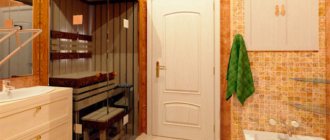
Small sauna in the bathroom
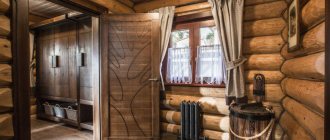
Beautiful sauna design
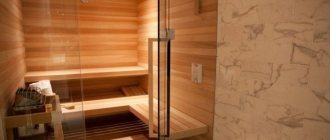
Sauna with glass partition in the bathroom
Stove in a metal casing in a sauna
Beautiful lighting in your home sauna
Wooden accessories in the sauna
What to do if the wiring power has not been calculated
Certain operational limitations of a sauna in an apartment may arise due to insufficiently powerful wiring. The problem can be complicated if there is an electric stove in the apartment with a power exceeding 3 kW. In such cases, you have to resort to a slight reconstruction of the wiring, and purchase a sauna stove with a power not exceeding 2 kW. However, this risks causing the temperature inside the sauna to rise for too long. In addition, high-quality thermal insulation will be required.
When installing a sauna in an apartment, it is advisable to lay an individual power cable to it and connect it directly to the panel.
Important wiring requirements also apply inside the sauna. So, the wiring method must be closed. As for the cable, it must be heat-resistant. The sauna structure must be grounded, and an RCD must be installed on the line.
You must understand that if a 4-kilowatt electric stove is installed in your home, then it will not create an excessive load on the network. However, it is not recommended to turn on the sauna heater at the same time.
Electrical wiring and ventilation system
The safety of operating an apartment sauna depends on the reliability of the electrical wiring.
The main heating equipment is an electric heater with a power of up to 3.5 kW. To connect it to the electrical network, it is necessary to install a waterproof socket, and run the current-carrying cable through the floor surface, placing it in a protective box.
The cable inside the cabin is placed in a thermostatic frame that can withstand high heating temperatures.
For an electric stove, it is also worth providing a special insulating base, located at a safe distance from the bathtub or sink.
The next important stage in organizing a home sauna is arranging a reliable ventilation system. In multi-storey buildings there is a standard ventilation shaft with apartment-by-apartment ducts. It would be a good idea to provide additional holes in the cabin design for mounting fans that are resistant to elevated temperatures.
Legal nuances and recommendations
More recently, installation in an apartment was considered impossible. Today, subject to certain requirements, this idea has become realistic. In particular, when installing a mini-sauna in an apartment, it is necessary to ensure compliance with the following requirements:
- The air in the sauna must be heated by a stove purchased from an official manufacturer. It must have auto switches that operate when it warms up to +130°C and in case of continuous operation for 8 hours.
- Spraying water in the sauna should be done with a specially installed perforated pipe or deluge.
- The total area of the room should not be less than 24 m2.
- Elements made of wood must first be subjected to special treatment to prevent fire and rotting.
- It is prohibited to install saunas in residential premises.
So, we have presented as much information as possible that will allow you to competently and in compliance with all requirements set up a sauna in your apartment with your own hands. We will be grateful if in the comments you decide to share with our readers the successes that you have been able to achieve.
Installation
Let's consider the stages of installing a sauna in an apartment.
Frame preparation and insulation
Before assembly begins, all bathroom surfaces are carefully treated with an antiseptic composition intended for baths or saunas. The wood for the frame is also treated with an antifungal agent.
To improve the thermal insulation characteristics of the room, the ceiling surface is covered with mineral wool mats and foil.
The design of the sauna also requires insulation, this will ensure long-term maintenance of the set temperature. Basalt-based cotton wool or quilted cotton wool mats are suitable for these purposes. The thickness of home insulation is 10 cm.
The sauna design does not require additional insulation if cork panels are used as decorative finishing.
The insulation is mounted between the frame elements and fixed with metal nails.
Vapor barrier and ventilation
A bathhouse in a bathroom must have high-quality thermal insulation and a ventilation system. To create a thermal insulation layer, it is recommended to use a non-toxic foil-based material. It is fixed from the floor towards the ceiling with an overlap of 10 cm, the joints are carefully taped with construction tape.
The material is attached to the wooden frame using bars mounted on metal nails or staples.
The sheathing is mounted on top, observing technological gaps for heat transfer. A lining made of linden or alder is installed on the sheathing.
To visually enlarge the room in which the sauna is installed, the lining is mounted in a horizontal direction. At the same time, fans and protective dampers are built into the provided openings.
The best flooring option for a home sauna is ceramic tiles or porcelain stoneware.
Entrance door installation
Sauna doors vary in type, design, materials and dimensions. They are presented in swing, sliding or folding structures.
For a sauna with an electric stove, it is better to choose a door made of wood or MDF, for an infrared sauna - a glass one.
The main thing is that the entrance is sealed and practical. To ensure a tight fit of the wooden door to the frame, it is recommended to decorate the edge of the jamb in three steps. For a glass structure, it is enough to use silicone sealing tape.
Installation of stove and lighting equipment
At the next stage of assembling the structure, the installation of the stove and lamps is carried out. The electric stove in the sauna is installed in a convenient place. The wall behind the heating equipment is covered with a protective heat-reflecting screen made of wood.
Important! Do not use brick, stone, ceramic tiles or asbestos sheets for the screen base.
For a mini-sauna, it is better to choose compact spotlights in a heat-resistant housing, which require installation around the perimeter of the structure. Lighting should not be installed dangerously close to a heating device.