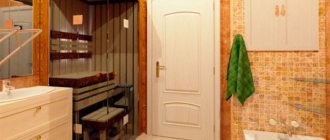
Features of a sauna inside the house
A do-it-yourself sauna in the house has some features that must be taken into account when planning this washing and relaxation complex:
- A Finnish sauna can be heated not only with wood, so it is characterized by increased fire safety.
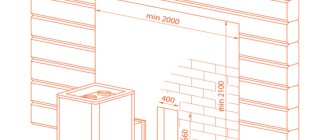
- The sauna does not require a separate building and does not take up much space: 3 square meters can comfortably fit up to 4 people, and a 5-meter room can accommodate 5-6 people.
- The ideal ceiling height is considered to be 2.1 meters. This allows you to install standard doors, avoid hot drafts, create cozy air circulation, and maintain optimal temperature and humidity.
Unlike a traditional bath, the sauna does not require water supply: the shower and washing area are located in a separate room.
Calculation of materials for construction
First of all, you need to calculate how many floor boards you will need. For example, we will consider a sauna measuring 3.7x3.7 m. To make a floor in it, you need to prepare 25 edged boards.
Edged floor board
Standard board dimensions: thickness - 0.5 cm, width - 15 cm, length - 4 m.
Accordingly, 4 x 0.15 x 0.5 = 0.03 m3 is the area of one board.
The width and length of the sauna is 3.7 m, so to install the floor base you need to prepare 25 boards 15 cm wide and 4 m long.
To arrange the ceiling in a bathhouse, you need 38 boards of lining. The calculation of the material is carried out according to the same scheme. The thickness of one board is 22 mm, width is 100 mm.
In order to complete the interior decoration of the sauna and install partitions, you need 22 mm thick lining.
Linden lining is suitable for a sauna
If you plan to place the boards vertically, you will need approximately 153 boards.
Standard dimensions: board length - 3 m, width - 10 cm, thickness - 2.2 cm.
3 x 0.01 x 0.22 = 0.01 m3 - the area of one board.
Next, you need to calculate the area of the sauna walls: the height is 2.1 m, and the length, taking into account the partitions, is 24 m.
2.1 x 24 = 51 m2
There are 3 boards in 1 m2, respectively 51 x 3 = 153 lining boards for the entire steam room.
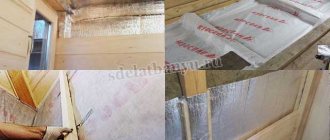
To perform a vapor barrier on the internal walls and ceiling structure, you can use various materials, among which vapor barrier film and breathable membrane are especially popular.
Vapor barrier of sauna walls is required
For a sauna 3.7x3.7 m, 44 m2 of material will be required.
To perform the calculation, you need to find out the total area of the ceiling structure and walls, while partitions do not need to be taken into account.
Length excluding partitions - 14.1 m.
2.1x14.1=29.61 m2.
The width and length of the ceiling structure is 3.7 m. The area is 3.7x3.7 = 13.69 m2.
Next you need to add up the area of the walls and ceiling: 29.61 + 13.69 = 43.3 m2.
At the next stage, the materials for the foundation are calculated. The need for cement, crushed stone, sand and other elements will depend on what type of base is planned to be made.
If it is a columnar foundation, then you will need asbestos-cement pipes with a diameter of 20 cm and a length of 150 cm. In the center of each of them, 2 reinforcement rods with a diameter of 5 mm must be mounted.
Types of home sauna
The question of how to make a sauna in the house has several answers. The choice of the optimal option depends on:
- The number of people willing to take a steam bath;
- Financial opportunities;
- Owners' preferences.
Nice factory options were:
- Barrel sauna. This method of arranging a steam room helps strengthen the cardiovascular system, get rid of cellulite, increase immunity and skin elasticity. The special charm of such a barrel is created by the cedar finish, which fills the room with the delicate color of the wood and a light, healthy aroma. The control process is displayed on a separate remote control, and if desired, additional functions can be installed in the sauna.
- Sauna cabin. A small cabin, designed for one maximum of two people, takes up very little space. The only condition for placing such a structure is the presence of free space between the floor of the room and the cabin, as well as between the ceiling and the upper part of the steam room. This work of bath art will be decorated with doors made of wood with glass inserts or made of tempered glass. Although they are installed more for the beauty and psychological comfort of the person inside.
- Salt sauna. To create this option, unique Himalayan salt is used. It normalizes the circulatory system, has a beneficial effect on the heart and blood vessels, rids the body of harmful bacteria and the effects of stress, and improves the condition of the skin and respiratory system.
Additional comfort will be provided by a small swimming pool or bar located nearby.
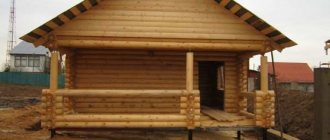
In a private house, they try to allocate a separate room for a bathhouse, in which it will be possible to equip a sauna, a washing room, a dressing room and a relaxation room, possibly even with a terrace or veranda.
Frame
First of all, the wall frame is installed. For the sheathing, a 50x50 mm softwood timber is required. A 50 mm thick insulation will be laid here.
The pitch of the bars is set according to the standard width of the insulation - 600 mm. Where it is not possible to make exactly 600 mm, we make it smaller. We provide a ventilation duct on the wall opposite the heater. We connect it with a tee to the ventilation duct for the ventilation valve, which will be located in the ceiling. One ventilation duct is led from the tee to the shower room or dressing room (for the installation location of the ventilation valve, see the technical specifications for electrical wiring below). We install a block flush with the doorway on each side. Part No. 1 is made 100 mm shorter than part No. 2, because a ceiling beam will be installed on it (specification of Saunaflame products - at the end of the article).
For greater rigidity, the ceiling frame is made along a short wall. Part No. 3 – timber 50x100 m – is installed on the second part with the short side. The ceiling insulation is made at least 100 mm.
The ceiling counter-lattice is made in increments of no more than 600 mm from 50x30 mm timber (part No. 4). The ceiling cake also contains aluminum foil on a paper base. To complete the ceiling installation, lining is hemmed onto the counter-lattice. A hole with a diameter of 100 mm is made in the lining to install a ventilation valve, which is connected to the previously installed vent. channel in the ceiling.
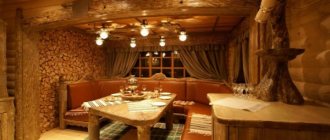
Sauna finishing
The layout of the sauna in the house involves creating a nice interior decoration. Of course, if the sauna is purchased in the form of a barrel or cabin, this issue has already been resolved at the manufacturer.
For self-built saunas, the best option is to decorate them with wood. It creates a cozy atmosphere, does not heat up, is environmentally friendly and has natural beauty.
Walls and floors made of natural stone or heat-resistant tiles look good.
By the way, it is better to place the sauna itself in a wooden structure, which allows you to create the most beneficial microclimate.
- When arranging a steam room in a brick or concrete building, the internal surfaces are covered with clapboard or solid boards.
- It is not recommended to use varnishes, paints and non-specialized impregnations, which, when heated, release chemicals that do not contribute to health.
- To maintain high temperatures and preserve load-bearing structures, all surfaces are laid with insulation, vapor and waterproofing.
Ceiling decoration in the sauna
The ceiling in the sauna is made of beams, vapor barrier and insulation materials, and wooden cladding. There are no special requirements for the ceiling, with the exception of strength and durability.
Finishing the floor in the sauna
It is best to use wood as a flooring, but high humidity significantly reduces the life of wood.
- Modern versions of saunas involve arranging the floors with ceramic tiles, which are completely resistant to steam and high temperatures, are easy to clean, and serve a long and happy life.
- But when laying this option, you should select tiles with a non-slip surface.
- To create more comfortable conditions for bare feet, the sauna floor is decorated with natural mats or home rugs, and wooden boards are installed.
- In this case, additional efforts will be required to dry such decorative elements after each water procedure.
When designing the floor, they try to provide a slight slope for better water drainage.
Wall decoration in the sauna
The largest area for finishing is provided by the walls.
Perfect for decorating them:
- Budget and strong aspen;
- No less budget linden, releasing a delicate aroma;
- Quite expensive, but very durable cedar and abashi;
- The usual pine and spruce, although at high temperatures the cladding will release too many resins that can be harmful to human health.
Almost any wood can be used in a dressing room or rest room. These rooms are not intended for steam and moisture, so any tree will feel quite comfortable here.
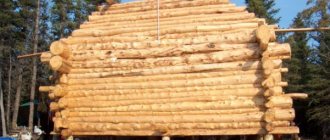
Briefly about the main thing
Setting up a good sauna is difficult, but it is possible. The result will justify the effort spent on it. Natural materials should be used in your work - they retain heat better. The ideal option is a log house on an earthen foundation. In finishing, you should also give preference to wood.
It is imperative to put insulation between the walls and the finishing. To quickly ventilate the room, you need windows in every room.
It is better to install a metal or electric stove, but you can choose other options.
If the sauna is a separate building, then there should be more rooms in it than if it occupies a room in the house.
Ratings 0
Doors and windows for sauna
Arranging doors can present some challenges. On the one hand, the doors must ensure reliable retention of steam inside the room, on the other hand, a necessary condition is the ease of opening the door in case of unforeseen situations.
A glass sheet will cope best with this task. It does not swell, easily turns on its hinges, and provides the necessary tightness.
Windows, for the most part, are a kind of decorative element that is designed to let in light and visually expand the room.
Shelf frame
Start installing the shelf frame with the rack blanks. For this, a 50x70 mm beam is used. The figure shows the sequential installation of racks. We start with the top shelf, which runs along the entire wall, then the other top shelf.
Secure the adjacent racks with metal corners for rigidity (on the inside). Transverse and longitudinal bars 50x50 mm will connect all the racks of the upper shelves. We recommend that you do not install the bottom shelf racks until you have installed parts #16, 17, 20, and 21.
We recommend fastening the racks of the lower shelf, which are adjacent to the racks of the upper one, together. We complete the installation of the lower shelf by fastening parts No. 18, 19, 22 and 23 racks (No. 15).
The frame of the shelves is done - it's time to install the lower baseboards.
Bake
But the most important element for creating a sauna remains the stove. She may be:
- Conventional wood-burning, independent of external energy sources. This design ensures fairly cheap operation of the sauna, the creation of soft steam, and a high heating rate. But when installing a wood-burning stove, additional costs will be required to install a chimney, and the risk of fire increases several times.
- New-fashioned electric, capable of heating to a fixed temperature and providing maximum fire safety.
A sauna with an infrared stove still causes quite a lot of controversy. It is believed that such heating does not provide a therapeutic effect other than intense sweating.
Walls
After the ceiling is hemmed and the walls are insulated, you can begin installing the wall counter-lattice. The top bar will just rest against the ceiling lining. The bottom one will be near the floor. Another plank should be opposite the future frame of the upper shelf - 855 mm to the top edge (height of the shelf minus the thickness of the plank for the shelves 25 mm and the thickness of the board on which the shelves are assembled 20 mm). The other bar is opposite the middle of the backrest. The remaining space is filled so that the counter-lattice pitch is no more than 500 mm. In our case, two more strips are added. One is between the bottom bar and the top shelf bar. The second is between the top bar and the backrest bar. We start with the wall according to type A (detail No. 5):
On the remaining walls, the spacing of the counter-lattice remains the same as on the long wall (view A). Drawing of the left wall counter-lattice (type B):
An electric heater is installed on the right wall (view B), so at the place where it is attached it is necessary to provide strips to which it will be screwed. In the instructions for the heater we find the dimensions and distances for the mounting frame:
In accordance with these dimensions, we provide a counter-lattice for the right wall (type B):
The wall in which the door will be installed (type D) must also have a stiffening frame around the perimeter of the door (parts No. 10 and No. 12), because In this place, door panels will be made from clapboard. Mounting boards for the door frame are installed in the doorway. At the top, two 100x20 mm strips are enough; along the edges, the strips (part No. 13) are installed opposite each hole in the door frame, into which it is then screwed. Unpack the door in advance and measure these distances.
Stones
For laying stones, it is best to use jadeite, diabase, and soapstone. All of them are not afraid of high temperatures and do not crack from water, and their evaporation is beneficial for the body. It is best to choose stones with a slight roughness, which will help water stay on the surface longer.
Cracked stones must be promptly replaced with new elements.
Setting up a sauna in your home will allow you to enjoy beneficial procedures at almost any time, so if you have the desire and opportunity, it is better to pamper yourself and your family with this type of bathhouse.
Required Tools
To build a sauna base you need:
- carpentry tools;
- shovel;
- trowel;
- building level;
- concrete mixer;
- wheelbarrow;
- container for preparing the solution.
Concrete mixer can be rented
If you plan to mix the solution manually, then you need to prepare a metal container and a shovel. You can also use a construction mixer or a high-power electric drill with a special attachment.
A mixer attachment will help facilitate the process of mixing cement.
During the construction of a sauna, it is impossible to do without an electric jigsaw. With this tool you can make cuts and cuts to achieve unusual shapes in different materials.
An electric jigsaw will allow you to cut a piece of wood into any shape.
Photo of a sauna in the house
Shelves
The stitching between the shelf levels is where we'll start. First of all, the one opposite the entrance is mounted.
Then install the second side:
We install the end strips of the lower level according to the same principle:
|
We fasten the prepared strips for the shelves with a 20x50 mm rail with the same pitch as that chosen for the racks. Thus, these slats will cover the frame of the shelves. Top shelf layout:
Layout of the lower shelves:
Place the resulting shields on the frame. A 20x50 mm rail that holds the planks together is screwed to the frame.
Room layout
There are many possible planning solutions. It all depends on the size of the family budget and personal preferences. Some people prefer several multifunctional rooms.
And for some, a modest-sized room with a stove and a couple of shelves will be enough. A popular idea is a swimming pool. But here you need a drawing, which will significantly affect your wallet.
As for the dimensions of the sauna, each user should be allocated a minimum space of 3 cubic meters. m. However, experts advise abandoning an overly spacious room - it is difficult to warm it up.
Interior Design
As a rule, two tiers are built inside the sauna for sitting and lying areas. Right angles between the walls and benches allow you to fully utilize the steam room area. All benches are made exclusively from wood. Spaces of 1.5-2 cm are left between the boards to ensure ventilation of hot and cold air in the sauna.
The width of the top shelf should be at least 50 cm so that a person can lie on it comfortably. Additionally, the front of the bench is equipped with a stand on which you can rest your feet. A distance of 70 cm should be left between tiers.
100-105 cm are left from the top bench to the ceiling so that a person can feel the maximum effect of the sauna. If the size of the room allows you to place shelves in only one tier, it should be taken into account that a very tall person, when sitting on a bench, should not reach the ceiling.
There is no plunge pool or buckets of water placed inside the sauna, since the shower and relaxation room are located separately. There are enough showers in small rooms. But equipping a swimming pool will be very useful if you have a large area. This way out is not only healthy, but also pleasant. Read also: “How to choose and install a dousing bucket for a bathhouse and how to make such a bucket yourself.”
The relaxation area warms up to a comfortable +25 ºС. The exception is when the outside temperature is above +35 ºС. However, it is extremely undesirable to install air conditioning in the recreation area - it can significantly undermine your health.