Types of log cutting
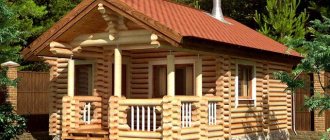
Anyone who plans to build a wooden house, a bathhouse, or a gazebo is faced with the need to choose the type of felling - “into the bowl” or “into the paw.” There is no clear answer as to which method is better. Disputes regularly arise on forums and construction resources. To understand which one is more appropriate in your particular case, consider the advantages and disadvantages of these cutting methods.
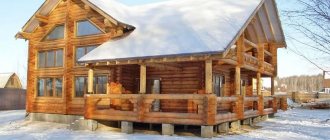
- “Into the bowl” is the most common type of corner cutting when building a log house from a solid log. With this method, the log extends beyond the perimeter of the log house by 25-30 cm. An “overlapping” of the ends of the logs is created behind each other. The locks are shaped like a bowl.
With this cutting method, a semicircular recess is created on the surface of the log for the next element of the crown. When assembling a house or bathhouse, the crowns are wedged together. After the log house shrinks, the tightest possible fit of the crowns is achieved. This method of creating grooves prevents the risk of blowing and freezing of corners. The “bowl” type of cutting allows you to obtain “warm” corners without additional measures for thermal insulation. The log house will have high thermal insulation characteristics, and condensation will not form inside.
Cutting into a bowl is popular not only in Russia, but also in Canada and Norway. This technology is also known under the names “Russian hut”, “bowl with a spike”;
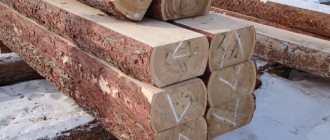
- “In the paw” is a more economically profitable type of felling. In this option, the ends of the logs do not extend beyond the perimeter of the log house. The locks are cut in the form of a “paw”, forming corners. The popularity of this type of cutting is explained by its more favorable price. The log is used for almost its entire length. The difference between the cost of a log house “in a bowl” and “in a paw” is 20-30%;
This cutting option is popular due to its more affordable price, because in this case the length of the log is used almost the entire length. The price difference is about 20-30%, and in larger projects it is more.
- "Wild Corner" This type of felling allows you to create an angle with unequal extension of the ends of the logs beyond the perimeter of the project. The stem takes the shape of an arc from top to bottom. This is one of the most interesting and expensive types of log felling.
An example of wild cutting into a bowl
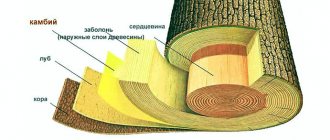
Type of processing of log walls:
- Half-carriage
. The walls inside the log house are hewn (leveled);
- Carriage
. The walls are leveled outside and inside the project;Finishing the walls with a carriage - alignment on the outside and inside of the log.
- Round timber
. The log retains its natural rounded shape. The wood is only debarked (cleared of bark), but not leveled.
The quality and durability of a log structure largely depends on the skills and experience of the workers. Our carpenters are fluent in all techniques for cutting and processing logs.
Types of shrinkage
It is clear that shrinkage processes in a log house are not limited to changes in the length and thickness of logs or beams due to changes in the moisture content of the material. In addition to the drying process of wood, structural elements can change their sizes for two reasons:
- Mechanical pressure of the upper tiers and parts of the roof rafter system. The lower crowns of the walls and parts of the logs on the north side of the bathhouse are more deformed due to the weight of the upper rows and more intense moisture;
- The presence of jute or linen seal between the crowns. Under the pressure of logs or timber, the fresh layer of compaction is eventually flattened and crushed. Since the bathhouse is used periodically, the process of squeezing out the seal occurs regularly.
The first type of shrinkage gives approximately 90% of the change in dimensions; after about 30 months, the structural deformations of the bathhouse frame parts are completed. The remaining 10% does not end as long as the bathhouse is regularly heated and heated with hot steam.
Important! Shrinkage of the log house can also occur due to improper installation of the seal or rough caulking of the joints.
For example, a three-year-old bathhouse box must be caulked between the roof gaps before final finishing and installation of the roof. If you hammer in a cord or tow with too much force, the box may become 5-7 cm higher, instead of the generally accepted 2-3 cm. After completion of the work, the weight of the roof parts and the finished roofing covering will press the seal. As a result, a turn-key finished bathhouse will shrink by 3-4 cm. Cracks and chips may appear in the finishing; this situation is especially dangerous for window and door openings.
The main part of the shrinkage is due to the deformation of the seal and the contact points between the logs
Which log house is better - “in the bowl” or “in the paw”?
When choosing the type of logging, it is important to weigh the pros and cons of each logging technology.
Advantages of cutting corners “into a bowl”:
- beautiful, authentic look of the log house,
- insulated corners - no risk of freezing, reliable protection from moisture,
- maximum stability of the project - has a positive effect on the durability of the log house,
- there is no need to additionally sheathe and insulate the corners.
The disadvantages of cutting into a bowl are the relatively high cost compared to other options.
One of our projects is a log house. A beautiful and reliable log house.
Advantages of cutting a log house “in the paw”:
- used in the creation of complex projects involving extensions,
- allows additional installation of facades,
- lower cost compared to cutting into a bowl,
- saving site area.
Disadvantages of felling "in the paw":
- the need for additional insulation and sheathing of the corners of the log house to protect against blowing, freezing, precipitation, and moisture;
- less structural stability compared to “bowl” log houses.
Naro-Fominsk urban district, Moscow region, Russia
Construction date 2021 https://yandex.ru/maps/-/CBBYv-FUPD 55.529572, 37.010925
img-20170812-wa0006
img-20170812-wa0000
img-20170812-wa0001
MORE >>>>
Expert opinion in the field of wooden house construction
The main advantage of cutting “into the bowl” is the reliability of the design . Such log houses will last for a maximum period. When cutting, the crowns are securely fastened together. Over the years, the connections become even more compact, and the structure gains maximum strength. Log houses made of logs “into a bowl” are reliably protected from the negative effects of moisture, frost, and blowing. The frame “in a bowl” will last for centuries.
It is worth choosing a log house “on the fly” when you need to save area of the site or the construction budget is limited. Cutting “in the paw” allows you to get a project of a larger area at lower costs. Savings range from 20%, depending on the area of the project.
As for the complexity of felling, it is more difficult to build “in the paw”. This technology requires more careful preparation than a bowl. If you entrust the construction of a log house to our professionals, the project will be warm and durable.
Sequence of bath assembly for shrinkage
The process of building a log house turns out to be even simpler than constructing a log or timber frame of a residential building. Most of the work can be done in advance. For example, pour the foundation or even order it from a company or workshop, even do it yourself by cutting down the logs for the bathhouse for shrinkage, transport the parts of the log house to the dacha and assemble the building with your own hands in a couple of weekends.
In the classic version, the construction of a bathhouse from timber for shrinkage without finishing looks like this:
- We are putting the foundation; for a log house it will be enough to build 16-20 brick columnar supports or pour piles from asbestos pipes. For a bathhouse made of timber on soft soil, it is better to make a strip foundation;
- Fill the heads of the supports or concrete strip with mastic and seal them with glass roofing felt. For logs, you can get by with mastic alone; for a log house, the waterproofing must be made as reliable as possible, otherwise the lower crowns of the bathhouse will rot in a couple of years, without even waiting for the end of shrinkage;
- The next step is to lay out the first crown, usually it is a massive beam 120x100 mm, or half-log. Sometimes the first row is treated with oil impregnation so that the material remains plastic even after shrinkage has completed;
- Next, we lay out the remaining logs or beams around the perimeter; if the corner locks were not sawed down in advance, then we lay the material on the wall, measure the exact dimensions of the grooves and saw them with a chainsaw or electric hacksaw;
- A support groove must be cut out in the logs; we pre-drill holes in the timber for installing dowels.
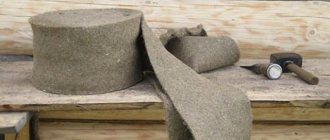
It is best to seal the walls of the bathhouse with moss or jute material. Moss prepared in advance is dried under a canopy to the state of dry hay, so that the fibers still retain elasticity, but with a minimum of green mass.
The seal is pressed in by hand, without a hammer, otherwise the bathhouse box will rise in height
After assembling the log house, they install the mauerlat, rafters and cover them with boards with roofing felt stuffed on top. Logs must be installed inside and a subfloor laid. All parts of the interior decoration are sewn to the walls only with nails, with gaps of at least 2-3 cm. Window openings and the bathhouse door are often simply clogged with boards. If you install full-fledged windows and a door, you will need to correctly cut mounting grooves for the frame at the ends of the logs. The remaining cracks are filled with jute tow, no polyurethane foam or bars. In a bathhouse that is built for shrinkage, a fiber material is used for seals, which easily allows water vapor to pass through and does not absorb moisture.
A groove is cut along the log with a circular saw; if a crack forms during shrinkage, it will not be on the front or inner surface of the walls of the bathhouse
To build a bathhouse from timber for shrinkage, the expansion gaps should be 1.5-2 times larger than for construction from logs. Moreover, shrinkage often occurs unevenly, so it is often necessary to install stud jacks on the upper crown in order to avoid tilting of the bathhouse roof. In this case, the screw supports allow you to tighten them with a nut and equalize the load on the rafters. True, this needs to be done as carefully as possible, and no more than 12-15 mm per day on one jack.
Swamp moss as the best insulation for a log house
While the log house is standing, you can do other equally important things. First of all, you need to take care of the insulation that will be used to lay all the grooves between the logs. Tow or glass wool can be used as insulation material.
However, many developers, when building their own wooden house, prefer to use natural materials, primarily moss growing in swamps. It is with its use as insulation that the best log houses are built.
There is no need to buy marsh moss; moreover, it has antiseptic properties and prevents the development of rotting processes in the grooves between the logs. After the allotted time has passed: from six to twelve months, you can begin to build a wooden house.
If a place for construction has already been chosen, then the first thing to do is lay the foundation of the future house. Typically, the now traditional concrete strip is used as a foundation.
Construction of the foundation
It is necessary to dig a trench of sufficient depth under the tape; the depth of the trench must be greater than the freezing depth of the soil. After that, a sand-cement mixture is poured into the bottom of the trench and compacted. Then it is necessary to install the formwork of the future foundation in the trench.
- Advantages and disadvantages of metal siding
TOP 5 popular myths about plastic windows
We are building a house, what should we pay attention to?
Reinforcement is installed into the formwork and cement is poured. After two or three days, when the cement tape has hardened and dried, the formwork can be removed. Log houses that have stood for the required period of time are dismantled and transported to the place where the house is built, where the foundation has already been laid.
Vladimir region Kirzhachsky district. The village of Golovino. St. Solnechnaya 23.
Construction date March 2021 https://yandex.ru/maps/-/CBBYnQB7PB 55.968393, 38.788212
img_0930
img_0933
img_0934
MORE >>>>
Caulking process
The process of caulking involves stuffing the insulation hanging on them into the grooves between the logs. If everything is done correctly, the house will be warm enough even in the coldest winters. After this, the floor is laid in the house, windows are installed and doors are hung.
To make the house look more beautiful from the outside, it is covered with boards and painted. Painting is also necessary to ensure that the house lasts as long as possible.
Log house-bath 5.4x8.4 Vladimir region, Kolchuginsky district, Golyazh, no. 171
Construction date March 2021 https://yandex.ru/maps/-/CBBYZUSAhB 56.338948, 39.395284
img_4687
img_4692
img_4693
MORE >>>>
SNT Solntsevo settlement Moskovsky, Moscow, Russia
Construction date February 2018 https://yandex.ru/maps/-/CBBYrUBoPC 55.647088, 37.418473
img_4614
img_4603
img_4605
MORE >>>>