Wooden architecture has developed over the centuries in many countries. Today, for the construction of warm and durable houses, various types of logs and logs are used, which have successfully proven themselves in the northern regions of Russia, Canada and Norway.
Timber and rounded logs are widely used as building materials - strict geometric dimensions simplify and speed up the assembly of the log house, since a template can be used to mark the connecting grooves. Construction from chopped debarked logs is noticeably more difficult, since each connection is adjusted individually.
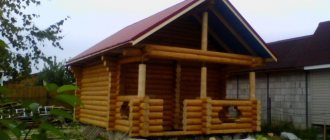
When it comes to houses made of wood for the private sector, we mainly mean either frame structures or ready-made turnkey log (timber) buildings. Is it possible to build log houses on your own, the way our ancestors did? The answer is unequivocal - yes, cutting a log house is within the capabilities of any skilled owner . You will learn about all its nuances from this article.
The construction of any building is a complex of various activities, including both preparation for construction and the phased implementation of individual technological operations. We will not consider them all, starting from the “zero” cycle, since the subject of conversation is precisely the felling of a log house. But one remark will not be superfluous. It concerns the most expensive part of the structure, the foundation, the costs of which can reach ⅓ of the estimate.
Which type should I choose? Considering the relative lightness of buildings made of wood, it is advisable to limit ourselves to a shallow-depth tape or a pile-grillage foundation. For any log house it is quite enough, if the presence of a technological (basement) floor is not an indispensable condition. Although in this case there is a good solution - to “raise” the house by installing a higher base.
The general order of work is unchanged: installation of the foundation - lower crown - laying wood samples in rows (from bottom to top) with simultaneous arrangement of openings for doors and windows. Next is the ceiling and rafter system. But what does “cutting a log house” mean? This is the connection of all blanks into a single structure with a preliminary selection of material at the designated “points”. The construction of the walls of a building is impossible without reliable fixation of all elements, therefore, when working with wood, cuts (cuts) are made in certain places of the log (timber).
But there is a difference in how the samples are fastened together. There are several ways to cut log houses. Each of the methods has both advantages and individual disadvantages, so we will give a general overview of the ones most used when doing DIY work, since there are quite a lot of them. And which one to choose is entirely at the discretion of the master.
Log house in a bowl
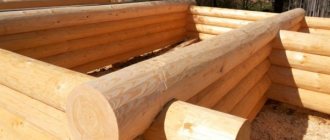
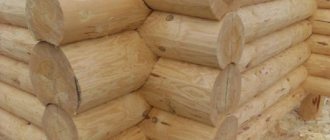
One of the common ways to make a log house with your own hands from a log is the method of assembling it into a bowl. It is most often used in the construction of a bathhouse, since due to its design features it retains heat well. In this assembly method, special semicircular recesses are made along the edges of the log, into which the upper elements of the structure are laid.
There is a 25-30 cm protrusion outside the corner, and the cutout is made to fit the size of the log that will be placed in it. This is necessary to increase the density of the connection, which will prevent the building from falling apart, and will also reduce the likelihood of heat loss due to drafts in the cracks. Thermal insulating material is placed between the parts.
Log house in winter Source skstroyider.ru
Corner connections
- To connect the walls, a dowel is used, which seems to penetrate these structures. These fasteners are nothing more than wooden vertical nails with a diameter of approximately 30 cm and a length 20% less than the height of the frame.
- Also in construction, specific types and methods of corner joints are used. Special tenons are prepared for them, which can be composite and cut into the material.
- In the process of this work, it is necessary to strictly observe the rule: when connecting elements, which is a necessary operation when building a log or block house, care must be taken to ensure that there is a certain vertical gap. Its purpose is to compensate for the effects of natural shrinkage that accompanies the construction of each wooden object. This gap should be no larger than 0.5 cm. When making longitudinal mounting grooves, the gap size is increased to 1 cm.
Technology selection
There are 2 main ways to cut a log into a bowl:
- “V oblo” (Russian cutting) is a method in which a cut is made in the lower crown. It can be smooth or with a spike (fat tail), which prevents the structure from moving.
- “In the okhlop” (Siberian felling) - in this method, a bowl is made at the bottom of the log, which is placed on top of the bottom.
The first method is used in most buildings that were made in the old days. For those who do not know how to build a bathhouse from a log with their own hands, it is recommended to use the “hollow” method, since during long-term construction moisture does not form in the bowl due to precipitation. It is also considered simpler than Russian cutting.
Types of log house in a bowl Source samdizajner.ru
Stage 9. Roof
Construction of a roof on males with layered rafters
Rafter system
As soon as the tree shrinks, you can begin building the roof. If you do this earlier, the roof will simply collapse.
Step 1. Place wooden beams on the wall framing (we have already talked about this).
Step 2. Fix the beams and attach the rafter legs to them in 1 m increments. In the ridge part, cut the rafters at the appropriate angle for the connection.
Step 3. Nail a solid board deck to the rafters (if you plan to use rolled roofing material) or make a sheathing (if you use slate, tiles, etc.).
Step 4. Install the roofing according to the instructions for the specific material.
Step 5. Cover the ridge with galvanized sheet steel to protect it from aggressive environmental influences.
Step 6. Cover the roof gables with siding or clapboard.
How to sew up a pediment
After this, proceed to further planned work - pouring a concrete screed or building a wooden floor (in the second case, the logs are cut into the logs of the second crown and fixed), install insulation, carry out interior finishing and arrangement of the steam room according to your project.
An example of a log house with a shingle roof
An example of a log house with a shingle roof
Cornice filing
Roof overhang trim
Advantages and disadvantages of a log house in a bowl
The main advantages of the log house:
- High strength of the joints of the structure, which ensures its stability.
- Increased thermal insulation of the room, which is created due to the low thermal conductivity of wood and protection from blowing through the corners of the structure.
- Environmentally friendly material.
- Possibility of constructing a building of several floors.
- Decorative appearance.
Multi-storey log house Source pokter.ru
The disadvantages of a log house in a bowl include:
- The difficulty of manufacturing structural elements and assembling a building without experience. If a log house is made by a person without skill, then such a structure may have cracks, begin to rot, and also crack or fall apart.
- Due to the protruding corners of the structure, it is difficult to carry out external finishing.
- Wood for log houses must be treated with insect repellents, as well as antiseptics (prevent the formation of fungus) and fire retardants (reduce the flammability of the material).
- Protruding parts of the log reduce the useful length of the crown, which increases wood costs. Because of this feature, this type of log house does not require additional insulation of the corners. Therefore, the difference in price when assembling a log house into a bowl or into a claw will be unnoticeable.
The finished building has a smaller usable area due to the thickness of the walls and protruding corners. This should be taken into account when calculating the size of the foundation and the length of the logs.
Why is it difficult to process the external part? Source royalwoods.ru
Two “indigenous” families of cutters
The fundamental criterion for dividing cutting methods into two large classes is the presence or absence of bypasses. This is what folk craftsmen called the remains of logs, and then timber, extending at the ends beyond the contour of the wooden structure. Based on this indicator, in the technologies for constructing log houses, I distinguish two main cutting schemes:
- “Into the bowl”, according to which the corners are cut out with a remainder . This is the most common method, which has a lot of variations of domestic and foreign origin. The downside of the nodal bowls is the significant consumption of material that is not cheap at all, but the plus is the excellent thermal insulation of the corner. And the buildings cut into a bowl look very impressive.
- “In the paw” or simply “without a trace . According to it, the outline of the building is built clearly according to the plan. With the same material consumption as the previous technology, the internal dimensions of the structure are larger. Corners cut into paws require obligatory lining, otherwise they will blow out and get wet. Log houses built without bypasses can be covered with clapboard, block house, plastered, faced with brick or sandwich panels. Unlike options with bowls, all finishing directions are applicable here, and sometimes even recommended.
One of the fundamental rules of wooden construction is that all corner connections must be made according to a single pattern. Since the cutting of beams and logs of load-bearing walls was carried out according to the “bowl” scheme, then the partitions will need to be cut in exactly the same way. Please note right away that all existing methods are applicable for corner joints in log crowns. But a bathhouse made of timber is cut mainly into the claw, but occasionally a number of bowl-shaped types are also used.
Both classes of corner notches have become overgrown with an impressive number of daughter subtypes, differing in manufacturing complexity and thermal properties. The choice of the best method is determined by:
- performer experience;
- climatic specificity of the area;
- the period preferred for taking bath procedures.
To assemble the crowns of a country bathhouse, which is used only in the summer, the simplest cutting methods are suitable. Especially if the owner is going to build a bathhouse on his summer cottage on his own. The customer of a team of craftsmen who needs a warm building for year-round use should not deny himself the choice of a complex technological scheme. Information about the differences and features of cuttings will help both the independent contractor and the prudent employer of builders, who wants to spend money well, to make a reasonable choice.
Materials and tools
To know how to cut a log frame into a bowl with your own hands, you need to choose the right cutting tools. To mark the logs, a tape measure, a level, a chemical pencil and a carpenter's line are used. This is a tool with two rigid plates with sharpened edges and a handle with which the distance between the ends is changed. This tool is designed to draw 2 parallel lines. Also, to cut out the bowl you will need:
- Carpenter's axe.
- Wood chisel.
- Chain saw (electric or gasoline).
- Hand saw.
- Hammer.
To blacken the recess when fitting logs, you will need coal. The cutout requires chemicals to treat fungus and insects, as well as insulation.
Tools for log house Source izba.spb.ru
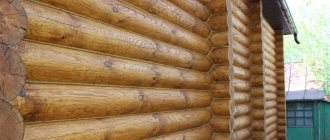
How to caulk a log house
To know how to assemble a log bathhouse from logs with your own hands, you need to understand what kind of heat-insulating material is required to fill the space between the structural elements. It will help prevent moisture from penetrating into the bowl, as well as enhance protection from wind and cold. In order to caulk cracks and cavities, the following is used:
- Moss . An environmentally friendly material that can retain heat, withstand temperature changes, and also remove excess moisture, which prevents the appearance of fungus. It is believed to have antimicrobial and healing properties, which manifest themselves when the structure is heated.
- Tow . As the log dries, it becomes damp and begins to rot. Therefore, after the structure dries, it is cleaned and re-laid.
Stage 4. Waterproofing the base
Waterproofing strip foundation
Waterproofing a strip foundation with roofing felt
Treat the surface of the foundation with molten bitumen and lay a layer of roofing felt on top. After the bitumen has completely dried, repeat the procedure. As a result, you will have reliable two-layer waterproofing.
Waterproofing with mastic
Additional insulation with roofing felt
Video description
In this video you will see how to caulk a log house with tow:
- Jute . An environmentally friendly type of insulation that retains heat well, but has a short service life (3 years) due to the fact that it strongly absorbs moisture.
Old jute is difficult to get out of the cracks, so it is rarely used. There are also differences between types of jute. For example, tow is too hard and has low density. Because of this, it is necessary to caulk the log house in several stages to achieve the desired density.
Flax-jute contains 50% flax fibers, so it requires additional treatment to prevent insects and rot. Jute felt consists of 10% flax fibers, but has high flexibility and good density. It also requires additional insect repellent treatment.
- Lnovatin . Due to heavy treatment with insect repellent chemicals, it is not environmentally friendly. It has a service life of 3 years and is attached to the structure using a construction stapler.
Felt made of jute Source drevtorg.rf
See also: Catalog of house projects made from hand-cut logs and timber
- Synthetic compounds . They cost more than other materials, but are easier to use.
Such substances are used in combination with natural material (cord). To do this, the thread is placed in the gap and filled with sealant, which is leveled with a small spatula.
The disadvantage of this method of sealing log cracks is that when exposed to sunlight, the sealant will dry out and begin to crumble. To do this, the place of putty must be covered with planks.
Also, synthetic compounds harden and can expand and contract with temperature changes, which can lead to cracks in the wood. To avoid this, it is necessary to use elastic compounds.
The right combination of sealing materials helps avoid the formation of damage and fungus, and also increases the thermal insulation of walls. This is necessary when constructing buildings in cold regions or when assembling a bathhouse, since in such rooms rapid cooling of the air can be critical.
Synthetic sealant for log houses Source td-artemov.ru
Company advantages
First-class timber. We harvest timber on our own plots, which are located in places rare for Siberian forests - on the edges and in non-swampy regions. This location provides many advantages:
- Our cedar trunks are 15% smoother than the regional average, and their resistance to pathogenic bacteria increases by 10%;
- We have the ability to harvest timber at any time of the year. All units of our equipment are equipped with special grips for transporting long lengths and exclusive items with embossed butt parts.
- Our forest is characterized by high environmental performance. The Siberian region has not suffered from anthropogenic degradation of air and soil, so the wood emits only beneficial phytoncides - it is not saturated with carbon monoxide and sulfur dioxide.
Professional projects. The design section includes cutting maps and a diagram for laying the crowns. These documents are a guarantee of the identity of the sketches and the finished log house, the ability to rationally cut valuable wood and minimize waste. A detailed diagram of laying the crowns along the axes speeds up the process of assembling the house. A large log house at our site takes 2 months to cut, which is 20% faster than when assembled without diagrams.
Full guarantee for all types of work. We build turnkey houses and bathhouses and provide a guarantee for all types of work and for the log house in general. We have a well-organized work process and take care of motivating our employees. High salaries, high-quality materials, and good technical equipment attract the best carpenters and finishers to our company.
High-quality complete set of hand-cut log houses. We choose the best for our log houses! We are dealers for Remmers, Borma and Osmo. Our Customers purchase the entire line of these products at a preferential price. We are partners of factories that manufacture elite roofing coverings “Metrotile Europe”, “RUUKKI” and “BRAAS”. We cooperate with leading manufacturers of window and door structures, Rehau and Veka.
Main types of wood for felling and their processing
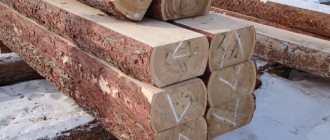
To know how to cut down a bathhouse, you need to select the appropriate types of wood for production. Most often, coniferous types of wood (pine, spruce, larch) are used for the manufacture of such structures. It is best to choose material from cold regions (for example, Siberia), since in winter the flow of sap along the trunk is least. This reduces the risk of cracks forming when drying the material.
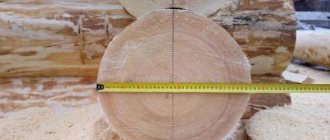
Also, trees that are felled in winter have a higher resin content, which increases its resistance to rot. The diameter of the logs must be at least 21 cm (but not more than 35 cm), and the length of all elements must be approximately the same to simplify processing and assembly. All wood must be smooth and free of knots. The area from the root to the beginning of the crown of a pine tree is best suited for this.
Wood for a log house Source sm-news.ru
See also: Catalog of companies that specialize in log baths and sauna vats
When laying structural elements, it is recommended to make the first 2-3 crowns from larch, as it has high resistance to moisture. When choosing a material, it is not recommended to use crooked trunks or wood with cracks and rot. The bark should be removed with a scraper, as it hardly touches the working surface underneath. After this, you need to let the material dry for 3-4 days. Also, before cutting, the wood is treated with an antiseptic and impregnated with a fire retardant.
Processed wood for a log house Source im0-tub-ua.yandex.net
Finishing
After completing all the activities described above and laying the roof, the log house must stand until it shrinks completely. The standing time ranges from one and a half years (for raw, even timber) to six months (if glued dried raw materials were used).
After the required time has passed, you can begin finishing:
- Houses made of profiled material do not require cladding either inside or outside. To ensure their durability, it is enough to treat the walls with an antiseptic or paint them with a composition for external use.
- In buildings made of even timber, cracks inevitably form during the shrinkage process. These cracks must be sealed, after which it is necessary to provide cladding that protects against blowing.
- We install a windproof membrane under the sheathing, and the finishing itself is made of lining (inside), siding or metal siding (outside). It is also possible to line the walls with brickwork.
House made of timber lined with brick - in progress
Material calculation
How to make a log house and calculate the amount of money spent, if the dimensions of the proposed structure are known - this is an important point in the manufacture or ordering of a finished building. For example, for a bathhouse with dimensions of 3x4 m and a height of 2.4 m with a frame in a bowl.
Due to the fact that the corners of such a structure will protrude 25 cm on each side, when calculating the length and width of the building, 50 cm is added.
If the diameter of the log is known (for example, 24 cm), then the volume of wood can be calculated using the formula 3.5 x 4.5 x 2.4 x 0.24 = 9.072 m³. During assembly, a groove is made in each log, which differs in width from 0.5D to 0.67D. This reduces the final volume of wood, so this formula requires further refinement.
Wide logs for a log house Source promdrevo.ru
Floor installation
Correctly lay a double floor in a wooden house. The bottom layer is rough, it is made from edged boards. A clean, high-quality board is laid on the second layer, on which finishing material can be laid.
Important! The most reliable method of installing a subfloor is laying it on a skull block. It is attached to the joists on each side. And the subfloor is nailed onto the cranial block from the outside.
A cushion of insulation is laid on top of the subfloor. In order for the material to last a long time, it must be protected with a moisture-proofing film. It is laid on top of the subfloor, after which the insulation is attached. A vapor barrier is laid on it, in turn. To prevent wood rotting, a ventilation block is attached to the logs (a board 3-5 cm high and wide, matching the width of the logs). A finishing board is laid on top of this entire cushion.
Marking and cutting logs
To know how to cut down a log house, you need to understand the method of marking logs. To do this, they need to be laid perpendicular to the lower crowns. It is recommended to use staples to secure the structure. This will prevent the log from turning around its axis. Next, using a line, you need to draw the contours of the bowl and longitudinal grooves using several rules:
- One leg of the feature should rest on only 1 log.
- The distance between its points should be half the diameter of the log, depending on the log house used: “to the edge” - the upper one, and “to the edge” - the lower one.
- It is recommended to start drawing with a bowl and end with a longitudinal groove.
- The prepared logs are placed in bowls, and after that it is necessary to process the joint: if there is a large gap, insert wedges, if it is small, remove the excess layer.
Stage 2. Timber processing
Processing logs for scraping
Processing a log for scraping
Step 1. After the consumables have been delivered to you (or you have cut and delivered them yourself), they need 25-30 days to rest.
Step 2. Next, carefully examine and sort through the logs - keep only the highest quality ones, and discard defective or damaged ones.
Step 3. Then start processing. First, peel the bark from the logs (do this carefully so that they do not crack), leaving a little of it on the sides - about a 15-centimeter strip on each side.
Step 4. After processing, place the logs in storage approximately 25 cm from the surface of the ground. You can stack it however you like - in stacks, packs, etc., the main thing is that the distance between the logs is 7-10 cm.
Scheme for preparing logs for building a log house
Log storage
Video - Preparing logs
Assembling a log house
Before assembling the log house, it is necessary to make a strip-type foundation, since the wooden structure has a large mass, and put waterproofing on its upper part.
Next, it is recommended to lay 2-3 larch crowns and level the horizontal surface of the log house using a level. During assembly, insulation is placed in the longitudinal groove, and to compact the log, the log is tapped with a wooden mallet or log. Also, after laying each crown, it is necessary to check the horizontal and vertical position of the structure.
After assembly is completed, all cracks and joints are caulked, and excess insulation is removed. After six months, it is recommended to repeat this operation, since the insulation can become saturated with moisture from the drying logs. All wooden structural elements must be treated with an antiseptic 2 times.
Log house Source metasold.com
offers Customers three design options:
- ready-made projects from our catalog;
- individual design based on amateur sketches, pictures from a magazine, or based on a detailed story about the future concept of the house;
- adjustment of the finished project in accordance with the Customer’s requirements: minor changes to the layout, selection of a different diameter.
Before developing a project or before adapting ready-made sketches for implementation at the Customer’s site, it is necessary to conduct geological surveys and make topographic surveys. It is not recommended to begin individual design of a bathhouse or house before a complete study of the land plot.
Our company employs experienced architects who have their own methods for minimizing material consumption. Rational design of houses reduces the cost of construction and allows you to use unspent funds on finishing the log house or on its technical equipment. If you wish, you can take a walk around your future home or bathhouse using interactive 3D modeling.
Briefly about the main thing
The log house is most often made from pine or other coniferous wood.
The main advantage of a wooden log house is thermal insulation and environmental friendliness.
When choosing a log manufacturing technology, it is recommended to take into account the level of knowledge and skill. If it is not high enough, then it is better to contact specialists.
It is necessary to use high-quality thermal insulation and means to combat fungus and insects. This will extend the life of the building.
All logs for a log house must be treated with a fire retardant to avoid fire in the structure.
Ratings 0
Stage 8. Caulking logs
Types of tools and caulking methods
After shrinkage is completed, the log house is caulked. To do this, prepare the following equipment:
- hammer;
- caulk (made of wood or metal).
Attention! If you sealed the inter-crown space with tow or moss, you can skip this step, since you most likely will not need caulking. But if you find even the slightest cracks, then it is still better to carry out the procedure.
Proceed to work only after the insulation has completely dried. First, twist the material (tow or moss) into a rope, then hammer it between the crowns with a hammer and caulk.
Caulk
You can use tape jute - in this case, the material is simply fixed with nails or a mounting stapler.
Primary and secondary caulking of a log house