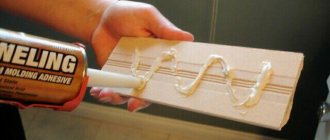
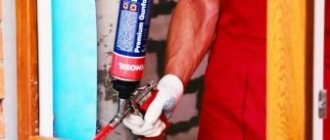
A carpenter's mark is a tool for marking parallel lines, straight or curved, on a wooden surface, along which logs are cut or construction forms are made. On one board, carefully remove the edge, then use it to apply a marking line on the next strip, which is leaned against the first.
The metal tip leaves a deep longitudinal mark along which further work is carried out.
Features of the carpenter's trait
Working with a carpenter's mark requires care, as the scratch cannot be erased like a pencil mark. Another work that is done with the help of a carpenter's line is the cutting of a longitudinal groove for a tight connection of logs in a wall frame, the bowl of a log, before subjecting it to the final processing. The line is used for beating and drawing an even line on the block when planing, processing the boards for their tight fit. The tool is used for marking joints and various marks in carpentry. At the same time, a carpenter's compass is used.
In ancient Russia, when cutting down the walls of houses and churches, carpenters used only an ax and a line. To connect the logs, unique grooves were used that did not require the use of a chisel and chisel. This demonstrated the individual methods of skillful work of ancient masters.
Subsequently, in wood finishing, the line was replaced by a surface planer, which translated from German means a device for drawing parallel straight or winding lines. This tool is used to copy dimensions from one shape to another part. The difference between the two devices is that instead of a wedge and a line ring, the thicknesser has a moving block with a screw lock.
Drawing principle
The process of drawing crowns during the installation of walls requires the special skill of a specialist, because the quality of the constructed log house depends on his precise work.
Deviations vertically and horizontally when drawing lines are unacceptable; moreover, in the process of work they first make rough markings, then the final clean drawing. It takes a carpenter to make a quality log house . Currently, the carpentry trait has been improved, and an almost new tool has emerged, which is called a scriber. Drawing contains the following steps:
Corner connections
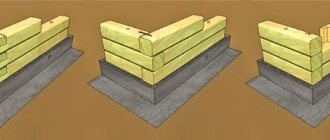
- To connect the walls, a dowel is used, which seems to penetrate these structures. These fasteners are nothing more than wooden vertical nails with a diameter of approximately 30 cm and a length 20% less than the height of the frame.
- Also in construction, specific types and methods of corner joints are used. Special tenons are prepared for them, which can be composite and cut into the material.
- In the process of this work, it is necessary to strictly observe the rule: when connecting elements, which is a necessary operation when building a log or block house, care must be taken to ensure that there is a certain vertical gap. Its purpose is to compensate for the effects of natural shrinkage that accompanies the construction of each wooden object. This gap should be no larger than 0.5 cm. When making longitudinal mounting grooves, the gap size is increased to 1 cm.
Possibility to make a tool with your own hands
A simple version of the dash is made from thick diameter wire. A similar solution is to drive two long nails into a suitable wooden handle. A mechanic's compass is also used to mark wood. The accuracy of drawing increases as the distance between the teeth of the tool decreases; skill and experience play an important role.
The scriber
is a mechanical compass with a built-in level. The latter is intended for precise marking of lines horizontally and vertically. If everything is done correctly, then marking with your own hands will allow you to assemble the log house in such a way that it will not be possible to push a match between the logs.
Scriber is an advanced carpentry trait that has been given two levels. This saved time for the carpenter. After all, now they don’t draw a rough line for marking, but immediately draw a finishing mark.
Construction from logs: technology of cutting into a bowl
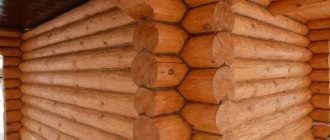
One of the most important advantages of a log house is its ability to retain heat well, which helps save on heating costs during the cold season. However, the energy efficiency of a wooden house largely depends on the assembly technology of the log house. Cutting into a bowl is the best option, since in such houses the corners do not freeze or become damp.
A frame made “into a bowl” can be erected with your own hands if you have carpentry skills and a suitable tool. If this is your first experience in building a log house, it is important to work carefully, carefully marking and adjusting each log. This will require a lot of time and effort, but the result will please you for many years.
Carpentry Feature Improvement
Time works to improve the instrument and does not stand still. When drawing markings, the main thing is to ensure horizontal and vertical compliance with the line; for this, the ends of the carpenter's line are set using level bubbles. A Canadian inventor proposed an innovation in the form of a marking tool based on a carpenter's line, which he called a scriber. The Russian skilled carpenter did not further elaborate and developed a different version of the scriber, which later became known as the carpenter’s compass.
Log processing
The prepared material is placed on a platform raised above the ground, so it will dry and ventilate better. It is much easier to remove the bark while the tree is fresh; after a week or two it will dry out, and you will have to work hard to debark the log.
The surface of the log is processed using a large electric planer with a power of 1.5-2 kW and a blade width of 100-110 mm. When sharpening, you must ensure that all flaws and damage are removed, but you should not remove too much wood, because The outer layer of wood is the strongest.
If the log house is not planed or polished, then when debarking you need to scrape the so-called more carefully. sapwood (sapwood) is a thin layer between the bark and the wood, otherwise the paintwork will fall off along with it.
Tool for making a modern carpenter's dash
To make it yourself you will need the following tool:
make a carpenter's compass entirely from available materials nearby. You will only have to buy the appropriate washers and nuts in the store, if they are not in the home craftsman’s storerooms.
The tool is based on old, obsolete metal scissors. Carefully cut off the bolt heads and attach them by welding to the handles of the scissors. To install the pencil and needle mounts, use the threads on the ends of the bolt.
They make a socket for installing the needle and the needle itself, then design it further. The device for installing a pencil is designed in such a way that in addition to it, a needle can be placed in the mount. Flasks with bubbles are taken from old building levels; you will need two of them, for the horizon and vertical.
To determine the amount of separation of the needle and pencil, an adjustment bar is provided. It is fixed with nuts, and the compass is secured in the extended position with clamps made of bolts and washers. To secure the levels, a mounting platform is made. During operation, the pencil lead is ground down, and when the compass is pulled out again, the compass may get lost, so a special template is created, which provides for a joint design of a screwdriver and a head. Alternatively, you can use another needle instead of a pencil.
In conclusion it should be noted that if for so many centuries carpenters have used a line for marking, then this tool will be popular in future years, so you can make it yourself and use it to ensure high-quality markings when working with wood.
Source
Longitudinal groove: marking and cutting a longitudinal groove
The first principle of laying the logs of a log house is that the arrangement of the logs should correspond to the order - “butt to top”.
The natural structure of logs is such that they become thinner towards the top. In order for the walls of the future log house to be smooth, it is necessary to alternate the location of the logs, in other words, a log with a thin end should be followed by a log with a thick end. The second principle of laying logs is that the lower log is laid with the hump up, and the top log with the hump down. After marking and selecting a longitudinal groove, you will receive a parallel arrangement of logs relative to the longitudinal axes. All rows must be laid in exactly this sequence to ensure that the wall is as even as possible.
To mark the corner bowls and the longitudinal groove, a special tool is used, which is called a “dash”. It is quite possible to make such a tool yourself using available materials. To do this, you will need to take a thick wire about 10 mm in diameter. Next, you need to bend it into a V shape, the length of each side should be about 10-15 cm.
is engaged in the construction of houses from hand-cut logs professionally, and therefore our specialists use a professional carpenter’s “line” for marking. In Europe, the “line” is called a “scriber”.
You can see the image of the carpenter’s “line” in Fig. 1
A professional carpentry “trick” is quite expensive, this is due to its complex structure and equipment. Levels are built into the professional carpenter's line, which enable carpenters to maintain an even vertical position when applying markings. The entire construction of the log house depends on how correctly the “line” is worked. If you only plan to build one house, then you don’t have to buy a tool at a high cost; instead, you can use a level and an ordinary carpenter’s compass. Of course, such a work process will take more time, but if the construction time is not critical, then this is quite acceptable.
Preparatory stage
At the preparatory stage, a cutting technology is selected. Traditionally used:
- cutting “into the oblo” - a bowl is cut out in the lower log;
- cutting “into the hole” - a bowl is cut out in the top log.
Non-professionals who decide to assemble a log house with their own hands are recommended to choose the second option, in which the crowns are laid with the bowls down. Since the work will progress relatively slowly, there is a high risk that the log house will be exposed to rain before the finishing, final assembly is completed - if the bowls are cut out in the lower logs, moisture will get into them, which will cause the wood to rot.
Construction requires high-quality timber, preferably winter felling. For a beginner, it is easier to make a frame into a bowl from rounded wood - the geometric precision of the elements simplifies the marking of the bowls and the adjustment of the links.
How to use "trait" ("scriber")
To correctly apply the markings, the logs must be laid one on top of the other (not forgetting the “butt to top” rule), and then secured with staples. Taking into account the region in which the log house is being built, the width of the future groove is determined. A mark is placed at the end of the log; the distance from the bottom point of the log to this mark should correspond to the width of the longitudinal groove. Then one leg of the instrument is moved to this mark, and the second is moved back to the top of the hump. Thus, we prepared the “line” for work by setting the required interval between the legs of the tool.
Having fixed the legs of the “feature”, we place one leg at the height of our mark, and the other on the surface of the hump of another log, draw a line. Thus, the second leg of the tool creates a line that follows the line of the longitudinal groove of the first log. Subsequently, for convenience, the markings made can be additionally highlighted with a pencil. The marking must be applied on both sides of the logs without changing the “line” settings. This completes the marking of the longitudinal groove.
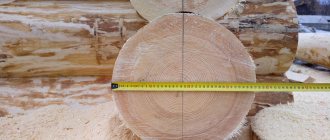
In Fig.2
You can see the layout of the longitudinal groove.
Now let's start creating a longitudinal groove. Having outlined the log, we can see the resulting groove; it has a rounded shape, repeating the run of the log.
The run-off of a log is a smooth change in the diameter of the log from the butt to the top.
Thus, all grooves will alternate the direction of inclination. This method can only be used when working with logs that have a slight slope or no slope at all, when the log has an almost cylindrical shape. Or this is applicable to working with logs that are calibrated and have approximately the same thickness at the point of cutting. In this case, the inclination of the grooves does not matter.
Logs of different thicknesses, on which there is a rung, need to be drawn to each other in a slightly different way. The lower log must be placed on special stands so that the hump is aligned as horizontally as possible, after which the log is fixed with brackets. The upper log is placed so that its butt is located towards the narrow part of the lower log. During the delineation process, it is necessary to maintain the vertical position of the legs of the “line”; only thanks to this can an even groove with a varying width be achieved.
If you mark the groove incorrectly, this will lead to the so-called “kiss” - the edge of one log will only slightly touch the end of the other. Of course, in this case, the conversation is neither about the thermal properties of the log house, nor about the required width of the longitudinal groove. Thus, all the logs are laid one after another and marked to the very top until all the grooves are horizontal.
After the drawing is completed, the log is removed from the brackets and turned upward with the side on which the markings are applied. Next is the sampling itself. Carpenters, when selecting, use a chainsaw, making many cuts across the log, moving along the entire length of the trunk, deepening the saw to the depth of the future groove. Experts do not recommend cutting to the full depth of the groove, but leaving half to one centimeter and then finishing it manually. This can extend the longevity of your building.
To finish cleaning the groove, a tool called an “adze” is used. This is an ax whose sharpened surface is directed across the handle, and not along it like an ordinary ax. There are two types of adze: small and large. Working with a large adze occurs while standing, cutting off the surface with strong blows. They can immediately begin creating a groove, without using an ax.
To further refine the logs, a small adze is used. When the groove is cut, all that remains is to check how well the logs fit together. To do this, a special coloring composition is applied to the upper part of the lower log, then a log with a cut groove is placed on top. After such fitting, you will see how the coloring pigment has stained the cut out groove. Those cutting areas that remain clean indicate that they were not touched by the surface of the lower hump.
This means you need to remove excess wood that interferes with the contact of the remaining sections of the groove. Thus, you need to gradually refine the groove until it is completely covered with pigment. There is another way to check how correctly the groove is made. To do this, you need to take a piece of log, about one meter in length, and tap it on the logs that are connected.
After this, remove the log in which the groove is made and look at which places in the groove are jammed. In these places there is excess wood that needs to be removed and the procedure repeated again. The block used to tap the log must be made of soft wood so as not to crush the front surface of the log.
Source
Video on this topic
Carpenter's trait
agency of historical projects "Ratobortsy" project "Seven in the Past"
Carpenter's Trait
Carpenter's trait/device/principle of operation Our website - https://vologdahouse.ru/ We are on VKontakte - https://vk.com/vologdahouse Forumhouse -...
Cutting a longitudinal groove is an operation that combines all types of corner cuts from logs and carriages. On this and subsequent pages of the site we will look at the logical elements of the work, how and what is done, but these elements have little to do with the construction of a real log house. In real construction of a log house, the groove and corner notches are interconnected and work, depending on the type of corner notch, is carried out as a complex.
The general rule for building a log house is to arrange the logs according to the “butt to top” principle. The logs become thinner from the butt to the top. Alternating thin and thick ends along the height of the wall allows you to level the walls of the log house. The lower log is leveled into the horizon with the lower hump, the upper log with the upper hump. Thus, two logs stacked on top of each other are obtained with approximately parallel longitudinal axes. After drawing and selecting a longitudinal groove, their top becomes close to horizontal. You can place and draw another log on it. This is how a wall gradually grows, the top of which tends to the horizon.
The marking of the longitudinal groove and bowls of corner notches is done with a special tool - a “dash”. This tool can be made from available materials, for example, from wire with a diameter of 8–10 mm. The wire is bent into a V shape with the legs approximately 10–15 cm long. In order for the “devil” to scratch the wood and leave a mark, the ends of the legs are sharpened. The tool is attached to a stick or hammer handle. In order to fix the size of the sliding legs of the “dash”, a wedge is inserted between them, and the legs themselves are wrapped with a cord. The real carpentry “trait” is an expensive tool, the imported version is called a scriber. Modern drawing tools have built-in levels that allow you to control whether the legs of the line are held in a vertical position. The entire work of cutting a log house depends on the “correctness” of this tool. To make one single log frame, it is possible that there is no need to purchase an expensive tool; it can be replaced with varying success with a carpenter’s compass and a short level. Unproductive and time-consuming? Yes, this is true, but if no one pushes you with work, then it’s possible.
To attach one log to another, they are laid vertically (butt to top) on top of each other and secured with staples. Depending on the region of construction, determine the width of the longitudinal groove (Fig. 2) and apply a horizontal line on the thin end of the log with a length equal to the width of the longitudinal groove. One leg of the “line” is placed at the center of the drawn line, and the second leg is moved apart and touches the top of the hump of the log. The tool is ready for use - its legs are moved apart to the required distance
Without knocking down the extension of the legs of the “line”, starting from the end of the line of the width of the longitudinal groove, touching with one leg of the “line” the hump, the logs are led along the surface of the hump. In this case, the other leg of the line scratches the end of another log, exactly repeating the line of the hump of the first log. At the end of the log we get a profile of a transverse groove, scratched with a line (Fig. 11). To improve visualization, you can outline it with a pencil.
Next, pushing the handle of the “line” between the logs and moving the tool along the logs, scratch out two lines - this will be the boundary of the groove. Approaching the other end of the log, draw the profile of a longitudinal groove on it. Then they outline the other side of the log. That's basically the whole operation of marking the groove. When drawing logs with the “line” handle sliding between the logs, a groove of even width is obtained, but it is not horizontal, but inclined, repeating the run of the logs. The next highest groove will be inclined in the other direction and so on until the very top of the wall, the grooves will alternate inclination. It is quite obvious that the method is applicable only to logs with a very small slope or no slope at all, practically cylinders, where the inclination of the grooves will be almost unnoticeable. Or to log houses, all the logs of which are calibrated and have approximately the same thickness in cuts (regardless of the run) and in which the inclination of the grooves is not given any importance.
Logs of different sizes with a bevel are drawn slightly differently. The lower log is laid on linings, its lower hump is leveled to the horizon (as far as possible) and secured with staples. Another log is placed on it, turning the butt towards the top of the lower log. The upper hump of this log is leveled into the horizon, after which the log is secured. Marking the width of the longitudinal groove and opening the legs of the “line” are done as in the first option. But the outline of the groove along the logs is carried out horizontally, focusing on the horizontally laid hump of the lower log. Modern carpenters have a “feature” with hydraulic levels, but in extreme cases you can use ordinary chalked cord stretched between the markings on the ends of the logs. When outlining, the drawing ends of the legs of the “line” should be on the same vertical. The longitudinal groove will be horizontal, but of variable width - tapering in one direction. Incorrect outline of the groove and/or incorrect choice of opening the legs of the “line” leads to a “kiss”. This is when, as a result of drawing and cutting out a groove, the end of one of the logs only slightly touches the other. Of course, we are no longer talking about the width of the longitudinal groove and the thermal characteristics of the log house.
Next, the third log is placed, its upper hump is leveled to the horizon and a groove is drawn. Then the next one and so on until the top, all the grooves of the log house are horizontal. But another option is also possible. The third log is not leveled to the horizon, but only the hump of the fourth log is leveled. It turns out to be a kind of paired cutting of a wall, inside each pair of which you can make both an inclined and a horizontal groove.
Foundation for a log house
The main tasks of any house foundation are as follows:
In addition to the above-mentioned requirements for the foundation of any house, some more requirements should be added to the foundation of a log house:
log house on a pile foundation
Read more about the types and properties of pile foundations
Read more about the properties of a columnar foundation
log house on a columnar foundation
Stage 6
Assembling the walls of a log house with your own hands
Types of log house assembly
There are several classifications of log house assembly: by type of corner connection and by place of origin or territory where this technology is more widespread.
According to the type of corner connection of the crowns, they are divided into:
example of a log house with the ends of logs released
example of a log frame angle
According to the distribution area, assembly technologies are divided into
Let's take a closer look at each of the methods of coronal connection.
Types of connections with the release of crowns
Cutting into the lower bowl
It is the oldest, most effective way of cutting and joining crowns. This method is also called Russian. Previously, in Rus' only this method was used. The essence of the technology is to cut out a semicircular bowl in the lower crown of the log house, with a depth equal to the radius of the upper log, with or without a tenon. The upper log is placed perpendicularly into the cut out lower bowl.
The advantage of this method is the prevention of cracking in the lower part of the log during shrinkage of the log house, and therefore a longer life of the log house. The disadvantage is the complexity of cutting, since this technology involves working with a log at the top of the well, which affects the speed of construction and labor costs. Therefore, construction organizations extremely rarely practice this cutting method, justifying their choice by the fact that supposedly with a lower bowl there is a greater risk of moisture entering and accumulating, and the percentage of formation of cracks in the corners allegedly increases.
lower bowl with spike
However, in practice we see absolutely the opposite result; when the log dries out, it begins to crack from below, since a longitudinal groove is selected at the bottom. And in the case of the bottom bowl, its walls hold the bottom of the log where cracking occurs and prevent the log from curling and expanding. If the cutting is carried out in the upper bowl, then the crack that appears at the bottom of the log is not restrained by anything and simply begins to expand, spreading along the walls of the lower crown. The angle into the lower bowl is well enhanced by the sharp tenon.
an example of a crack in the lower groove that is restrained by the walls of only the lower bowl
cracks in the lower grooves of the crowns
Felling in Okhlop
Another way of Russian cutting. Logs are also chopped into a bowl, but unlike the first method, the bowl is selected in the upper crown of the log house. A more effective method for the longevity of the house, since the locks are less susceptible to the effects and accumulation of moisture. But more labor-intensive due to
Felling in Kurdyuk
It is the same as cutting into a bowl, only with a more complex cutting of a special tenon in one log. A protrusion is cut out, which will create a stronger connection with the next log, in which a groove is in turn cut. This connection enhances strength and tightness and eliminates the occurrence of slot blows after shrinkage. A modern, technologically advanced tool allows you to use this installation technology no less often than cutting logs into a bowl.
Felling in Ohryap
Provides for double-sided selection of castle bowls, but with a flat and straight bottom, and not with a semicircular one, as in the methods described above. The inner sides of the bowls remain semicircular. Okhryap joints were previously used for the construction of cabins and utility structures, since when they shrink, noticeable gaps form in such joints, the density deteriorates and the building is noticeably blown in the corners.
Types of connections in Lapu
This type of connection of the crowns of a log house, without releasing part of the log beyond the corners of the log house, forming a right angle. Joints are cut with a straight or oblique paw.
Straight paw
Rectangular projections are cut out at the ends of the logs, with straight ends. Each subsequent end of the log, located perpendicular to the previous crown, is laid out on the lower rectangular ledge. Since such a connection is not particularly strong, the logs at the corners are fastened with dowels.
Oblique paw
As in the previous version, connecting protrusions are cut out at the end of the logs, but not in a rectangular shape, but in the shape of a trapezoid, at a certain angle of inclination. This connection is characterized by greater strength and resistance to blowing. To strengthen the joints, a tenon and a groove can be cut on both a straight and an oblique paw.
Canadian cabin
This is an improved technology of Russian cutting, which arose experimentally. Unlike the traditional semicircular bowl, the Canadian bowl has a trapezoidal shape. It is cut out at the bottom of the crown. A spike forms inside the bowls. A groove is cut into the top of the log for the tenon to enter. The locks leave a reserve - a gap of up to 2 cm, which self-jams as the log dries out. That is, as the frame shrinks, the corners of the frame shrink more and more tightly and, unlike previous technologies, do not require additional caulking. In the upper part of the log, on the sides and at an angle, flat “cheeks” are cut out, on which the sides of the trapezoidal bowl sit.
The advantage of such cutting is a strong locking connection in the corners, the corners are not blown out and only become stronger over time, moisture will not get into the joints of the logs, during rainfall the liquid does not enter the bowl and flows onto the ground. There is only one drawback - the laboriousness of the process, which involves additional selection of the tenon and groove.
Swedish cutting
A distinctive feature of the Swedish loghouse is the hexagonal protruding ends of the crowns. The bowl itself is not semicircular, but in the shape of a trapezoid (half a hexagon). The process is labor-intensive and long-term. A distinctive feature is its unusual appearance. The peculiarity of the connection prevents moisture from penetrating into the corners.
Norwegian cutting.
Identical to the Canadian method of joining logs, with the only difference being the shape of the log. For the construction of Norwegian log houses, carriage logs are used, which are timber with semicircular edges. The cross-section of such a beam resembles an oval. Has all the advantages of a Canadian connection. The difference between a Norwegian log house and traditional ones is that it has smooth walls, without semicircular transitions.
Laying the lower, frame crown
The lower crown of the log house is the fundamental part of the entire structure. The lower crown bears the maximum weight load, and is also most susceptible to humidity and other mechanical influences from the outside. Therefore, if you are building a log house from one type of wood, then a log with the largest diameter should be selected for the frame crown. For the lower crown, it is recommended to specifically look for or purchase logs of larger diameter. The best option for the lower crown is hardwood, such as larch or oak, which are most resistant to any changes and influences. Read more about the properties of larch.
Before installing the first crown, the surface of the foundation, be it a concrete or piled metal foundation, must be covered with three layers of waterproofing material: roofing felt or other bitumen-based materials. The foundation itself is also recommended to be covered with bitumen mastic for additional protection from moisture. Waterproofing will protect the tree from direct contact with the foundation.
Next, between the waterproofing and the first crown, a sealing material is laid out, which is used as tow, jute or classic natural moss.
the foundation must be covered with bituminous materials to protect the casing
The crowns of the log house are laid to each other at an angle, according to the design of your log house. Often the crowns are mounted at right angles to each other. But by experienced craftsmen, the crowns can be cut and folded at both wide and sharp angles. This kind of cutting requires a lot of experience and high skill.
The first method of laying the casing crown
The side of the log that will interact with the foundation, for greater stability and reducing the load on the foundation, by increasing the contact area, is trimmed to 5 cm from the total diameter. Such crowns are laid on two parallel sides of the foundation. After which, logs with already cut out bowls are mounted on the other two sides of the foundation, perpendicularly. In this case, a gap is formed between the logs with bowls and the foundation, approximately the height of the radius of the log. The resulting gap at the foundation, after complete assembly of the log house, is filled with bricks or additionally filled with a monolithic foundation, or a part of the log is cut to size and mounted in the gap.
the gap under two parallel rims will have to be filled. the gap between the casing and the foundation is filled with bricks
The second method of laying the casing crown
It differs in the area of contact with the foundation of the first two parallel-laid crowns and eliminates the occurrence of a gap between the foundation and the other two sides of the log house. The logs of the first two crowns are cut to exactly half the diameter, through the core of the log and laid flat on the foundation. Two other crowns perpendicular to them with a cut out bowl are mounted on top and are already in close contact with the foundation without forming a gap. The lower surface of the crowns, which rests on the foundation, should be well treated with an antiseptic and coated with bitumen mastic.
the frames on all sides are completely laid on the foundation
The advantage of this method is: there is no need to raise the level of the foundation in order to create a gap between the crown and the foundation, as well as less mechanical load on the foundation. The disadvantage is the lower durability of the crown as a result of the violation of the integrity of the core of the log.
The strongest and most durable is the base of the log house with a clearance, mounted using the first method.
If desired, the lower crown can be further protected using external finishing, by coating with mastic, constructing a blind area or canopies.
Cutting the corner of a log house with a lower bowl
Marking and cutting a longitudinal groove
We mark the longitudinal groove. At the bottom of the log, perpendicular to the diameter line, we mark the width of the groove you have chosen, from 10 to 14 cm. Often they stick to the average value of 12 cm. Using a line, measure the vertical distance between the edge above the marked line, to the bottom log. Using a line, we draw the boundaries of the groove on both sides of the log along the entire length of the log. At the same time, we draw a pencil line along the log without lifting it, and draw the second end of the line tightly along the surface of the lower log. In this way, all the unevenness of the lower log is projected onto the upper one, which will ensure a tight fit of the crowns after cutting.
After marking the groove, using a chainsaw, we make transverse cuts in the groove every 10 cm. If you don’t have a chainsaw, you can make cross-cuts with an ax. Next, we make a longitudinal cut to the depth of the groove. Using an ordinary ax or an adze ax, we cut out cuts in the groove to the marking line and give it a semicircular shape. To measure the correspondence between the inner circumference of the groove and the circumference of the lower log, craftsmen recommend making a template for the circumference of the lower crown. To smooth the inner surface of the groove, after cutting it is recommended to go through it with a stapler.
longitudinal groove cutting
Marking and cutting a bowl of logs with a tenon
Let's look at a practical example in more detail about the most reliable method of cutting logs for a log house, namely, into the lower bowl with a spike.
First of all, it is necessary to correctly mark both ends of the log for the bowls. For convenient work with the log, we securely fix it on the lower crown, as it will be located after installation. Using a measuring tool and a construction pencil, draw a diameter in the center of the end of the log. The diameter line is needed so that the correct position of the log relative to the lower crown can be seen and should be located perpendicular to the lower log. The center lines at all ends of the logs must coincide when measured with a plumb line.
1. Log diameter line; 3.Mark the depth of the bowl in the central part of the log; 2. vertical mark coinciding with the mark of the lower log 4. mark of the center of the lower log coinciding with mark No. 2
The second mark is placed along the central part, on the log, at a distance from the end, no less than the length of the diameter of the log. It is recommended to add 10-15 cm to the diameter size. This mark fixes the depth of the crown bowl. Next, using a building level, you need to draw a vertical line that will intersect the bowl depth mark at a right angle. The vertical mark must coincide with the control mark of the center of the lower crown when laying.
We set the dimensions of the line equal to the distance from the central mark of the upper log to the mark of the lower log. Draw a line along the bottom log of the bowl.
marking the bowl with a line
We mark the spike in the bowl. On the flat surface obtained inside the bowl, draw a central line, which will be the center of the tenon. We mark a spike 10 cm wide relative to the center line. That is, 5 cm on each side of the center line in the bowl. Then we cut along the lines with a chainsaw, make longitudinal cuts to the tenon line, and cut out the tenon with an ax or chisel.
marking the spike in the bowl
Wood selection
Preference is given to coniferous species.
Most often, pine is used, which is distinguished by a smooth trunk of uniform thickness along almost the entire length, a minimum number of knots, and resistance to decay. The best wood is considered to be from the northern zones, cut down in winter. In winter, the movement of sap in the tree is minimal, which leads to less cracking of winter preparations when dried. The blanks must have the same overall dimensions, the recommended diameter is ≥ 22 cm. The larger the better, this will reduce the number of node connections and increase the thermal performance inside the building. The material is sanded and trimmed from the inside to the thickness of the upper section. To ensure the stability of the log house against weather conditions, the blanks must be oriented along the annual rings. The part with thin rings is located outward, and the part with thicker rings is located inward. The prepared workpieces are dried in a ventilated stack, providing shelter from precipitation. Minimum drying time ≥ 6 months.