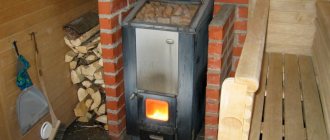
A stove in a bathhouse is a mandatory attribute, since it is responsible for heating and subsequent maintenance of temperature. At the same time, there is a whole range of factory-made brick products or structures that best meet the necessary requirements. However, drawings of homemade metal sauna stoves are especially popular, which make it possible to make a small device that is ideal for specific conditions.
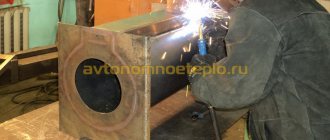
Amateur photo of a simple homemade metal stove
Helpful information
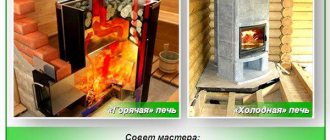
Traditionally, homemade sauna stoves are built from brick.
This material is able to heat up evenly and release heat slowly, which is important for the formation of healing steam. If the steam room has a small area, they try to place the entire structure in the washing room, and only the side of the stove is brought into the steam room
Simpler stove designs are made of metal. A universal option is ovens that use both brick and metal.
There must be a gap between the stove and the wall (as well as any other wooden bath structure). For a brick stove this distance is 30-40 cm, for a metal stove (lined with brick) - 60-70 cm, for a metal stove or metal pipe -100 cm.
The above distances can only be reduced if the walls or other wooden structures that are in close proximity to the stove are protected from accidental fire by foil with asbestos cardboard.
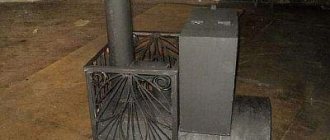
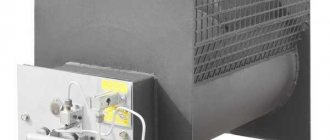
Homemade stove made from a metal pipe: layout of structural elements.
A homemade stove is made of ordinary bricks. Hole, slot and sand-lime bricks should not be used, since they do not provide uniform heating and quickly collapse under the influence of high temperatures. Poorly fired bricks are also not used. You can take used bricks if they are strong enough and there are no chips or cracks on them. Usually these are bricks from old dismantled walls and stoves. Before use, it is cleaned of solution and soot.
The size of the brick that can be used must correspond to 250x120x65 mm
It is very important that all its corners and edges are straight, the shape is correct, and various defects are absent. Most often, a homemade stove in a bathhouse is lined with bricks of grade 75-150 with a density of 1700-1850 kg/m³ and a weight of 3.6-3.8 kg
High-quality fired brick produces a ringing sound when tapped.
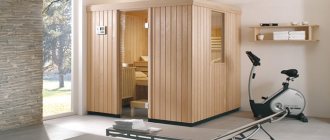
How does a bathhouse differ from a sauna?
Connoisseurs know that between a real Russian bath and, for example, a Finnish sauna
there lies a real abyss.
In saunas, air humidity is relatively low, but the temperature can reach 110-130 degrees. In the bathhouse, the temperature usually does not rise above 70-90 degrees. Only under the very ceiling, where extreme sports enthusiasts prefer to steam, does it approach the mark of a hundred degrees.
But the humidity in a Russian bath can be 50-70 percent. Therefore, the bath has a gentler effect on a person than a sauna. Moist air with the aroma of oak or birch leaves allows you to get rid of diseases that affect the respiratory tract. And the relatively low temperature (with high humidity, 60 degrees is perceived no worse than 120 degrees in a sauna) does not put much strain on the heart, stimulating the release of sweat containing salts and toxins.
Also, unlike a sauna, which heats up quite quickly and cools down quickly, a bathhouse takes longer to warm up, but retains heat for a very long time.
Having dealt with these subtleties, you can begin to choose a suitable stove.
Manufacturing examples
Having decided to make a sauna stove on your own, you need to approach the matter thoroughly. Firstly, choose a project that is best suited for the bathhouse, and secondly, make drawings to make it easier to build. There are many options for sauna stoves, so anyone can create their own version, taking into account some basics.
Here are some examples of homemade projects.
Metal with a tightly closing heater
This option is possible for a steam room measuring 2 by 3 and 2.3 meters high. The material, namely metal, is taken as a sheet, three millimeters thick. The air supply goes to the top of the firebox. A metal plate is welded to the back wall of such a firebox, and air is supplied into the hole between the wall of the firebox and this plate using tubes. This helps cool the back wall and push hot air up where the flue gases are concentrated. When mixed, the substances ignite. Thanks to this, the stones are heated to high temperatures, although much less firewood is used.
For a compact steam room
It is not difficult to build such a stove. To build it you will need a metal sheet up to five millimeters thick. If you take a thinner sheet, the stove will quickly burn out. Its dimensions are 90 cm in length, 80 cm in height and 60 cm in width. To create a chimney, a piece of pipe with a diameter of 11.5 cm is suitable. At the bottom there should be an ash pit with a door; between this part of the stove and the firebox, cast iron grates and heaters are placed to remove waste remaining after combustion. To do this, one third of the back wall of the heater is welded with a strong sheet of metal, where a chimney pipe is welded in the center, lowered down 10-12 centimeters.
The top of the oven is covered with a metal lid up to one millimeter thick. It is this that prevents the stones from cooling down and also prevents waste and ash from entering the steam room. The lid opens only when needed, namely before going to the bathhouse.
Simple heater
This is the best homemade stove, which is suitable for both a sauna and a simple bathhouse. The high temperature is reached in about an hour and a half. During this time, the 50 liters of water needed for swimming can boil. Such a stove has not one chimney, but two. The first is suitable for heating the room. The second is for the release of carbon monoxide and acrid smoke. The structure consists of sheets of iron 3-4 millimeters thick, but the firebox itself is made later. It is made of metal up to 6 millimeters thick. The kit also includes a small and large valve and two metal grilles.
The heater is made of steel up to three millimeters, which is attached to the “neck” of the firebox itself. Two pipes are placed on top, to which flanges with the necessary holes are welded for fixing the outlet pipe and for attaching the elbow.
With brickwork
In this option, double technology is used, that is, brickwork plus a metal body. Steel up to two millimeters is suitable here, and the brick must be heat-resistant.
First, a base is made to which the legs necessary for the stability of the structure are welded. Then they lay out a row of bricks. The remaining rows are built near the half-brick firebox. Install a grate and a grate for stones. It is also necessary to install a window for the valve, where the heat will be retained after the end of the fire. The last two rows are made solid, leaving only a place with a window for the chimney.
Having finished laying the brick and waiting for it to harden, you can begin welding the metal body, which plays the role of a case. It is necessary to cut out the metal for the ash pan and windows for loading. A door is installed, always with a seal. The metal base is complemented by a cold handle.
The last thing to weld is the lid with the hole for the chimney. When the stove is installed in the place allocated for it, you can lay the stones. Their bookmark plays an important role. After all, work efficiency also depends on this. It is better to take stones that are round in shape and of different sizes, from approximately 50 to 100 kilograms.
Having examined the types and designs of homemade sauna stoves, we can say with confidence that making one yourself is a completely doable job if you take into account all safety requirements when installing it. This will save money for the family, and the stove itself will become the property and pride of the owner.
In the next video you will see how to make a sauna stove from a pipe with your own hands.
What you need to know about heater stones
It’s stupid to argue - a sauna stove with a water tank is one of the main elements. But stones are also an integral part of it. They need to be given considerable attention so that later they do not have to do the titanic work of remaking the heater.
Stones usually have several simple requirements:
- High heat capacity.
- High strength.
- No radioactivity.
In other words, suitable stones accumulate heat well and then release it for a long time. They must also withstand not only high temperatures, but also sudden changes without harm (not crack when in contact with cold water). That is why it is better to choose homogeneous, dense stones that are approximately the same in size and shape.
The size should not be too big or small. Small stones cool too quickly, causing the masonry to be unable to retain heat. Large ones are more likely to crack and simply don’t look very elegant. The optimal choice would be stones slightly smaller than a fist.
Of course, the use of rough stones with sharp and sloppy edges is unacceptable. Not only are they unattractive, but they often crumble quickly. It is better to give preference to neat river smoothies, rolled in water.
If it is not possible to buy stones in a specialized store, you can simply check those that are on hand. Take two stones in your hands and hit them hard against each other. If they do not crack, then they have passed the strength test. After this, you should heat the stones by placing them on the fire for a few minutes, then dip them in water. If it passes this test, then it is suitable for use on a heater in a sauna.
But it would be better to purchase suitable stones from companies that sell bath equipment. Experts recommend using several types of rocks:
- jade,
- basalt,
- soap chloride,
- gabbro-diabase.
Jadeite is an independent mineral, while the others are of volcanic origin. All these stones perform their function well on the heater. But if you have the opportunity to choose, it is better to give preference to jadeite. Yes, it may not be strange, but correctly selected stones are no less important than correctly selected drawings of a sauna stove. Jadeite can withstand an almost infinite amount of heating and cooling cycles without cracking. Experts say that it does not crumble at all, but can only melt. But for this the temperature must exceed 1200 degrees Celsius.
Once the suitable stones have been selected, it is not the end. They need to be looked after accordingly. At least once a year, try to look through all the stones on the heater. Rinse them in warm water to get rid of the unpleasant odor that may arise during prolonged use. If some stones are cracked, replace them after removing the dust from the heater. After all, stone dust may contain sulfur, which burns when heated, and you will have to breathe this dangerous substance.
Choosing a sauna stove design
When choosing a design, you should be guided by the following requirements:
- quick heating of bath rooms;
- burning duration;
- heat preservation;
- small footprint and volume;
- safety.
When designing a furnace, a balance must be struck between these requirements.
Thus, to ensure a long combustion duration, it will be necessary to increase the volume of the combustion chamber, and this will lead to an increase in dimensions and occupied area.
According to the location of the stove body, and with it the combustion chamber, sauna stoves can be:
- Vertical. They occupy a smaller area, but also have worse heat transfer parameters and combustion duration than horizontal ones.
- Horizontal.
Depending on the location of the combustion door, a metal sauna stove can be:
- Loaded from the steam room.
- Loaded from another room. The furnace door is carried out through the wall. This frees up space in the steam room, but to add firewood or adjust the draft you will have to leave the steam room.
Furnace design with water heater
Stoves may also have a built-in water heater located next to the heater or on the stove pipe.
Based on the location of the heater, stoves are divided into two subtypes:
- From the inside. They retain heat longer, but when exposed to heat it is easier to get burned by the steam or on the door.
- From the outside. Less economical, but more convenient and safer to use.
When choosing a design, it is important to determine which requirements are paramount and which ones can be compromised
Construction of a locomotive-type furnace
At a quick glance, a stove of this type really resembles a driver’s delight. And, first of all, because of the round cross-section of its profile, elongated in length, the vertical chimney pipe and a whole series of smaller screws - steam guns. So, from the main design elements we note:
- The firebox is also the fuel combustion chamber. Horizontally oriented cylindrical pipe, up to 1000 mm long, made of low-alloy structural steel, main body thickness 10 mm. The firebox rests on supports, which can be made in different functional solutions;
- Fuel tunnel. It is adjacent to the firebox from the front plane and is made with a length equal to the thickness of the partition wall separating the steam compartment from the room into which the firebox door directly leads;
- The fire door is made of cast iron. Based on aesthetic considerations, the front plane is removed with durable heat-resistant glass;
- Below it is the door of the ash drawer, which is also made of cast iron and in its plane has a set of slots for the passage of air, the cross-section of which is regulated by a valve;
- The ash box is made along the entire length of the structure, in its lower part and serves to collect fuel ash;
- An essential structural unit is the smoke circulation circuit, which is equipped with a technological hatch for cleaning, equipped with a door with slots of an adjustable cross-section;
- The smoke circulation rests on a massive metal pipe placed vertically on an edge—the pipe support;
- A lattice structure is installed vertically to the firebox, at an angle of 75 - 80 degrees, holding the stone backfill;
- The final element is a pipe set, including a chimney and steam guns.
The total weight of such a metal structure can reach 280 - 320 kg, and this does not take into account the stone backfill, the volume of which can be 400 liters.
The massiveness of the furnace has its undoubted advantages:
- Due to the high heat capacity and heat transfer of the structure, intense heating of the stone backfill occurs, sometimes reaching values of 300 degrees Celsius.
- This also determines the quality of the steam, which should be light and translucent.
- Due to the special convection design of the firebox, the stove is quite economical for its size, heats up quickly, the generation of the first steam is possible within 25 minutes from the start of kindling, and the stove reaches its nominal operating mode within 50 - 70 minutes. Naturally, when using high-quality conditioned fuel.
- A stove of this design and volume is almost impossible to choke; even if it is overfilled, it quickly returns to nominal mode, and the hard heavy steam quickly settles and is replaced by high-quality generated light steam, so valued by true experts and lovers of the traditional Russian bath.
- The steam locomotive sauna stove is very inertial in terms of applied heat engineering, which, in fact, determines its high fuel efficiency.
Attention! A prerequisite for the normal operation of such a structure as a locomotive sauna stove is the creation of a stone cutoff around the perimeter of the stove. Firstly, it increases its inertial qualities, and secondly, it becomes an effective barrier to intense infrared radiation, which, due to the large mass of metal in a small steam room, makes staying in it uncomfortable. And one last thing. Such a fence protects steam room users from burns in case of accidental contact with hot metal. The fencing is made of solid oven bricks, laid in half.
A simple metal stove-heater for a bath
One of the simplest designs is a metal rectangular heater stove. To make it, you need to acquire:
- Steel sheets (more than 5 mm)
- Cutter (you can use a grinder)
- Welding machine
- Pipes
- Stones and fireclay bricks
- Metal corners
- Doors and components for them (curtains, latches)
The basis of the installation is a tank filled with water. One of its surfaces is the wall of the furnace, divided zonally into two parts: the heater and the combustion chamber. Smoke is removed to the street through a chimney pipe.
It is very easy and quick to build such a sauna stove with your own hands from metal. First, you need to decide on the dimensions of the future structure and cut out the bottom, side and rear walls from the prepared metal. They are securely welded together. Metal corners are boiled from the inside at a certain height - they will serve as supports for the bottom of the heater (cut from a thicker sheet).
The perimeter of the front wall is scalded with steel strips and the door is mounted. Holes must be drilled at the bottom through which the oxygen required for combustion will flow.
To prevent the metal from coming into direct contact with the fire, the space inside the firebox must be lined with fireclay bricks.
In the sheet that will rest on the corners and form the bottom of the heater, it is necessary to cut a hole equal to the diameter of the chimney and weld a pipe to it.
Next, you need to think about installing a water tank. It will consist of a bottom and three walls, welded directly to one side of the finished stove. A hole is made in one of the sides (whichever is more convenient) at the bottom and a pipe with a tap is welded in to drain the water.
A similar structure can be mounted on a base made of bricks (25-30 cm), or on a frame welded from metal profiles. Stones with a diameter of up to 12 cm, but not less than 5 cm are laid on top of the heater. Basalt, porphyrite, etc. are perfect.
Then you need to finish the chimney from the pipe that was removed earlier. The tank is filled with water and closed with a lid. The wood is burning in the firebox and it looks like all the smoke is escaping outside.
It will not be difficult to make some changes to the built sauna stove with your own hands and arrange an ash pit under the firebox. This will give you the opportunity to:
- Easier to clean from combustion products
- Use the blower door to increase/decrease draft
The valve can be installed directly on the chimney. With its help, it will be possible to control the combustion process no less effectively.
Video instruction
Alternative heating using a heat pump, find out how
Do-it-yourself round sauna stove
The design of a round stove, in which the tank is located directly above the firebox, looks simple. When starting work, you need to prepare a tank or pipe with a diameter of 0.5 m and a height of about 1.5 m with a wall thickness of 1 cm, fittings, a mortise tap, a pipe with a diameter of 0.35 m, doors, hinges and curtains, steel sheets.
We begin building a stove for the bathhouse with our own hands:
- A large pipe needs to be cut into two parts - 60 and 90 cm, a water tank and a firebox, respectively
- A circle corresponding to the diameter of the firebox (50 cm) is cut out of sheet steel and welded to the pipe
- Here you can weld the frame of legs up to 15 cm high
- Next, you need to cut one hole near the bottom for the ash pan, a little higher - for the firebox, corresponding to the size of the purchased doors, weld the hinges and bracket for the latch
A grate is welded inside, allowing air to pass into the firebox from the ash pit; it is placed at a height of up to 15 cm from the bottom
A basket is made from reinforcing bars and tied with plastic wire - this will be a heater. It is installed at the top of the pipe, a door is made of a suitable shape for laying stones
Now you need to equip a water tank from a piece of 60 cm pipe. A bottom is welded to it, through which the chimney pipe passes, and a pipe with a valve is welded closer to the bottom
Both structural parts of the furnace are joined together and welded. A double-leaf lid is made on top. The first part is welded to the pipe, and the second is attached to the curtains and equipped with a handle
Let's sum it up
It’s quite simple to build bathhouse stoves with your own hands, but you need to approach the work as responsibly as possible. If the design is made poorly or with even minor errors at first glance, it will not produce the desired amount of high-quality steam and can be very dangerous in operation.
When starting work, it is recommended to see several ovens first. If you know a master or stove maker, you shouldn’t be shy to ask him for advice.
How to make a sauna stove with your own hands - details from the master
The design of the stove is primitive, but has a number of significant conditions.
The difference between an ordinary heating stove and a sauna is that the second one contains additional elements, such as a heater and a water tank. Many craftsmen opt for making a bathhouse stove with their own hands, without buying it in a store. The construction process is not simple and requires a lot of time.
First you need to familiarize yourself with the main components of sauna stoves, and these are:
- material;
- energy carrier used;
- firebox location;
- heater heating system.
Horizontal oven - step by step
- prepare a working piece of pipe 0.7-0.9 meters long;
- thoroughly clean all edges;
- cut a fragment measuring 0.8 by 0.4 meters from the prepared metal sheet;
- Weld rods horizontally to the opening in the middle, and a grate in the lower part of the pipe;
- make a remote-type firebox from a metal sheet and make cutouts;
- weld this facade to the base pipe;
- to decorate the back wall, cut out a circle equal to the diameter of the pipe and weld it to the main structure;
- You can make a hole for the chimney in the upper part - a small size, approximately 0.16x0.16 meters, will be enough;
- weld the main vault and the pipe that will be used as a chimney;
- all that remains is to install the doors for the combustion chamber and the blower;
- finishing comes down to careful sanding of the entire body, and then treating it with durable polymer-based paint.
Here are some drawings and pictures that will help you in making a horizontal type oven.
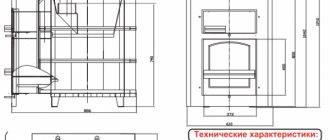
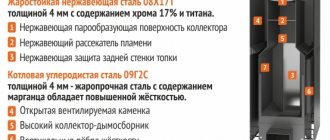
Performance characteristics
First of all, it should be noted that the steam locomotive sauna stove is very durable. Depending on the quality and thickness of the steel used for its manufacture, its service life can range from 7 to 15 years or more, and this is no less, about 1200 bath cycles.
We present the average typical indicators for a furnace of this type in the form of a table:
| Parameter name | Numerical indicator |
| Dimensions of the furnace with lining, mm | |
| Length | 1250 |
| Width | 1000 |
| Height | 1300 |
| Weight of the furnace system, kg | |
| Directly from the oven | 230 |
| Facings | 1350 |
| Stone bookmarks | 270 |
| Sandwich chimney, primary/secondary diameter, mm | 160/140 |
| Diameter of the chimney pipe, mm | 140 |
Drawings of the “Steam Locomotive” furnace
A classic furnace of this type has two complete completed horizontal turns. The front door of the smoke circulation circuit makes it possible not only to carry out inspection and prevention, but also to additionally adjust the air flow, which initiates the transfer of the furnace to the “sleeping” smoldering mode of operation of the furnace and a qualitative reduction in the temperature of the outgoing flue gases.
The convection of the stove is relatively small, which is due to the round shape of its combustion chamber and the massive stone filling in the heater. At the same time, the top layer of stones heats up quite moderately, which allows you to pour solutions of essential oils onto the “lid” without fear of their thermal destruction.
An operational feature of the furnace is the ability to remove “fast steam”, that is, until the stones have reached a temperature sufficient for steam generation, water evaporates from the steel body of the furnace. At the same time, it is impossible for such a stove to choke even with an excessive amount of water; unevaporated water simply flows off the rounded sides.
Important! A furnace of this type is one of the few steel furnaces that meet fire safety requirements in accordance with the regulatory document of the Ministry of Emergency Situations SP 7 13131, which provides for the possibility of admitting flue gases with a temperature not exceeding 400 degrees Celsius into steel chimneys.
Due to the high inertia of the oven, it perfectly dries the steam room after finishing the procedures, relieving it of excess moisture.
A word from Experienced! Furnaces of this type have the weakest point in the furnace roof, at the point where it transitions to the upper part, since this is where the flue gases flow out with a peak temperature. Since the stove is very repairable, the consequences of burnout are eliminated by applying a repair patch no less than the thickness of the body of the vault.
In general, the stove provides excellent performance characteristics and can be recommended for use in classic Russian steam baths with virtually no restrictions.
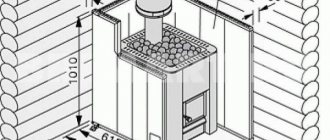
Placing the stove in the steam room
To make using the sauna stove enjoyable and safe, it is recommended to follow the following rules:
- The stove is mounted on a metal sheet (iron, copper or brass). The sheet should protrude at least 0.7 meters from the front.
- The walls and ceiling adjacent to the stove should be sheathed with non-combustible materials at a distance of at least half a meter from the stove and chimney.
- If the firebox is moved into an adjacent room, the opening should also be reinforced with non-flammable heat-insulating materials, such as basalt wool or vermiculite.
- The thermally insulated chimney pipe must be at least 40 cm away from wooden structures.
For the chimney, it is recommended to choose stainless steel with thermal insulation made of basalt wool. For rooms in which people are located, it is not recommended to use materials containing asbestos as thermal insulation. Inhaling asbestos dust can cause serious health problems.
After installation, a metal stove is often lined with 1/2 brick brickwork. This allows you to retain the heat accumulated in the masonry longer and protects against burns due to accidental contact.
Manufacturing stages
1. To obtain a boot-shaped stove with a heater, we will need four metal boxes. The first and second boxes will be joined together using a detachable connection and form the oven itself. In the first of them there will be a firebox, in the second (“top” of the boot) there will be a hole for the chimney. The third box with stones will be inside the furnace. The fourth removable stainless steel water box is installed separately.
2. To avoid errors during assembly, the sheets of metal are first grabbed together, starting from the bottom of the sheets. Final welding is carried out only after the product has been completely assembled and inspected. To prevent smoke from penetrating into the room, the connection of the elements must be of very high quality.
We invite you to familiarize yourself with Do-it-yourself bathhouse chimney insulation
3. We assemble a box for stones measuring 50x50 cm. To prevent the top sheet from moving out during welding, it is better to install it on a tripod with a magnet attached to it.
4. In order to grip the lid and bottom, you can place a thin metal square under them to ensure their stability.
5. The bottom of the box for stones, which will bear the entire impact load of the fire, is made of a sheet with a thickness of at least 10 mm.
6. Using a grinder, a door for the heater is cut out in the upper part of the box. Its size should be sufficient for steam to escape.
7. In the lower part of the third box, in which the stones will be located, 2-4 holes are cut for pipes (the number of pipes can be arbitrary) at a distance of at least 5 cm from the bottom of the cube to improve traction. A cube with heavy stones will be installed on them.
8. Cut a hole for the firebox measuring 28x28 cm.
9. In the upper part of the first box we make a hole for inserting the second cube. We cut and weld two 4 cm plates around the perimeter of this hole on three sides to strengthen the cut site and a corner in the left, fourth part. The first three strips are attached to the inner surface, the second - to the outer part of the cut with slight mixing. A small gap is left between the plates for inserting a second box.
10. One plate is welded to the doors of the firebox and heater to strengthen them. The firebox is separated from the ash pan by a grate made of 10-12 cm steel rods. To ensure complete combustion of the fuel, it is necessary to ensure better air flow, so the grate bars are welded along the ash duct.
11. A third cube is inserted into the second box onto the pipes welded in its lower part. in which the stones will be located.
12. To strengthen the inner cube for stones, small gussets are welded to it.
13. To clear the soot, a small hole is made above the door, next to which bolts are welded on 4 sides to install the door. Before its installation, for tightness, it is wrapped with asbestos thread and screwed with brass nuts. protecting metal from acidification.
14. A lid with a hole for a chimney pipe 12x12 cm (the size of half a brick) is welded to the top of the heater. To install it, a metal “skirt” is welded to the hole. The cube with the stone box installed is inserted into the first one.
A metal heater not only heats up quickly, but also cools down almost instantly. Therefore, to take bath procedures, it is necessary to heat the device well. Heating a steam room for a group of people will be quite difficult.
There are several ways to assemble the device yourself. It can be made from a metal container, sheets or pipes. If you do not have the skills to work with a welding machine, it is recommended to assemble the unit from a pipe. The diameter of the structure will be 80 centimeters. and the height is approximately 170 centimeters. A heater and a container of water are made on top. To increase the temperature in the steam room, you need to pour water on the stones.
Tools and materials
- To make equipment with your own hands, first of all, you need to prepare a drawing, the so-called sketch with exact dimensions.
- Metal pipe with a height of 180 cm and a diameter of 60 cm. The walls of the pipe should have a thickness of about 10 millimeters.
- 8mm metal sheet.
- Steel rod with 10mm diameter.
- Metal doors.
- Grate.
- Tap.
- Chimney.
These materials are sold in construction stores. It is also necessary to prepare a welding machine and a grinder.
A homemade long-burning stove is made with your own hands in several stages. In order to assemble the structure efficiently, it is necessary to carry out all the work consistently.
Using a grinder you need to cut a metal pipe in half. The first part will be needed to make the firebox, and the other part will be needed to heat the water tank. At the bottom of the first pipe you need to make a small hole (blower), the dimensions of which are 20X5 centimeters. It is also necessary to weld special brackets for the grate from the inside. Make another hole for the firebox a little higher: 20X25 centimeters. Then the doors are installed on the fixed hinges.
The heater should be located above the firebox, into which a grate or metal grate is installed, the cells of which should be smaller than the size of the stones.
It is necessary to make a window in the heater for pouring liquid. It is recommended to place it opposite the firebox, and then install the door. A chimney is installed above the grate, after which stones are laid. You need to weld a metal circle on top and make a hole in it for the second pipe. Welding seams should be checked for water tightness, since there will be a tank of liquid on top.
Based on the drawing, you need to weld a tap at the bottom of the second pipe. Then secure the pipe section to the heater using a welding machine. The seam must be checked for water tightness. Two halves of the lid are welded to the tank. One should be welded, and the second should be installed on the hinges.
The surface of the near wall must also be insulated. To do this, you can use metal sheets. Also, a homemade long-burning structure can be lined with red brick to prevent ignition. This nuance should also be included in the drawing.
There are quite a lot of drawings of a sauna stove and each of them has its own functionality. Let's start with the furnace firebox.
- The firebox is the first thing to do. You determine the size of the firebox yourself, based on the size of your steam room. The main thing to remember is that the width and height of the firebox must be the same.
- On some drawings of metal stoves you can see ready-made solutions that you can buy in a store rather than cut and cook yourself. For example, doors, grilles, handles, and so on. You will save a lot of time if you buy them at the store.
- In almost all drawings, the firebox consists of 2 parts. In one part, firewood is burned, and the other is designed to collect ash and also serves as an ash pit.
- If stones will be placed on the top of the firebox, then it should be made of a grate. You can make a decorative lattice for beauty.
We invite you to familiarize yourself with the DIY sauna stove: 4 types with drawings, photos and order
Detailed drawing of a metal sauna stove
To create certain conditions in the steam room, different stoves are used, and different approaches to their installation are also used. If you are setting up a sauna, you will need to maintain the maximum area of contact between the stove body and the air and ensure rapid circulation of air flows along the walls.
It all comes down to heating the air in the steam room as quickly as possible. A small open heater, located above the firebox, can heat the stones to 200-250 ºС. It makes it possible to get a little steam - as a rule, this is enough for a sauna, because you only need to achieve 15% humidity.
In a Russian bath, a different microclimate is created - low temperatures are reached and a lot of steam is produced. Moreover, it should consist of very small droplets heated to 130-150 ºС - such steam is called “dry”. Such a microclimate gives the body lightness and strength. “Dry” steam can only be obtained by heating stones to values of more than 500 ºС. To achieve such indicators, stones are placed in a firebox, that is, in a closed heater.
To make a stove for a bathhouse with your own hands as high quality and practical as possible, its body is made of thick metal and the casing is made of thin metal, because it is not subject to overheating.
When placing the heater above the firebox, holes can be made in the body for ventilation. In this case, a portion of the air rising along the walls will be directed into the heater, blowing the stones and increasing their temperature. This ventilated heater is perfect for saunas.
Types of stoves by shape
Do-it-yourself metal sauna stoves can be in the following shape:
- curly;
- rectangular;
- horizontal;
- cylindrical.
Rectangular installations are considered the most popular because their corner zones do not heat up to very high temperatures. The shape of the device is directly related to the uniform heating of both the installation itself and the room. Cylindrical and round shaped units have the lowest degree of heat transfer, so fairly thick iron is used for their production. Rectangular structures are distinguished by enviable stability, but have cold corners.
How to improve the performance of a metal stove
The consumer properties of the stove can be improved in two ways:
- heat treatment of the material;
- improvement of the furnace device.
Metal preparation
After cutting the material, it is subjected to heat treatment using the tempering method. The metal of the workpieces is heated to a dark red color. Next, they should be cooled slowly. If slight warping of the workpieces occurs during the tempering, they are straightened with a hammer. It is also necessary to check the dimensions and cut off excess if necessary. This treatment will eliminate warping of the finished product.
Design features of the firebox
To ensure long-term burning of wood without overheating of the stove, some experts suggest eliminating grate bars from the design and burning wood directly on the metal bottom of the firebox.
Metal oven with grate
Additionally, it is proposed to seal the firebox door with asbestos cord to slow down the flow of oxygen. A hole (or a series of holes) is made in the door itself, which is retractable with a damper. This damper regulates the air supply.
From the pipe
If there is space to install a stove, you can make a homemade electric stove from an iron pipe and U-shaped industrial electric heaters. The following is recommended:
- select the pipe diameter according to the size of the electric heaters;
- place the heaters in one of the pipe holes with the contacts facing outward, make grooves around the perimeter of the hole for inserting ceramic bushings for wires connected to the electric heaters;
- close the pipe hole with a durable metal sheet, which will become the base of the stove;
- connect the sheet to the pipe;
- the connection can be either welded or threaded;
- the free space of a vertically standing pipe must be filled with basalt-type stones measuring 6–11 cm.
Stones at the bottom of the pipe should not put pressure on the electric heaters.
To do this, you can place reinforcement rods along the pipe between the electric heaters, which will become a supporting device for the stones. The pipe and support sheet must be grounded. That’s it, the smallest stove-heater for a mini-sauna is ready. All that remains is to make the correct connection to the network and grounding device. Stoves with a power of up to seven kilowatts are connected to a 220-volt network, more powerful ones are connected to a 380-volt network. The same design can be used to construct a stove in a fairly large bathhouse. A large diameter and length of pipe and a larger number of electric heaters should be used. Date: September 25, 2021