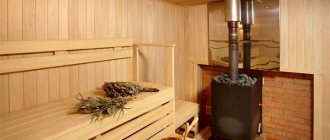
In the cold frosty winter, bath procedures are much more relevant than in the summer. This is a great opportunity not only to take a steam bath, but also to relax comfortably in a warm room. To heat a classic Russian bath, a wood-burning heater is chosen; for modern saunas, electric saunas are often used.
In any case, correct installation of the stove in compliance with fire safety standards is important. To do this, you need to select a location in advance, determine the type of furnace, what raw materials it will be heated with, and whether there will be a heat exchanger.
Users often search for:
- Stones for the sauna heater
- How to make shelves in a steam room correctly
Fire safety requirements
The current document that regulates the procedure for installing a stove and boiler in residential buildings and baths is SP 60.13330.2016 (updating SNiP 41-01-2003).
When deciding where the structure will stand, it is important to consider:
- distance from the stove to the walls of the building;
- placement of air ducts;
- What material should be used to protect walls from heat and fire.
According to SP 60.13330.2016, the distance between a metal stove, boiler and a non-combustible wall (fire resistance limit from 60 minutes) is 38 cm.
But in fact, even if the baths are made of non-combustible bricks and foam concrete blocks, they are most often finished with flammable wooden lining.
When building a bathhouse from logs, timber, you should follow a number of recommendations:
- There should be at least half a meter from the partition, wall without any protective screens to the hot surfaces of the oven.
- The wall from the floor to a level of 25 cm above the combustion door, through which the fuel channel will be discharged, is built from non-combustible raw materials. The minimum wall thickness is 12.5 cm.
- The distance from the non-combustible ceiling in the steam room to the top of the stove is from 80 cm.
- If there is no fireproof protection on the ceiling, the distance from it to the stove should be 1.2 m.
- The distance from the firebox door to the opposite wall of the room is from 1.25 m.
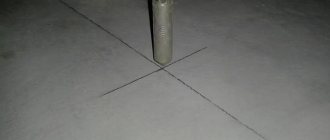
- You need to leave 3 cm between the wall and the front of the stove with an external firebox.
Photo: left – side view, right – top view.
Installation of the boiler and factory stove must be carried out strictly in accordance with the manufacturer’s instructions and diagram.
Preparation of tools and consumables
To lay the stove you will need not only bricks, but also many auxiliary materials and tools. The most important ones that will need to be purchased in advance:
- grate bars – 6 pieces of standard size 300 x 220 mm;
- firebox door – 250 x 280 mm;
- door for the blower - 200 x 250 mm;
- quartz or river sand;
- fireclay clay;
- door for compartment with stones;
- steel corners – 4 pcs;
Required Tools
- steel sheet for firebox;
- steel corners for the ceiling - 10 pcs;
- fireclay elements for the ceiling - 6 pcs;
- heat-resistant varnish for a brick stove;
- construction mixer;
- level.
Now you need to prepare a clay mortar that will serve as a binding material for the bricks. First, soak the clay for 2 days - dry material is difficult to process. Then mash it with a special spatula, add water and mix with a construction mixer until you get a composition that resembles sour cream. Then add sand to the mixture. The ratio of clay and sand should be 1:1. Then knead the mixture again until a homogeneous solution is obtained.
Advice. If the clay is too oily, add a little fireclay mortar to it along with sand.
Oven installation methods
In the classic version, it is customary to place the stove directly in the steam room. But it is also installed in a steam room with the firebox removed to the dressing room or rest room. In small bathhouses, it is permissible to place the firebox on the street side.
Let's look at each of the methods in more detail.
In the dressing room, rest room
Removing the combustion part to the dressing room is considered the safest and most convenient installation option.
This heating arrangement has several significant advantages:
- Oxygen in the steam room is not burned out by fire.
- More free space in the steam room.
- It’s easier to keep the room clean by cleaning the ash pan.
- They throw firewood in the dressing room. The firewood shed should also be located here.
- There is no need to separately heat the dressing room, provided that the stove has enough power.
Stoves with a protruding firebox and rectangular shape are suitable for this.
The installation of such a structure should be planned during the construction phase of the bathhouse, otherwise you will have to break part of the partition between the rooms.
To do this, a hole is left in the wall, which is then lined with fireproof materials. The stove must be installed so that access to the firebox is from the outside, that is, from the dressing room.
In the steam room
The most popular option in the classic Russian bath. The oven is located entirely in the steam room. Firewood is also loaded from here. Therefore, you need to immediately leave a little more space for firewood.
The advantage of a stove in a steam room is convenient draft adjustment by opening/closing the combustion door. A device with a door made of tempered glass, through which the fire will be visible, looks beautiful.
Disadvantages of this location:
- It is more difficult to keep clean near the stove.
- In a small steam room, oxygen will be quickly burned out by the flame.
The location of the stove must be planned in advance so that vacationers do not come into contact with the hot surface.
It is better to place the stove in the corner so that when pouring water on the stones, no one will get burned by the hot steam. It is imperative that the distance from the stove to the shelves complies with current fire safety standards and regulations.
It will be easier to install the stove if you follow the manufacturer's instructions. To protect the walls from fire, a fire-resistant apron should be installed.
For good air exchange in the room, you need to make a ventilation hole in the floor. It should not be higher - the heat will escape from the room.
With access to the street
This option is for a seasonal bathhouse in a country house, designed in the form of a barrel or a mini-house. Fuel loading and ash removal are done outside.
The disadvantage of this solution is the inconvenience of controlling the filling of the stove with wood, coal and maintaining the required temperature.
A few words about the disadvantages of an external firebox in the dressing room
The most important “disadvantage” of such an engineering solution has already been mentioned - the difficulty of implementing the project for a beginner in the furnace business.
If this is your first oven, then it is better not to risk it and invite a professional to help. But this, as we know, will entail certain financial costs. In addition, there is a possibility that you will have to occasionally interrupt the water treatment to adjust the burning intensity and thus adjust the heat level. And since the firebox is located in the dressing room, you will need to leave the steam room itself into a cooler room. However, we recommend treating this as another veiled “plus”. After all, temperature changes are nothing more than hardening procedures for the body. This means you will get double the health benefits.
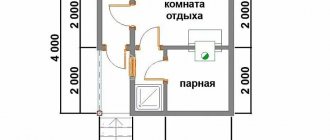
Illustrative examples of the optimal location of the stove in the bathhouse
Install the stove taking into account the location of the following elements:
- hot water tank;
- external heat exchanger;
- pipeline for a remote tank;
- hanging mesh heater.
Any of these elements must remain freely accessible so that, if necessary, dismantling or repair can be carried out without problems.
The power of the stove is selected in accordance with the size of the steam room. You can find out this information from your sales consultant or look at the product data sheet.
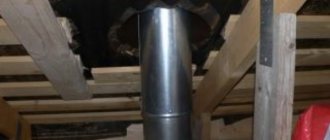
An important point is the choice of where the chimney pipe exits through the roof. It is best when it is connected to the stove directly, and there are no elbows or turns. This way, all the smoke will go straight up, and soot and fumes will accumulate less on the walls of the pipes.
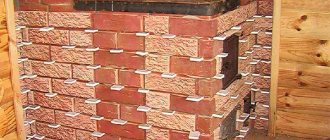
The photo above shows an example of installing a stove unit in a bathhouse made from a fresh log house with the firebox removed to the dressing room. The distance from the metal surface to the walls is 0.5 m on any side. The indicator can be reduced if the walls are insulated with fire-resistant materials. Perfect for:
- basalt cardboard;
- asbestos cardboard;
- ceramic tile;
- Red brick;
- mineralite (in sheets).
1. KOSTER stove.
2. Water tank 3. Sandwich adapter. 4. Sandwich chimney 5. Basalt wool. 6. Ceiling groove filled with non-flammable material. 7. Roofing passage unit (Master-flash). 8. Umbrella head. 9. Steel sheet over fireproof material. 10. Brick (or walk-through convector). 11. Finish floor. 12. Clay screed. 13. Brick platform. 14. Steel sheet or ceramic tiles. 15. Pre-furnace sheet 500x700 mm. When purchasing a factory stove, it is worth considering which side the firebox door will open from. When open, it should not be an obstacle to loading firewood or a cause of inconvenience during bathing procedures.
It is best when the model has the ability to hang the door on either side.
For small year-round bathhouses, builders recommend installing units with remote fireboxes or purchasing electric or gas stoves, which take up very little space and can be mounted directly to the wall.
Criteria for choosing a heating device
The installation of a sauna stove begins after its purchase. When choosing a device for heating rooms for thermal therapy, it is recommended to take into account a number of distinctive characteristics of the products. These include:
- heated area and layout of the bathhouse;
- location of the firebox: inside the steam room, adjacent room, with removal to the street;
- overall dimensions, configuration, weight of the device to create a comfortable microclimate in bath rooms intended for high-quality thermal therapy;
- the power of the stove, which must correspond to the volume of the steam room;
- compliance with the price of the product, quality and performance characteristics;
- consumption of fuel resources, which determines the production of thermal energy in the bathhouse and the rate of heating of the premises;
- sauna stove manufacturing company.
Taking into account such criteria will allow you to become the owner of the best option for a sauna stove that will correspond to your wishes, preferences and financial capabilities.
Nowadays, among a wide range of products, iron sauna stoves most often attract the attention of consumers
Today we will look at the rules for installing just such models inside a building
I would also like to draw your attention to multifunctional units with a special water tank heater. It's called a heat exchanger
The heat exchanger is installed in a production environment. Purchasing multifunctional sauna stoves, in my opinion, is considered the right, rational and cost-effective decision.
Features of furnace installation depending on the material
According to the shape and design of the furnace, there are:
- horizontal;
- vertical;
- cylindrical;
- rectangular.
They are made from:
- cast iron;
- metal (steel, iron);
- bricks
Some models are equipped with a grid for stones and a tank for heating water.
Cast iron
Cast iron is an alloy of metal (iron, graphite, carbon). This is an environmentally friendly and safe raw material.
Advantages of a cast iron stove:
- Long service life - 30 years or more.
- The creation of the structure does not involve welding. The absence of seams has a positive effect on the quality and service life of the product.
- The material is highly resistant to temperature changes. He is not afraid of deformation.
- Heating rate. Cast iron heats up quickly and retains heat well. Such a stove can heat a large sauna in 2–3 hours. One load of fuel lasts up to 9 hours of heating.
- The device is assembled from individual elements connected to each other by locks. If one part breaks, it is easy to replace.
- A cast iron stove will fit perfectly into any room design.
Among the disadvantages of the unit:
- Heavy weight. It will not be possible to install such a structure alone. Its average weight is 200 kg.
- It is susceptible to corrosion, so it is not recommended to place such a stove directly in a steam room.
Any cracks or damage to the product must be repaired in a timely manner to prevent a fire.
The stove will look great in the dressing room or rest room.
Steel (iron)
Among owners of summer cottages and country houses, metal stoves are in great demand due to the availability and low price of the material compared to other types.
Having a drawing of a finished stove, skills in working with a grinder and a welding machine, you can assemble it yourself.
Advantages of metal stoves:
- Light weight of the finished product - from 80 kg.
- Many stove models do not require a separate concrete foundation to be poured.
- The oven will be easy to install. One person can handle this.
- Compact size - it won't take up much space.
- The metal heats up quickly, releasing heat, reducing fuel consumption.
- The housing is completely sealed. The risk of carbon monoxide leakage is minimal.
- Affordable price of finished products.
- You can make the oven yourself.
Among the disadvantages of the device:
- Rapid cooling of metal. To maintain a comfortable temperature in the premises, you will have to constantly heat in winter.
- Strong heating of the metal dries out the air.
- Hot surfaces not protected by partitions can cause burns.
- Steel and iron in conditions of constant humidity without additional protective treatment will quickly begin to rust.
In bathhouses with wooden floors, additional protection should be given to the areas around the stove by installing a covering made of non-combustible materials. The same applies to products with 4 legs. The floor underneath them, without protective flooring, will gradually collapse.
If the total weight of the stove with firewood, a screen, a full tank of water, and a layer of finishing materials does not exceed 700 kg, then it is not necessary to pour a monolithic slab or podium under the stove.
Brick
The furnace is laid with refractory bricks (fireclay), and the finished product is lined with ceramic.
Advantages of a classic heater:
- Long-term heat retention.
- Fire safety.
- Ability to heat large areas.
- Soft water vapor is produced.
- The building warms up evenly and gradually.
- The material is non-flammable and resistant to temperature changes.
- Durability. A properly laid stove will last for decades.
But this design also has disadvantages:
- Difficulty of masonry. Without knowledge of ordering technology, it is not worth taking on construction.
- High cost of materials and work.
- The large weight of the finished product requires pouring a reliable foundation.
This material will be useful:
- Installation of a foundation for a brick oven
- Which brick for the stove is better to choose?
Finishing work
It is necessary to check the “operability” of the system - to heat the stove.
Kindling the stove
Check the draft; there should be no odors or smoke in the room. Test the traction on different wood burning modes
Important note: the firewood must be dry. During the burning of wet wood, a lot of moisture condenses on the walls of metal chimneys, to which soot sticks.
The result is that the nominal diameter of the chimney decreases, the draft force is disrupted, and frequent cleaning of the internal surfaces of the pipe is required. To clean the chimney you need to disassemble the pipes. Doing this is long and tedious; there will be plenty of dirt in the bathhouse.
And one last thing. Some bathhouse owners install a damper on the chimney to preserve heat. We do not recommend doing such things. Firstly, a bathhouse is not a room in which you need to keep warm all night. Secondly, premature closing of the damper often causes carbon monoxide poisoning.
Shiber
Installing a heat exchanger for a sauna stove or boiler with your own hands
Modern models of sauna stoves and boilers are often supplemented with heat exchangers - devices for heating water. What they are, the nuances and difficulties of installation will be discussed below.
Scheme: 1 – heat exchanger; 2 – storage tank; 3 – upper outlet (min tilt 20°); 4 – lower outlet (min downward slope 1-2°); 5 – drain valve of the storage tank; 6 – drain valve of the system.
Heat exchanger device
The work is based on the physical properties of water, which when hot expands and goes to the top, cold water remains at the bottom.
Small heat exchangers are placed in the bathhouse for quick heating. One pipe goes to it from above, the other from below.
A water tank is sometimes installed in the steam room, but more often in the wash room. And at such a level that it cannot be touched.
Hot water flows through the upper pipe to the tank, and cold water is poured through the lower pipe as hot water is consumed.
Important installation details
The heat exchanger can:
- be built into the oven;
- attached to the chimney;
- fixed to the ceiling of the steam room.
The unit’s capacity of 5 liters is enough to fill a 120 liter tank with boiling water.
To ensure constant availability of hot water in the washing machine, it is necessary to maintain the combustion process in the furnace and an uninterrupted supply of water to the tank. To realize the second point, a circulation pump is often used.
You can do without it when the diameter of the pipes is 1 inch.
To reduce heat losses, the total length of pipes should not be more than 3 m.
Before installation, you should consider the following recommendations:
- A high-quality heat exchanger should not consume more than 10% of the energy generated by the furnace.
- The pipes are laid in such a way that water flows on its own with direct supply at an angle of 250 degrees, and with reverse supply at an angle of 30 degrees.
- The volume of water in the tank is selected separately for each heat exchanger model. This depends on the selected power. If there is not enough of it, it will boil frequently and scale will begin to accumulate on the walls, which can cause a fire. If the volume of water is too high, the heating process will take a long time.
- The power reserve should be enough in case of cooling after the wood burns out in the stove.
When the water tank is placed directly in the steam room, the heat exchanger is connected in the following order:
- The inlet hole into the tank is made 5 cm above the upper register fitting (at least 1.5 m from the floor). This will ensure better water circulation.
- The bottom of the tank should be at least 1.5 m above the floor or even higher.
- You need to step back another half meter from the ceiling.
Because the tank is located too high, it is difficult to control the water level in it.
Therefore, there are other connection options:
- The tank is located below.
- The fitting is equipped on the side under the underwater circuit.
The disadvantage of this method is that when the water level is less than the upper fitting, circulation will not occur. The water in the heat exchanger will stand and boil at times, but in the tank it will remain cold.
When placing the tank in a sink, the installation requirements remain the same.
It is important to note that the heat exchanger pipes that will be in contact with the hot furnace must be stainless steel to withstand the high temperature and humidity.
You can buy connecting pipes made of metal-plastic or take regular flexible hoses. Diameter - 1 inch. With a larger diameter you will have to install a circulation pump.
Seals should be made of durable tangit, fitting gaskets should be made of paronite.
A drain valve must be installed. Through it, you can remove blockages from the system and drain the water during the period of non-use of the bath.
Formation of the base
One brick of standard sizes with mortar weighs approximately 4 kg, so the entire structure of the stove is very heavy - you cannot do without a high-quality base. The foundation is arranged as follows:
- in the area where you plan to install the stove, dig a hole 70 cm deep;
Important! When digging a hole, keep in mind that the base should protrude beyond the boundaries of the future stove structure by 5-6 cm on all sides.
- Fill the bottom of the depression with 15 cm of sand and moisten the layer so that it sinks well;
- lay a 15 cm layer of gravel (you can mix gravel with broken bricks);
- install the formwork;
- lay a reinforced metal frame on the base;
Furnace base
- prepare cement mortar and fill the hole with it;
- level the base and leave to harden;
- when the cement is completely dry, remove the formwork and fill the remaining cracks, if any, with sand;
- check the level of the foundation - if there are any unevenness, level the base using concrete - it is important that the surface is perfectly flat.
The finished foundation must be waterproofed. To do this, lay sheets of roofing felt on it.
Next, you can begin laying the stove. Let us conditionally divide this process into two large stages: before lining and after.
Safe placement and connection of an electric oven
A convenient solution is an electric heater. This is a great alternative to a wood stove. Doesn't take up much space. There is no chimney pipe. No need to clean or load fuel. It is enough to set the temperature correctly.
When connecting, it is important to follow the rules for connecting to the network and fire safety.
It is recommended to ground the electric heater. If this is not possible, then zeroing is carried out. To do this, on the distribution panel, the grounding wire of the electric furnace is connected to the zero terminals.
Installation of an RCD is required. This is excellent protection against short circuits during voltage surges in the network.
The wiring covering must be heat-resistant. The cross section is selected according to power and mains voltage. Read more in the article: “Electrical installation of a bathhouse.”
Where to order or buy
Customers are given the opportunity to purchase a stove from one of the suppliers and install it themselves or contact specialists from companies that provide services for the construction of bathhouses and installation of units.
A metal stove is neither very beautiful nor very safe, since cast iron not only heats up quickly, but literally gets hot. Moreover, after rapid heating, an equally rapid cooling occurs.
But these shortcomings can be easily corrected by brick lining. The brick-lined structure looks no worse than a completely brick heater, and its construction requires minimal skills.
Chimney installation
Popular material options for chimney pipes:
- stainless steel;
- fire brick;
- ceramics;
- sandwich pipes.
Sandwich pipes have a layer of heat insulator inside.
Thematic material: “How to properly assemble a chimney.”
Variations on the theme of refractory bricks
In general, the laying of bricks for cladding in terms of technology is no different from the laying of stove walls. However, when deciding to line a cast-iron or iron stove with brick, pay attention to the important points listed below.
- every 4th row of facing masonry with wire or steel strip. The firebox opening (including the opening of the remote firebox) is reinforced with a metal corner.
- During the DIY cladding process, you will need a heat insulator. Asbestos or basalt cardboard can be used as it.
- Review all purchased bricks for defects (chips, cracks, etc.). Take the time to lay out the material on the floor, adjusting brick to brick so that the pins touch with the smallest possible gap. Follow the same order when you lay the bricks on the mortar.
- The masonry mortar must match the chosen type of brick. However, there is no need to rack your brains here. Usually, when purchasing building materials, you will immediately be offered a dry mixture, which you only need to dilute with water according to the instructions.
- Watch the thickness of the seams, do not make them too wide. The thinner the seams, the better thermal conductivity the lining will have.
- Be sure to check the verticality of the corners with a plumb line, as well as the horizontality of the rows with a level.
Fifth stage - external appearance
After all preparatory and construction work has been completed, the final final stage is the exterior finishing of the structure. A beautiful stove pleases the eye, and the abundance of facing materials on the construction market will help you.
You can also base it on your budget. If there is a shortage of it, the outer part of the stove can be plastered and whitewashed. It won’t turn out luxurious, but you are guaranteed the original Russian look of a sauna stove. Or resort to cladding the external structure with porcelain stoneware, marble or tiles. This appearance of the stove will delight you every time you visit the bathhouse.
After completing all the steps to build your stove, do not rush to fire it right away. It is necessary to completely dry the stove, masonry, and mortar. After several days of drying, you can begin to heat it little by little. After proper drying, you can use the bathhouse for its intended purpose.
It is worth recalling that the quality of construction of a sauna stove depends entirely on the selected materials and the skill of the builder. You should not save on cheaper materials and rush to build a stove, neglecting the standards and advice given in the article. So it will serve you for a short period of time and will not bring the desired result.