How to remove: fire standards
All features of the passage through the ceiling in the bathhouse are related to fire safety. Furnace gases and solid particles formed during fuel combustion have a temperature of several hundred degrees ( up to 700 ). And this hot stream almost immediately (in the case of a metal stove, because a brick stove has labyrinths where the walls take heat from the stove gas) enters the chimney, heating it and making it dangerous for adjacent structures.
We read SNiP 41-01-2003 , which talks, in particular, about the heating device, and highlighted what concerns our case, that is, the passage of a chimney through the ceiling in a bathhouse.
First, you need to comply with temperature restrictions. Most people install metal pipes, and according to regulations, they should not heat above 500 degrees. For asbestos-cement, the limit is 300 degrees, but who sets them now?
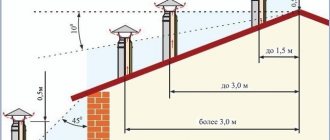
Secondly, SNiP describes the empty space that should separate the pipe from combustible and non-combustible roofing materials:
- from concrete and brick pipes to flammable materials - at least 130 mm;
- ceramic pipes: if without insulation - 250 mm, with insulation - 130 mm.
Despite the fact that the use of steel pipes is not prohibited , nothing is said there about at what distance from the ceiling material the pipe in the bathhouse can be brought out through the ceiling. And we are talking about the roof, if you noticed, that is, you have to extrapolate the available information to the ceiling.
Metal pipe at the installation stage. Photo StroyDom
So, the minimum for insulated pipes (thermal insulator with a heat transfer resistance of 0.3 m2∙°C/W) is 13 cm, for non-insulated pipes - 25 cm.
There is also Appendix K, which everyone interprets in their own way, which states that, together with the thickness of the stove or pipe (the latter is not written explicitly), the amount of indentation is 50 cm for combustible materials and 38 cm for those finished with 2.5 cm thick plaster or metal sheet on top of asbestos cardboard 8 mm thick. It implicitly follows from this that we are talking about an air gap between the heated and combustible surfaces.
In SP 7.13130.2009 there was another addition: that the cutting size should be 7 cm greater than the thickness of the ceiling. In this case, a link is given to the application already mentioned above, which talks about 50 and 38 cm.
BUT! In some cases this is seen as an indication of the size of the opening in the ceiling.
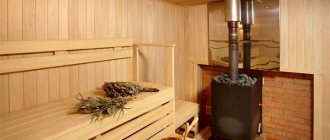
Features of furnace installation depending on the material
According to the shape and design of the furnace, there are:
- horizontal;
- vertical;
- cylindrical;
- rectangular.
They are made from:
- cast iron;
- metal (steel, iron);
- bricks
Some models are equipped with a grid for stones and a tank for heating water.
Cast iron
Cast iron is an alloy of metal (iron, graphite, carbon). This is an environmentally friendly and safe raw material.
Advantages of a cast iron stove:
- Long service life - 30 years or more.
- The creation of the structure does not involve welding. The absence of seams has a positive effect on the quality and service life of the product.
- The material is highly resistant to temperature changes. He is not afraid of deformation.
- Heating rate. Cast iron heats up quickly and retains heat well. Such a stove can heat a large sauna in 2–3 hours. One load of fuel lasts up to 9 hours of heating.
- The device is assembled from individual elements connected to each other by locks. If one part breaks, it is easy to replace.
- A cast iron stove will fit perfectly into any room design.
Among the disadvantages of the unit:
- Heavy weight. It will not be possible to install such a structure alone. Its average weight is 200 kg.
- It is susceptible to corrosion, so it is not recommended to place such a stove directly in a steam room.
Any cracks or damage to the product must be repaired in a timely manner to prevent a fire.
The stove will look great in the dressing room or rest room.
Steel (iron)
Among owners of summer cottages and country houses, metal stoves are in great demand due to the availability and low price of the material compared to other types.
Having a drawing of a finished stove, skills in working with a grinder and a welding machine, you can assemble it yourself.
Advantages of metal stoves:
- Light weight of the finished product - from 80 kg.
- Many stove models do not require a separate concrete foundation to be poured.
- The oven will be easy to install. One person can handle this.
- Compact size - it won't take up much space.
- The metal heats up quickly, releasing heat, reducing fuel consumption.
- The housing is completely sealed. The risk of carbon monoxide leakage is minimal.
- Affordable price of finished products.
- You can make the oven yourself.
Among the disadvantages of the device:
- Rapid cooling of metal. To maintain a comfortable temperature in the premises, you will have to constantly heat in winter.
- Strong heating of the metal dries out the air.
- Hot surfaces not protected by partitions can cause burns.
- Steel and iron in conditions of constant humidity without additional protective treatment will quickly begin to rust.
In bathhouses with wooden floors, additional protection should be given to the areas around the stove by installing a covering made of non-combustible materials. The same applies to products with 4 legs. The floor underneath them, without protective flooring, will gradually collapse.
If the total weight of the stove with firewood, a screen, a full tank of water, and a layer of finishing materials does not exceed 700 kg, then it is not necessary to pour a monolithic slab or podium under the stove.
Brick
The furnace is laid with refractory bricks (fireclay), and the finished product is lined with ceramic.
Advantages of a classic heater:
- Long-term heat retention.
- Fire safety.
- Ability to heat large areas.
- Soft water vapor is produced.
- The building warms up evenly and gradually.
- The material is non-flammable and resistant to temperature changes.
- Durability. A properly laid stove will last for decades.
But this design also has disadvantages:
- Difficulty of masonry. Without knowledge of ordering technology, it is not worth taking on construction.
- High cost of materials and work.
- The large weight of the finished product requires pouring a reliable foundation.
This material will be useful:
- Installation of a foundation for a brick oven
- Which brick for the stove is better to choose?
Chimney: types of pipes
What can a modern chimney for a sauna stove be made of? There are not many options:
- brick (we will talk very little about it in this article, because this is a topic more for brick stoves),
- metal;
- ceramics;
- glass.
It is noteworthy that the best material will be impact-resistant, heat-resistant glass , ceramics are in second place, and then come steel of various grades. Below is a video in which the author compiles a list of the highest quality steels, but for those who are too lazy to watch, we will present it in text form:
- austenitic AISI 310 and 310S;
- austenitic AISI 316 TL;
- austenitic AISI 321;
- austenitic AISI 304;
- with the addition of manganese AISI 201-202;
- ferritic AISI 409;
- ferritic AISI 430.
At this point, the list is interrupted by a description of enameled chimneys, then those made of aluminum-zinc, after which the author moves on to black carbon steel, which can only be used if painted with heat-resistant enamel.
Here's the video itself:
We agree that ceramic chimneys are better than metal ones, but they are also more expensive. As for which brands have become better, we trust the author of the video.
Useful tips for stove makers: pay attention...
That's all for now, I'll end it. If I didn’t explain anything clearly, ask questions in the comments. I'll try to answer. Anyone who finds this information useful and informative can share it through the social buttons. networks. I will be very grateful. And now - bye, bye. See you in the next article.
Wisdom Quote: If you want the world to change, be the change.
Source of the article: https://dom-srub-banya.ru/ustanovka-pesochnitsy-v-bane/
Brick pipe passing through the ceiling
A special consideration is the case when a brick pipe is laid through the ceiling. In principle, this is also part of the work of a stove maker, but even so, the owner should understand what is being done and why.
A brick chimney heats up just like any other. Therefore, when passing through the interfloor ceiling, thermal protection of this ceiling from excess temperature is required.
A brick pipe is insulated either with brick or concrete. In order for the brick PPU to be reliably connected to the pipe, “fluffing” is done - this is a gradual increase in the cross-section of the pipe due to additional bricks.
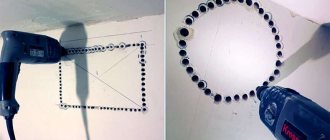
The fluff order is shown in the figure below.
An alternative would be to create formwork to the size of polyurethane foam and fill it with concrete.
The hole in the ceiling is cut to the size of the fluff.
But the author of the video considers such thickening of the pipe to be an ugliness, and suggests following the regulations, which do not insist that the insulation be made of brick. We agree that a more effective material can be found, but it is not mineral wool! Because it will turn into dust over time .
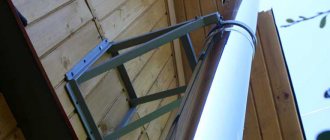
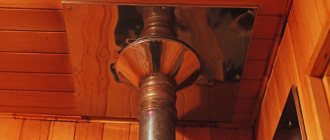
Pass-through unit: structure and dimensions of the box
There are several names for a box that is installed in the gap of a hole cut in the ceiling: these are “pass-through unit”, and “cutting box” and “ceiling cutting”, and PPU (ceiling pass-through unit).
What is he? Quite simply, it is a box with insulating material that should fit into the hole you cut, and also keep the chimney pipe exactly in the center.
Box for the passage of the chimney through the ceiling for installing a stove in a steam room
In addition to this, there is also the finishing of the hole itself, which is very desirable to be reinforced with a material that can withstand high temperatures, is non-flammable and has low heat transfer . Below we will talk about specific materials, but the problems that should be solved by them are exactly the same.
The pass-through unit is made of metal. In particular, it can be stainless steel. In any case, the part that is visible from the steam room is usually made of stainless steel. On sale you can find boxes made entirely of stainless steel, and entirely of galvanized steel , and combinations thereof.
The boxes vary in size. And not only the box itself, but also the internal hole through which the chimney must pass. Diameter varies from 115 to 300 mm.
As for external dimensions, everyone interprets GOST in their own way. We already understand why this happens - some believe that a box with a side of 1 meter corresponds to GOST, others that 26 cm + pipe diameter is quite enough. And all this is based on technical standards.
IMPORTANT! If there is any discrepancy, one has to rely on common sense.
What is the main limitation when passing through the ceiling? Ceiling beams if the ceiling is false. If the dimensions of the box are greater than the distance between the beams, you will have to cut the beam and insert the cross member in another place. This will affect the load-bearing capacity of this beam. That is why they try to fit the box between the existing beams without additional waste of effort and time.
The ceiling in the bathhouse and the chimney. Photo StroyDom
Of course, if the position of the furnace had been thought out at the design stage, then the beams could have been positioned so that the foam would pass between them. Consequently, the size of the PPU would need to be thought out in advance.
On the other hand, there are now materials with low heat transfer that can withstand heating up to 1000-1100 degrees. If you use them, there is no need to cut out a large piece of the ceiling. For example, watch a video showing a test test of a calcium silicate . We then looked at the technical characteristics of this refractory - they are simply excellent! Find out for yourself (we do not advertise or sell).
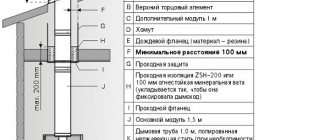
For now, let’s summarize the data. It turned out that, according to SNiP and other standards, there are the following options:
- radius of ceramic pipe + insulation + 13 cm;
- ceramic pipe radius + 25 cm;
- pipe radius + 38 cm;
- pipe radius + 50 cm.
ATTENTION! There are no data for steel pipes in the first two cases.
As for the device, everything is simple: the metal box has the height of the ceiling, and is closed at the top and bottom with lids with holes for the diameter of the pipe. The lids are larger than the size of the box.
The box itself is lined on all external surfaces with a heat insulator - mineralite or basalt cardboard . Expanded clay is poured inside the box or basalt wool is laid. This is the standard option and is done most often. But in the video you saw that you can get by with a calcium silicate and use it to insulate the pipe in the bathhouse from the ceiling.
Safe installation standards
To decide how to install a stove in a bathhouse, you must study fire safety standards. They are easy to follow, provide safety and can truly save not only property, but also lives. It is worth highlighting several basic standards:
- Be sure to maintain the specified distance around the perimeter, as well as from the ceiling.
- It is advisable to treat nearby walls and objects with fire protection and not to place flammable objects nearby.
- Prepare the base or foundation to protect against fire.
If all rules and regulations are observed, installing a sauna stove in a wooden bathhouse is truly safe.
How to make a chimney: choosing insulation
Fireproof plate
We believe that special attention should be paid to the choice of insulation. We repeat: most will put expanded clay or mineral wool inside the box, and cover it on the outside with mineralite (its analogue is Flamma sheets) or basalt cardboard. This is a valid solution. It is doubtful to use asbestos instead of mineralite .
asbestos cardboard (asbestos cardboard)
ADVICE! Do not make an internal backfill of sand, because it transfers heat perfectly, and when the chimney heats up to 400 degrees, even this is a guaranteed fire. Because wood lights up at 330 degrees, but if you heat it for a long time, it will light up at 150-170 degrees. Sand will do a very bad job.
However, in our time, other refractories have appeared - the same calcium silicate, known commercially as superisol or Silca slabs. But it is a slab material.
The chimney in the ceiling of the bathhouse in the area of the polyurethane foam can be lined with other materials, such as cotton wool or felt. If we talk about stone derivatives, these are basaltine and Basfiber, which are technologically more advanced modifications of mineral wool.
But now you can buy not only them, but also ceramic fibers, in particular, Supersilica, which is a silica fiber from which either cotton wool or mats are made. It has no binding substances at all, which in mineral wool burn out over time, causing it to crumble. The manufacturer's website directly states that this fiber is suitable for insulating the ceiling passage in a bathhouse.
Below is a video that shows a funny stress test of everything that can be stuffed into a PU foam assembly:
There is also mullite-silica wool, but this is a real refractory that can withstand temperatures twice as high as the maximum for a chimney.
What thermal insulator to use
After the device is fixed to the ceiling, they go up to the attic or second floor and fill the gap between the outer wall of the pipe and the beams with heat insulator.
Basalt wool can be used as thermal insulation. But be sure to check that the operating temperature range should be greater than 600°C.
You can use mineral wool or clay to insulate the pipe.
Some people think this option is not the best. Firstly, during production, resins are used as a binder, which release formaldehyde when heated. Secondly, condensation sometimes runs through the pipe. And mineral wool (and basalt wool too) lose their heat-shielding properties when wet. And when they dry, they are only partially restored. So this option is really not the best.
The penetration is also covered with expanded clay of medium and fine fractions. This is a natural material that is relatively light in weight. Even if it gets wet, it then dries and restores its properties. When wet, the thermal conductivity increases slightly, but it is already worse for expanded clay than for mineral wool.
In the past, sand was often used. The option is not bad in all respects, except for one detail: it gradually wakes up through the cracks. Refilling the sandbox is not difficult, but constant sand on the stove is annoying.
If we talk about natural heat insulators, then you can use clay. It is diluted to a paste-like state and the entire gap is covered. Sometimes expanded clay is used as a filler.
One of the heat insulators is expanded clay
How to insulate a pipe from the ceiling
Now this is an interesting question. One of the videos says that the maximum temperature to which the chimney duct can, but should not, be heated is 700 degrees. And since most make metal pipes, according to the rules, first there is a mono pipe, then, closer to the ceiling, it turns into a sandwich. That is, in the steam room we will have an unprotected monopipe - a thin layer of metal separating it from hot gases. And this is powerful and hard IR radiation.
We can consider the problem of insulating a pipe in a bathhouse from the ceiling in two ways - both down and up. down is not so much insulation as a device that takes away heat, which literally “flies into the chimney.”
There are two options here - you can hang a heat exchanger on the pipe, which will heat the water. Or you can hang a mesh with stones , which will absorb heat and retain it longer than metal.
If we consider such devices as insulation in particular, then they will perform their function - their temperature will be significantly lower - water heats up to 100 degrees, stones can hold a higher temperature, but lower than that of the gases in the pipe.
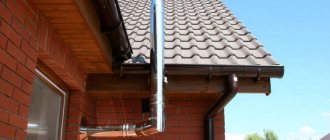
As for the pipe above the ceiling, that is, passing through the under-roof space and the roof, then more care needs to be taken specifically about insulation.
ADVICE! Do not neglect fire-prevention impregnations for wood; they are quite appropriate in the attic of a bathhouse and can protect it from fire.
insulate a pipe above the ceiling with a calcium silicate box with an air gap between the pipe and the box for better cooling of the former.
The second option is to use supersilica. It is a ceramic fiber that can be purchased in sheet or mat form. The pipe wrapped with it will become simply warm to the touch. In addition to the pipe, supersilica can be used to protect all flammable surfaces in the immediate vicinity of the chimney.
It even occurred to us that ceramic fiber is much better than ordinary sandwich stuffing, which loses its insulating properties when condensation forms inside, and over time settles and turns into dust (losing binders). And the most unpleasant thing is that the sandwich tends to burn out if it is fired incorrectly frequently, which makes such a pipe dangerous.
In other words, you can either try not to take a sandwich at all, but limit yourself to supersilica insulation, or replace the mineral wool inside the sandwich with this material.
What thermal insulator to use
After the device is fixed to the ceiling, they go up to the attic or second floor and fill the gap between the outer wall of the pipe and the beams with heat insulator.
Basalt wool can be used as thermal insulation. But be sure to check that the operating temperature range should be greater than 600°C.
You can use mineral wool or clay to insulate the pipe.
Some people think this option is not the best. Firstly, during production, resins are used as a binder, which release formaldehyde when heated. Secondly, condensation sometimes runs through the pipe. And mineral wool (and basalt wool too) lose their heat-shielding properties when wet. And when they dry, they are only partially restored. So this option is really not the best.
The penetration is also covered with expanded clay of medium and fine fractions. This is a natural material that is relatively light in weight. Even if it gets wet, it then dries and restores its properties. When wet, the thermal conductivity increases slightly, but it is already worse for expanded clay than for mineral wool.
In the past, sand was often used. The option is not bad in all respects, except for one detail: it gradually wakes up through the cracks. Refilling the sandbox is not difficult, but constant sand on the stove is annoying.
If we talk about natural heat insulators, then you can use clay. It is diluted to a paste-like state and the entire gap is covered. Sometimes expanded clay is used as a filler.
One of the heat insulators is expanded clay
Here is a review of the use of clay when passing a bath pipe:
“Clay rules in cutting! I dismantled the chimney in my bathhouse. Or rather, I took apart what was left: there was a lot of snow, and when it melted, it blew off the entire top. Once you change the top, you need to look at the bottom: the pipe has been standing for 7 years. So here it is. There is zero burning inside, and there is no burnout of the pipe either. Condition: as soon as installed. My penetration is lined around the perimeter with basalt wool, and then everything is covered with clay. This is definitely the best option."
Not everyone recommends using insulation in the passage unit. There is an opinion that it is better to leave the gap unfilled: this way it will be possible to avoid overheating and burning out of this section of the pipe - it will cool better due to air blowing. This may be true, but the radiation from the heated pipe will dry out the nearby wood, and in this case the temperature of spontaneous combustion is significantly reduced - to +50°C.
As you can see, the pipe burned out
There are several ways to avoid overheating. The first, and most rational, is to use the heat that flies out into the pipe and heats it to extreme temperatures for your own needs. There are three options:
One way to avoid overheating is to place stones on the pipe
When using any of these methods, the pipe temperatures in the ceiling passage are significantly reduced. The likelihood of burning becomes very small. That's not all. There is a way - simply cool with air. To do this, another one of larger diameter is put on the heat-insulated pipe. A grate is made at the bottom and top through which air enters/exits. For a steam room this is not an option - it will draw out all the steam, but for a washing room it can be used. The method is especially good in the attic and when passing through the roof.
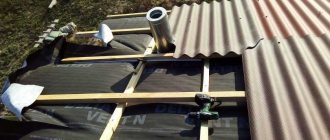
How to install a chimney through the ceiling with your own hands
It is advisable to start at the design stage. The location of the stove must be matched with the position of the ceiling beams and roof rafters. In this case, you won't have to redo anything at all. Then a decision is made on the size of the PPU. If you do it “according to GOST”, that is, 38 or 50 cm from the bare pipe, then it will most likely be impossible to fit between the ceiling beams without undercutting. If you use store-bought versions of polyurethane foam that are far from GOST, then you won’t need to cut anything even with a standard beam spacing of 60 cm.
However, we will still provide a drawing showing how to properly trim a ceiling beam that interferes with the passage of polyurethane foam.
Just in case, let us clarify that a similar design is used for cutting rafters, but in this case it is necessary to make the rafters adjacent to the trimmed ones double (for the entire length).
Those who for some reason do not want to make a hole exactly above the stove can either make an L-shaped chimney that will lead the pipe to another place in the ceiling, or lead it out at an angle of 45 degrees - the difference is determined by the amount of displacement - if it is greater meters, then an inclined version is made, if less - an L-shaped one. You only need to then provide reliable support to the chimney pipe so that it maintains its vertical position.
But this is a technical solution, but how good it is for a steam room is another question. To be honest, it 's not good at all . And the extra IR radiation from additional meters of the chimney will not improve the health of visitors, alas.
ADVICE! To avoid having to suffer so much, add a roof plan to the floor plan with the foundation for the stove - you will immediately see where the chimney will go. At this stage, you can adjust the plan itself.
So, preparation for penetration is desirable even before the final filing of the ceiling. If everything is calculated correctly, all you have to do is cut out a piece of lining with a vapor barrier, insulation and waterproofing. Well, if you put a rough and finishing floor on the second floor, then those too. But the beams will remain intact.
You can cut with what you have on hand, for example, with a jigsaw.
Next, you need to choose what exactly you will finish with mineralite or calcium silicate, or basalt cardboard - the outside of the box or the walls of the hole. Both are acceptable. After attaching the slab insulation, the box is inserted into the hole and secured from below with self-tapping screws.
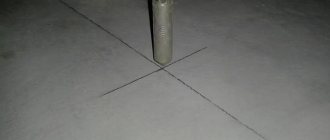
IMPORTANT! The center of the hole in the ceiling should coincide with the center of the pipe. To do this, use a plumb line and align the centers.
A pipe is mounted below. If you choose a sandwich, then first put a monopipe on the stove pipe, not forgetting to fix all connections with high-temperature sealant. Closer to the ceiling, a start is put on the monopipe - this is an adapter for a sandwich. The sandwich is already threaded through the PU foam hole.
Check your verticals! The pipe must have fastenings to the wall that will fix it in a strictly vertical position.
After the sandwich is threaded through the polyurethane foam, the space between it and the walls of the box is filled with another insulation - mineral wool, expanded clay or ceramic wool . We like mineral wool least of all from this list. Expanded clay is perfect for a budget option.
BY THE WAY! The bottom of the box can be lined with the same calcium silicate and the inside of the lid can be finished with it.
We close the lid and fix it to the attic floor with self-tapping screws (it protrudes slightly beyond the hole). At this point, the passage of the chimney through the ceiling, done with your own hands, can be considered complete. Next is the exit through the roof.
Wall protection
This procedure is not relevant for structures made of non-combustible material or if a distance of 50 cm is maintained between the walls and the stove.
In other cases, it will be necessary to install additional wall protection, for which you can use brick or steel screens, plaster over metal mesh, or ceramic tile cladding.
The wall through which the remote firebox channel will pass deserves special attention.
It is best to use a frame partition to separate the steam room and the dressing room. For its construction, timber impregnated with an antiseptic is used.
The result should be a structure in the form of the letter H: its bottom will be decorated with brickwork around the removed fuel channel, and the top will be filled with thermal insulation from basalt slabs 10 cm thick. The brickwork and the fuel channel should be separated by a gap of 3 cm.
If a stove with an external firebox is mounted in a log house, you need to cut an opening in the wall under the channel.
After this, the ends of the opening are sewn up with mineralite and covered with foil. In the same way, all the free space of the niche is filled (this can be done completely, and then a hole can be cut to fit the size of the channel). The sheathing procedure is reminiscent of the construction of a plasterboard wall - the distance between two sheets of mineralite is recommended within 30 mm.