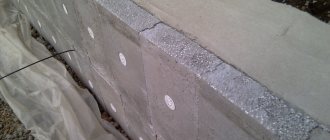
- Preparation for plastering
To create an air gap for floor insulation, after building the foundation, they immediately begin building the basement. This design helps distribute the load evenly from the building to the foundation. It is also necessary to protect walls from getting wet and mechanical damage. Traditionally, the height of the base is 0.4-0.5 meters. It is better to carry out its cladding before assembling the log house or erecting walls.
How to insulate the base of a log bath?
So, if the floor in a chopped bathhouse is always cold and there is even dampness, it’s time to properly insulate its base. Here's how it's done:
- Step 1. We dig around the perimeter of the bathhouse 40-50 cm wide and 50 cm below the frame. We throw out all the rotten fragments and replace them with new ones, preferably from larch.
- Step 2. We treat the rolled logs with the following mixture: drying oil with processing, heated to 50˚C.
- Step 3. Lay inter-crown insulation – “thermojute” is best.
- Step 4. We jam the rolled logs until they crunch.
- Step 5. We caulk the outer seam of the casing crown with jute tape and cover it with a solution of gypsum putty and sawdust.
- Step 6. We fix the polymer mesh to the log and once again plaster the seam with cement mortar with a water repellent.
- Step 7. Using a torch, we fuse the Steloizol to the very top third of the lining log.
- Step 8. Fill the trench with sawdust and larch bark (to prevent soil freezing).
- Step 9. We build open terraces around the bathhouse and cover them with a roof - if possible.
That's it - from now on it will always be warm in the steam room.
How to cover the base of a house on screw piles: all the methods
Pile foundations have become quite widespread.
This is due to the low cost of the device and the possibility of use even on soft soils. But during construction a problem arises: how to cover the base of a house built on screw piles?
The buildings located on the supports in question have a ventilated underground. A grillage is provided for tying the piles. It connects separate elements into one system.
The grillage can be made of concrete or metal. When constructing wooden or frame houses, the frame is made of wood.
The plinth cladding will be attached to the piles or walls of the house.
To complete this you will need to make a frame or sheathing. It is most convenient to make and attach wooden boards. Their cross sections will depend on the pitch of the piles and the mass of the cladding material used.
There are several options for solving the issue of how to cover the pile foundation from the outside.
The finishing of the basement of the house can be made of the following materials:
The choice of material depends on aesthetic and economic considerations.
Important!
Whatever cladding of the basement of the house is chosen, it is necessary to provide vents.
They are necessary for normal ventilation of the space under the building. Lack of ventilation can lead to direct danger to human life.
You can often hear about the dangers of gases such as radon. It lies in the ground, but often rises and accumulates in the basements of buildings and underground areas.
Constant ventilation will help avoid the accumulation of hazardous substances. It is highly not recommended to close vents for the winter.
Insulation with expanded clay - simple and reliable
Here is the most popular external basement insulation in Russia:
- As soon as the foundation is poured, another formwork is built around it - about 15 cm wide.
- A solution of expanded clay and concrete is poured into the formwork.
- Now - the waterproofing layer.
- Next, fill the soil with a layer of crushed stone and sand.
- We move on to the horizontal foundation slab - we also fill it with expanded clay and concrete, put a double layer of mineral wool and a waterproofing film.
Communities › DRIVE2 At The Dacha › Blog › Closing the pile-screw base.
Warm dacha greetings to all Drayvovites. I went through different options for the subject, and finally settled on this one. Cover it with extrusion and cover it with aceid. You can then stick anything on top of the aceid or just paint it. And so, step by step. We dig a trench 30-70 cm deep, depending on how heaving the soil is. Mel1971 and I have clay, so we dug 50 cm (we didn’t have enough strength for more).
The top board goes along the top of the piles and is attached with self-tapping screws directly to the frame of the house, the bottom board is parallel to it, 5 centimeters above the ground level at the lowest point.
Since the piles somehow protrude or move away from the vertical, we adjust the places where they intersect with the bottom board so that they are in the same plane with the top one.
Insulation with spray polyurethane foam - no gaps
Waterproofing is not necessary for this method. Polyurethane foam is sprayed from a construction gun - directly onto the concrete base. The normal layer is 5-7 cm. Polyurethane foam dries instantly, and a dense and heat-insulated water-repellent surface is formed on the base. For more warmth, you can even spray it twice, with the second layer directly on top of the previous one, without any preparation.
Next, the mounting mesh is attached and a layer of plaster or some other decorative finish is placed on it.
Thermal insulation of a screw foundation
One of the main negative characteristics of this technology for creating a foundation for a house is that the foundation design on screw piles has an underground space, and this, in turn, allows cold air to penetrate from below, which will certainly affect the comfort and microclimate in the entire building.
Thermal insulation of the foundation on screw piles has its own characteristics. The first step is to create a structure similar to the missing base, which is subsequently insulated. Insulation must be carried out in a complex - inside and outside.
Scheme of thermal insulation of the foundation with polystyrene foam.
So, the entire thermal insulation procedure is divided into the following stages:
Experts recommend two methods for constructing an imitation plinth:
The first method involves digging a small depression (150-200 mm) between the support posts, then pouring a reinforced foundation into it. After it has set, it is necessary to lay half a brick and glue the insulating material to this wall.
The second method is to fix wooden beams on piles in a horizontal position using bolts or metal guides, but then you will need a welding machine. After this, insulation sheets are attached to the constructed structure. According to experts, the insulation can also be fixed directly to the cladding material. It is best to use penoplex or polystyrene foam as insulation material. In addition to excellent thermal insulation properties, these materials have good sound insulation.
Insulation made from extruded polystyrene foam
Here's how to insulate the base with extruded polystyrene foam:
1. We lay a waterproofing membrane on top of the foundation. 2. On top of the membrane - heat-insulating boards up to 120 mm thick. They can be secured with glue using the spot application method.
Advice: you can also lay thin slabs in two layers - it will be even warmer. And in this case they need to be laid in a checkerboard pattern, overlapping the seams of the previous layers.
3. On top of the slabs there is an additional profiled membrane as drainage for draining groundwater. 4. Now – geotextile as a filter layer. 5. And finally, we insulate the horizontal foundation slab and make a concrete blind area around the entire perimeter of the bathhouse.
Yes, this option for insulating the base with your own hands is more difficult to do, but, as practice shows, a well-thought-out technology that is personally implemented is always more effective than what a hired team does. After all, any worker just wants it to be “faster, easier, and so that you can take something for yourself.”
Materials
The hinged base is lightweight and does not require excavation work.
Let's consider how to cover the pile foundation from the outside
It is important that the material used for finishing is durable and frost-resistant, and does not lose its qualities under the influence of temperature changes and ultraviolet radiation.
More reliable is finishing the base of a pile foundation with stone, brick, cinder block, or concrete. This will require excavation work similar to the construction of a shallow foundation.
The suspended structure is lightweight and does not require excavation work. Polymer, wood and composite materials are used, which are quickly and easily installed.
Basement siding
Basement siding is most often used for finishing screw foundations.
It is produced in the form of decorative panels with a thickness of 1 to 2.5 mm.
It is possible to cover the foundation of a house with semicircular shapes. For this purpose, a technology was launched into production, thanks to which the material bends easily. Panels of small thickness (1.1 mm) with the addition of synthetic threads are produced.
Profile flooring
One sheet of corrugated sheeting will cover a significant space.
Sometimes the question arises of how to cover the screw piles so that the work can be completed during the day.
In 4-7 hours you can cover the pile foundation with profile sheets.
The width is available from 1 to 4 m, due to this one sheet can cover a significant space.
Disadvantages include:
Flat slate
Asbestos boards are not an environmentally friendly material.
Every year this material is losing its popularity, it is being replaced by modern, environmentally friendly materials.
Frame system
Is a budget option. To install the sheathing, we use vertical posts made of timber (metal) with horizontal slats and metal profiles attached between them. We attach acrylic and vinyl siding to a pre-fabricated frame. For more information on how to close the basement space in a house on screw piles, watch this video:
Leaf system
You can lay tiles on the mounted profile
It is economically beneficial to use a sheet system.
Composite materials
As a composite material we use:
Facing brick
Facing brick
Brickwork is a reliable, but expensive and labor-intensive method of finishing a foundation on screw piles. To lay the cladding correctly and evenly, you need to have construction skills.
How to cover a basement space with a brick:
The masonry must be connected using metal pins to the piles. The metal is welded to the sheathing and bonded to the brick using cement mortar.
Foam insulation - quickly and economically
With polystyrene foam, the base of the bath will be protruding - and well protected from moisture and cold. For this purpose, it is better to take material with a density of at least 25 kg/cubic meter, and any thickness, unless the base protrudes more than 40 cm.
Stage I. Marking the new base
The polystyrene foam will slightly increase the volume of the base, and therefore it needs to be marked in advance. To do this, pull the string just above the waterproofing and draw a horizontal line on the wall.
Stage II. Preparing the surface
We clean the surface of the dirt and prime it with a deep penetration compound.
Stage III. Styrofoam fastening
We start gluing the foam plastic from the corner - to do this, we make markings with a marker and cut off a couple of pieces with a knife. Now we apply glue to the wall with a notched trowel, apply foam boards and lubricate the ends. So, having glued several plates, we make holes with a drill, fix the sheets and hammer in nails.
Stage IV. Reinforcement
Now the foam needs to be treated with primer. Next, use cement glue to glue the metal slope corner around the perimeter and corners. We also attach the reinforcing mesh to the foam with glue, having previously cut it into the same pieces as the foam.
Here's how to attach it: apply glue to the foam, spread it with a wide spatula, apply the mesh and go over it with the spatula again.
Stage V. Finishing the base
After the glue has dried, we move on to finishing the base. Apply the putty solution with a wide spatula on top of the glue-cement. The dried putty is already primed and can be painted. And you need to paint the base with special acrylic facade paint.
Natural and artificial stones are also excellent for cladding the base of a bathhouse - they can be attached with ordinary glue for installation work. And this finish looks simply gorgeous!
Finishing the plinth with façade (plinth) panels
Facade panels are a multilayer building material in the form of a sandwich, which provides aesthetic appeal and has good thermal insulation characteristics. Vinyl and acrylic PVC panels are inexpensive and light weight. The finishing of the base with stone panels looks impressive.
Advantages:
- the presence of an effective thermal insulation layer;
- strong and durable outer layer;
- does not weigh down the building structure;
- relatively low price;
- fire resistance (except for vinyl, which melt without supporting the combustion process);
- excellent aesthetic properties.
Disadvantages of panels for finishing the base:
- fragile, requires careful installation;
- not repairable.
The panels are used for the basement of a private house, where there is less chance of accidental damage.
Clinker tiles
An excellent solution for walls and foundations, as clinker is durable. In addition, this finish looks attractive and goes equally well with different facades. The main advantages are as follows:
- A huge selection of options, differing in color and texture. You can find almost any shade.
- Long service life. The resource is at least 20 years.
- Low maintenance, the surface does not require the application of protective compounds, although moisture protective agents will not hurt.
Clinker tiles also have some disadvantages:
- High price. This is one of the most expensive solutions.
- Difficulty in installation. The small size of the tiles complicates the process.
Important!
In order for the work to go quickly, you need to level the base as best as possible.
Siding
Covering the outside of a house with special siding is a simple solution that allows you to make the foundation more attractive in a short time. The panels can imitate stone or brick and are matched to the style of the facade. The main advantages are:
- Siding is the easiest to work with. The panels are lightweight, easy to attach and join, there are corners and other additional elements.
- For installation, a wooden or metal frame is constructed. You can put heat or waterproofing material under it.
- Suitable for both strip and pile foundations, as it is attached to the frame and not to a solid surface.
Plastic panels for the plinth also have certain disadvantages:
- When fastening, it is important not to tighten the screws to the end, leaving a gap for thermal expansion. If you overlook this, the material may crack.
- At sub-zero temperatures, the panels become brittle and can be damaged even by a slight blow.
Siding does not allow moisture to pass through, but if it gets behind it, it will not let it out. Therefore, it is important to secure a reliable flashing on top to drain water.
Gabions
This element is not often used for foundations, but it looks original and is not very expensive. The structure is a frame made of mesh, inside of which crushed stone or pebbles are poured. The main advantages are:
- You can design both strip and pile foundations. In the second case, the mesh frame should be more durable.
- The stones are simply poured in and lightly compacted. Most of the time is spent on installing the frame.
- The appearance is original, this is rare.
Gabions also have disadvantages:
- They are quite thick and can stick out strongly relative to the facade.
- They allow water and cold to pass through; it is advisable to lay hydro- and heat-insulating materials from the inside.
By the way!
This is how you can design the foundation of a fence or any other structure.
Profiled sheet
It is made of galvanized steel with a polymer or paint coating. The base made of corrugated board lasts a long time, but at the same time it looks simple and unpretentious. It has many advantages:
- You can choose not a plain option, but a profiled sheet that imitates stone, wood or other material; it looks much better.
- It is not difficult to attach the sheets with your own hands; the process is very similar to installing siding; it also uses lathing.
- The weight of the finish is light and, if necessary, it can be easily dismantled.
As for the disadvantages of corrugated sheets, the most significant of them are the following:
- Low sound and heat insulation characteristics. It is advisable to use mineral wool or polystyrene foam under the metal.
- When the protective layer is damaged, the steel begins to rust.
Important!
It is better to cut profiled sheets with a jigsaw. If you do this with a grinder, the metal overheats and begins to rust at the ends.
Safety
Safety for a bathhouse is a paramount issue.
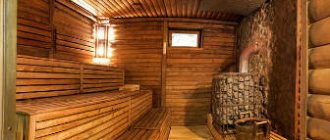
Wood, stoves, constant exposure to high temperatures often lead to fires. The main reasons are contact of the chimney with wood and improperly installed electrical wiring. To avoid contact, it is recommended to tile the stove. The wiring must be used with asbestos insulation and run along the surface of the wall. Switches and sockets are not installed in the steam room; the lamps are protected by special shades. Sockets in dressing rooms are equipped with special covers. If we take into account all the mistakes traditionally made by builders, the bathhouse will last a long time and safely.
Calculation instructions
To determine the size of the base of the bathhouse, it is important to take into account the weight of the future structure and the distinctive features of the soil.
Plaster
Suitable for concrete surfaces, block structures and other prefabricated elements. The work can be done independently, but if you need to create a certain structure, it is better to practice beforehand. If you don’t know how to cover the strip foundation of a house from the outside cheaply and beautifully, then this solution will be optimal, as it has many advantages:
- Availability. The price of plaster compositions is low; they can be bought at any hardware store.
- Easy to apply. To work, you will need a container for preparing the mixture, a trowel and a small rule for leveling the surface. All features of the process are indicated on the packaging.
- Short terms of work. Finishing the foundation of an average-sized home can be completed in a day.
- Possibility of painting the surface in a suitable color.
There are also disadvantages that are worth considering:
- You need to purchase special plaster; regular façade plaster will begin to crack in a couple of years.
- The surface must be dry and clean, so work cannot be carried out during wet periods.
- If the foundation has significant unevenness, the consumption of plaster increases greatly.
If necessary, you can first fix the thermal insulation material; extruded polystyrene foam is best suited. And a reinforcing mesh must be laid on top of the sheets.
Painting
Painting is only suitable for already plastered surfaces or block foundations that do not require finishing. A simple solution that has many advantages:
- Takes minimal time. The work is carried out with a roller; for joints and other difficult places, a brush is used.
- The choice of paints is simply huge; in the store they can choose any shade that is needed.
- You can refresh the color or change it at least every year.
Coloring also has some disadvantages:
- It does not hide surface flaws; if the foundation is uneven, it will be visible.
- It is necessary to prepare the base - clean it from dirt and apply a primer, otherwise the paint may peel off.
It is best to use special paints with moisture-repellent properties. But at the same time they must be vapor permeable.
Moisture protection
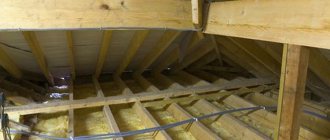
For a good log bathhouse, it is important to properly waterproof the foundation. The safety of the structure depends on this procedure. It is important to additionally insulate the floor, because in a bathhouse the main part of the heat can escape through the pouring floors.
For strip foundations, roofing felt is most often used. It is laid on the base, glued with hot bitumen lubricant.
The blind area is important for a bathhouse. If you neglect to install it, the wastewater will wash away the soil and the bathhouse will become distorted.
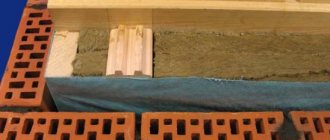
Logs with a diameter larger than the wall material are used as the first crown. The first crown is carefully secured and insulated.
Slate
A flat version is used, which allows you to quickly create a flat surface. Slate is good because it is easy to use and affordable; it can be bought almost anywhere. The advantages of this solution are:
- Low price: slate is one of the most inexpensive materials today.
- Suitable for both strip and pile foundations.
- The surface can be painted or covered with plaster.
There are also disadvantages:
- When cutting, a lot of harmful dust is generated.
- For painting you need to use special roofing paint, which is expensive.
Important!
Slate can be glued to any suitable composition or attached to the frame with self-tapping screws, having previously drilled holes.
conclusions
In each individual case, it is very important to take into account the characteristics of the soil, the size of the structure, the quality of the materials used, as well as other factors that significantly affect the reliability and durability of the object. The width also affects the strength of the foundation. In any case, taking into account such characteristics, you can easily and confidently make one or another type of foundation with your own hands, as a result of which you will get a truly beautiful and reliable bathhouse and enjoy your vacation
In any case, taking into account such characteristics, you can easily and confidently make one or another type of foundation with your own hands, as a result of which you will get a truly beautiful and reliable bathhouse and enjoy your vacation.
Attention! If you are not confident in your abilities, it is recommended to turn to specialists with experience who will carefully analyze what kind of soil is on the territory and choose exactly the type of base that is most suitable for you.
Features of the base for the stove
Separately, the manufacture of the foundation for the furnace should be examined. In this case, the instructions differ slightly from pouring a common base.
Let's consider two options that differ in the material used:
Metal oven
Iron stove for heating
To understand the dimensions in this case, consider the entire installation process:
Tip: It is recommended to use a vibrating plate for compaction. This will greatly improve the quality of the pillow.
Brick oven
Brick stove
The foundation for a brick structure requires a much stronger one due to the added weight:
Tip: Do not use welding to connect reinforcement. In this case, the elasticity of the metal is impaired.
Advice: do not tie the foundations of the sauna stove and the entire building. Because they can produce different shrinkage and destroy each other.
Stage 1. Preparation of round timber
The construction of a log bathhouse is a labor-intensive and responsible process that is carried out in stages. The initial stage is preparing the bathhouse project. A typical project includes:
- choosing a suitable location for development;
- layout of the number of floors and interior spaces of the bathhouse;
- layout of the location of window and door openings;
- selection of heating, ventilation equipment and lighting devices;
- selection of construction and finishing materials;
- development of premises design;
- calculation of construction costs.
Finished projects are presented in the public domain, but to receive an individual sketch, you should contact the design office.
Preparing the log
Round timber must be harvested at sub-zero temperatures, that is, in winter. It is at this time that the amount of moisture in the wood is minimized, therefore, during drying the material will deform and crack less.
Harvesting logs for a log house
Butt logs
The same applies to diameter. For example, the diameter of the base of the log is 35 cm, while the top is 25 cm or less. Such round timber is categorically not recommended for use in construction.
Logs for a log house
Perform further actions in accordance with the previously drawn up project. You can create such a project yourself, find it on the Internet, or order it from specialists. It is with the help of this document that you can calculate the required amount of consumables, determine the area and shape of the base.
To work you will need the following equipment:
- chisel; Chisel
- carpenter's axe; Carpenter's Ax
- medium power chainsaw;
- plumb line; Plumb
- level; Laser level
- electric drill; Cordless drill/driver
- mallet; Wooden mallet
- "trait". Trait (tool)
We will pay special attention to the last tool - the “line”. For production you will need steel wire with sharply sharpened ends.
Bend the wire in half so that it takes the shape of a compass; you can additionally secure the handle. This tool will be needed when marking logs.