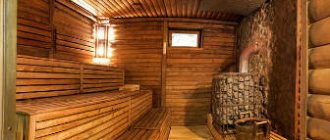
Wooden lining is often used for interior decoration in bathhouses, balconies and loggias, kitchens and even living rooms. However, most often it serves as a decorative finish with minimal insulation capabilities.
To make an insulating coating from a material, it must be installed correctly, first installing thermal insulation. All the work is simple, so even beginners can easily do it. How to sheathe correctly and other tips from the craftsmen - read on.
Types of insulation for wooden houses
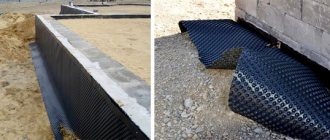
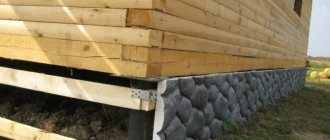
Insulation of timber walls can be done by external cladding with brick, concrete or ceramic stones, small blocks, and insulation material can be laid between the cladding and the wooden wall. The outer side of the insulation must be provided with a provided ventilated air layer, which will remove excess moisture from the wood, as well as ventilation ducts.
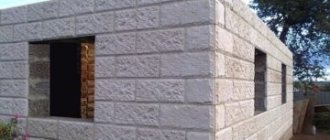
The most popular insulation of timber walls is lining the outside with masonry made of aerated concrete blocks. The thermal conductivity of aerated concrete blocks is almost identical to that of wood, and the vapor permeability of the blocks is higher than that of a wooden wall. If you make cladding with adhesive from aerated concrete blocks (20 cm thick), then the heat transfer resistance of a wall made of timber (15 cm thick) will increase twofold or more. Aerated concrete is a fireproof, frost-resistant and environmentally friendly material, which allows for cladding without providing a layer of vapor barrier and ventilated gaps between aerated concrete and wood.
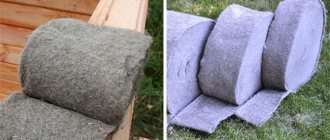
The optimal insulation option for log walls is mineral wool, which in its qualities meets the necessary characteristics: high thermal insulation properties, low hygroscopicity and low thermal conductivity. Mineral wool is a non-flammable material that is completely indifferent to the effects of fungi, insects and mold, does not contain toxic contents, and perfectly releases vapors into the external environment.
Features of mineral wool as insulation
Today, there are several types of mineral wool and therefore you need to correctly approach the issue of choosing a suitable material for insulating walls under drywall. Such thermal insulation can be made from rock or waste from the glass industry. These distinctive features affect the cost of the finished product. Mineral ecowool, which is produced both in mats and in rolls, is considered optimal for internal wall insulation. In this case, you can always choose the appropriate thickness of the material.
Mineral-based insulation has a high degree of thermal and sound insulation and is very easy to use. Mineral wool is very flexible and does not contain harmful carcinogens, unlike glass wool, when working with which you need to protect the respiratory tract and exposed skin. To do this, you need to wear a respirator and rubber gloves, limiting direct contact with the material.
Insulation with mineral wool under drywall
Before directly insulating the walls from the inside with mineral wool plus plasterboard as a final finish, it should be taken into account that the walls will increase in thickness to 5–10 cm, which will be needed to place the heat-insulating layer. All other work is carried out in accordance with the following stages:
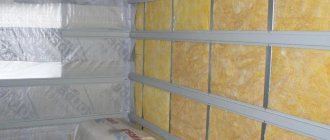
If the finishing layer is plasterboard sheets, then first a sheathing of metal profiles is installed, which are placed at a distance from the wall corresponding to the thickness of the mineral wool. As the first layer, a vapor barrier is laid - polyethylene film or a membrane equivalent. It is important to properly seal the joints of adjacent vapor barrier strips to completely prevent the penetration of moisture. For this, standard tape is most often used. Between the fixed profiles, rolls of pre-cut mineral wool are rolled out to the required sizes.
It is also important to take into account that wool has an insignificant degree of shrinkage and therefore its length should be 10–15 cm greater than the height of the insulated wall. The insulation is placed between the profiles and spread evenly throughout the entire volume. A vapor barrier is again laid on top of the thermal insulation, which can be fixed using self-tapping screws to the metal profiles. At the final stage, sheets of plasterboard are screwed to the profiles, and the final finishing of the walls is performed.
It is very convenient that after attaching drywall to metal profiles, the wall surface is perfectly flat and suitable for finishing with any decorative materials.
Is it necessary to install it?
Sometimes you may not need to install a vapor barrier. If the frame is built from durable timber, dried to a minimum level of humidity. The connecting elements must fit as tightly as possible. This way the structure will be protected from moisture.
A number of risks remain:
- Due to the specific nature of wood as a material, fibrous and porous, at high humidity it serves as a medium for the development of pathogenic microflora.
- If you varnish, after a few years the treatment will become ineffective. After 5-10 years, moisture will begin to penetrate deep into the timber.
- If the house is for permanent residence, installation of waterproofing is required. This will prevent the walls from rotting from the inside from moisture generated during cooking and other household needs.
Insulation and ventilation
A house insulated from the inside is no longer an “environmentally friendly” building. Synthetic materials will keep all odors, moisture, carbon dioxide, etc. inside them. Ventilation in such houses is simply necessary. Good ventilation will preserve building materials and people's health.
It is necessary to ensure an influx of fresh air and the possibility of exhaust air. The load on the heating device will increase by approximately 1.5 times. Therefore, you need to take this into account and factor it into the power of the device.
Ventilation in a wooden house
Installing a recuperator (you can do it yourself) will help reduce heating costs.
You cannot skimp on ventilation. But if, nevertheless, the funds do not allow you to create a full-fledged system, then you need to organize at least forced exhaust. And for a house with stove heating, inflow is more important.
Preparing for installation of the premises
Cladding inside the house with clapboard is carried out after purchasing the necessary materials and tools:
- Wooden slats.
- Material for thermal insulation.
- Fastening elements – dowels, screws.
- Electric jigsaw.
- Nails, staples, clamps.
- Hammer.
- Screwdriver.
- Electric drill.
- Building level.
- Materials for coating: antiseptic, primer, varnish.
Before installing it yourself, you need to prepare the lining.
For this:
- Boards of the required size are selected.
Tip: Fresh or damp boards should be thoroughly dried first.
To cover the room, boards of the same width are selected, usually from 6 to 10 millimeters.
- Places for cutting are marked on the board. A factory part can serve as a stencil.
- Excess edges are sawed off.
- Grooves are made on both sides of the board using a milling cutter.
- The outer side of the panel is chamfered.
- The material is treated with a special solution to increase its moisture resistance and durability.
Materials used for internal insulation
Materials used in the internal insulation of a house must meet certain requirements:
- Firstly, they must have low thermal conductivity in order to fulfill their main function - insulation.
- Secondly, these materials must meet fire safety requirements for premises.
- Thirdly, the material, alone or in combination with the mounting structure, must provide the required mechanical strength.
- And finally, all materials used indoors must be environmentally friendly and not release any chemicals into the surrounding air that adversely affect the health of living beings.
Direct upholstery of the frame with clapboard
There are several ways to attach lining units to the frame:
- The first method is to drive the nail obliquely from the side of the tongue. In this case, the nail head is completely cut off so that the attachment point is almost invisible. Wall upholstery with clapboard will have a more uniform appearance.
- The second method involves using a clamp (the so-called “clip”). This option provides a useful advantage: you can remove the lining at any time and fix it in another place.
- The third option is only possible with a short external latch. In this case, the nail is driven into the inner latch.
Choice of insulation
How to insulate the walls of a wooden house from the inside? There is always a high percentage of humidity in a residential building. People breathe, cook food, etc. Moisture gets on building materials and penetrates them.
For more correct external insulation, materials that are vapor permeable are selected.
After all, one of the main requirements is to allow the wood to “breathe”, getting rid of condensation.
If the same is done with internal insulation, the steam will reach the wooden walls and fall into condensation in front of them or inside them.
In winter it will be freezing, and in summer it will be damp.
Therefore, for internal insulation, on the contrary, it is better to use sealed materials.
The problem of removing moist, stagnant air must be solved!
If the walls are lined with sealed insulation, you just need to take care of good supply and exhaust ventilation.
The first one comes to mind because it is inexpensive, holds heat well and is practically impenetrable. But it is not recommended to make walls from it inside, due to its flammability.
In a matter of seconds, the foam turns into a molten mass that emits acrid smoke and drips. They are strictly forbidden to insulate ceilings, and walls - at their own peril and risk.
Extruded polystyrene foam
EPPS is Penoplex, Thermoplex and others.
The same foam, but made using a different technology.
Here it is, resists fire much better.
In addition, it has a higher compressive density, which means you won’t have to worry about dents on the wall. The price is higher than that of foam plastic, but the simplest safe installation pays for it.
Mineral wool
Constructing a bag from mineral wool wrapped in polyethylene is also not the best solution, because when fastening, holes will still appear in the film, and installation is troublesome, but in the absence of better options, they use the technology.
Sprayed materials
Sprayed materials such as:
They have excellent thermal insulation properties, are not flammable or belong to the average flammability category, and are of fairly small thickness.
The disadvantage of such materials is their high cost. Requires professional equipment and a team with special skills.
Other insulation materials
Other materials are of little use for interior use. Insulation with plaster has virtually no effect. Penofol is a good material, but too thin. It can be used if little insulation is required.
In order to keep your house warm, it is not necessary to install a very powerful heating boiler. First you need to insulate the house. What is the best way to insulate a house - outside or inside? Read the recommendations.
A review of thermal insulation materials for insulating walls from the inside is presented here.
Mistakes made when insulating
In order for the insulation of the walls of the house, from the inside, done with your own hands with mineral wool, which will be covered with plasterboard on top, to last as long as possible, it is important to avoid common mistakes:
- an attempt to save money when purchasing thermal insulation material from little-known manufacturers;
- non-compliance with the sequence of thermal insulation work;
- laying mineral wool with various types of defects;
- there are gaps between adjacent sheets of material;
- improperly equipped vapor barrier or its complete absence.
It often happens that when doing DIY work, the homeowner forgets to install sockets or a switch in the drywall. If you carry out installation work on installing electrical products after fixing the drywall, you can significantly damage the insulation. Therefore, this procedure must be performed in advance.
As you can see, insulating mineral wool under drywall is not the most difficult process; the main thing is not to forget about high-quality vapor barrier and distribute the mineral wool in an even layer from the inside over the entire surface of the walls. This procedure will keep the house warm and prevent the formation of drafts and other troubles.
The need for vapor barrier
Let's figure out whether a vapor barrier is needed for insulation? When a room is warm, water vapor always forms in it, and the warmer the air, the more vapor it contains. At a certain temperature regime, called the “dew point,” water vapor is converted into condensate. If there is a large temperature difference between the inside and outside of the house, the “dew point” moves to the wall of the house.
Internal vapor barrier
When air exchange occurs naturally in the house, steam freely leaves the room and goes outside. Now imagine that a multilayer barrier has arisen in the path of the steam. Condensation gets into the insulation and lingers there.
This happens day after day, and as a result, moisture accumulates in the heat insulator. The insulation is deformed, its heat-insulating ability decreases, moisture contributes to the formation of mold, fungi, rotting and destruction in the wood.
A vapor barrier allows you to avoid such unpleasant consequences, which becomes a protective barrier on the path of steam, preventing moisture from entering the insulation.
How to insulate a wooden house with polystyrene foam from the inside with your own hands
Foam plastic, Penoplex or another type of polystyrene foam - the installation technology for all these materials is the same.
Penoplex can be fixed in one of two ways:
- Glue method.
- Using a frame.
The adhesive method is simpler and cheaper, but it can only be used if the wall is smooth, flat, and plaster is chosen as the final finish.
Internal insulation with foam plastic
In this case, a special adhesive composition and fasteners with an umbrella-shaped cap are purchased. The glue is diluted according to the instructions and applied to the sheet in even strokes. The canvas is leveled and fixed on the wall. Additionally, it needs to be reinforced with dowels with umbrellas.
Frame method. If the wall is log or uneven, it is better to build a frame. It is also more convenient to attach OSB boards, plasterboard and plastic panels for finishing to the vertical joists of the frame.
Penoplex does not need any additional layers of waterproofing - EPP itself does an excellent job of resisting moisture.
It is important to fill the joints between sheets of expanded polystyrene with polyurethane foam. If this is not done, moisture will penetrate under the insulation.
Insulation methods
Methods for insulating a wooden house directly depend on the materials used for this. In modern construction, several types are used:
- Slabs made of mineral basalt wool are used most often. This material does not burn, is environmentally friendly, its use provides excellent heat and sound insulation. Low mechanical strength requires the construction of an enclosing structure, and high hygroscopicity requires covering mineral wool with special vapor barrier films.
- Expanded polystyrene boards (foam plastic). also found application in internal insulation. Their use is not recommended, as they can release substances containing styrene into the air. When burned, pressless polystyrene foam releases deadly substances: hydrogen cyanide and toluene diisocyanate. Therefore, you can only use extruded polystyrene foam, flammability class - G1. Insulation with polystyrene foam also requires a building envelope.
- Glass wool is a widely used insulation material. It has a lower price than basalt wool, but also has greater thermal conductivity. To insulate interior spaces with glass wool, only material specially designed for this purpose should be used, which should additionally be covered with films. Small particles of glass wool are very harmful to health, so installation is carried out only with skin and respiratory protection. Requires enclosing structures.
- Isoplat is a modern insulation material that consists of a layer of pressed flax fiber and fibreboard with a thickness of 12 to 25 mm. High mechanical strength makes it possible not to make powerful enclosing structures, and the environmental friendliness of this material allows it to be used indoors. The thermal conductivity indicators of Isoplat are worse, and the price is significantly higher than that of other insulation materials.
- Insulation with polyurethane foam. sprayed onto the surface - a modern excellent method that requires special equipment. Enclosing structures are needed for such insulation.
In this video you can see how a wooden house is insulated from the inside with polyurethane foam.
Video description
For some thoughts on the use of polystyrene foam and expanded polystyrene, see the video:
In particular, there are many complaints about the release of toxins during combustion, plus it is believed that foam plastic evaporates harmful substances into the air even at normal temperatures.
The material does not allow steam to pass through well, and in a room without good ventilation, moisture will constantly accumulate.
The advantages of the material include relatively easy installation, which means that workers will not be required to have high qualifications, and the cost of the work will be lower.
Polystyrene foam is available in slabs of various sizes and thicknesses Source on-woman.com
Stages of foam installation work:
- A lathing is installed on the pre-prepared surface with a pitch of planks equal to the size of the foam boards. Installation begins with load-bearing walls.
- Foam plastic is laid between the bars while maintaining a ventilation gap.
- A membrane film is fixed on top of the insulation . If it is possible to use other materials for other insulators, a special film with membranes is chosen for foam plastic. It will allow you to maintain a normal microclimate in the room.
- The installation of insulation is completed with finishing work .
Insulation technology from the inside with mineral wool
In order to fix soft mineral wool on the wall, you will need to build a frame. In addition to insulation you will need:
- Wooden bars for the frame.
- Thin wooden strip.
- Vapor barrier (polyethylene or glassine).
- Finishing materials, depending on desire: OSB, plasterboard, fiberboard, PVC panels, etc.
Preparatory work
The preparatory stage includes a thermal engineering calculation, which will help select the thickness of the material for a certain wall that can retain heat inside the room.
The area of the insulated surface is calculated and the required amount of material is purchased (for convenience, you can draw a diagram of the house, on which you can plot the dimensions of all the walls and subtract the area of windows and doors from them).
The wall must be cleaned of traces of previous finishing. Wallpaper, plaster, plaster, etc. are removed.
All defects and irregularities are puttied. If the work is carried out on a base log wall, then all the cracks will be caulked. The vertical is checked.
The walls are treated with an antiseptic and dried.
Instructions
- A waterproofing film is attached to the wall. It should be well stretched so that there is a small space between it and the wall. The film joints must overlap by more than 10 cm.
- The frame is assembled from boards or bars (placed vertically). The width between the joists is slightly less than the width of the mineral wool.
- The insulation is inserted, the roll should be tightly inserted into the spaces between the joists.
- Another layer of film is placed on top of the lags. Additionally, it is pressed against the insulation using slats. Let the film be a little longer and partially extend onto the floor and ceiling.
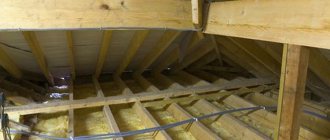
Soft rolled mineral wool is more suitable for floors and ceilings, but for the wall it is better to use mineral slabs - a denser insulation material.
Approximate costs
Calculation of the cost of work on external hydro- and vapor barrier using the example of a residential building as part of a ventilated facade.
Initial data:
- residential building 10x10 m, one-story;
- building perimeter, 40 m;
- wall height, 300 cm;
- insulation - mineral wool, 10 cm;
- insulation density, 30 kg/m3;
- cost of insulation, 1500 rub./m3;
- cost of dowel “fungus”, 4 rubles;
- window area, 3.6 m2;
- door area, 2 m2;
- total insulation area, 114.2 m2;
- lumber consumption for sheathing, 1.2 m3;
- membrane consumption, 115 m2;
- construction tape consumption, 265 m;
- total weight of insulation, 343 kg.
Cost of work
| № | Name of expense item | Quantity | ISOSPAN price of work per m2, rub./total | Ondutis price of work per m2, rub./total | JUTA SP-1 price of work per m2, rub./total |
| 1 | Installation of step lathing, m2 | 115 | 200/23000 | 200/23000 | 200/23000 |
| 2 | Installation of insulation, m2 | 115 | 380/43815 | 380/43815 | 380/43815 |
| 3 | Installation of hydro-vapor barrier film and counter-batten, m2 | 115 | 120/13800 | 145/16675 | 150/17250 |
| 4 | Ventilation gap installation, m2 | 115 | 150/17250 | 150/17250 | 150/17250 |
| 5 | Cladding with clapboard, m2 | 115 | 300/34500 | 300/34500 | 300/34500 |
| Work, rub. | 132365 | 135240 | 135815 |
When and why do you need internal wall insulation?
It often happens that, for a number of reasons independent of a person, it is impossible to carry out facade insulation with your own hands. For example, if the apartment is located on the upper floors of a high-rise building. Therefore, in such a situation, installing mineral wool inside and outside the rooms is the only correct solution. The same applies to other situations:
- in private or public buildings, facades that are decorated with stucco elements or expensive cladding made of natural stone, the replacement of which is not planned in the near future;
- buildings that are of architectural value;
- premises bordering elevator shafts;
- wooden buildings to preserve the aesthetic component of the house;
- if the city authorities have imposed a ban on making changes to the façade of the building;
- in emergency buildings with deformed seams or requiring major restoration repairs.
Even though a layer of internal thermal insulation steals the usable area of the room, it has a number of advantages. Work can be carried out regardless of weather conditions, without the need to additionally level the walls.
Principles of insulation
Choosing how to insulate a wooden house. actually not that big. There are only two options: indoor and outdoor. The best option from a thermotechnical point of view is the first option. External insulation does not allow the wall material to cool. As a result, the dew point is located in the outer insulating layer.
Nevertheless, sometimes it is necessary to insulate the walls inside a wooden house. There may be several reasons for performing such work:
- the desire to leave the external texture of wooden walls unchanged;
- insufficient thickness of external insulation;
- the ability to carry out work without reference to weather conditions.
Wood, as a construction material, does not like excessive waterlogging. To ensure comfortable operating conditions, it is necessary to isolate the insulation from water vapor penetrating from the living room.
Moisture that finds itself inside the structure for one reason or another should have a chance to evaporate into the environment. The vapor permeability of the wall “pie” should gradually decrease in the direction from the living space towards the outer (street) surface of the log house.