How to make formwork for a swimming pool? The formwork of the pool walls is made of boards, plywood, timber or corrugated sheets with the surface covered from the inside with film. This design does not require special skills or complex equipment. Even a beginner in this matter can cope with such a task.
The formwork for a pool is its most important part, on which the correct shape and durability of the bowl largely depends. The result of all work depends on the quality of the formwork; this determines the choice of formwork.
Types of formwork
Pool formwork can be of two types:
- Removable.
- Fixed.
Removable formwork is made of beams and laminated plywood. This formwork is made at a small height, which is just enough for the walls of the pool. The bars are driven in around the perimeter of the pool giving the required shape. Wooden boards, plywood or any available material are nailed to the beams. The main thing is that there is no leakage of the concrete mass. You can lay film on the inside. The wood can be any kind, it will still be removed after the cement dries. Using plywood, it is very convenient to construct the formwork of a round pool. It bends well and takes the required shape.
Installing removable formwork is a complex job that will take more than one day, but this technology allows you to make formwork of a complex curved shape, unlike ready-made panels.
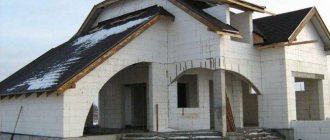
Permanent formwork is made of reinforcement, metal or polystyrene boards. The latter, in combination with reinforcement, create a very strong concrete bowl. In addition, polystyrene boards are not only a convenient material for work, but also good thermal insulation and additional protection of concrete walls from moisture. But before you start constructing the formwork, you need to do a number of mandatory works:
- Decide on a location for the future pool.
- Dig a pit.
- Make a bulk pillow.
- Proceed with the construction of the pool bottom formwork.
- Erect formwork for the pool walls.
ADVICE!
Permanent formwork will significantly reduce the time needed to build a pool and save some materials. This occurs due to the fact that the formwork does not need to be removed and it already has waterproofing functions.
Installation and dismantling of structures
When performing installation work, you need to know, first of all, that the forms must be airtight, this will prevent leakage of the concrete mixture. For this reason, it is better to use ready-made foam blocks.
They are easy to install; special holes are provided in them to remove the reinforcement. An important advantage is that the blocks will not need to be dismantled. Finishing is carried out directly on the foam using a plaster mesh.
So, building a pool on a site is a difficult, but completely solvable task. To cast a concrete bowl you will need formwork. It is best to assemble it from ready-made block forms; this will significantly reduce the labor intensity of the work. But you can build the formwork for casting the walls of the bowl yourself, using plywood and boards.
Choosing a location for a pit
If you don’t need a “pig in a poke,” then before starting excavation work, be sure to contact the geodesy service. They will conduct the necessary research, and you will not go wrong with choosing a location for your future pool. Since the nearby groundwater either did not allow filling, or would eventually destroy the concrete bowl of the pool. It is advisable to exclude the presence of green spaces near the pool, as they will be an additional source of garbage. But close proximity to sources of light and water is very necessary. For future connection to communications.
Waterproofing
Liquid coating waterproofing is applied to the plastered walls of the pool bowl. Moreover, preferably - on a fiberglass mesh with a cell of 5 * 5 mm.
If groundwater is located close, the walls need to be prepared more seriously before applying liquid waterproofing. The walls are coated with a penetrating primer with water-repellent properties OSMOSEAL. It will prevent groundwater from leaking out.
There is also a composition with increased elastic properties - UNOLASTIC. Applied in a layer of 1 mm, it can withstand cracks up to 2.5 mm. First, the surface is treated with a penetrating primer, and after drying, the elastic composition is applied with a spatula.
The outside of the pool bowl is also covered with liquid or built-up waterproofing. Or you can do both.
Before finishing, you can check the quality of waterproofing work. To do this, water is drawn into the pool and its level is marked on the wall. Leave for 12-14 days. If during this time there is no noticeable decrease in the level, the waterproofing is done efficiently.
Laying tiles is also part of the waterproofing work for a monolithic pool. Glue is used with water-repellent properties, like grout for joints. Another finishing option is the use of PVC film, welded to the size of your pool.
This concrete pool is finished with PVC film
Digging a pit
The first step is to decide on the size and shape of the future pool. If you are building it yourself, it is better to go with a rectangular or oval shape. In addition, the simpler the shape of the pool, the less costs will be spent on equipment. Since intricate shapes require more filtering equipment. Markings can be made using pegs and a stretched rope between them. The top layer of soil and subsequent layers are removed along the intended perimeter. This method is considered the most convenient. The walls are torn out along the outer slope to prevent soil shedding. The desired depth for the pool is 1.5 m, length about 5 m. The hole is dug 60 cm deeper and wider on all sides; this reserve is needed for a cushion under the bottom and a concrete base.
In addition to the pit for the bowl, a recess for the drainage system and equipment is necessary. It is certainly smaller in size than the main bowl, but deeper.
ADVICE! Follow the rule that the bottom plate is larger in area than the bottom of the pool bowl. If the bottom slab is located at a level above which groundwater rises, then drainage must be performed along its perimeter.
backfilling
If the soil is not heaving, the previously removed rock can be filled and compacted into the gap between the pool wall and the bottom of the pit. Otherwise, it is better to fill it with crushed stone. It will partially compensate for winter heaving. In general, in winter, water in outdoor pools is drained only below the level of nozzles and skimmers. Frozen ice partially compensates for the pressure from the ground. And to prevent the ice from destroying the walls, plastic eggplants are thrown into the water, which should be about half submerged (you can add a little sand). When the ice freezes, they take on most of the load. The walls remain intact.
Ready pool
Preparing a bulk cushion for the base of the pool
An insulating material in the form of a film or roofing felt is placed at the bottom of the finished pit. The second one is stronger in quality and will not tear during further work. The sheets are laid overlapping each other in two layers. Firstly, it is additional thermal insulation for the pool and protection from the impact of soil on concrete. Secondly, it will prevent the soil and bulk material from mixing. Crushed stone is poured on top and compacted. The second layer is compacted sand. Starting from the pillow, a slight slope is formed towards the drainage hole.
Plastering
First, a plaster metal mesh is fixed to the finished concrete wall. They work with a solution with waterproof qualities. You can either buy ready-made mixtures or add appropriate additives to the standard composition. They are added strictly according to the norm, since excess can only cause harm.
To plaster the walls of the pool, you can use the following composition: cement M-500 (1 part), sand (2 parts), latex additive, microfiber (according to manufacturers' standards). Microfiber will serve as reinforcement and increase the strength of the layer; the latex additive will add elasticity and make the composition water-repellent. As a result, the plaster will not have increased resistance to cracking.
After leveling the walls, you can install the embedded parts - the nozzles themselves and, to this day, the drains and backlights are installed. They are sealed with special cords, then the joints are additionally coated with sealants. To ensure greater tightness, sand or cement is poured onto the applied sealant.
After plastering, embedded parts are inserted - nozzles, drains, spotlights, etc.
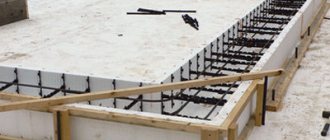
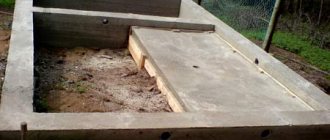
Formwork for the base of the bottom of the future pool
After preparing the cushion, formwork is needed for the foundation of the pool at the bottom. A concrete bowl reinforced with reinforcement will last longer, so you need to start with laying the reinforcement:
- Along the perimeter of the pit, rods are vertically inserted into the soil; firstly, they create the outline of the pool, and secondly, they serve as additional strength for future walls.
- Vertical reinforcement is fastened together with horizontal rods, which are fixed with strong wire. For reinforcement, metal corrugated rods with a diameter of 10-20 mm are used.
- The width of the slab should be 20 cm. Accordingly, the reinforcement in the concrete should be 10 cm apart from each other. This distance is created using brick halves, on which metal rods are laid. The bricks are laid along the entire perimeter of the bottom with a distance of 20 cm from each other. Visually, the picture should resemble a grid on the bottom and walls. The rods are secured with wire.
- The bottom structure is filled with moisture-resistant concrete.
IMPORTANT! When constructing a frame, it is very important not to use welding in those places where the reinforcement intersects and is tied together. Because the welding process can disrupt the structure of the metal, burning off carbon, and this is the first reason for the appearance of “rust”. It is best to use steel wire with a diameter of up to 3 mm. or plastic clips.
Materials used
If everything is very clear with the materials for formwork, we suggest you figure out what will be required.
To install the outer insulating layer, we prepare a waterproofing roll material. In addition, the frame base is created from steel reinforcing bars, the cross-section of which and the placement spacing are determined by design calculations. As a rule, the diameter of the reinforcement is ten millimeters.
When constructing the frame, welding is not used so that the structure of the steel material is not disturbed, which will definitely lead to the formation of corrosion.
To avoid this, the frame is mounted using a knitting wire with a diameter of up to three millimeters. It will be necessary to stock up on clamps made of plastic material that protect the reinforcing bars from exposure to a humid environment.
To further protect the fittings from rust, they are treated with special protective compounds before installation. This measure will give the entire structure additional reliability and extend the operational period of the pool. It is recommended to treat the metal with polymer paints or mastics.
Formwork for pool bowl walls
After the concrete base has dried, construction of the formwork for the pool bowl begins. Roofing material is laid on the soil, as well as on the bottom. For external protection of future concrete walls. To do this, formwork is constructed from beams and durable waterproof chipboard or plywood. In addition, in the center of the wooden formwork you should have the reinforcement that you erected while pouring the bottom. Support beams are installed between the walls. They will prevent the structure from collapsing, since concrete creates strong pressure. If the installation of the pool formwork is ready, then cement-sand mortar is poured into it. To prevent voids from forming in the cement, it is necessary to pierce it with a piece of reinforcement and perform mixing movements. This will allow the solution to better fill the mold.
ADVICE! The structure dries for about a month, and in extreme heat it is watered to prevent cracking of the concrete.
Another wonderful material for constructing formwork is polystyrene boards. It is easier and more convenient to work with them. They are light in weight and take the required shape. They are placed parallel to each other, creating a void. Otherwise, the operating technology is the same as described above.
Recommendations
Construction of a concrete pool is a rather lengthy and labor-intensive process, so the start of work, as a rule, is planned for the month of March, as soon as the snow melts and it is possible to start digging a pit. In this case, it will be possible to build a bowl, line it and equip the reservoir with the necessary control devices around the beginning of summer. It will be necessary to lay water supply and electrical communications in advance, and lay pipes for draining water from the pool.
It is imperative to consider a water purification system for the time the owners are away from the dacha. Traditionally, the mirror is covered with a specialized plastic film; sometimes a protective grille with reflective marks is installed on top of the bowl. This will help the guests of the dacha not to fall into the pool at night.
When should you choose it?
A concrete platform should be chosen in the following cases:
- The site is located in a swampy area.
- It is planned to install a large-volume frame pool - from 10 thousand liters.
- The site has loose soil and excessive seasonal soil heaving.
- The pool has a height of 80 cm (on a soft sandy area the walls may become deformed).
If the frame structure is supplied with a ladder, its legs will sink into soft ground, which will damage the bottom of the bowl. With concrete this problem is eliminated.
Briefly about the main thing
A concrete pool is a rather complex structure for a private plot, so a technical design is developed for it, which is then approved and registered with the BTI. Construction includes several stages, from digging a pit to cladding and arrangement of the surrounding area.
Correct execution of each stage will ensure the durability and integrity of the structure. Particular attention is paid to laying the bottom and pouring the walls of the bowl; it is important to use high-quality, frost-resistant and impenetrable concrete. High-quality waterproofing and finishing will make the operation of the structure trouble-free.
Ratings 0
About the technical project
Once the location has been chosen, the development of the technical design can begin. Construction work will be carried out according to this document, so all the nuances are spelled out in it:
- Construction technology, calculation of strength and durability.
- Pool parameters, including bowl shape, size and depth. Drawings are developed and dimensions are set.
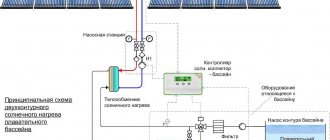
- The configuration of utilities is selected. You need to think about how to fill the bowl and drain the water, and where to place the cleaning filters. You may need a heating or lighting system.
Stages of building a pool and some tips, subtleties and nuances
- Preparatory work - pool design, includes development of the structure and drainage system, determination of location, hydrostatic calculations.
- Excavation work, digging a pit.
- Bottom construction - adding a cushion, laying waterproofing material and reinforcing the bottom slab.
- Installation of formwork for a swimming pool.
- Concreting, placement of other elements.
- Plastering and finishing works.
- Leveling the bottom and walls, carrying out finishing work.
Of great importance is the creation of the pool bottom, drainage system and the correct composition of the concrete solution. The bottom of the pool has a complex multi-layer structure. You can buy concrete mortar or prepare it yourself. To fill the bowl, it is better to use special hydraulic concrete. Pouring concrete mortar is similar to monolithic construction techniques. If the project creates an oval pool, then it is recommended to buy reinforcement in coils (less than 10 millimeters in diameter). It can be cut into pieces of the required length.