Home » Building a house
We are building a house
Alexander Korovaev 05/12/2020
983 Views
SavingSavedRemoved 0
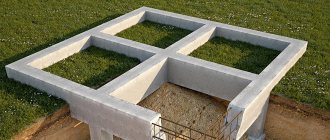
A properly made foundation of a building is the key to its long-term operation. The key to a good foundation for a building is formwork. For a country house or cottage, you can make the formwork for the foundation with your own hands.
Purpose of formwork
The design is designed to prevent liquid material from spreading. Due to the limited space, concrete maintains its given geometry and position in space, dries evenly and acquires the required strength.
Basic requirements for formwork for strip foundations:
- high strength, resistance to the pressure of the liquid mixture inside a given volume and external influences;
- stability of the dimensions of the internal space (the geometry of future base elements);
- the possibility of unhindered pouring of the liquid mixture into the mold, reinforcing the monolithic foundation.
Technical requirements for formwork are collected in GOST 52085-2003, but they relate to industrially used auxiliary structures. For self-installation of formwork, only basic conditions must be met.
Permissible deviations
The hardened mass can be processed for roughness, insulated, covered with waterproofing, but it will no longer be possible to eliminate geometric deviations (especially towards a smaller thickness). A mismatch along the axes of load-bearing walls can stop all construction or require new fundamental design solutions.
SNiPs establish permissible deviations for formwork:
The frame, assembled from any number of parts (a solid plane of plywood or a set of boards 0.1 m wide), of different heights and lengths of a straight section, is equipped with a sufficient number of stops; if necessary, metal squares are placed on the corners.
Features of different types of structures
There are removable - removed after hardening - and permanent formwork.
Removable formwork for foundation
This name refers to auxiliary structures that are removed after the concrete mixture has gained partial strength. Removable elements consist of panels (solid or plank) and fastening and fixing elements connecting them. If reinforcement is provided (almost always for strip bases), supplies and spacers are added to the standard set to prevent contact of the reinforcement grids with the soil and the inner surface of the pouring forms.
Important: the removal of the formwork occurs before the final curing of the concrete, therefore, when carrying out further work, you should focus on the “maturation” time frame of the foundation, depending on the grade of concrete, weather conditions and the dimensions of the structural elements.
Permanent formwork
Fixed forms are considered to be pouring molds that remain in the building structure after the mixture has cured. This type of structure provides additional strength to the building, its heat, sound and waterproofing properties, and other characteristics. Typically, special blocks made of polystyrene foam, fiberboard and other materials are used as material for permanent structures.
Important: constructing a house using permanent forms significantly speeds up construction, improves the operational characteristics of the building, but at the same time increases the cost of the work.
Tool
You will need regular carpentry tools and some extra ones. Marking tools - marker, water level, building level, plumb line, cord. Hand tools: hammer, hacksaw, carpenter's hatchet, mallet, small sledgehammer, nail puller, crowbar (used for removing formwork), wide “priming” brush (for coating with a water-repellent composition). A small sapper blade will come in handy, but you can also use a regular bayonet blade. If you use self-tapping screws, you definitely need a good screwdriver. Having a chainsaw, electric saw, circular saw or even a jigsaw will greatly facilitate the work.
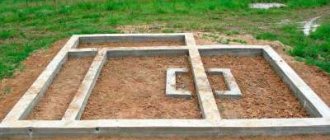
Calculation of formwork for the foundation
In this case, calculation means the calculation of the required thickness of the boards or boards of the structure, taking into account the distance between the supports, the specific gravity of the mixture being poured and the resistance ability of the mold material. The traditional, simplest formwork design consists of panels installed at the bottom of a pre-dug trench, held in a vertical position by special supports.
The choice between stakes or braces depends on the volume of the mixture being poured and the type of soil: for small foundation strips (250...400 mm) and dense soil that is not prone to shedding or sliding, stakes are sufficient. If in doubt, it is better to give preference to braces, since they are able to hold the panels in place even with increased load.
Formula for calculating the thickness of shields (minimum)
h = √((0.75×G×n×l^2)÷T)
Here
- G is the load of the liquid mixture on the formwork, it is assumed to be maximum and is defined as the product of the specific weight of concrete and the thickness of the poured layer G = qx H. The specific gravity is q = 2500 kg/m3, H is the height of the foundation strip in meters;
- n is the compaction coefficient of the concrete mixture. If vibration compaction is not used, the coefficient is equal to one;
- l – distance between shield supports, in meters;
- T – load resistance of the board material; for wood it is assumed to be 8 x 10⁵ kg/sq.m.
Taking into account the difficulty of independently determining the grade of concrete, respectively, its density, as well as the lack of accurate data on the resistance of the material of formwork panels, calculations are carried out approximately, for average values. Typically, the thickness of the board is taken to be 25 mm.
The second part of the calculation is determining the required number of boards of a given thickness and the number of fasteners. For these calculations, it is necessary to know the length of the foundation strip and the height of the fill. The length of the tape is multiplied by two, since the shields are located on both sides. When installing a strip foundation with a step, the calculation is carried out twice - for the first and second stages of pouring. The amount of lumber is determined based on the data on which board for the foundation formwork will be used (dimensions).
Drawing up a plan similar to that shown in the illustration will help you navigate a more accurate calculation of the required length of the form, the number of connecting and supporting parts.
Filling in layers
It is important to calculate this process according to plan. If the foundation depth is 1.5 meters, it is enough to divide the pouring into three stages of 50 cm each
Follow these instructions:
- knit reinforcement for the entire volume of the formwork;
- pour concrete along the height;
Pouring the foundation in layers
- after 7 hours, remove the top layer of cement laitance on the surface. It should be removed, since when it hardens, this layer becomes very fragile. After removal, the surface will become rough, which will increase adhesion to the next layer;
- after three days, raise the structure and place it at a higher level. Leave the pipes in concrete;
- Refill the exposed formwork.
Do-it-yourself formwork for a strip foundation
In order to correctly form the base of the building, it is necessary to correctly install the base for pouring. We will analyze two design options, based on removable wooden and permanent foam formwork.
Regardless of what type of form is used, part of the work performed is carried out according to a single scheme.
- Site marking. It is done using stretched cords or fishing line (in the illustration “cast-off strings”) according to the building construction plan.
- Digging a trench. In this case, it is necessary to dig out a ditch according to the depth of the future foundation, taking into account the cushion under the foundation and the depth of soil freezing (you can read in more detail about the principles of constructing a foundation and preparing a place for it in the article). Since creating strictly vertical walls is practically impossible, they try to create a slope with a minimum slope, about 15...30 degrees to the vertical.
- Compaction of soil at the bottom and walls of the ditch. Tamping is done manually or using special mechanisms. This process is especially important for loose soils. Tamping can be replaced by the use of geotextiles - a special material that prevents soil shedding.
- Creating a foundation cushion. For it, sand of large (1...3 mm) fractions, fine crushed stone or granots, pre-washed and dried, is used. To enhance the load-bearing capacity of the base, the cushion is poured with a liquid cement mixture; in especially critical cases, concreting is performed.
- The formwork is being installed. Slots and gaps between structural elements should not exceed 2 mm, the strength of the structure should correspond to the required one, taking into account the thickness of the poured layer.
- The fittings are being installed. The installation of rod systems and meshes is planned with the obligatory preservation of the protective layer of concrete from the metal to the external environment. You can read more about the rules for tying reinforcement and its protection against corrosion in the feature article.
- Pouring concrete mixture.
- Vibration compaction (if possible).
Depending on what type of forms is used, the nuances of the technological process of installing the formwork and, in the removable version, its removal change.
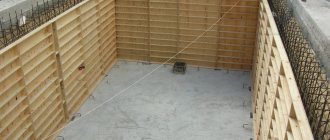
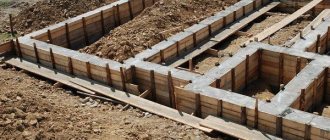
Installation of formwork from boards or plywood
Due to the successful combination of load characteristics and price, edged boards for foundation formwork are the most popular and popular option. The wood used is water-resistant species (pine, alder, birch) with an initial moisture content of 18...25%. Boards made from boards are assembled using bars on nails or self-tapping screws. In this case, the points of the fasteners should extend to the outer (facing the ground) side of the boards.
The knocked down panels are installed on the prepared cushion, reinforced with braces or stakes with a pitch of 800...1000 mm. To prevent the structure from spreading under the weight of the poured mixture, the opposite panels are connected by spacers.
As an option, first a box is mounted on the base of shields and cross braces, after which the finished structure is laid in a trench and fixed with stakes.
Important: there should be no gaps between the boards! Otherwise, the solution will begin to flow into the gaps, and the consumption of concrete will noticeably increase. Possible formation of voids inside the poured form, violation of the strength calculations of the foundation.
Proper formwork can easily withstand the pouring of concrete mixture and is easily separated from the hardened base after initial curing. The period for stripping (removing formwork), depending on temperature and humidity conditions, is 8…20 days. At subzero temperatures, it is undesirable to disassemble the form-building structure, since the time it takes for concrete to gain design strength slows down in proportion to the decrease in temperature.
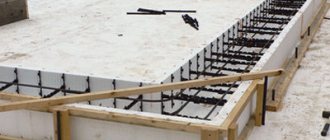
How to assemble formwork for a foundation from foam blocks or panels
Industrially produced foam blocks or panels are manufactured with their own tongue-and-groove fastening system. Thanks to this, connecting the elements of the future form is not difficult:
- the first row is laid according to the markings so that the line is perfectly straight;
- the second and subsequent rows are mounted taking into account the location of the reinforcing bars - they must pass strictly through the cavities in the blocks. For panel options, displacement is allowed;
- concrete is poured only by hand, after installing every three to four rows of foam blocks.
Important: low-quality (crumbling, irregularly shaped) blocks are only suitable for low-impact buildings with low loads.
If you want to create permanent formwork with your own hands, you should choose the option with a two-layer structure. The outer layer is a sheet material that defines the geometry (as is the case with removable formwork), the inner layer is sheets of foam plastic or expanded polystyrene. Concrete is poured into the cavity between the internal heat-insulating layers, which are not subsequently removed. The outer layer is dismantled after the mixture has cured.
Conclusions and useful video on the topic
Making wooden formwork with your own hands for a strip foundation with reinforcement with fiberglass reinforcement with a diameter of 8 mm. How to level formwork using a water level. Strengthening the formwork with braces to give additional rigidity to the structure:
Installation of reusable formwork using various materials. The master class was carried out by professional builders:
Calculation of materials for formwork with your own hands. The video presents detailed calculations for the construction of various formwork systems and specialist recommendations:
The period of operation of the building directly depends on the strength of the concrete foundation. By following the sequence of actions when constructing the formwork, you will be able to avoid a number of mistakes that can cause premature destruction of the foundation. Properly installed formwork will give the foundation the desired shape and will not allow it to sag or deform in the future.
Perhaps you have experience in constructing foundation formwork yourself, please share it with our readers. Tell us if there were any difficulties during construction and how you managed to overcome them. Leave your comments in the contact form.
Nuances of formwork installation for different types of foundations
In low-rise private construction, a strip base is the most common option. However, he is not the only one. Slab and columnar foundations are also used.
Formwork for columnar foundations
In this case, in addition to the general trench, deep holes are dug for columnar supports. They are located along the perimeter of the future building so that there is a support at each corner or intersection of the walls.
The formwork itself is also made from boards, plywood or other sheet materials using the technology described above. The difference is the arrangement of the limiting elements in the form of a vertically located tetrahedral prism (a column of rectangular or square cross-section) or a cylinder. Filling is done from above. Reinforcement of a columnar foundation is carried out separately for each support, followed by piping.
In this case, the column has either the same cross-section throughout its entire height, or an enlarged lower step.
It is mandatory to place a cushion under the foundation supports; the lower step can be poured into the ground without formwork, but at the same time reinforced. Formwork is installed for the upper part of the support, and the reinforcement of the upper and lower parts is tied together. Supports that are simple in shape and have a limited load can be concreted without reinforcement.
If it is planned to install a monolithic grillage on top of a columnar foundation, the formwork for it is carried out separately, in the form of a box.
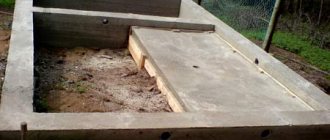
Formwork for foundation slab
The main difference between this type of limiter is its one-sided arrangement: the shields outline the shape of the future slab along the outer sides.
Important: when installing this type of formwork, you should be more careful when calculating the strength of the structure, since the load on the panel stops increases in proportion to the size of the slab.
Foam blocks are not used as permanent formwork for slab foundations. If it is necessary to make the limiters non-removable and at the same time use them to insulate the base, use flat sheets of foam or polystyrene.
Preparatory work
Initially, the area where the foundation will be poured must be cleared of trees and pieces. Then you need to uproot the stumps and roots remaining in the ground, and then remove the top fertile layer of soil.
Marking
To mark the boundaries of the base, it is best to resort to the use of pegs, between which a cord or strong thread should then be pulled. They need to be driven into the ground at the corners of each of the walls that will be erected in the future.
It is between them that you need to pull the thread in a strictly horizontal position using a building level to avoid any unevenness.
Note! The width of the formwork ditch should be 10 cm greater than the width of the foundation being poured.
Digging a trench
Its depth should be at least 50 cm, and preferably more. The bottom of the trench must be level and horizontal. During the work, it is also necessary to resort to the use of a building level or a marking cord.
Important! The soil dug out from the trench can be placed inside along the perimeter of the base or used to level the garden plot.
Arrangement of the pillow
A sand layer should be laid at the bottom of the trench, which will protect the foundation from groundwater and freezing, and will also provide the opportunity to evenly distribute the load on the soil.
Each sand coating should be 10 cm thick and must be moistened with water. It is required to lay at least 3 such sand layers.
A geotextile fabric should be laid on the sand covering, and fine crushed stone should be poured on top of it. The thickness of the layer should reach 10-15 cm. The crushed stone coating must be well compacted and leveled.
What can it be made from?
It is easier for a builder to use ready-made collapsible formwork, but it is much cheaper to make it yourself from scrap materials. Racks can be made of the following materials:
- Tree. The most affordable option for self-construction. Wooden panels have such advantages as aesthetics and reliability. They are well processed and fastened using ordinary tools.
- Metal. Sheets made of carbide metal are characterized by strength, help to achieve an equal concrete surface and further strengthen the foundation.
- Plastic. Panels made of polypropylene are used as collapsible formwork elements. This material is lightweight and easy to use.
- Available materials. You can use slate or corrugated sheets that were left over from previous construction projects. But it will be difficult for the worker to achieve accurate geometry and there remains a risk of the solution leaking through the cracks.
For non-removable you can use:
- metal;
- reinforced concrete blocks;
- plywood;
- wood concrete;
- DSP;
- profiled sheet;
- expanded polystyrene;
- glass magnesite.
Which board should I use?
Experts recommend using cheap boards as the main material for formwork for work without the involvement of a construction team. This is an affordable building material that is not difficult to work with without having special equipment at hand.
However, the builder needs to take into account the requirements for wooden panels:
- the type of wood is selected taking into account the humidity, which should be at least 22% (for example, conifers);
- recommended board sizes: width – 15 cm, thickness – from 4 to 5 cm;
- the permissible size of the cracks is up to 2 mm (it is permissible to moisten the boards before pouring to swell and reduce the cracks);
- the wood surface must be free of any defects (knots, breaks);
- At least one side of the board should be smooth and have clean edges.
Compliance of the characteristics of the source material with the given recommendations guarantees that the boards will be able to withstand at least 15 pouring cycles if the technology is followed. Collapsible formwork elements made of chipboard, fiberboard and plywood can be used up to 30 times.
Which board is best to use?
To assemble the formwork, the most common material is usually used - edged pine boards. It is recommended to plan the working surface of the boards, but this is not always possible, so most often the panels are assembled from unplaned boards.
An important issue is the degree of moisture content of the lumber. In this case, the use of a dry board is not necessary, and sometimes even undesirable. The formwork holds a mass of wet concrete for a long time, which is periodically watered with water all this time.
Dry lumber begins to actively absorb moisture, swells and increases in size, causing individual boards to be squeezed out of the plane of the board.
The thickness of the boards used to assemble the boards ranges from 25-40 mm. The higher and wider the tape, the thicker the boards must be to withstand the loads during pouring and the pressure of liquid concrete on the walls.