of budget is very interesting and in demand , because you still want to do it well and efficiently, even if you don’t have much money. Let's try to explore the possibilities of this approach. One of the simplest and most affordable options is a bathhouse made of boards on a frame with insulation, lined inside with clapboard or other boards. And there are three ways to connect the boards together. All of them are discussed below.
Readers interested in the topic of high-budget construction and improvement should pay attention to bathhouses made of kelo and cedar, as well as impregnated wood and wood species such as abash.
Do-it-yourself bathhouse made of boards at the dacha: simple and cheap building options.
A do-it-yourself bathhouse made from boards in the country is an affordable and labor-intensive project, an alternative to expensive large log buildings, which many simply do not need.
The plank structure is so named because of its appearance, because its construction is not made from timber or round timber.
At the heart of a bathhouse made of boards there is always a frame that ties the structure together and rests on the foundation.
The smaller such a structure, the cheaper it is to build. For a summer bath, it is enough to line the frame with clapboard from the inside; for year-round use, insulation and steam and waterproofing are installed in the walls.
With a limited budget, not only unedged boards, but even slabs and obapol can be used for cladding.
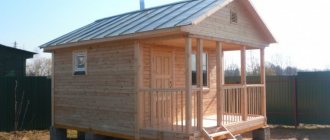
Frame baths made of boards do not shrink and can be made in a wide variety of sizes and layouts.
Another advantage is the speed of construction: with an assistant, you can erect such a structure in a month or two and enjoy the hot steam.
Creating a wooden base
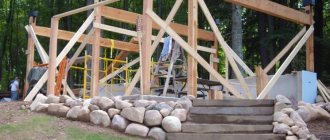
Self-construction of a small frame bathhouse, as a rule, does not require the construction of a foundation due to its lightness. But to prevent the walls from becoming damp, you need to make a foundation.
In the case where you plan to build a bathhouse no larger than 3x4 meters in size, and the walls and roof are light, then it is enough to create a simple wooden foundation, which is secured along the edges with stakes. Such a foundation is considered a particularly good solution when carrying out construction on clayey, seasonally mobile soils that do not have excessive levels of moisture.
Do-it-yourself sauna made of boards - how to make it reliable and warm
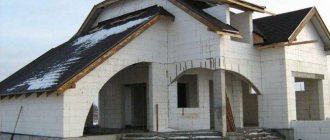
Ways to reduce the cost of building a bathhouse are relevant for many people. If it stands on a summer cottage and is used only in the summer, there is no point in erecting a permanent structure - a summer bathhouse made of boards will fully cope with its functions.
If it is well insulated, it can be used at any time of the year. At the same time, it will cost less than a structure made of timber, logs, bricks and other expensive materials.
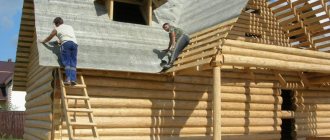
A frame sauna can be as warm as a log sauna
And not only due to the lower cost of the materials themselves, but also due to the work. In addition, you can build such a bathhouse yourself, with only one assistant and the necessary tools.
Advantages and disadvantages of frame baths
Any material and, accordingly, a building constructed from it, has certain pros and cons. Boards and timber, from which frame baths are mainly built, are a natural material that has such disadvantages as susceptibility to rotting, deformation, cracking, infestation by bugs, etc.
But, unlike bathhouses made of logs or timber, frame structures do not shrink, which is their great advantage: you do not need to wait several months to finish and put the bathhouse into operation.
Another big plus is that for a light-weight bathhouse made of boards, you don’t have to make a strip foundation; a columnar one is enough. This is also a good way to save money, and in the end the price of the bath is lower.
How to build a bathhouse from boards
When constructing buildings using frame technology, not only boards can be used, but also materials such as plywood or OSB (oriented strand board). The basic principles of construction depend on their choice.
But in addition to the sheathing, you will need materials for steam, hydro and thermal insulation. How to choose them?
Frame wall arrangement diagram
Selection of materials
- For the frame, you can take well-dried timber or boards with a cross-section of at least 50x100 mm.
- For external cladding - coniferous boards (pine, larch).
- For internal cladding - wood with low thermal conductivity (linden, aspen).
- When heated, the vapor barrier should not emit harmful substances or odors, so traditional roofing felt and roofing felt cannot be used. Stop your choice on modern vapor barrier films.
Advice. Foil films are the most effective. They not only prevent steam from passing under the skin, but also reflect back warm air.
- Thermal insulation is the main material that ensures the preservation of heat in a heated bath, but does not interfere with air exchange in it. It is recommended to use moisture-resistant insulation - stone (basalt) wool. Unlike many other materials, it does not burn and does not emit harmful substances when heated.
Basalt wool can be in rolls or sheets
If you decide to learn how to build a bathhouse with your own hands from boards, then keep in mind that the difference from construction from other materials lies only in the design of the walls. Although, as mentioned above, the foundation can also be lightweight - columnar.
Base trim
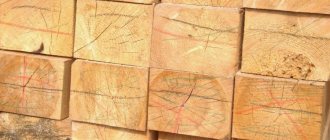
Installation of the bathhouse begins with the installation of a rigid base frame - the base for the frame. For it, use 15x15 cm timber or boards with a cross section of 50x100 (150) mm laid on edge in 2-3 rows. Before installation, they must be impregnated with antiseptic solutions.
Advice. If you use boards rather than timber, it will be easier for you to connect them in the corners and make grooves in the trim for installing the vertical posts of the frame.
Trimming of three rows of boards
The photo shows the herringbone end connection and sawn grooves. When working with timber, installing these elements will require more labor, experience and special tools (jigsaw, chainsaw).
After assembling the strapping, it is laid on the foundation support columns with gaskets made of roofing felt or roofing felt and leveled horizontally. If necessary, the level is raised using wooden pads or the required number of layers of roofing felt. The corners of the harness should rest on the posts, so do not make mistakes with the dimensions when making it.
Racks and top trim
After mounting and fastening the lower trim and making grooves in it, the racks are installed. The step between their axes is usually 60 cm; subsequently, it will be convenient to lay sheets of insulation for a bathhouse of the same width in these cells.
It is necessary to determine in advance the location and size of window and door openings in order to first install the framing and corner posts, then it will be easier to calculate the position of the intermediate ones.
Note. Vertical racks must also be installed in places where internal partitions adjoin the main walls.
To prevent the already mounted racks from falling while the others are being installed, they are additionally attached to the bottom trim with temporary jibs, while simultaneously checking the verticality.
At the upper ends of the racks, they are fastened together with a top strap, which is made from a fifty-fifty board laid flat.
Despite the apparent simplicity, the described work should be done very carefully in order to obtain right angles and maintain the vertical and horizontal level of the corresponding structural elements.
Insulation and sheathing
The instructions for the construction of frame baths require the following sequence to be followed when installing an insulating pie:
- First, the outer cladding of the frame is done with boards. To give the structure rigidity, it is made in the horizontal direction. But the boards dry out over time and gaps may appear between them, so they should not be fastened end-to-end, and it is recommended to lay a layer of bathhouse waterproofing under the skin.
External cladding option - overlapping
- The next stage is installation of insulation. It fits between vertical posts and does not require additional fastening, since the clean distance between them is slightly less than the width of the insulation, so it fits tightly in the cells.
- The vapor barrier is installed on top of the insulation, close to it. For fastening, thin slats and a construction stapler with staples are used. The canvases are overlapped and must be taped with a special tape. It is necessary to seal all random holes with it, since the vapor barrier layer must be continuous.
Attach vapor barrier from bottom to top
Attention! The vapor barrier film should protrude 10-15 cm below the junction of the wall and the floor so that condensation flows down it without falling on the wooden elements.
- The internal lining is made vertically from wooden lining. There should be a ventilation gap between it and the vapor barrier layer.
The ceiling is installed in the same way, but to reduce heat loss, insulation is laid on it in two layers.
Conclusion
In this article, you only learned about the construction of bathhouse walls built from boards. If you need complete information describing all stages of construction, watch the video in this article.
Construction of the truss structure
The main conditions for the comfort of any bath are:
- Walls, floor and ceiling well protected from heat loss.
- Reliable insulation of structures from water and steam.
- Compact, quick heating oven.
- Effective sewerage and ventilation.
Typically, boards with a section of 15x5 centimeters are used for floor beams and rafters in frame baths. They are placed on the edge and fastened together. As a result, a distance of 10x12 centimeters is obtained between the rafters. In a vertical position they are fixed with “kerchiefs”, and on top they are combined with a ridge beam of a similar section.
The beams extend outward approximately 40 centimeters. The sheathing is made from boards 25 cm thick, it is laid in the direction from the ridge.
To fasten the rafter forms, special metal plates are used. It is much easier to assemble such a structure on the ground next to the building, and then lift it up and install it there ready-made.
Technology for building a bathhouse from boards with your own hands
Today, there are plenty of technologies that allow you to save on expensive building materials and at the same time profitably build any structure with maximum useful functions and comfort. One of them, the most popular and also relevant, is a do-it-yourself bathhouse made from boards. It is very cost-effective to install such a frame bathhouse on your suburban area in terms of its easy and quick installation of the foundation, walls, and roof.
Another name for a summer bathhouse made from boards, made with your own hands, is a summer cottage. Since initially it is possible, for example, when a summer cottage is just being built up, to temporarily mount a small frame made of boards, cover it with unedged elements in the form of a house (shed) and store gardening tools and other tools in it. When all the dacha buildings are completed, the necessary communications are made to the building (shed) made of boards and it is used in the future as a full-fledged shower room, bathhouse, etc.
How to build a bathhouse from boards with your own hands? In fact, such a building will cost much less than its counterparts, assembled from solid beams, logs, bricks and other expensive building materials.
Nuances of constructing a frame summer bath
It is quite possible and convenient to install a frame-type wooden bathhouse with your own hands, which will be used only during the summer spring-autumn season. In addition, a competently and correctly assembled summer bathhouse made of boards with your own hands fulfills its intended purpose with the same success as a winter (insulated) building. If you subsequently invest a little more into it and thoroughly insulate the load-bearing structures, then the temporary flight structure made of boards can then be fully heated during the cold season.
So, in order for a do-it-yourself bathhouse from boards to be built competently and in compliance with all the nuances of construction using frame technology, it is necessary:
- When selecting materials, purchase high-quality dried boards with a section of 5x10 cm or timber. At the same time, it is advisable to choose coniferous boards (for example, larch or pine) for the internal cladding, and linden or aspen for the external cladding, that is, wood with low thermal conductivity.
- Lay a vapor barrier using modern moisture-proof films (for example, foil), that is, the material should not subsequently release harmful substances and odors when the temperature inside the room increases.
- When carrying out thermal insulation work, use waterproof insulation. For example, basalt rolled wool, because Unlike other thermal insulation materials, it does not emit substances hazardous to human health when heated, and also does not burn.
In addition, before you start building a summer bathhouse on your country plot, in addition to the appropriate project, you need to choose a place for it where it will aesthetically combine with the appearance of other buildings and at the same time fully function.
The main stages of building a bathhouse from boards with your own hands:
- A pile foundation is being erected.
- The basement trim, that is, the floor in the bathhouse, is accordingly made from boards with your own hands, using the herringbone technology (in the end connection), and is also treated with antiseptic solutions.
- Walls (top frame) and other ceilings (windows, doors and interior walls) are similarly laid out using frame technology, that is, they are knocked together according to the intended design and covered with protective agents.
- Facing and other works on steam, hydro and thermal insulation are being carried out.
- Upon completion of construction, a standard roof is installed using a lightweight structure, which is made of the same boards as the bathhouse itself, laid with slings, and then, after insulation work, covered with roofing material, for example, corrugated sheeting.
Advantages and disadvantages of a summer bath
Like any building assembled with your own hands, a summer bathhouse made of boards also has its positive and negative aspects. For example, when constructing a bathhouse using the frame method, not only unedged boards can be used, but also plywood sheets, OSB and other particle boards. Depending on the selected materials, the basic principles of its construction also change.
An important advantage of a summer bathhouse made of boards is that there is no need to wait for the structure to shrink.
In the case of constructing a bathhouse from timber or logs, it will take some time (up to 10-12 months) for the building to give the natural (normative) shrinkage required for it, i.e. otherwise - elementary shrinkage of natural wood. Thus, finishing and commissioning of the bathhouse will happen much faster and with the same efficiency.
Another positive aspect of a frame bath is the lightness of the entire structure. In this regard, for such baths mounted using frame technology, it is enough to raise the columnar foundation and thereby save on price. For other baths, you will need to make a strip foundation.
A do-it-yourself bathhouse made from unedged boards has the disadvantage that without proper treatment it is susceptible to rotting (due to constant contact with water), deformation, cracking and damage to the frame material by insects - grinder bugs.
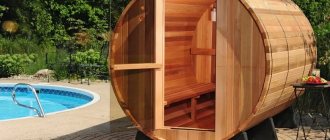
Original barrel sauna made of boards
An inexpensive barrel sauna made of boards, assembled according to a do-it-yourself project, will look original and unusual on a country plot.
It is very compact and mobile, that is, if necessary, it can be easily disassembled and moved to another place. In this case, you take an ordinary board for a barrel sauna with your own hands, simply tighten it with metal plates in accordance with the required shape.
The only drawback of the barrel bath is the difficulty of its operation in winter, since the supply of sewerage and other communications is not designed for sub-zero ambient temperatures.
Following building rules and regulations, it is quite possible to build a summer frame bathhouse without the involvement of specialists, the main thing is to put into this matter the desire and a little finance.
Walling
If we are building a frame bathhouse, after the foundation is prepared, we can begin building the walls. Before doing this, make sure that the wood is well dried. The type of wood used is not particularly important, with the exception of birch, since it will quickly rot. The main thing is that the wood has low thermal conductivity.
When choosing materials for external cladding, preference should be given to pine and larch, while aspen is best suited for interior finishing. After completion of construction, the outside of the building is covered with an antiseptic, for example, Texturol. It is necessary to monitor the quality of the work performed so that repairs to the bathhouse are not required too early.
What and how to build a simple bathhouse in the country?
Washing in a country bathhouse is a pleasure available to everyone. Its construction does not require large financial investments. In a minimal plan, such a structure is erected in a few days.
In this article we will look at the topic of how to build the simplest bathhouse in your country house quickly and inexpensively.
Let's start by studying ready-made options, and discuss the designs of walls, floors, stoves and sewers that are popular among craftsmen.
Design Features
The main conditions for the comfort of any bath are:
- Walls, floor and ceiling well protected from heat loss.
- Reliable insulation of structures from water and steam.
- Compact, quick heating oven.
- Effective sewerage and ventilation.
Examples of country baths
In photo No. 1 we see a simple bathhouse, reminiscent of Diogenes’ barrel. You can only take a steam bath in it. You won't be able to wash yourself here because there is no sewage system in the building. However, if desired, it is not difficult to do. To do this, you need to install a standard shower tray in the corner of the bathhouse and lead the drain pipe into the septic tank.
An important advantage of this design is its low weight, allowing it to be placed on a plank terrace.
The construction of the simplest bathhouse from the container category is shown in photo No. 2.
It consists of one steam room. For washing, the owner needs to attach a canopy with a summer shower or add a sewerage system to the room, and the stove - a tank for heating water.
Improvising on the theme of a barrel-shaped bath, let's turn our attention to cellular polycarbonate. You can quickly and easily assemble an original design from it. In order for it to retain heat well, you will need two large sheets of this material and a frame made of metal or wooden blocks. A mineral wool insulation 10 cm thick is laid between them.
The ends of the building can be made from boards, stuffed onto an insulated wooden frame. Place such a bathhouse anywhere: at your dacha, on a polar ice floe or on the top of Everest and you will always be comfortable in its steam room (photo No. 5).
A small Russian bathhouse, made from scraps of timber, can be installed on oak posts. We see an example of such a structure in photograph No. 6.
Larger structures require their own foundation. There are three possible options here:
- Rubble concrete tape.
- Brick columns.
- Piles made of asbestos cement pipes.
Do not forget that the type of foundation affects the choice of material and wall design. Pile and columnar foundations are used to install a wooden frame, as well as for bathhouses made of timber or logs (photos No. 7 and No. 8).
The “tape” of rubble concrete is suitable for any walls (made of gas silicate blocks, logs and frames).
A cheap, reliable and simple version of a bathhouse is obtained using a technology called “clay mortar”. For such a structure you will need little: a truck of firewood, a cart of straw and a dump truck of clay (photo No. 10).
The best shape for a wood burning structure is round. It eliminates the need to reinforce masonry corners and looks aesthetically pleasing and original.
By borrowing from birds the technology of building nests from branches and clay, you can build such a simple and warm bathhouse (photo No. 11).
Recommendations for choosing finishing, insulation, sewerage installation, flooring, roofing and stove
For the exterior finishing of a frame bath, we can recommend the following materials:
- Wooden blockhouse.
- Metal tiles or corrugated sheets.
- Plastic siding.
- Cement particle board (CSB).
- OSB board.
- Flat slate.
It is best to use ecowool as insulation. It does not accumulate moisture, does not rot and does not burn. If ecowool is not available in your region, then you can buy ordinary mineral insulation in the form of a semi-rigid slab. It is easily and simply placed in the spaces between the frame posts.
To protect mineral wool from water vapor and reduce heat loss, the walls are lined with sheets of foil polyethylene. After this, a frame of slats is attached to them and trimmed with wood: alder, linden or pine clapboard (photo No. 13).
We do not recommend installing OSB board indoors. This material releases toxic gases when exposed to high temperatures.
Options for steam and thermal insulation of walls of a frame structure, as well as a bathhouse built from blocks or logs, are presented in Figure No. 1.
Building a simple bathhouse with your own hands includes sewerage. It can be made from standard plastic pipes led into a cesspool or drainage well.
The water intake funnel is placed in the center or in the corner of the room, and the floor is made in the form of expanded clay concrete screed with a slope towards the drain. Before concreting, you need to compact the soil and cover it with several layers of waterproofing. Wooden flooring is an excellent option, but in a bathhouse it quickly rots and requires replacement. Instead, we recommend making gratings from wooden slats and laying them on a concrete screed. After washing, they can be removed, taken outside and dried.
The design of the bath ceiling is standard. First, a vapor barrier film is “attached” to the rafters and counter-battens (3x4 cm) are stuffed. A clapboard cladding is attached to them. The gaps between the rafters are filled with insulation and covered with under-roofing film. It protects it from weathering and atmospheric moisture (Fig. No. 2).
A counter-lattice is placed on the film, creating a ventilated gap between the roof and the insulation. The work on installing the ceiling and roof is completed by installing the main sheathing and laying the roofing material (slate or metal tiles).
The main “detail” of any country bathhouse is the stove. It should provide rapid heating of the air and maintain a high temperature. A metal stove heats up the fastest.
To accumulate heat and create steam, it must be equipped with a compartment for stones. There are many options for stoves for simple baths, so we will not dwell on them in detail. Let's just say that the easiest way to make a heat generator is from a large-diameter steel pipe, an old gas cylinder or barrel (photo No. 15). Another easy-to-use material is a steel sheet 3-5 mm thick (photo No. 16).
Knowing the simplest welding techniques, you can assemble such a structure without outside help.
Internal insulation and vapor barrier
Bars with a cross-section of 5x5 centimeters are nailed to the bottom of the logs in the main rooms of the bathhouse building. Rough coating boards are mounted on top of them, then roofing felt (for waterproofing), followed by mineral wool slabs 10 centimeters high or expanded polystyrene. Before laying the final finishing material for the floor, glassine is laid (to provide a vapor barrier).
The floors in the washing area can be arranged differently:
- To ensure that the floor surface is warm in any weather and dries quickly, a separate foundation should be created around the perimeter of the room.
- The soil is removed to a depth of 50 centimeters and a 10-centimeter layer of gravel and sand is poured into the resulting trench. If water enters such a drainage hole, it will go into the ground and a pit will not be required.
- For this floor, it is advisable to use asbestos-cement pipes with a diameter of 10 centimeters. They are laid directly on the foundation and filled with concrete so that they do not move.
- Then a 4-5 cm thick edged round board is laid on the pipes, maintaining a gap of 6-7 millimeters and using rubber gaskets, which are fixed with nails.
- Then the floor material is pressed down with baseboards.
Improvement of the bathhouse premises of a frame bath from the inside involves carrying out work to prevent the accumulation of moisture as a result of temperature changes. The fact is that it is very hot inside the structure in the winter, and the weather outside is cold. Hence the need to install a vapor barrier. The simplest solution to this problem is to lay polyethylene film under the interior trim with clapboard.
You should approach the work of covering the steam room room responsibly. In this case, you will need a high-quality vapor barrier made of glassine, aluminum foil, polyethylene film, etc.
It is laid out between vertical posts, secured with nailed slats. In some places, the heat insulator can be fixed to external boards, but using special nails with a rubber washer above the head.
The main point that should not be forgotten is the need to leave a 5 cm air gap.
As for the walls and ceiling of the steam room, it is advisable to use aspen lining, which has healing properties, for finishing. Boards, namely poplar or tongue-and-groove linden, are also suitable.
A bathhouse, regardless of the design solution, usually consists of the following rooms:
- tamboura – the “face” of the folk hospital;
- steam room - the “heart” of the kingdom of purity;
- sinks are the “soul” of the health resort;
- rest rooms are the “body” of the temple of beauty and youth.
Of course, modern baths can boast of the presence of many other rooms, but the above rooms are mandatory. Therefore, imagining ourselves in the role of a couturier, let’s begin recreating highly artistic models of “clothing” for Her Majesty Bath!
A friend once asked me: “Why line the inside of a bathhouse if the ceiling, walls, and floor have a wonderful appearance without any finishing?” Of course, you can do without cladding, for example, if the bathhouse is made of attractive rounded logs. But, in general, additional finishing plays a role:
- thermal insulation material;
- waterproofing raw materials;
- vapor barrier material.
In addition, finishing:
- makes the room charming;
- releases beneficial substances that have a beneficial effect on the human body;
- significantly extends the service life of the steam room;
- protects visitors from accidental burns, which can easily be obtained by leaning on heated walls.
As you can see, facing raw materials play a rather important role. Therefore, when choosing a finishing material, it is necessary to give preference to raw materials that differ:
- durability;
- wear resistance;
- functionality;
- environmental cleanliness;
- security;
- hygiene;
- biological inertness;
- chemical passivity;
- mechanical strength;
- climate resistance;
- thermal resistance;
- aesthetics.
Thus, you need to take the choice of material extremely seriously. You can't act at random. For example, experts advise paying attention to:
- lining - a thin board that is a product of wood processing;
- block house - planed board made in the form of a log segment;
- Unedged board is a primary product of wood processing.
Unedged board for cladding? Nonsense! But no. It is very often used for cladding. But an unedged board is rough, with knots and bark! Right. But further processing of the board with your own hands solves this problem. You'll have to work hard. But, as they say, cheap and cheerful!
Finishing with unedged boards
It is strictly forbidden to use chipboard, OSB boards and other raw materials that contain harmful substances released when exposed to high temperatures.
Thus, dear readers, in order to rejuvenate and heal, and not end up in the hospital with poisoning, you need to give preference to finishing made from natural wood. But even here it’s not so simple. You should know which wood can be used in a particular room of the health resort. However, let's figure it out now.
Mini-sauna for a summer residence: luxury or routine?
Reading time: 7 minutes No time?
Often, land plots only require the construction of vital buildings. The small area of the site, the use of every piece of land for planting or thoughtful landscaping simply does not leave room for additional buildings. In this case, there is only one solution left for lovers of bath procedures: building a mini-bath. What is a mini-sauna for a summer residence, how to build it and what is needed to build it - let's figure it out.
Read in the article
Mini-sauna for a summer residence. Advantages and disadvantages
The main advantage of a mini-bath is the area occupied during its construction. The second, no less important parameter is the cost of building a mini-bath in the country.
To create such a bathhouse you do not need a lot of building materials. bathhouse , in turnkey condition, or build it yourself. This does not require many years of experience working with tools, nor any special builder skills.
Mini sauna on site
The advantage of small baths is that the structure fits into almost any landscape, a miniature bath structure, and very often the sophistication of stylistic forms.
Mini-sauna integrated into the landscape
Such baths have only one drawback - they have a small internal area. Most often, these baths are a steam room with a relaxation room. The washing compartment is often combined with a steam room or is absent altogether. These baths are not designed for a large number of visitors; 2-4 people is the maximum for a mini-bath.
A small bathhouse in the country is comfort, convenience and savings in one building. Although with limitations in size and space.
Important! When choosing a frame technology for building a summer house, special attention should be paid to vapor barrier materials and moisture-resistant insulation. Insufficient vapor barrier can lead to rapid destruction of the mini-bath structure.
Construction materials
The traditional material for a bathhouse is wood, but due to the emergence of new materials and technologies, other building materials are also becoming widespread. The mini-bath is built using the following technologies:
- Frame-panel and frame method of construction;
- Construction made of rounded logs or timber;
- Profiled timber;
- Barrel sauna. An original look for a mini-bath made from boards.
Due to the light weight of the structure, lightweight foundations are also allowed: columnar type, screw piles or shallow strip foundations. A barrel sauna does not require a large complex foundation at all.
Soft roofing materials are suitable for covering the roof, but in some cases it is advisable to use metal tiles or other coverings. It all depends on the preferences of the owner of the dacha and his capabilities.
Insulation must be selected based on moisture resistance, since exposure to water and steam can have a negative impact . Foil materials should be used as a vapor barrier.
Strip foundation
Such a foundation is installed when there is heaving soil on the plot.
The work on its construction is carried out step by step:
- Markings are made on the site and a trench is dug, the width of which is 40 centimeters and the depth is approximately 50 centimeters.
- The hole is filled with sand layer by layer until the ground level is reached, compacted each time and watered with water to ensure compact shrinkage.
- They construct formwork 50 centimeters high and 30 centimeters wide. For greater strength, it is reinforced using rods and metal pipes.
- Pour the concrete solution in several approaches (without allowing the previous layer to dry) or at a time.
- Roofing felt is laid on top of the concrete to waterproof the frame walls.
Where to order
You can select companies offering the construction of frame baths in this section.
This is the first building on our site, which was purchased at the beginning of 2014 for the construction of a summer house. As they say, “a home begins with a bathhouse.” The task was not simple: to build a bathhouse in the field, before the end of the construction season, to surround the site with a fence. All the work was done together.
And so it went. They brought in a construction trailer, as you can see in the photo, there is a field here.
We drill a well, of course not ourselves. You can't go anywhere without water.
At the same time, we started installing the fence, first we drill holes with a motor drill, 60 cm deep. Fill it. A motor drill, by the way, is a very useful thing, it saves a lot of effort and time. We pump the well, water comes with clay.
There is no electricity yet, so there is no way without a generator.
We are settling in, we are here every day after work
If the house begins with a bathhouse, then the bathhouse begins with the toilet))))
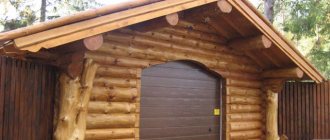
The steam room of the bathhouse will be made of a log house 3 by 3 meters, everything else will be framed. They brought the log house. I stood there for two years.
The toilet is ready, it stands in splendid isolation, we are digging the foundation for the bathhouse, we will put a steam room and a sink on the foundation, and the rest on posts. The fence posts are already distributed among the holes.
We dug some more, the depth is not great, 30-40 cm. My uncle is joking)))
We made formwork, tied 8 mm fiberglass reinforcement, and tied it with plastic ties. I sawed the reinforcement with a small angle grinder.
We mix the solution with a concrete mixer and transport it in a wheelbarrow.
We almost forgot about the sink drain; we made it from a 110 mm sewer pipe.
The foundation has been poured and is gaining strength. The toilet is still the tallest building on the site.
Now we proceed to the columnar foundation for the rest room. I will dwell on this foundation in more detail. The choice fell on him for several reasons:
- Not expensive (very not expensive)
- Quickly done
- Easy to perform.
To begin with, we drill a 200 mm motor drill, holes 1.8-2 meters deep (depending on the depth of freezing), then insert 110 mm pipes into them, from the sewer,
In order to drill such a hole, you need to put an extension on the motor drill.
Before pouring concrete into them, we reinforce the pillars as in the photo.
Reinforcement with fiberglass reinforcement occurs along the entire length of the column
The columns for the foundation are prepared. Distance (1) is 4 meters, this is a lot, in the future we had to install shrinkage compensators so that the floor would not sway and the door between the rooms would not warp.
The foundation has stood a little, we are starting to assemble the log house, which will be the steam room
Once assembled, it took no more than four hours to assemble. This includes processing the lower crowns and laying jute. They didn’t collect moss because it was windy and it was very difficult to lay moss on a log without it blowing away.
The logs in the log house are numbered, the numbering of the logs looks like this (circled in a green oval), the seller of the log house also gave us a diagram that shows the order in which the logs are assembled
Floor base
Logs for a dense floor begin to be laid from the walls with a slope towards the sump to collect water. The logs near the wall are the highest. In the remaining logs, make cuts with a bevel of 2-3 mm. This will make the floor slope about 10 degrees, which will ensure good drainage of water.
For loose floors, a joist slope is not provided, and they can be laid from any wall.
Stelem boards
First create the "sub" floor. According to their design, 50x50 mm bars are fixed from below along the edges of the trunk. A “subfloor” is laid on them - any illicit or unedged board. The subfloor is covered with roofing felt or a special waterproofing film. Then the floor is insulated with a layer of expanded clay or mineral wool.
After this, they begin laying the clean floor. Use grooved boards. Sometimes the nails in the steam room and washboard are not secured so that they can be removed for drying. The grooves of the boards are located inside the tank; when adjusting, this will allow you to hit the end with a hammer, which, unlike a tongue and groove, is thicker and will not break.
Pediment functions
The pediment is the part of the facade of the house enclosed between the roof slopes. It has a triangular, pentagonal or trapezoidal shape and is made of a material that matches or differs from the material of the main wall. In addition to its aesthetic function, the roof gable performs the following tasks:
- Protects from wind. The gable structure is exposed to wind loads, so it must be strong enough.
- Supports roof slopes. Reliable gables are an additional measure of support for slopes, which is especially important for roofs made of heavy roofing materials, for example, slate or tiles.
- Keep warm. The pediment is a protective barrier between the warm spaces of the attic and the cold atmospheric air. Therefore, the thicker the lining, the fewer cracks in it, the warmer the house.
- Protection from atmospheric precipitation. The wall between the slopes should be sewn up to protect the finishing of the under-roof room from moisture.
- Improves the appearance of the facade. The facade of the house will look beautiful if the pediment is covered with siding, clapboard or other decorative materials.
We invite you to familiarize yourself with Finishing the walls of the attic floor
Note! When it comes to choosing sheathing, experienced builders offer two options: sheathe the roof gable with a material similar in color and structure to the main wall trim, or highlight this area using a contrasting shade. High-quality lining masks small flaws in the masonry, unevenness or unsightly appearance of the wall.
Sheathing with horizontal boards
This type of installation is more common in Russia, but is usually limited to the use of imitation timber, although there may be many options.
If the board is attached with an overlap, then only one nail is used for fixation into the lath through the bottom of the board to ensure reliable operation of the facade in all weather conditions and minimize the risk of cracks. The overlap must be at least 20mm.
With this installation scheme, ventilation of the facade is ensured not only vertically, but also horizontally, this improves the working conditions of the facade and reduces the impact of natural factors.
READ Cover brick walls with plasterboard yourself
To ensure the safety of the wooden facade, it is necessary to ensure high-quality priming of the boards and sheathing bars themselves. You need to prime the entire surface, both internal and external, as well as the grooves if it is imitation timber.
For this reason, priming should be carried out before installation, preferably by immersion in a suitable solution. If the primer is applied with a brush, then this procedure must be carried out at least 2-3 times. Finns usually practice covering painting, i.e.
the board is completely covered with paint, hiding the texture of the wood, this ensures greater wear resistance of the facade to natural factors.
For the article, material from frame house designer Vladislav Vorotyntsev was used @
First option
A very common type of facade in Scandinavian countries. Made from boards 120-170mm. minimum thickness 20mm. As the width of the board increases, its deformation can be very significant; for this reason, for widths greater than 150mm, a board with a thickness of 22mm is used.
In this case, the flashing does not have to be the same size as the outer cladding board; it can be either narrower or wider. It is necessary to attach the flashing to the sheathing bar, bypassing the outer sheathing board. This will avoid cracks on the facade when the geometry of the boards changes depending on humidity and weather conditions.
Types of materials
Today, the most popular materials made from wood or based on it are:
- Lining.
- Boards imitated as timber.
- Block house.
- Siding.
- Not an edged board .
Let's look at each of the materials in more detail.
- Imitation of timber. This is a material that, when assembled, is similar to solid timber. It is this distinctive feature that allows you to give the room solidity. Such a massive and durable material has a high level of strength, is not afraid of mechanical stress, and is also able to withstand environmental factors, but only after specialized processing.
Advice! As you can see, this finishing option is especially good for the living room, and is especially often used in country houses. Installation of the blade is very simple, thanks to the presence of “locks”: the tenon fits into the groove, which significantly speeds up and facilitates the work. This allows you to use the material not only as floor or wall decor, but also to fix it on the ceiling without much difficulty. Ceiling beams will help harmoniously complement the picture and give the room a special atmosphere.
- Block house. This material allows you to imitate a log house made from a cylindrical log. It is used inside and outside buildings due to the presence of canvases of different thicknesses and widths. As a rule, coniferous wood is used to make such boards, which gives not only realism, but also a natural appearance. Larch, cedar or aspen can also be used.
- Planken. a small decorative board The material has different textures and comes in a wide range of colors, and easily tolerates moisture. The material is laid end-to-end, but with a small gap, because the material can expand from exposure to moisture.
- Siding. Siding is a decorative material, for the manufacture of which both synthetic and natural materials can be used. Finishing with such material allows you not only to imitate a wooden surface, but also to choose the optimal color and texture. Siding panels are very durable, are not afraid of the sun and moisture, which is why they are often used for exterior decoration. The panels are installed on the sheathing using brackets. Also, when purchasing material, the kit includes instructions and elements that allow you to hide seams and cuts.
- Not an edged board . The material is a board that has a raw edge. This finishing material allows you to create an original room design, especially if you correctly complement it with decorative elements.
Exterior wall decoration
As practice has shown, the construction of frame baths is best done from OSB boards. The fact is that they are multi-layered and do not move or warp, as happens with natural wood. But a bathhouse made of OSB or other materials needs external finishing. One option is plastering or painting.
The modern construction market offers a huge selection of finishing materials, and therefore it does not matter how simple the design of the bathhouse is from the outside, since it can be given an expensive appearance.
The most popular and in demand of them now are:
- Lining. This decorative finishing material is the most accessible and easy to install for external upholstery of frame baths. Such buildings look very solid. On the external wall, the lining is placed horizontally after waterproofing has been made from glassine, the sheets of which are fixed overlapping and the edges are taped. If the work is done efficiently, unnecessary moisture will not be able to penetrate inside the bathhouse.
- Thermal panels. Often the construction of a frame building requires wall insulation, which can be done with their help. Thermal panels have a three-layer structure. It contains thermal insulation material (mineral wool or polystyrene) between two polyvinyl chloride layers. The surface of thermal panels, as a rule, looks like masonry and is sprinkled with compressed stone chips on top. The panels have mutual grooves, and after they are laid, a monolithic pattern is obtained, reminiscent of brick or stone walls. The finishing of the façade of the bathhouse is carried out using ordinary self-tapping screws - they will fix the material to the profiles.
- Facing brick. Brickwork fits perfectly into the landscape of any garden or summer cottage on which a frame bathhouse is being built. An even row always looks beautiful on a bathhouse building. The cost of facing a frame structure with brick will be much cheaper than building an entire bathhouse from it. In addition, additional insulation can be laid between the brick trim and wooden walls.
- Vinyl siding. This is the most popular modern cladding material used for cladding frame bath buildings. Siding has an affordable price and is easy to install. In addition, the market offers a wide selection of textures, colors and thicknesses of products.
- Block house. A frame bathhouse, the façade of which is lined with this latest material, looks like a log structure. It is almost impossible to distinguish such a building from a real log house.
Sauna roof
What is a frame building without a roof? The final stage of construction work is the construction of the roof. Most often it has a gable shape. It is assembled on the ground from 150x50 mm boards and rises to the top one by one. The front parts are installed first, then the intermediate rafters. The pitch is calculated according to the size of the building and usually does not exceed 1000-1200 mm. All fastening occurs with nails and self-tapping screws. For additional reinforcement, crossbars are used.
The assembly ends with the installation of sheathing, insulation, roofing and drainage.
Choosing the type of wood for sauna cladding
Each type of wood has its own shade, texture and health effect. Deciduous and coniferous trees are used to make boards. It is recommended to trim the steam room with deciduous trees, and the rest rooms with coniferous trees.
Deciduous wood for a bath
The following hardwood species are used for cladding the bathroom:
- Linden. Decorating a bathroom with linden boards is the most popular option. This wood is easy to install and retains its beautiful color in high humidity conditions. Linden can be touched even at high temperatures without the risk of getting burned. Plus, it smells good and has healing properties.
Alder. This breed is characterized by the presence of tannins, which provide clean indoor air and protect it from mold and bacteria. At high temperatures, alder releases substances that have a positive effect on the heart and vascular system, and also have an anti-inflammatory effect.
Oak. Contains tannins, like previous wood species. It is very durable and flexible. When heated, it releases beneficial substances that help eliminate fungi and unpleasant odors. But oak has one drawback: its surface is difficult to polish to the required smooth state, since its wood is somewhat rough.
Ash. Ash wood is flexible and not very dense. However, it does not break down and has better health benefits. In addition, ash is one of the most beautiful types of wood. Various photos of finishing a bathroom with ash boards show that this wood is very light, neat and elegant.
- Aspen. This type of wood has low thermal conductivity, which prevents burns at high temperatures. Does not crack or dry out. Aspen also has a nice color and is easy to work with. The only drawback is the rapid loss of natural color.
Coniferous wood for baths
You can sheathe your bathroom using the following softwoods:
Larch. It is very durable and has low thermal conductivity, which is important for the bathroom. It emits a subtle relaxing aroma even at low temperatures. Larch has a beautiful color, but, like oak, it is quite difficult to work with.
Spruce. It has a pleasant color and aroma. Spruce wood is very soft and easy to work with. It is recommended to install spruce boards in rooms not intended for high temperatures. This is due to the release of a large amount of resin.
Cedar. Perfect for finishing shower cabins or living rooms. It has a unique color, specific aroma and antiseptic properties. Cedar wood releases resins and essential oils that soothe and relax. This type of wood is the most expensive.
Alder
Alder has a valuable quality - it has low thermal conductivity. This allows you to avoid burns in the bath from contact with the heated shaft. Alder boards and cladding have a pleasant smell and a reddish tint. Moreover, over time, these qualities take on even more pronounced forms.
For a steam room, finishing with alder suits all parameters. It does not shrink, does not release resin drops and successfully withstands regular exposure to hot steam.
Among the disadvantages, the difficulty of mechanical processing of alder is noted. This material is inelastic, although quite soft. Considering the fact that there is practically no perfectly smooth alder cladding on the market, covering a steam room with this high-quality material can be difficult. In addition, alder is not the cheapest tree.
Finishing the bathroom with alder
The main advantage of linden boards and coverings is their ability to have a beneficial effect on the respiratory system. The reason for this is the high concentration of active substances in wood. Linden is easy to work with. The resulting coating does not crack or twist when used in the bathroom. Even with the softness of the wood, alder can last for many years.
The surface of freshly cut linden has a soft texture and a pleasant pink color. At the same time, there are no knots or resinous drains on it.
Among the shortcomings, dirt is noted, which manifests itself in the form of stains on the surface. However, sanding easily eliminates this problem, returning the original color.
Finishing the bathroom with linden
Application of DIY insulation
The second most commonly used insulation for frame-type baths are compositions based on sawdust and shavings. Processed in a certain way, the material is poured in portions and compacted. A sandwich wall using sawdust has the following structure (from the inside to the outside):
Insulating a bathhouse with sawdust
- plank cladding;
- kraft paper (no air gap);
- sawdust with a layer thickness of 10 cm;
- kraft paper;
- plank cladding.
The boards play the role of both a strength frame and decorative cladding. Reflective screens are usually not used, since the default option with sawdust should be the simplest structurally and inexpensively.
Pre-treatment of sawdust involves soaking it in a lime solution. Lime gives the material moisture resistance and is quite effective in fire protection.
If the work is carried out in the warm season, there is no need to dry the limestone chips before installation. Evaporation of excess moisture occurs quite quickly after backfilling.
In operation, processed sawdust has proven to be the same effective material as mineral wool, but lacking one of its main disadvantages - high hygroscopicity. To insulate floors, sawdust is used in the composition of cellular concrete. Treated sawdust is poured into natural coffered false ceilings in a layer of about 200 mm with moderate compaction. The top layer is covered with a waterproof membrane.