Having completed the long process of building a wooden house, you finally faced the question of how to complete the finishing of your log house? If you performed all the stages of construction yourself, then finishing the log house with your own hands will not be a big problem for you. This article will try to explain all the stages and features as clearly as possible, as well as provide as many useful tips and tricks as possible.
Advice: don’t rush to finish the house if there is no strict need for it, it’s better to wait a couple of years until the shrinkage of the log house ends, otherwise it may happen that all your efforts will go in vain.
First of all, the finishing of a log house inside includes insulation and laying of a wooden floor, insulation of walls (caulking,) casing and frames, door and window openings, ceiling, attic, sanding of logs, etc., but we will talk about them in the next article , but for now let's discuss:
Clapboard finishing- Block House Finishing
- Plasterboard finishing
- Type of log house unique finishing
- Log putty
- Plastic finish
- Do-it-yourself finishing of a log house with rope
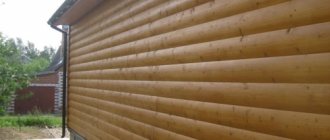
Lining finishing
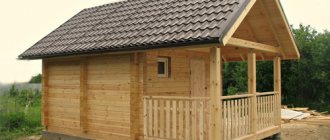
The board, intended for covering premises, does not exceed 220 mm in thickness. Usually made from pine wood, less often from deciduous wood. According to the type of installation, it is divided into vertical and horizontal. After covering, this imitation of timber looks very aesthetically pleasing and stylish.
The floor of such a log house can also be made of lining or oak; simpler options are also possible: carpet, linoleum parquet. The ceiling is also made of boards.
First of all, decide which type of installation suits you best. If the structure is not large, for example a bathhouse, then you can use the vertical installation method. Well, in the case of larger buildings, such as a summer house or a residential building, it is better to use a horizontal installation method. This is due to the short length (usually 2.5m) of the lining and when positioned horizontally in a large building, joints will inevitably appear (this problem is partially solved by placing vertical boards every 2.5m). Before fastening, it is advisable to treat the board with a special mixture to protect it from moisture, insects and fire (anticeptic).
Note: at this stage you need to decide whether there will be additional insulation of the walls between the walls of the log house and the carriage board. If the board thickness is from 180 to 220mm, you can do without insulation
Ways to fasten the lining
The best mounting option is to mount it on the sheathing (especially if a rounded log was used during construction). The lathing is made from horizontal bars located around the entire perimeter (at a distance of 50 cm from each other) of the building and helps to achieve even laying of the carriage boards. Another advantage of the sheathing is the ability to hide wiring and pipes behind it. If profiled timber or laminated veneer lumber was used in the construction of the log house, then you can do without lathing (the walls of such a building are quite smooth on their own).
vertical installation of lining fastening with nails
Advice: it is better to carry out the wiring before the interior finishing, because during the work this can add a lot of hassle to you.
Installation should begin from the corner of the building, while the installation itself will not be difficult due to the presence of a special tongue-and-groove type coupling on the carriage board (it is better not to use a regular carriage board due to the difficulties when covering large volumes). This method of adhesion allows you to achieve an even and dense installation. Fixing the boards to the sheathing slats can be done in three different ways.
- Using a special clamp (claymer). The most preferred option due to fast and, most importantly, high-quality clutch. One part of the kleimer is attached to the inside of the groove of the carriage plank, and with the second part it is connected to the lath of the sheathing using a self-tapping screw.
- Using a self-tapping screw. A hole is drilled in the board approximately ½ of its thickness and with a diameter the size of the head of a self-tapping screw. Next, a screw is screwed into the hole, and the hole is closed with a pin, after which it is sanded until the pin is completely aligned with the board. The main disadvantage is the rather large amount of time required for installation.
- Using a galvanized nail. The nail is tilted at 45º and carefully hammered in (Fig. above), the head of the nail should be recessed so as not to interfere with the lock when engaging. The disadvantage of this option is a large percentage of the “groove” chipped and, accordingly, a large amount of waste.
Pros:
- Natural appearance
- Additional insulation
- Environmentally friendly material
- Easy to install
Minuses:
- Quite a high price
- The need to treat the board with a mixture from various harmful factors
Video of lining installation:
https://www.youtube.com/watch?v=gIL7Z79Jc4g#at
Thermal panels
Thermal panels are a material that performs two functions at once - cladding and external insulation of houses. A layer of decorative coating is applied to the thermal insulation layer at the factory. It looks like marble or natural stone, does not burn, and has low water absorption characteristics.
You can clad and insulate a house with one material at the same time using thermal panels
This finishing material is made from polystyrene foam, mineral wool or extruded polystyrene foam. Depending on the type of insulation, the installation method is selected: polystyrene foam and polystyrene foam are glued to the appropriate composition. The joints are closed with a special aluminum strip or rubbed with paste.
Panels for façade cladding based on mineral wool are mounted only on a special system of profiles, and the joints are also sealed.
A very attractive idea is to immediately insulate the house and cladding it. Excellent appearance, and the characteristics of this cladding are impressive. It’s just a pity that there is little operating experience and no reviews yet: it appeared only recently.
There are also clinker thermal panels. Clinker tiles are glued to the insulation. The material is not cheap, but the characteristics are impressive, as is the variety of finishes.
Another option for thermal panels is with clinker tiles
The choice of materials that can be used to cover a house at any time - winter or summer - is considerable. There are expensive options, and there are cheaper ones. In any case, in addition to cost, be sure to consider vapor permeability. Then you won’t have to deal with mold and dampness.
DIY Block House Decoration
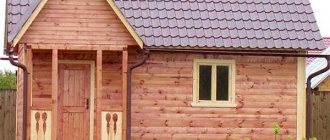
The option of finishing a log house with your own hands with an imitation of a solid log can be presented as a carriage plank (imitation of a rounded log) or as separate panels resembling a profiled beam. The very impressive appearance and original Russian design of this finish makes it one of the most common options.
[ads1]If a block house uses a carriage plank, then the installation process is no different from the above (I think there is no need to explain that only a horizontal type of laying is applicable for a block house). The boards are attached to the sheathing using the chosen method (vertical bars located every 50-60cm), the boards should be laid from the bottom up. Remember, the last board will almost always be trimmed down a bit and it won't be as noticeable at the top.
If you decide to use ready-made panels, the installation process will take much less time and labor costs. Such panels are also attached to the sheathing, but the finished structure looks less natural.
Pros:
- A beautiful imitation will create the feeling of a real hut
- Provides the opportunity to hide communications and insulate walls
- Great for different types of interiors
- Simplicity and reliability of connection
Minuses:
- Great cost
- If installed incorrectly, the panels look unnatural
Video of finishing a wooden house with a block house
Why is external cladding needed?
Wooden houses to this day remain the most environmentally friendly, breathable, healthy and comfortable to live in. However, wood is a short-lived material and therefore requires mandatory protection.
In addition, due to its softness and friability, the wood is attractive to rodents, bugs and other living creatures.
But protection becomes more effective if the top of the façade of a wooden house is covered with cladding - reliable, beautiful, and heat-insulating.
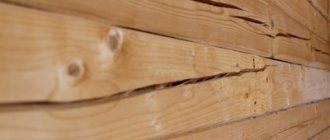
Wood constantly absorbs moisture, as a result of which it becomes deformed, loses strength and density, darkens over time, becomes covered with cracks, begins to rot and mold.
There are no universal rules for choosing a facing material, but preference is given to finishing that has the following characteristics:
- is a heater;
- has vapor permeability;
- easy to install;
- has a low cost;
- does not require constant painting.
Of course, wooden types of cladding win - lining, block house, planken, imitation timber. They have the same characteristics as the main building material and preserve the naturalness and environmental friendliness of the building.
To strengthen the logs, they are coated with protective chemical compounds: varnishes, paints, stains, impregnations, antiseptic solutions. To reduce flammability, treat with fire retardants
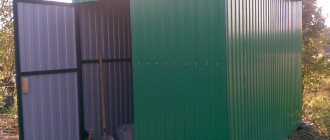
But other materials are often used that are more practical and do not require constant maintenance - for example, vinyl siding.
You should also take care when choosing insulation for your home. You can read about which material is better to give your preference in this material.
Finishing a log house with plasterboard, no matter how funny it sounds, but still appropriate
A very versatile option. But applying it to a log house is simply ridiculous; it will spoil the entire impression of the house and nullify its wooden originality. However, anything can happen in life, and perhaps it was the combination of external antiquity and internal modernity that you initially envisaged.
For this style it is better to use carpet or parquet flooring. The ceiling can either be sheathed with plasterboard or made suspended.
Drywall installation
With this option of finishing a log house with your own hands, you need to lath the entire perimeter of the building with a U-shaped profile. Next, you should install all the wiring (if this has not already been done) and, if necessary, insulate the walls (glass wool between the plasterboard and the log house wall is ideal). One of the main advantages of this finish is the ability to make protrusions and recesses in the wall (thanks to the versatility of the profile and drywall). Which in turn allows you to hide pipes and radiators, make a niche in the wall for a TV and refrigerator, etc.
The drywall is attached to the profile using self-tapping screws. After fastening, it is necessary to putty the joints to level the walls. Then your imagination is limitless.
Pros:
- Almost unlimited possibilities for giving the walls the desired look
- Simplicity and ease of installation
- Low price for material
- A very original combination of past and present
Minuses:
- Kills the atmosphere of antiquity
- Requires additional insulation
- Weak resistance to mechanical damage (and it’s very difficult to drive a nail into such a wall)
- Relative fragility (15-20 years)
Thermal insulation of the building
It is highly desirable to insulate a house in areas in the north; in the south, you can limit yourself to only sheathing. Before thermal insulation of a building, you need to select a suitable material.
Suitable types of insulation
The photo shows mineral wool in slabs.
- Expanded polystyrene in slabs. It has high thermal and sound insulation parameters. Easy to install, not afraid of pests. However, the instructions do not recommend using polystyrene foam as a heat insulator in a log house. It does not allow air to pass through, which can lead to wood rotting.
- Penoplex is a modern material produced by extrusion. It is non-flammable, resistant to pests, and has a high level of thermal insulation. However, it is also vapor-tight, difficult to install and difficult to cut.
- Mineral, basalt wool. Air passes through it well, this preserves the structure of the tree. Easy to install with your own hands, easy to cut, does not burn. The disadvantage of the material is that it absorbs moisture, which leads to loss of thermal insulation qualities.
Note! As can be seen from the above, the best option for insulating a log house is basalt wool. It is best to use the material in slabs. Their price is low.
Installation of thermal insulation
Insulation installation diagram.
First, the frame is knocked down on the tensioned layer of vapor barrier.
Insulation boards will be installed in it.
- For it, you should vertically fill boards measuring 5x10 cm. The step between them should be 1-2 cm less than the width of the heat-insulating boards. The material will be held in place due to the fact that it will be inserted “into the spacer”.
- If necessary, you can install insulation in 2 layers. In this case, the joints of the levels should not coincide.
- A waterproofing film for wood is stretched and secured over the thermal insulation material. This layer is required when determining whether it is necessary to sheathe a log bathhouse.
Note! The moisture protection must be positioned correctly. Its rough side should be turned towards the mineral wool, and its smooth side should look outwards.
- The waterproofing and vapor barrier films are fixed using a stapler. Their panels should overlap each other, the joints between them should be taped.
- 5x4 cm beams are placed on the frame.
They will simultaneously perform 2 functions.
- Form a ventilation gap for air circulation.
- They will act as a frame for covering the building.
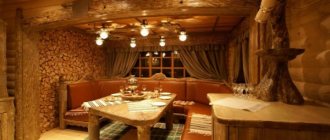
The log house itself is the best finish
If the inside of the timber itself looks respectable and beautiful, and no mistakes were made during the construction of the log house and it is warm enough, then you can do without any additional finishing.
It is better to make a wooden floor from parquet boards or lining. The ceiling should also be finished with wood.
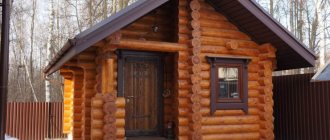
In the case where the log house was built from rounded logs using the “bowl” technology, it is enough to simply coat the surface of the wood with a protective varnish - it looks great. In such cases, the wiring must be laid along the floor and corners of the building, covering it, for example, with a plinth. It is better to run the pipes under the floor, and those that are visible from the outside can be beautifully finished with a frame made of carriage boards.
For a log house that has been cut into pieces and has a smooth internal wall (if necessary, the wall can be leveled with a workbench), the option of painting it in the color you want (white or chestnut color will be suitable, it looks just right).
Tip: putty the walls before painting - this will hide knots, cracks and chips in the timber.
Pros:
- There is no need to wait for the log to shrink
- Minimum finishing costs
- Prostate works
- Beautiful and natural look of timber or logs
Minuses:
- You will not be able to achieve a perfectly flat wall surface
- Difficulties in hiding communications
- Limited design choices
- The need to periodically renew the finish (approximately every 4-7 years)
Conclusion
As we found out, there are several simple and effective ways to insulate a log house. Each of them allows you to make your home more comfortable and economical in terms of energy consumption for heating. However, it is still advisable to insulate the log house from the outside, and at the same time strictly adhere to the technology outlined above.
Additional information on this topic is contained in the video in this article. If you have any difficulties during the process of insulating a log house or have any questions, ask them in the comments, and I will be happy to answer you.
Log putty
Mainly used for brick walls. Can be used as an option for interior finishing of a log house. To do this, use an acrylic or mineral plaster mixture for wood. This technology protects wood well from moisture and other harmful factors. With the help of special additives you can give it the desired color and shade. The plaster is applied to a special mesh attached to the frame with self-tapping screws. Use plaster to level the walls; under it you can hide wires and telephone cables. You can also easily hide all kinds of chips and cracks in timber or logs. In general, during construction, be sure to have it with you, just in case of fire, to disguise the “shoals”
The flooring can be your choice, although wood flooring will look out of place. The ceiling can also be anything; stretch ceilings and plasterboard are best, although you can putty the ceiling itself.
Pros:
- Cheap materials
- Minimum knowledge and skills when finishing
- Speed and ease of the process
- Wide selection of different shades
Minuses:
- Fragility (re-putty will have to be carried out every 5 years)
- A very ordinary appearance, it may not look harmonious in a log house.
- Difficulty in hiding some communications. The pipes will be visible and it is unlikely that aesthetic options for solving this problem will be found.
Fiber cement boards and siding
Relatively recently, a new cladding appeared on our market: fiber cement boards and siding made of the same material. They consist of wood fiber, quartz, mica, cement, and may contain chlorine and asbestos (some materials used only for exterior decoration). This mixture is formed into sheets, then dehydrated in several stages, and fired using some technologies. Then a protective and decorative coating is applied to the surface:
- acrylic - inexpensive, fade-resistant;
- hydrofilceramic - high resistance to abrasion and fading (30 years), very low percentage of water absorption, but expensive;
- photoceramic - retains color for a long time, dirt is easily washed off, price - average.
This house is also lined with fiber cement slabs
Watch the video to see how to attach fiber cement boards.
Fiber cement siding is produced using the same technology, only it is molded into long strips. They are basically standard: 3600*190*12 mm. This material is cut with a jigsaw, installed on a wooden sheathing with an overlap (like a cone) and nailed to it or screwed with self-tapping screws.
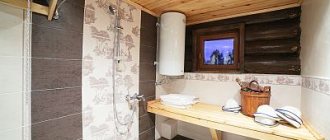
Plastic finish
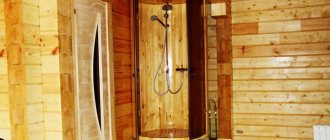
Using plastic to decorate a log house with your own hands can be considered as an option for some of the premises; decorating the entire log house with plastic would be a real blasphemy. Plastic will be acceptable, for example, for a loggia, balcony, any closet or closet. The bathroom and toilet can also be lined with plastic.
The flooring option can be very varied and depends entirely on your preferences and the room in which the plastic is installed (tiles, etc. will do in the bathroom). The ceiling can also be covered with plastic, or suspended ceilings can be used.
Installation of plastic
There is, as in the case of lining, a vertical and horizontal installation method. Let's consider the more common vertical one. The process of installing plastic is in many ways identical to that of a carriage board. First, a frame is assembled onto which the plastic panels will be attached. Next, special profiles (molding) are attached to the upper and lower parts of the sheathing, into which plastic will then be inserted according to the tongue-and-groove principle.
Advice: the plastic panel should fit tightly into the molding, but you should not force it in there; this can lead to both deformation of the panel (the panel can stand up in a “wave”) and distortion of the molding itself, which is why subsequent panels will not fit tightly.
Laying of plastic panels is done from the corner of the building, the panel is inserted into the molding from the beginning and then interlocked with each other using a “lock”. Fastening to the bars (profile) of the sheathing occurs using nails and self-tapping screws, which are driven into a specially provided section of plastic called the “fastening tail”. For a better connection between the panels, you can use special glue or liquid nails.
Pros:
- It is easy to hide various communications and insulation elements behind plastic.
- Cheap and practical material.
- The parts are easy to assemble and cut to the required size.
- The variety of colors makes it possible to combine different options, creating contrasting and beautiful patterns.
Minuses:
- Not the most suitable option from an aesthetic point of view
- Good flammability of plastic
- Weak resistance to mechanical damage (although it is worth noting that the damaged section of the plastic panel can be replaced without much difficulty)
What materials cannot be used for the facade of a wooden house
There are no special prohibitions on exterior finishing for the simple reason that it is always attached to the frame and if there is a ventilation gap, excess moisture will freely evaporate from the surface. But if there is no clearance, problems can arise even with the use of suitable materials. As for prohibitions, it is worth remembering a few simple recommendations:
- Do not insulate a wooden surface with plastic film or other materials that do not allow air to pass through. Only special membranes can be used that ensure evaporation of moisture from the inside.
- It is undesirable to attach metal elements to wood, since during frosts frost forms on them, which turns into water after thawing. It is recommended to make the sheathing from wood.
- Plastic cannot be attached directly either. Hanging structures are needed to ensure high-quality ventilation.
- It is not advisable to attach polystyrene foam, extruded polystyrene foam and polyethylene foam materials to wood. All this does not provide even the minimum acceptable air exchange rates.
Finishing a log house with rope
This is a decorative option for interior decoration, in which the main consumable material is a special rope or rope (jute). This option is applicable only to a log house made “in a bowl” and preferably from rounded logs (if ordinary timber was used, then the effect of such finishing is much lower).
Home beautification work should begin only after all necessary work with the timber has been completed (antiseptic treatment and sanding). Decorative jute rope is used as a finishing material, which is placed in the crowns of the log house and also plays a protective role. Jute rope prevents moisture and wind from entering the house and also helps keep heat inside.
For this design, oak flooring or parquet boards are suitable. The ceiling should be covered with carriage boards.
Basic Rules
When selecting materials for cladding a house from the street, be sure to remember that in order to maintain normal humidity in the rooms, the vapor permeability of the materials must decrease from inside the room to the outside. That is, the exterior finishing should conduct steam better than the wall material. Then the increased humidity, which is typical for our homes, will be removed through the walls naturally (explanations in the photo).
When deciding what is best to sheathe the outside of the house, do not forget to take into account the vapor permeability of the materials
If this principle is violated, moisture will accumulate at the interface of materials with different vapor permeability. It condenses, creating conditions for rotting and the development of fungi and mold. In winter it freezes, destroying the wall material and/or finishing. Sooner or later such a system will have to be dismantled and rebuilt.
The trouble is that only wood meets this requirement. Most other materials for exterior decoration of a house have low vapor permeability. The problem is solved in two ways:
- A ventilated facade is being installed. A ventilated gap with a width of 60 mm to 150 mm is left between the wall or insulation layer (with high vapor permeability) and the finishing. Ventilation holes are left at the bottom of the cladding at the rate of 75 cm² for every 20 m² of wall, including windows and doors. Air will enter through them. There are exit holes at the top. With this device, moisture will be removed from the wall material or insulation, and the outer cladding will protect from precipitation and perform a decorative function. The principle of finishing a house using a ventilated facade
- The finishing material is attached directly to the wall. But from the inside the wall must be protected by a layer of vapor barrier. In this case, the penetration of vapors into the wall material is prevented and it remains dry. Excess moisture is removed by the ventilation system.
Today the second option is becoming increasingly popular. Very effective thermal insulation materials have appeared that can significantly reduce heating costs. But they have very low vapor permeability (expanded polystyrene and extruded polystyrene foam). When using them, only the second humidity control scheme is possible. When choosing what to cover your house with, consider these points.
Video: what is better and how to properly cladding and insulating a house from the outside
On the video, what is the best way to sheathe the outside of a wooden house:
We looked at the features of cladding the outside of a wooden house. As you have seen, there are quite a lot of options for decorating your home - you can choose either an inexpensive, practical option or a presentable, but more expensive one. It all depends on the capabilities of the buyer, his taste preferences, and the style of the building itself. Thanks to our tips, you will be able to better navigate the sea of various sheathings and choose the best option for your home.
You may also be interested in information about artificial stone for cladding a house.
Why is such a procedure carried out?
Before you engage in sheathing, insulation of walls and foundations in a bathhouse, you need to understand why this is necessary. Thermal insulation allows:
- Keep the room warm.
- Prevent destruction of the building foundation due to exposure to moisture. Liquid penetrating into the micropores of the foundation under the influence of temperature changes expands small holes, forming cracks.
- Increase the rigidity of the base.
- Warm up the floors of the building.
- Reduce heating costs.
- Normalize the room temperature.
Insulation is not necessary when the bathhouse is built without a foundation (mobile or lightweight construction).
In addition to its practical purpose, thermal insulation of the base is necessary to give the building a finished look.
It is important to take care not only of insulating the base. The base also needs treatment